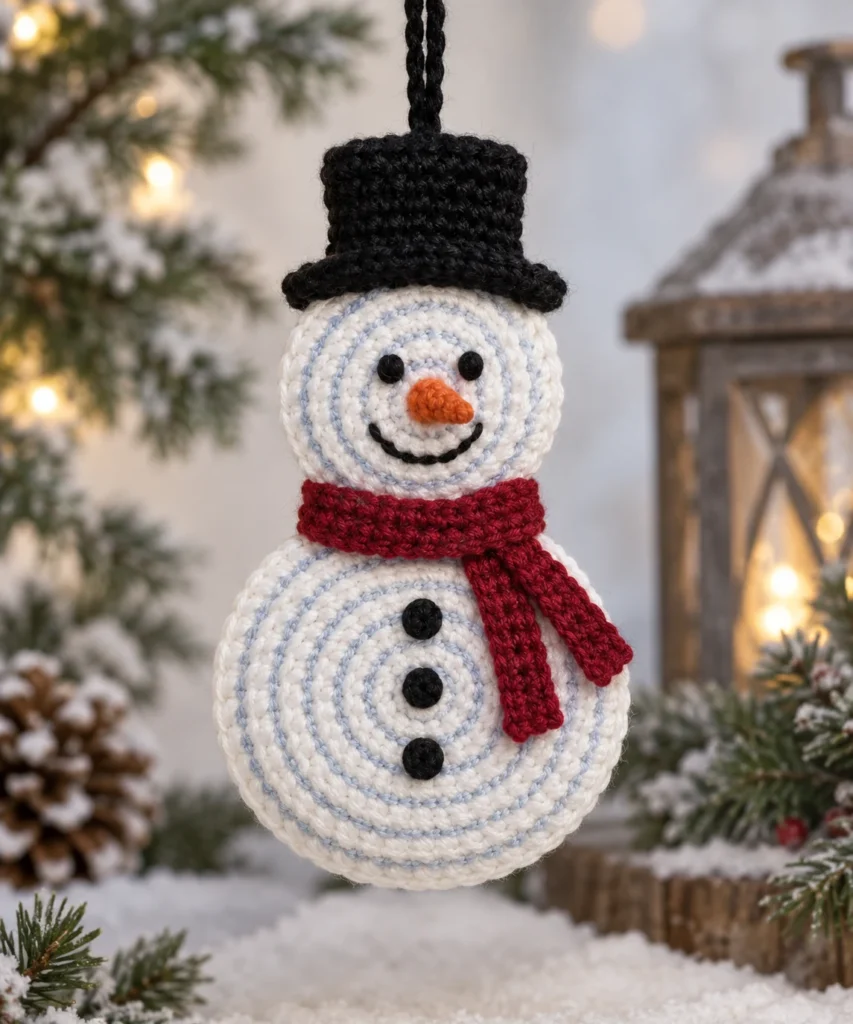
Spiral Snowman Ornament: Free Crochet Pattern
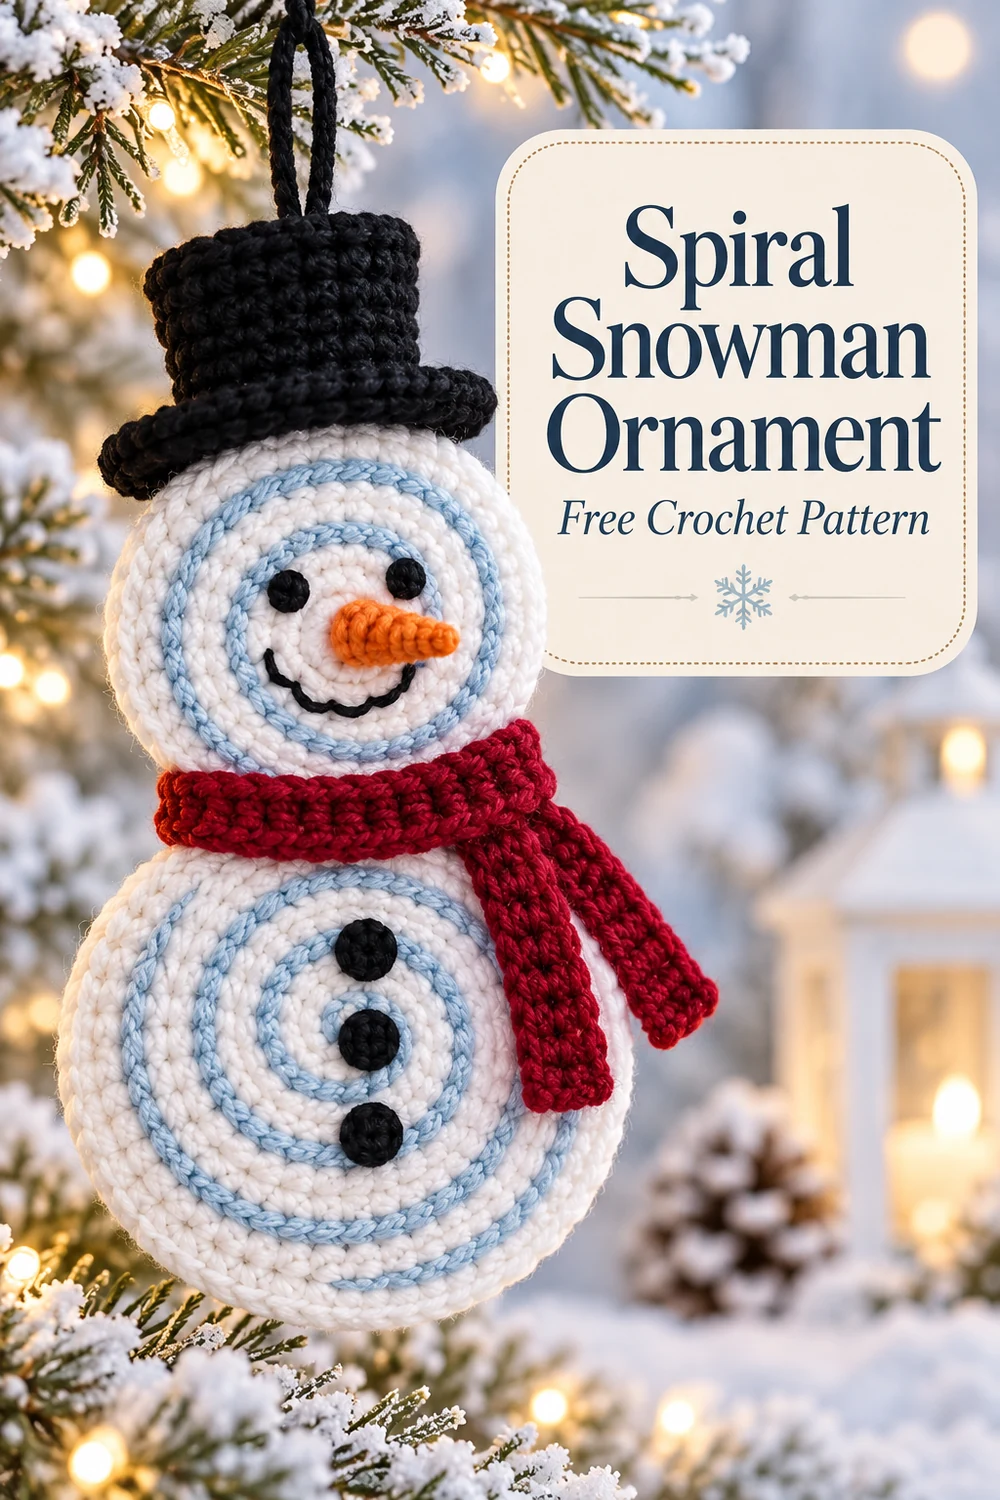
Create a cheerful snowman with softly stuffed white disks, raised ice-blue spirals, a cranberry scarf, a dimensional carrot nose, and a classic black top hat. This original Spiral Snowman Ornament crochet pattern uses US crochet terminology and worsted-weight yarn. The finished ornament is decorative and is not a toy.
Pattern at a Glance
- Skill level: Confident beginner to intermediate
- Terminology: US crochet terms
- Construction: Two lightly stuffed disk pairs joined into a snowman, with surface-crochet spirals and separately crocheted accessories
- Main techniques: Magic ring, continuous rounds, BLO crochet, surface slip stitches, flat rows, embroidery, seaming, and light stuffing
- Use: Decorative hanging ornament; not a toy
Visible Component Inventory
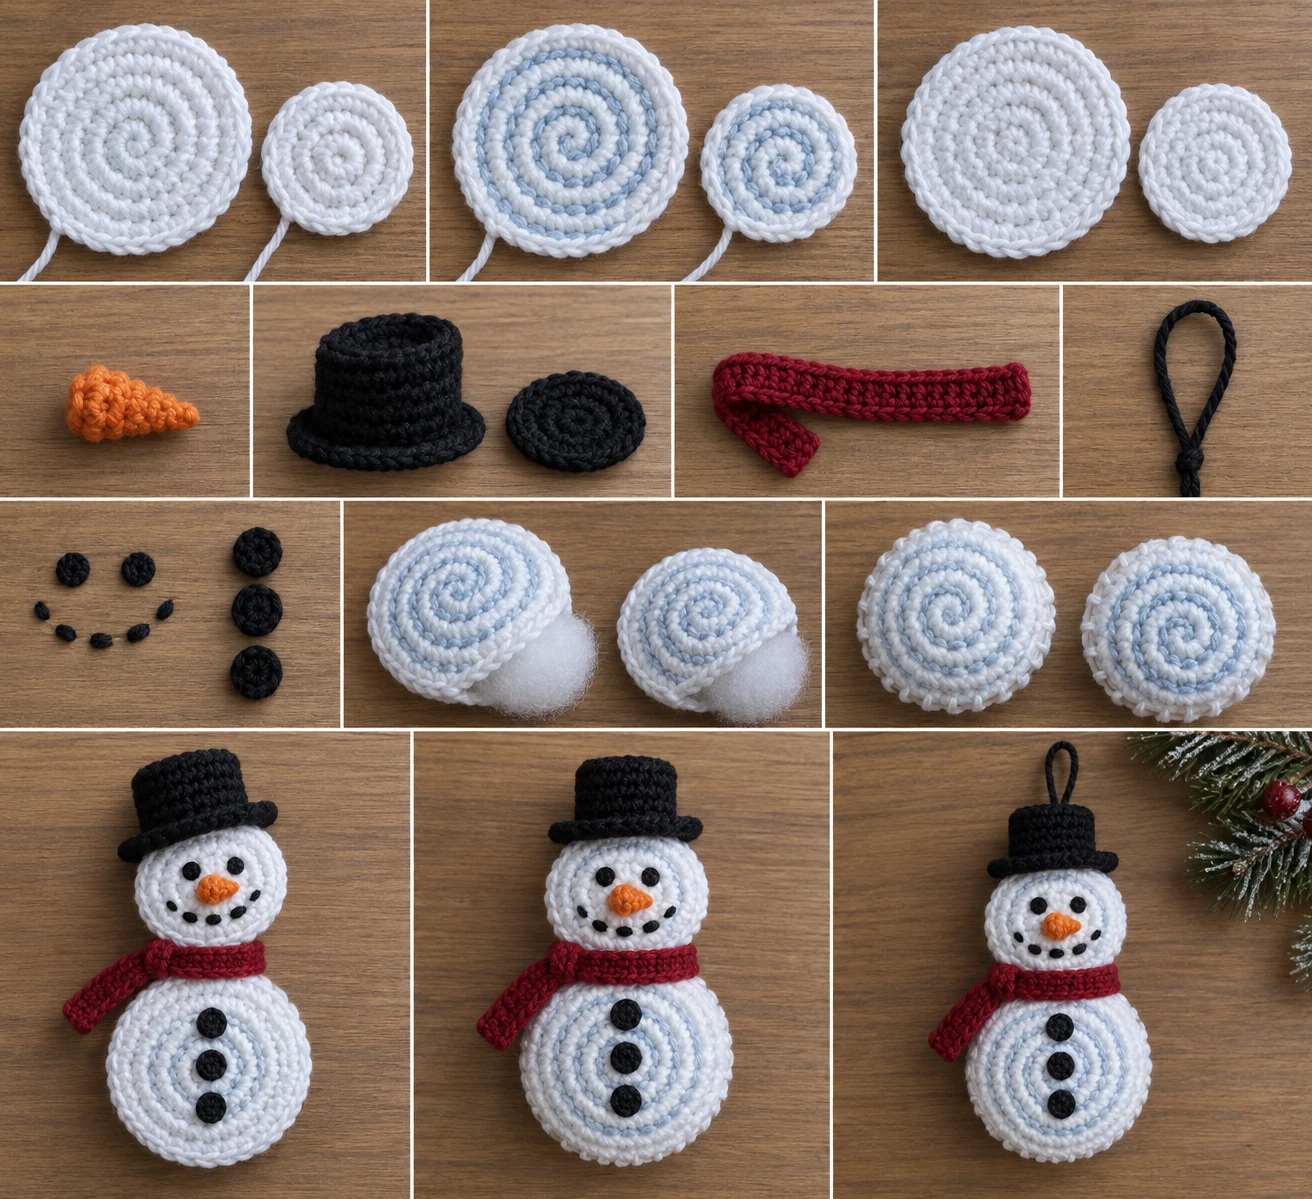
Make every component below before final assembly:
- Large lower-body front spiral disk in white with an ice-blue ridge — 1
- Large lower-body back disk in white — 1
- Small head front spiral disk in white with an ice-blue ridge — 1
- Small head back disk in white — 1
- Carrot nose in orange — 1
- Top-hat crown in black — 1
- Top-hat brim in black — 1
- Scarf in cranberry red — 1
- Crocheted hanging loop in black — 1
- Embroidered eyes, smile, and three buttons in black yarn
Materials You’ll Need
- Worsted-weight category 4 yarn: white, 55 yd/50 m
- Worsted-weight category 4 yarn: ice blue, 18 yd/17 m
- Worsted-weight category 4 yarn: black, 12 yd/11 m
- Worsted-weight category 4 yarn: cranberry red, 10 yd/9 m
- Worsted-weight category 4 yarn: orange, 2 yd/2 m
- US G/6 (4 mm) crochet hook
- Yarn needle
- Stitch marker
- Scissors
- Approximately 0.4 oz/12 g polyester fiberfill
Choose smooth, firmly plied cotton or acrylic yarn. No metal, plastic, or wooden hardware is used.
Gauge
18 sc and 20 rows = 4 in (10 cm) in firmly worked single crochet.
Exact gauge is not critical, but the front and back halves of each disk must match. Work firmly enough that the fiberfill cannot show through the stitches.
Finished Measurements
- Approximately 7 in (18 cm) tall from the lower body to the top of the hat, excluding the hanging loop
- Approximately 4.25 in (11 cm) across the lower body
- Approximately 3.25 in (8.5 cm) across the head
- Approximately 2.5 in (6.5 cm) folded hanging-loop drop
These measurements are design targets based on the stated gauge.
Crochet Abbreviations
- ch: chain
- MR: magic ring
- sl st: slip stitch
- sc: single crochet
- inc: work 2 sc in the indicated stitch
- BLO: back loop only
- FLO: front loop only
- st(s): stitch(es)
- rnd(s): round(s)
- rep: repeat
- RS: right side
Important Pattern Notes
- Disk rounds are worked in a continuous spiral without joining. Mark the first stitch and move the marker after every round.
- On both front disks, work Rnd 2 onward in BLO. The unused FLO strand forms the path for the raised decorative spiral.
- An increase means working 2 sc in one stitch.
- Numbers in parentheses are completed stitch counts.
- The ch 1 at the beginning of a flat row does not count as a stitch.
- Surface slip stitches are worked from the RS and do not alter the structural round counts.
- Place the embroidery and attach the nose before joining the head disks so all knots can remain hidden inside.
- Optional scarf fringe is intentionally omitted so every visible yarn element remains secure.
Complete Free Crochet Pattern
Large Lower-Body Front Spiral Disk — Make 1
With white, make an MR.
Rnd 1: Work 6 sc in MR. (6)
Rnd 2: Working BLO throughout this and all remaining rounds, inc in each st around. (12)
Rnd 3: [Sc in next st, inc in next st] 6 times. (18)
Rnd 4: [Sc in next 2 sts, inc in next st] 6 times. (24)
Rnd 5: [Sc in next 3 sts, inc in next st] 6 times. (30)
Rnd 6: [Sc in next 4 sts, inc in next st] 6 times. (36)
Rnd 7: [Sc in next 5 sts, inc in next st] 6 times. (42)
Rnd 8: [Sc in next 6 sts, inc in next st] 6 times. (48)
Rnd 9: [Sc in next 7 sts, inc in next st] 6 times. (54)
Rnd 10: [Sc in next 8 sts, inc in next st] 6 times. (60)
Sl st in the next st. Fasten off, leaving a 24 in (61 cm) sewing tail.
Large Disk Surface Spiral
With the RS facing, insert the hook under the first unused FLO of Rnd 2 near the center. Draw an ice-blue loop from the back, leaving a 5 in (13 cm) tail. Sl st in that FLO, then work one sl st in every unused FLO while following the continuous spiral outward through Rnd 10. Work 324 surface sl sts total. Fasten off with a 5 in (13 cm) tail. Draw both ice-blue tails to the back, knot them securely to nearby white stitches, and weave them in.
Large Lower-Body Back Disk — Make 1
With white, make an MR. Work Rnds 1–10 exactly as for the large front disk, but work through both loops in every round. The successive stitch counts are 6, 12, 18, 24, 30, 36, 42, 48, 54, and 60. Sl st in the next st. Fasten off and weave in the tail.
Small Head Front Spiral Disk — Make 1
With white, make an MR.
Rnd 1: Work 6 sc in MR. (6)
Rnd 2: Working BLO throughout this and all remaining rounds, inc in each st around. (12)
Rnd 3: [Sc in next st, inc in next st] 6 times. (18)
Rnd 4: [Sc in next 2 sts, inc in next st] 6 times. (24)
Rnd 5: [Sc in next 3 sts, inc in next st] 6 times. (30)
Rnd 6: [Sc in next 4 sts, inc in next st] 6 times. (36)
Rnd 7: [Sc in next 5 sts, inc in next st] 6 times. (42)
Rnd 8: [Sc in next 6 sts, inc in next st] 6 times. (48)
Sl st in the next st. Fasten off, leaving a 20 in (51 cm) sewing tail.
Small Disk Surface Spiral
Work as for the lower-body surface spiral, placing one ice-blue surface sl st in every unused FLO from Rnd 2 through Rnd 8. Work 210 surface sl sts total. Secure both ends on the back and weave them in.
Small Head Back Disk — Make 1
With white, make an MR. Work Rnds 1–8 exactly as for the small front disk, but work through both loops throughout. The successive stitch counts are 6, 12, 18, 24, 30, 36, 42, and 48. Sl st in the next st. Fasten off and weave in the tail.
Carrot Nose — Make 1
With orange, make an MR and work continuously.
Rnd 1: Work 4 sc in MR. (4)
Rnd 2: Sc in each st around. (4)
Rnd 3: [Sc in next st, inc in next st] twice. (6)
Rnd 4: Sc in each st around. (6)
Sl st in the next st. Do not stuff. Fasten off, leaving a 12 in (30 cm) sewing tail. The open six-stitch edge is the base.
Top-Hat Crown — Make 1
With black, ch 16.
Row 1: Sc in second ch from hook and in each ch across; turn. (15)
Rows 2–10: Ch 1, sc in each st across; turn. (15)
After Row 10, fasten off, leaving a 24 in (61 cm) sewing tail. Use the rectangle flat; do not fold or stuff it.
Top-Hat Brim — Make 1
With black, ch 24.
Row 1: Sc in second ch from hook and in each ch across; turn. (23)
Rows 2–3: Ch 1, sc in each st across; turn. (23)
Fasten off, leaving a 24 in (61 cm) sewing tail.
Scarf — Make 1
With cranberry red, ch 51.
Row 1: Sc in second ch from hook and in each ch across; turn. (50)
Row 2: Ch 1, sc in each st across. (50)
Fasten off, leaving a 24 in (61 cm) sewing tail at this end and retaining the starting tail. Do not add fringe.
Crocheted Hanging Loop — Make 1
With black, leave an 8 in (20 cm) starting tail and ch 30. Without twisting the chain, sl st in the first ch to form a loop. Fasten off, leaving an 8 in (20 cm) tail. Tie the two tails together with a firm square knot. Do not trim them until the loop has been sewn into the hat and head assembly.
Embroidered Face and Buttons
Complete all embroidery before joining the disk pairs. This keeps the knots concealed inside the finished ornament.
- Using black yarn on the head front, make two French-knot eyes approximately 3/4 in (2 cm) apart. Position them above the center and clear of the raised spiral.
- Make five small straight stitches in a shallow upward curve for the smile.
- On the lower-body front, make three black French-knot buttons evenly spaced down the vertical center.
- Knot the embroidery ends together securely on the wrong side and trim them to 1 in (2.5 cm).
Assembly
- Attach the nose: Center the open base of the orange nose between the eyes and smile. With the orange tail, whipstitch through each of the six base stitches and the corresponding head stitches. Make a second securing pass through two opposite base stitches. Knot the yarn on the wrong side and trim it.
- Join the lower body: Place the large disks wrong sides together with their edges aligned and the spiral facing outward. Using the large front disk’s white tail, whipstitch corresponding edge stitches together through both layers. After approximately 48 of the 60 edge-stitch pairs are joined, insert about 0.25 oz/7 g of fiberfill. Spread it into a thin, even layer so the disk remains flat. Join the remaining 12 pairs, knot securely between the layers, and bury the tail.
- Join the head: Join the small disks in the same way. After approximately 38 of the 48 edge-stitch pairs are joined, insert about 0.15 oz/4 g of fiberfill in a thin layer. Join the remaining 10 pairs, knot securely, and bury the tail.
- Join the head to the body: Overlap the bottom of the head over the top of the body by approximately 3/4 in (2 cm), keeping both spiral sides facing forward. Using a doubled 24 in (61 cm) strand of white yarn, sew a shallow horizontal line through both stuffed disks across approximately 1.5 in (4 cm). Return along the same line for a second pass. Knot behind the head and bury both ends.
- Attach the hat crown: Center one 15-stitch edge of the crown behind the upper edge of the head so approximately 1 in (2.5 cm) of the crown overlaps the head. Keep the crown’s RS facing forward. Use its tail to sew the overlapped area to the head around both side edges and the lower edge. Knot behind the work and bury the tail.
- Secure the hanging loop: Place the loop’s knotted ends on the back of the ornament, centered where the hat crown overlaps the head. The knot and at least 1 in (2.5 cm) of each tail must lie beneath the crown. Thread both tails together and stitch through the hat crown, head front, and head back four times without crossing the visible face. Tie the tails together again behind the crown, then bury them inside the head.
- Attach the hat brim: Center the 23-stitch brim horizontally across the lower crown and upper head, with approximately 1/4 in (6 mm) overlapping the crown. Using the brim tail, sew the complete lower long edge to the head and the overlapping central section to the crown. Tack both ends of the upper long edge to the head so they cannot curl. Knot behind the work and bury the tail.
- Attach the scarf: Wrap the scarf once around the narrow head-to-body join and cross the ends at the front-right side. Keep one end approximately 1.5 in (4 cm) longer than the other. With the long yarn tail, tack the crossed layers together, then sew through the scarf and underlying white fabric at four separated points around the neck. Use the starting tail to tack the shorter end to the body once. Knot and bury both tails beneath the scarf.
Finishing
Shape both stuffed disks into smooth circles without stretching the surface spirals. Gently tug the nose, hat, scarf, head-to-body join, and hanging loop to confirm that none shifts. Weave every remaining end through at least 1 in (2.5 cm) of dense fabric before trimming.
If the yarn label permits, lightly steam-block the ornament from a distance. Do not press the crochet or expose the polyester filling to direct heat.
Customization Ideas
Keep the component quantities, stitch counts, and assembly method unchanged while personalizing the color palette. The ice-blue ridge can coordinate with another scarf color, and the white yarn may be warm white or bright white. A smooth cotton produces crisp stitch definition, while acrylic creates a softer look. If substituting yarn, use the same weight for every component and check gauge so the paired disks remain equal in size.
Common Mistakes to Avoid
- Working the front disks through both loops: Rnd 2 onward must be worked in BLO so the unused FLO path remains available for surface crochet.
- Losing the beginning of a round: Move the stitch marker after every continuous round.
- Adding or skipping a surface stitch: Work once in every unused FLO. The large spiral has 324 surface sl sts, and the small spiral has 210.
- Overstuffing: The disks should remain broad and flat rather than becoming ball-shaped.
- Finishing the face after seaming: Embroider the face, buttons, and nose attachment before closing the relevant disk pairs so the knots remain hidden.
- Leaving attachments loose: Follow every reinforcement pass and tack point, especially at the head join and hanging loop.
Troubleshooting
Why is my disk ruffling?
Check that each round contains exactly six evenly spaced increases and verify the completed count before continuing. A hook that is too large for your tension may also make the fabric loose.
Why is my disk cupping?
Confirm that no increases were missed. Firm crochet is desirable, but excessive tension can also pull the disk inward.
Why is the ice-blue spiral tight or puckered?
Surface slip stitches should lie on the fabric without cinching it. Relax the working loop and spread the disk flat every few stitches.
Why do the front and back disks not match?
Recount the final rounds: the large disks must each finish with 60 stitches, and the small disks must each finish with 48. Use the same hook, yarn weight, and tension for both halves.
Why does the ornament lean after assembly?
Check that the head overlaps the body’s top center by approximately 3/4 in (2 cm), that the reinforced join is horizontal, and that the hat and hanging loop are centered above it.
Care Instructions
Spot-clean gently with cool water and mild detergent, then reshape and dry flat. Do not wring, iron, or apply direct heat. Follow the care instructions for the yarn used. Before each season of display, inspect the hanging loop and all sewn attachments. Store the ornament flat or loosely supported so the hat, nose, and stuffed disks are not crushed.
Frequently Asked Questions
Is this pattern written in US or UK terminology?
It uses US crochet terminology throughout.
Is the Spiral Snowman Ornament suitable for beginners?
A confident beginner familiar with magic rings, continuous rounds, increases, and basic seaming can complete it. The surface-slip-stitch spirals require careful loop placement but use only slip stitches.
Can I use safety eyes or buttons?
No separate hardware is required. The approved construction uses black yarn embroidery for the eyes, smile, and three body buttons, keeping every detail soft and securely integrated.
Should I stuff the carrot nose?
No. Leave the nose unstuffed and sew all six stitches of its open base to the head.
How much stuffing goes into each section?
Use approximately 0.25 oz/7 g in the lower body and 0.15 oz/4 g in the head. Spread it thinly and evenly.
How are the raised spirals formed?
Working the structural front disks in BLO leaves the FLO strands unused. Ice-blue surface slip stitches follow those strands continuously from near the center to the outer edge.
Is this ornament a toy?
No. It is designed as a decorative hanging ornament and should not be used as a toy.