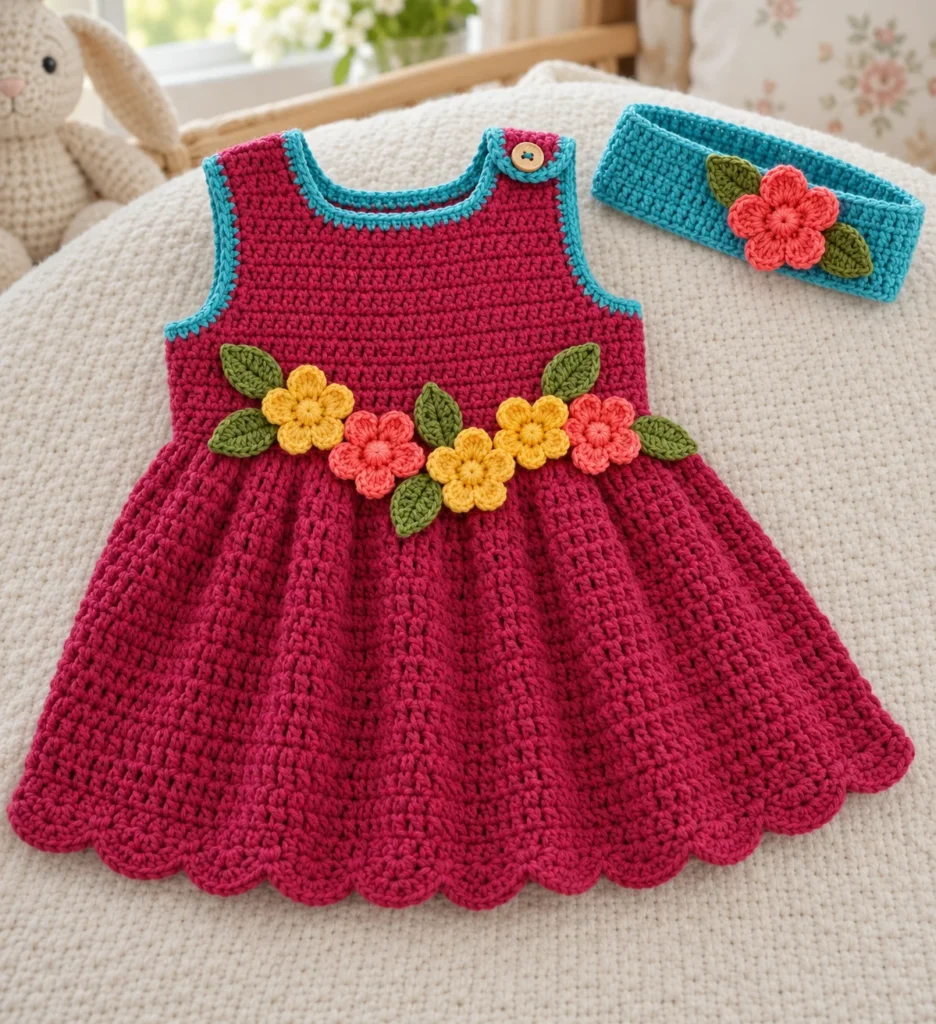
Vibrant Floral Baby Dress Set Crochet Pattern
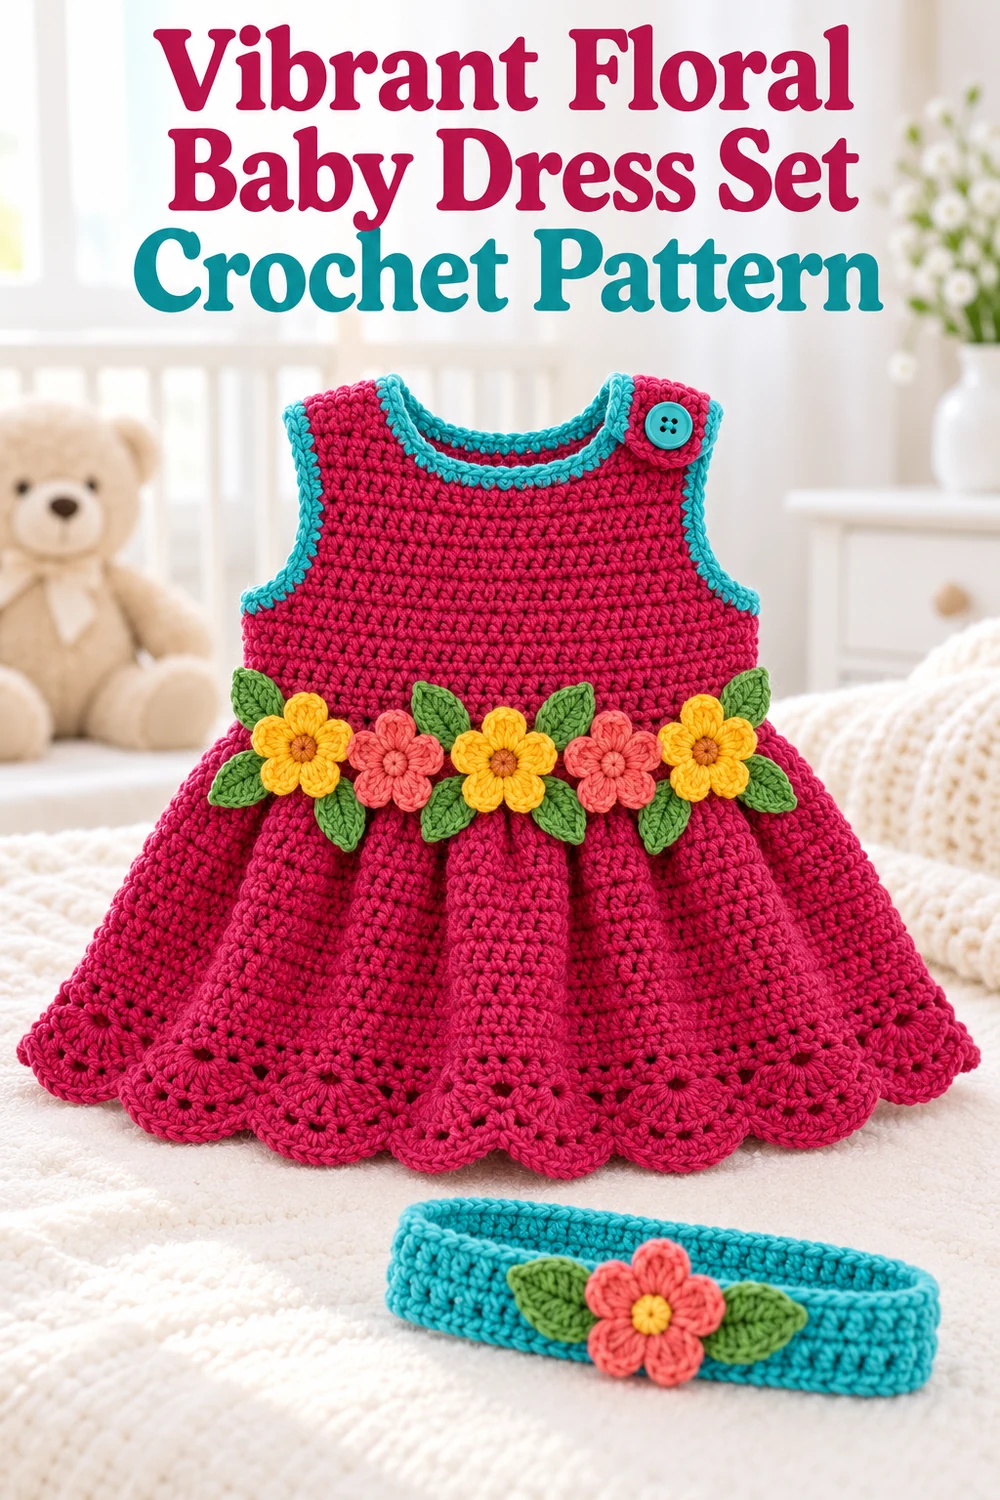
Create a cheerful sleeveless baby dress and coordinating floral headband with this original free crochet pattern. The raspberry dress features turquoise edgings, a softly flared skirt, a scalloped hem, and securely sewn flowers and leaves. The instructions use US crochet terminology and are sized approximately for 0–3 months.
Safety note: Measure the intended child before beginning. Inspect every applique, seam, loop, and button before each wear. For a baby who mouths clothing, omit the button and permanently sew both shoulders. This mathematically checked design is not represented as physically sample-tested.
Pattern at a Glance
- Skill level: Confident beginner to intermediate
- Terminology: US crochet terms
- Approximate size: 0–3 months
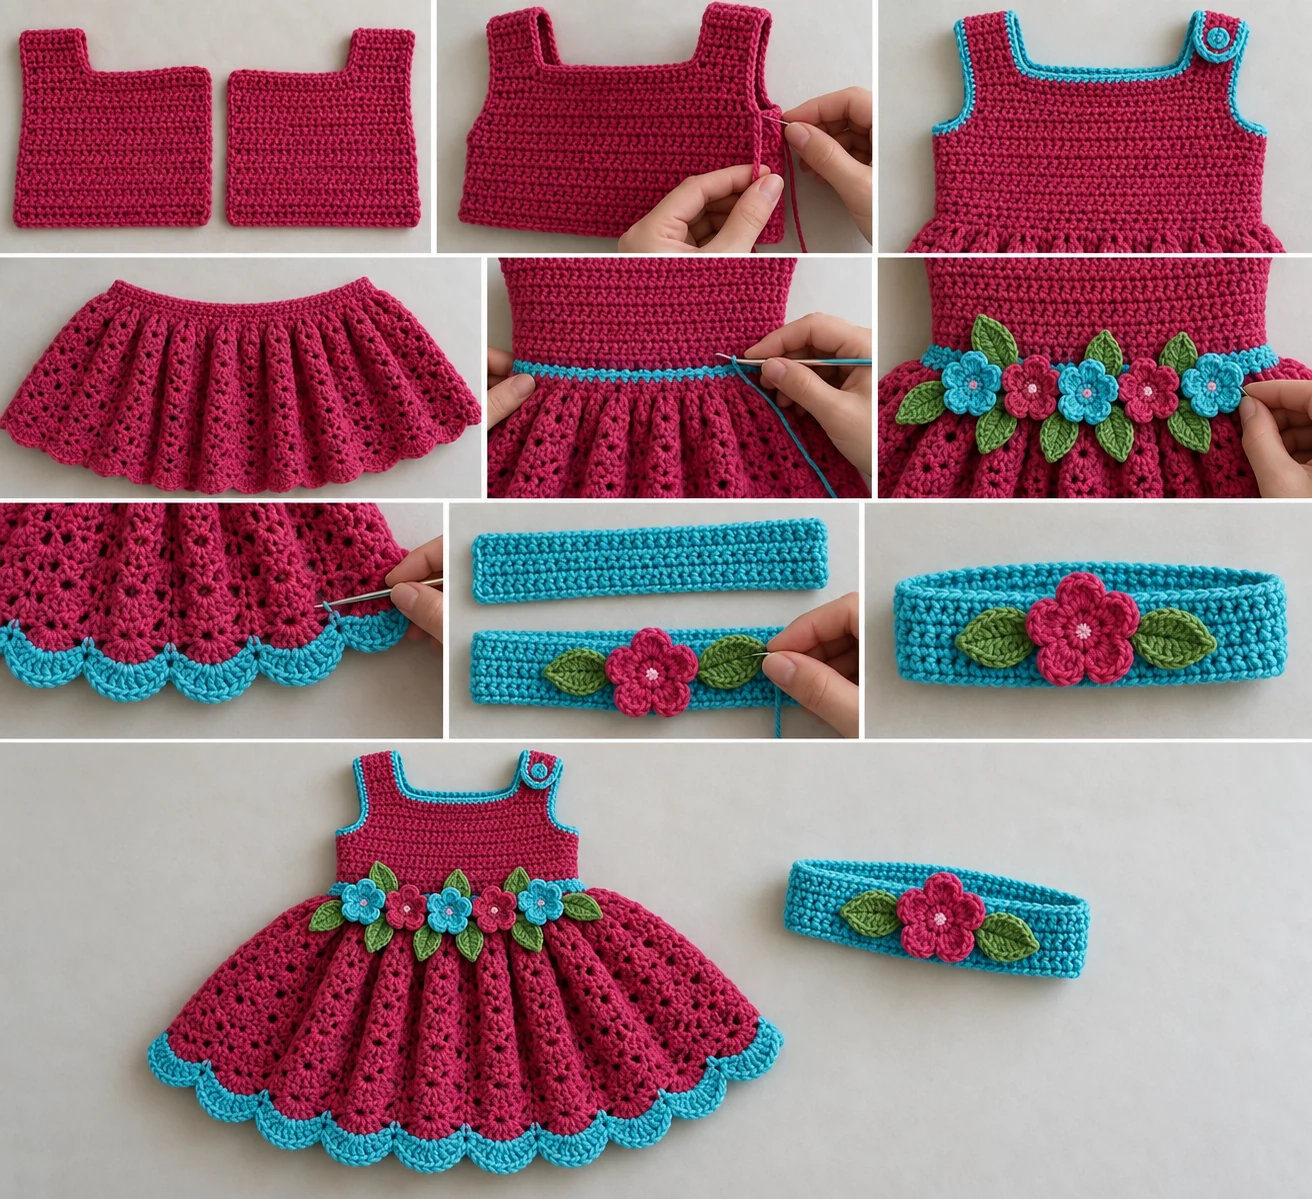
- Construction: Two rectangular bodice panels are partially seamed. The skirt is crocheted directly into their foundation edges. Armhole and neck edgings, a separate headband, flowers, leaves, and one optional shoulder button complete the set.
- Visible components: One front bodice panel, one back bodice panel, one skirt, two armhole edgings, one neck edging with an integrated button loop, one hem scallop edging, one headband, six five-petal flowers, eight leaves, and one shoulder button.
Materials You’ll Need
- DK/light worsted, category 3 yarn in Color A, raspberry: 250 yd (229 m)
- Color B, golden yellow: 20 yd (18 m)
- Color C, turquoise: 35 yd (32 m)
- Color D, leaf green: 25 yd (23 m)
- Color E, coral: 20 yd (18 m)
- US G/6 (4 mm) crochet hook, or size needed to obtain gauge
- One washable 0.5 in (12 mm) button
- Yarn needle, locking markers, scissors, and tape measure
Use smooth, washable, baby-safe yarn of similar fiber and weight for every color. No stuffing is used.
Gauge
- 16 hdc and 16 rows = 4 in (10 cm) in blocked hdc fabric
- 16 dc and 8 dc rows or rounds = 4 in (10 cm)
Make and wash a gauge swatch before beginning. Stitch gauge controls circumference, while row gauge controls length. Adjust the hook size instead of changing the verified stitch counts.
Finished Measurements
- Dress chest circumference: approximately 19 in (48 cm)
- Dress length: approximately 12 in (30.5 cm) from shoulder to hem
- Bodice depth: approximately 4 in (10 cm)
- Skirt circumference after increase: approximately 28.5 in (72.5 cm)
- Headband: approximately 15 in (38 cm) circumference and 1 in (2.5 cm) wide
- Flowers: approximately 1.75 in (4.5 cm) across
Infant proportions vary. Measure the child and allow comfortable positive ease.
Crochet Abbreviations
- beg = beginning
- ch = chain
- dc = double crochet
- hdc = half double crochet
- rep = repeat
- rnd = round
- RS = right side
- sc = single crochet
- sk = skip
- sl st = slip stitch
- st(s) = stitch(es)
- WS = wrong side
Important Pattern Notes
- Ch 1 at the start of an hdc or sc row does not count as a stitch.
- Ch 3 at the start of a dc round counts as the first dc.
- Join rounds with a sl st to the top of the beginning ch-3 unless directed otherwise.
- Turn after each row.
- The bodice panels are rectangles. Their lower halves are side-seamed; their upper halves remain open to form the armholes.
- Leave a 10 in (25 cm) tail wherever sewing is specified unless another length is given.
- Stitch totals appear at the ends of applicable rows and rounds.
Complete Free Crochet Pattern
Dress Front Bodice Panel
Make 1 in Color A.
Ch 39.
Row 1 (WS): Hdc in second ch from hook and in each ch across; turn. 38 hdc.
Rows 2–16: Ch 1, hdc in each st across; turn. 38 hdc.
Fasten off with a 20 in (51 cm) sewing tail.
Dress Back Bodice Panel
Make 1 in Color A.
Work exactly as instructed for the dress front bodice panel. Do not fasten off after Row 16. Place the working loop on a locking marker for the skirt.
Dress Shoulder and Side Assembly
Block both panels to 9.5 in wide by 4 in tall. Place them with WS together and Row 16 at the shoulder edge. The outermost 8 stitches at each side form the shoulders, leaving the central 22 stitches of each panel for the neckline.
Left shoulder: With Color A and a yarn needle, securely sew together the corresponding outer 8 front and back stitches. Knot on the WS and weave in the tail.
Right shoulder: Leave the corresponding outer 8 stitches unsewn for the buttoned opening. The neck edging will stabilize this opening.
Side seams: Align each side from the foundation edge upward. Sew together only the edges of Rows 1–8. Leave Rows 9–16 open at both sides for the armholes. Each armhole contains 8 front row ends and 8 back row ends. Secure and weave in the seam tails, then turn the bodice RS out.
Skirt
Work in Color A. Remove the marker from the back-panel working loop. Hold the bodice so its foundation edges form the waist. Work evenly through the unused side of every foundation chain.
Rnd 1: Ch 1, sc in each of the 38 back foundation chains, place a marker, sc in each of the 38 front foundation chains; join to first sc. 76 sc. The marker identifies the opposite side seam; the join identifies the first side seam.
Rnd 2: Ch 3, dc in same st as join, 2 dc in next st, *dc in next st, 2 dc in next st; rep from * around; join. 114 dc. The beginning ch-3 and dc in the same stitch make the first 2-dc increase.
Rnds 3–13: Ch 3, dc in each remaining st around; join. 114 dc.
Do not fasten off.
Rnd 14, hem scallop edging: Ch 1, *sc in next st, sk next 2 sts, 5 dc in next st, sk next 2 sts; rep from * around; join to first sc. 19 scallops.
Fasten off and weave in the tail.
Armhole Edgings
Make 2 in Color C.
With RS facing, join Color C at the bottom of one armhole and ch 1. Work 2 sc around the end of each of the 8 front rows and 2 sc around the end of each of the 8 back rows; join to first sc. 32 sc.
Fasten off and weave in. Repeat for the second armhole. If an edge flares, use a smaller hook while retaining all 32 stitches.
Neck Edging and Button Loop
Work in Color C.
With RS facing, join Color C at the back edge of the open right shoulder. Ch 1, sc in each of the 22 back neckline stitches, then sc in each of the 22 front neckline stitches. 44 sc around the neckline.
Continue along the front right shoulder edge: ch 6, then sl st into the same corner to form the button loop. This loop is additional to the 44 neckline sc.
Fasten off with a 10 in (25 cm) tail. Wrap the tail twice around the base of the loop, secure it on the WS, and weave it in. Check that the loop fits closely over the chosen button without slipping free.
Headband
Make 1 in Color C. Leave a 12 in (30 cm) beginning tail. Ch 61.
Row 1: Sc in second ch from hook and in each ch across; turn. 60 sc.
Rows 2–4: Ch 1, sc in each st across; turn. 60 sc.
Fasten off with a 12 in (30 cm) tail. Bring the short ends together without twisting the band. Whipstitch all 4 corresponding row ends together, then secure and weave in both tails. This seam marks the back of the headband.
Five-Petal Flowers
Make 6 total: 3 in Color B and 3 in Color E. Leave a 10 in (25 cm) finishing tail on each flower for sewing.
Rnd 1: Make an adjustable ring, ch 1, work 5 sc in ring; join to first sc. 5 sc. Pull the ring firmly closed.
Rnd 2: In each sc work (sl st, ch 2, 2 dc, ch 2, sl st). 5 petals.
Fasten off with the sewing tail. Each of the five center stitches supports exactly one petal.
Leaves
Make 8 in Color D. Leave a 10 in (25 cm) finishing tail on each leaf. Ch 8.
Row 1: Sl st in second ch from hook, sc in next ch, hdc in next ch, dc in next 2 ch, hdc in next ch, 3 sc in last ch. Rotate to work along the unused loops on the opposite side of the foundation chain: hdc in next ch, dc in next 2 ch, hdc in next ch, sc in next ch, sl st in final ch. Join to first sl st.
Fasten off with the sewing tail. Each leaf is worked around all 7 available chain positions; the 3 sc at the tip turn the work.
Assembly
Floral Placement and Assembly
Dress: Arrange 5 flowers and 6 leaves asymmetrically across the front waist. Keep every piece below the bodice and clear of the armholes. From the wearer’s right to left, use this suggested layout: Flower 1 with one leaf; Flowers 2 and 3 overlapping slightly with two leaves; Flower 4 with one leaf; and Flower 5 with two leaves.
Pin the arrangement and check that the skirt hangs freely. With each flower’s long tail, sew around its center through every center stitch, then add one small anchoring stitch behind the outer tip of every petal. Sew each leaf around its complete outer edge and add one straight stitch along its center. Keep the interior stitches neat, knot securely, and weave every tail at least 1.5 in (4 cm) in three directions.
Headband: Center the remaining flower over the headband seam so the flower conceals it. Position the remaining 2 leaves behind opposite sides of the flower. Sew the leaves around their edges, then sew through all five flower-center stitches and anchor every petal tip. Keep the sewing flexible enough for the band to stretch.
Button Attachment
Overlap the open right shoulder edges by approximately 0.5 in (12 mm), placing the front shoulder edge on top. Mark the back shoulder directly beneath the button loop. With doubled matching sewing yarn, sew the button to the back shoulder through all fabric layers at the marked point.
Pass through the button holes at least six times, form a short thread shank, knot securely on the WS, and weave both ends in three directions. Close the loop over the button and confirm that the shoulder lies flat. For maximum infant safety, omit the button and permanently whipstitch all 8 corresponding right-shoulder stitches together.
Finishing and Safety Checks
Weave in every remaining end securely. Wash according to the yarn label, shape the set to the stated measurements, and dry it flat.
- Confirm that the hem has 19 scallops.
- Confirm that each armhole edging has 32 sc.
- Check the shoulder seams and side seams for gaps.
- Pull gently on every flower, leaf, petal tip, button-loop wrap, and button.
- Ensure no loose yarn ends or components remain.
- Inspect all attachments again before every wear.
Customization
Keep all verified stitch counts unchanged when making this size. Customize the set safely by rearranging the prescribed 5 dress flowers and 6 dress leaves, swapping the roles of the listed flower colors, or choosing five coordinated baby-safe yarn colors of the same fiber and weight. You may also omit the optional button and sew the right shoulder closed as directed.
Do not add extra appliques, cords, beads, ties, or other loose embellishments to an infant garment. For a different size, use a separately graded pattern rather than casually adding stitches, because changes affect the neckline, armholes, skirt increase, and scallop repeat.
Common Mistakes to Avoid
- Skipping the washed swatch: The dress dimensions depend on both stitch and row gauge.
- Changing a verified count to correct gauge: Change hook size instead.
- Joining the wrong bodice edges: Row 16 belongs at the shoulders; the foundation edges become the waist.
- Sewing side seams too high: Sew only Rows 1–8 and leave Rows 9–16 open for each armhole.
- Miscounting Round 2: The beginning ch-3 counts as the first dc, and the dc in the same stitch completes the first increase.
- Working the scallops over the wrong multiple: Each repeat consumes 6 stitches, so 114 stitches produce exactly 19 scallops.
- Counting the button-loop chain as neckline stitches: The ch-6 loop is additional to the 44 sc.
- Attaching only applique centers: Every flower petal tip and the entire edge of every leaf must also be anchored.
Troubleshooting
Why does the bodice measure wider or narrower than 9.5 inches?
Your stitch gauge differs from the pattern gauge. Make a washed swatch and change hook size while keeping 38 hdc in every bodice row.
Why are my armhole edgings flaring?
Use a smaller hook for the edging, but retain 32 sc around each armhole. Also distribute the two stitches around each row end evenly.
Why does the skirt increase not total 114 dc?
Start with exactly 76 sc. In Round 2, alternate one dc and two dc around all stitches. Count the beginning ch-3 as the first dc; together with the dc in the same stitch, it forms the first two-dc group.
Why do the hem scallops not meet evenly?
Recount Round 13 and confirm 114 dc. Each scallop repeat uses six stitches: one sc, two skipped stitches, one five-dc shell, and two skipped stitches.
Why is the headband twisted?
Lay it flat and trace one edge from end to end before whipstitching. The short ends must meet without either end turning.
What if the button loop is loose?
Use a smaller button that remains appropriate to the pattern or remake the ch-6 loop at firmer tension. It must fit closely without slipping. If uncertain, omit the button and permanently sew the right shoulder.
Care Instructions
Follow the care directions for the selected yarn and button. Wash gently, reshape to the finished measurements, and dry flat. Avoid hanging the wet dress, which can stretch the skirt. Before every wear, inspect the button, loop, flowers, leaves, seams, and woven ends. Stop using the set immediately if any component becomes loose or damaged.
Frequently Asked Questions
Is this pattern written in US or UK terminology?
It uses US crochet terminology throughout.
What size does the pattern make?
It is designed for approximately 0–3 months, but fit depends on the child and the maker’s washed gauge. Compare the finished measurements with the intended child before beginning.
How many decorative pieces do I need?
Make exactly 6 five-petal flowers and 8 leaves. Use 5 flowers and 6 leaves on the dress, then 1 flower and 2 leaves on the headband.
Can I work the skirt separately?
No. In this construction, the skirt is crocheted directly into the unused loops of the front and back bodice foundation chains.
Does the pattern use stuffing?
No stuffing is required.
Can I omit the shoulder button?
Yes. Permanently whipstitch together all 8 corresponding stitches of the right shoulder. This is the preferred option for an infant who mouths clothing.
Has the stitch math been checked?
Yes. Each bodice panel has 38 stitches; the joined waist has 76 sc; the increase produces 114 dc; the hem has 19 six-stitch scallop repeats; each armhole has 32 sc; and the neckline has 44 sc plus its separate ch-6 loop. The design is mathematically checked but is not represented as physically sample-tested.