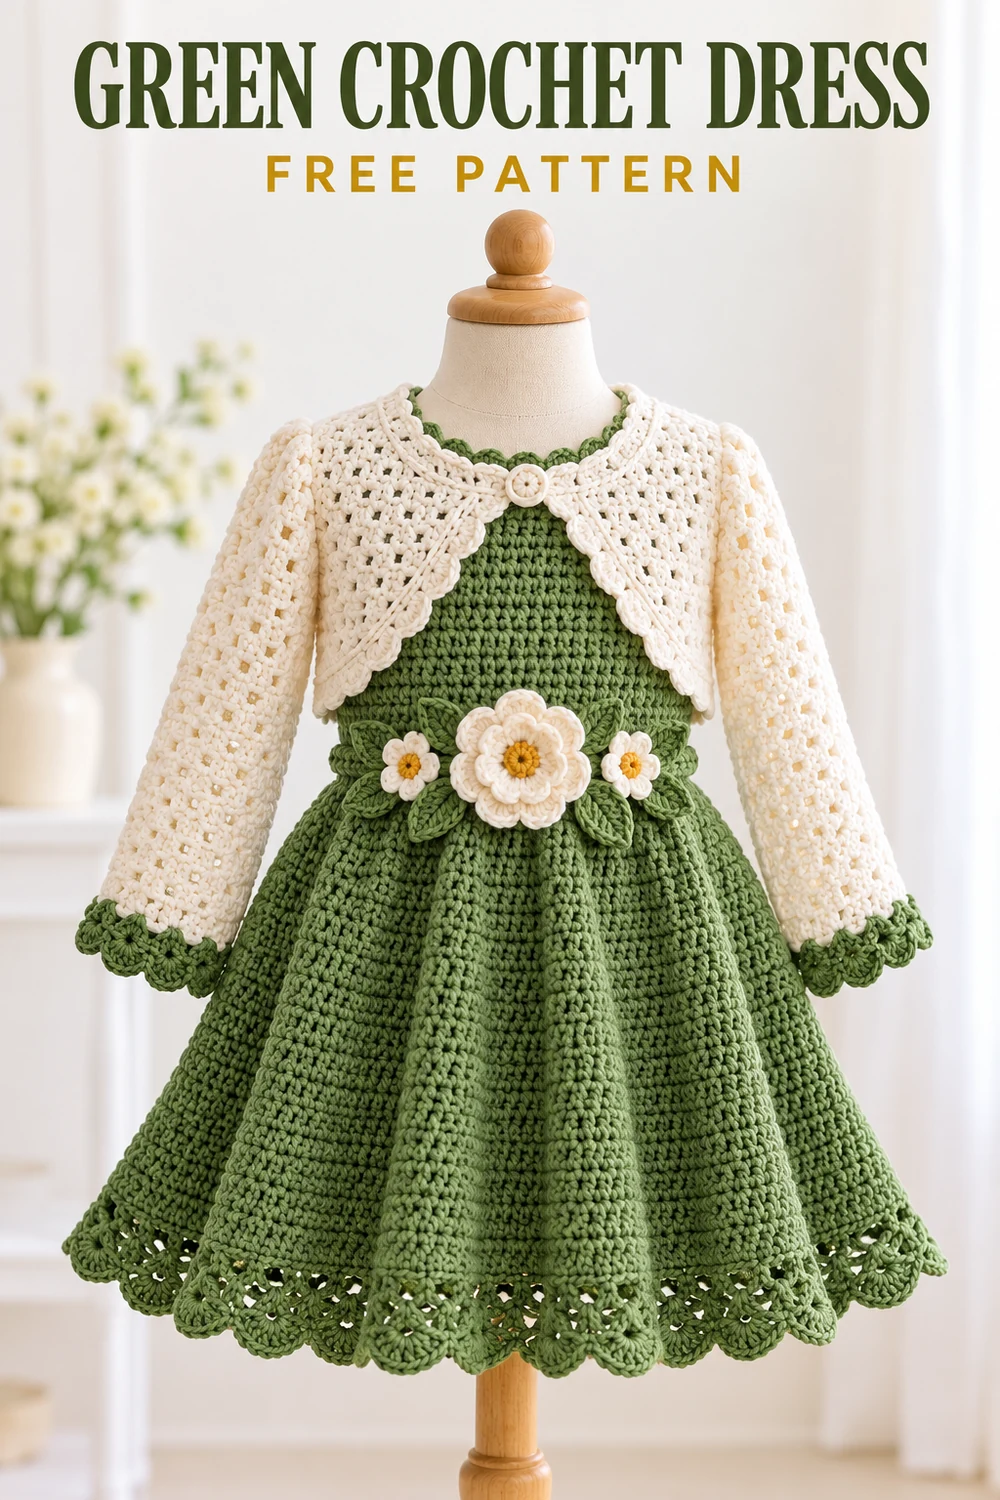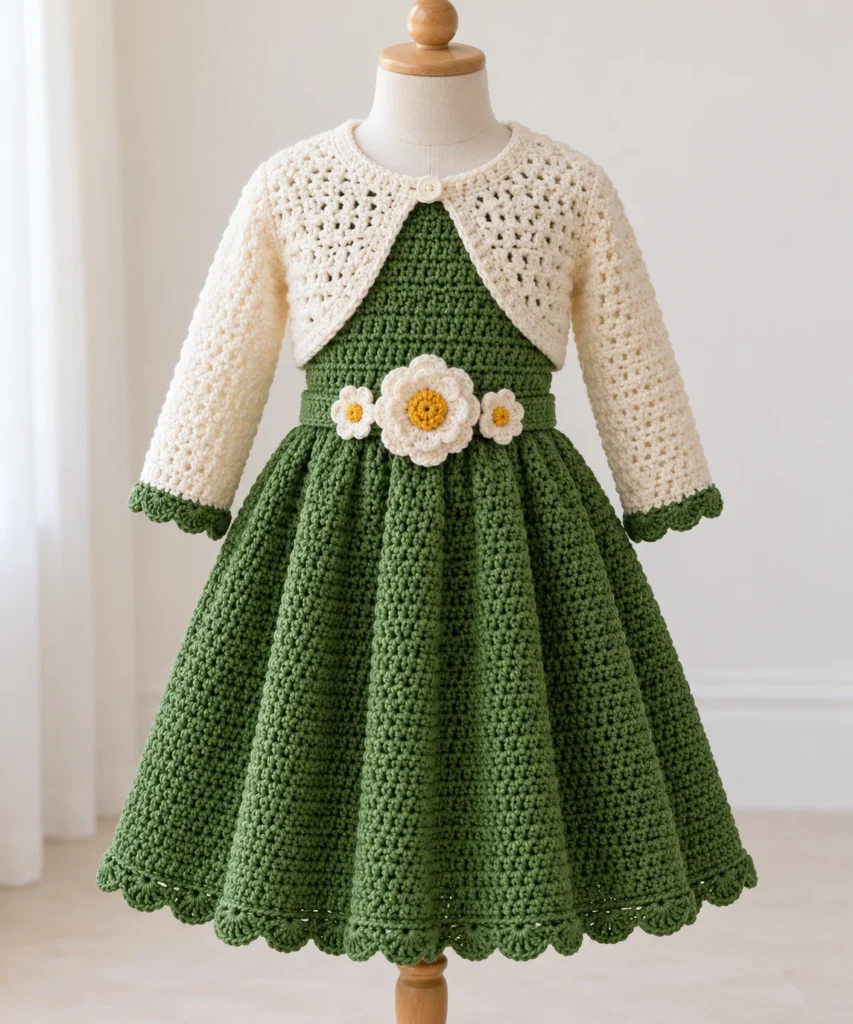
Green Crochet Dress for Girls With Flower Belt and Bolero
This original free crochet pattern creates a Fern Green dress with a fitted bodice, flared scalloped skirt, removable flower belt, and coordinating Cream bolero with green-edged sleeves. The sample is drafted for an approximate child size 4–5 and uses US crochet terminology. Read the complete pattern, make and wash a gauge swatch, and compare the finished measurements with the intended wearer before beginning.
Important: This design is mathematically specified but has not been physically crocheted or fit-tested. A sample and human fit review are recommended before publication or gift use.
Pattern at a Glance
- Skill level: Intermediate
- Terminology: US crochet terms
- Construction: The dress bodice is made from separate front and back pieces. A seamless flared skirt is worked separately in joined rounds and sewn to the bodice. The bolero has a back, two fronts, and sleeves worked directly into the assembled armholes. A removable band-style belt carries one large layered flower and two small flowers.
- Sample size: Approximate child size 4–5
- Intended ease: Approximately 2 in/5 cm positive ease at the chest
- Main techniques: Rows, joined rounds, increasing, dc2tog decreases, shaped necklines, seaming, edge pickups, scallops, and layered crochet flowers
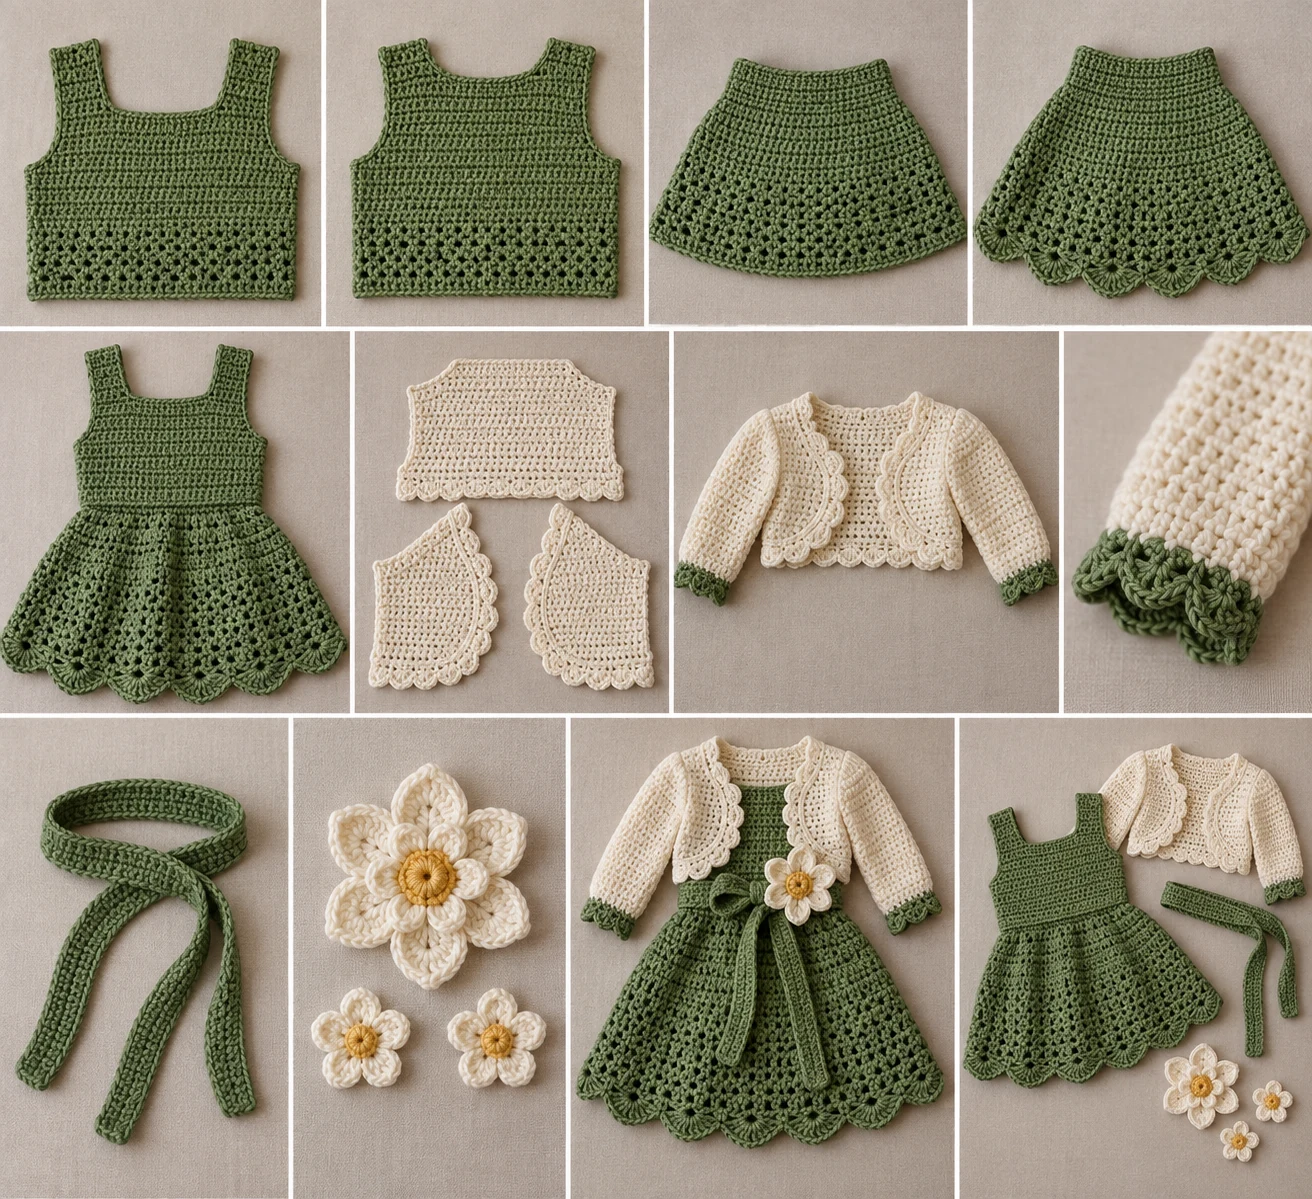
Visible Crocheted Component Inventory
- Dress front bodice: 1 in Fern Green
- Dress back bodice: 1 in Fern Green
- Flared dress skirt: 1 in Fern Green
- Integral scalloped skirt edging: 1 in Fern Green
- Bolero back: 1 in Cream
- Bolero right front: 1 in Cream
- Bolero left front: 1 in Cream
- Bolero sleeves: 2 in Cream
- Sleeve cuff edgings: 2 in Fern Green
- Bolero button loop: 1 in Cream
- Flower belt band and ties: 1 in Fern Green
- Large layered belt flower: 1 in Cream and Golden Yellow
- Small belt flowers: 2 in Cream and Golden Yellow
Materials You’ll Need
- DK/light worsted, category 3 yarn: approximately 850 yd/777 m Fern Green
- DK/light worsted, category 3 yarn: approximately 550 yd/503 m Cream
- DK/light worsted, category 3 yarn: approximately 20 yd/18 m Golden Yellow
- US G/6 (4 mm) crochet hook, or size needed to obtain gauge
- Yarn needle
- Stitch markers
- Scissors
- One washable 5/8-in/16-mm button
- Sewing needle and strong matching sewing thread
Use smooth, washable yarn of similar fiber and weight in all three colors. No stuffing is used.
Gauge
- 18 dc and 9 dc rows = 4 in/10 cm in blocked fabric
- 20 sc and 22 sc rows = 4 in/10 cm for the belt
Make, wash, dry, and measure a swatch before starting. Change hook size if necessary. Stitch gauge controls garment width, while row gauge controls bodice, bolero, and sleeve length.
Finished Measurements
- Dress chest: 24 in/61 cm
- Dress waist: 24 in/61 cm
- Bodice depth: 7 in/18 cm
- Skirt length including edging: 17 in/43 cm
- Total shoulder-to-hem length: approximately 24 in/61 cm
- Bolero chest: approximately 24 in/61 cm
- Bolero back length: 10.75 in/27 cm
- Sleeve length: approximately 9.5 in/24 cm
- Belt band before ties: approximately 27 in/69 cm
- Each belt tie: approximately 9 in/23 cm
Confirm the wearer’s chest, back-waist, shoulder-to-waist, and desired finished length. The intended chest circumference is about 2 in/5 cm larger than the wearer’s chest.
Crochet Abbreviations
- beg = beginning
- ch = chain
- dc = double crochet
- dc2tog = double crochet 2 stitches together
- hdc = half double crochet
- rep = repeat
- rnd(s) = round(s)
- RS = right side
- sc = single crochet
- sl st = slip stitch
- sp(s) = space(s)
- st(s) = stitch(es)
- WS = wrong side
Important Pattern Notes
- Turning ch 3 counts as one dc on the bodice and bolero pieces.
- Beg ch 1 does not count as a stitch.
- Beg ch 3 in joined skirt and sleeve rnds counts as the first dc. Join each such rnd with a sl st to the top of the beg ch 3.
- Keep joined-round seams aligned and confirm the stitch count after every increase or decrease rnd.
- Leave every sewing tail at the length specified. Do not weave in a tail that is assigned to assembly.
- Flower stitch totals count completed stitches worked into petals. Construction chains are not included unless explicitly stated.
- When picking up the sleeves, distribute exactly 40 dc evenly around each armhole. Individual row-edge tension may change the spacing, but not the total.
- The bolero perimeter edging uses a pickup ratio rather than a universal total because actual row-edge gauge can vary. Keep both fronts symmetrical and the fabric flat.
- Check the finished button loop against the actual button before fastening the button permanently.
Complete Free Crochet Pattern
Dress Front Bodice
Make 1 in Fern Green. Leave a 24-in/61-cm sewing tail at the beginning and end.
Ch 55.
Row 1 (RS): Dc in fourth ch from hook and in each remaining ch; turn — 54 dc.
Rows 2–11: Ch 3, dc in each remaining st; turn — 54 dc.
Row 12, first shoulder: Ch 3, dc in next 17 sts; leave remaining 36 sts unworked; turn — 18 dc.
Rows 13–16: Ch 3, dc in each remaining st; turn — 18 dc. Fasten off with a 16-in/41-cm shoulder-seaming tail.
Second shoulder, Row 12: With RS facing, skip the center 18 sts of Row 11 and join Fern Green in the next st. Ch 3, dc in next 17 sts; turn — 18 dc.
Rows 13–16: Ch 3, dc in each remaining st; turn — 18 dc. Fasten off with a 16-in/41-cm tail.
Dress Back Bodice
Make 1 in Fern Green. Leave 24-in/61-cm tails at the lower corners.
Ch 55.
Row 1: Dc in fourth ch from hook and across; turn — 54 dc.
Rows 2–14: Ch 3, dc in each remaining st; turn — 54 dc.
Row 15, first shoulder: Ch 3, dc in next 17 sts; leave remaining 36 sts unworked; turn — 18 dc.
Row 16: Ch 3, dc in each remaining st — 18 dc. Fasten off with a 16-in/41-cm tail.
Second shoulder, Row 15: With RS facing, skip the center 18 sts of Row 14 and join Fern Green in the next st. Ch 3, dc in next 17 sts; turn — 18 dc.
Row 16: Ch 3, dc in each remaining st — 18 dc. Fasten off with a 16-in/41-cm tail.
Flared Dress Skirt and Scalloped Edging
Make 1 in Fern Green. Leave a 30-in/76-cm tail at the foundation edge.
Ch 109 loosely. Taking care not to twist the chain, join with a sl st in the first ch.
Rnd 1: Ch 3, dc in each remaining ch; join — 108 dc.
Rnds 2–3: Ch 3, dc in each remaining st; join — 108 dc.
Rnd 4: Ch 3, dc in next 7 sts, 2 dc in next st; rep around, interpreting the initial ch 3 as the first dc of the first 8-dc group; join — 120 dc.
Rnds 5–6: Dc evenly — 120 dc.
Rnd 7: Rep (dc in next 9 sts, 2 dc in next st) 12 times — 132 dc.
Rnds 8–9: Dc evenly — 132 dc.
Rnd 10: Rep (dc in next 10 sts, 2 dc in next st) 12 times — 144 dc.
Rnds 11–12: Dc evenly — 144 dc.
Rnd 13: Rep (dc in next 11 sts, 2 dc in next st) 12 times — 156 dc.
Rnds 14–15: Dc evenly — 156 dc.
Rnd 16: Rep (dc in next 12 sts, 2 dc in next st) 12 times — 168 dc.
Rnds 17–18: Dc evenly — 168 dc.
Rnd 19: Rep (dc in next 13 sts, 2 dc in next st) 12 times — 180 dc.
Rnds 20–38: Dc evenly — 180 dc.
Rnd 39, scalloped edging: Ch 1, sc in same st, skip next 2 sts, 5 dc in next st, skip next 2 sts; rep around; join to first sc — 30 scallops and 180 worked stitches. Fasten off and weave in the hem tail.
Bolero Back
Make 1 in Cream. Leave 24-in/61-cm tails at both lower corners and 16-in/41-cm tails at both upper corners.
Ch 55.
Row 1: Dc in fourth ch from hook and across; turn — 54 dc.
Rows 2–24: Ch 3, dc across; turn — 54 dc.
Mark 15 sts at each shoulder edge. The center 24 sts form the back neck. Fasten off.
Bolero Right Front
Make 1 in Cream. The neckline is at the beginning of RS rows. Leave a 24-in/61-cm lower tail and a 16-in/41-cm upper tail.
Ch 28.
Row 1 (RS): Dc in fourth ch from hook and across; turn — 27 dc.
Rows 2–20: Ch 3, dc across; turn — 27 dc.
Row 21: Sl st loosely in first 3 sts, ch 3, dc across; turn — 24 dc.
Row 22: Work across to the last 3 sts, leaving them unworked; turn — 21 dc.
Row 23: Sl st loosely in first 3 sts, ch 3, dc across; turn — 18 dc.
Row 24: Work across to the last 3 sts, leaving them unworked — 15 dc. Fasten off.
Bolero Left Front
Make 1 in Cream. The neckline is at the end of RS rows. Leave tails as for the right front.
Ch 28.
Row 1 (RS): Dc in fourth ch from hook and across; turn — 27 dc.
Rows 2–20: Ch 3, dc across; turn — 27 dc.
Row 21: Work across to the last 3 sts, leaving them unworked; turn — 24 dc.
Row 22: Sl st loosely in first 3 sts, ch 3, dc across; turn — 21 dc.
Row 23: Work across to the last 3 sts, leaving them unworked; turn — 18 dc.
Row 24: Sl st loosely in first 3 sts, ch 3, dc across — 15 dc. Fasten off.
Bolero Sleeves and Cuff Edgings
Make 2 after completing the bolero shoulder and side assembly. Use Cream and leave an 18-in/46-cm tail at each join.
With RS facing, join Cream at the underarm. Place exactly 40 dc evenly around the armhole, distributing 20 across the front row ends and 20 across the back row ends; join.
Rnds 1–3: Dc evenly — 40 dc.
Rnd 4: Rep (dc in next 8 sts, dc2tog) 4 times — 36 dc.
Rnds 5–7: Dc evenly — 36 dc.
Rnd 8: Rep (dc in next 7 sts, dc2tog) 4 times — 32 dc.
Rnds 9–11: Dc evenly — 32 dc.
Rnd 12: Rep (dc in next 6 sts, dc2tog) 4 times — 28 dc.
Rnds 13–20: Dc evenly — 28 dc. Fasten off Cream.
Cuff Rnd 21: Join Fern Green. Ch 1, sc in same st, skip next 2 sts, 5 dc in next st, skip next 3 sts; rep around; join — 4 scallops and 24 worked stitches. Fasten off with a 10-in/25-cm tail and weave in securely.
Bolero Button Loop
Make 1 in Cream after the bolero edging is complete.
Join Cream at the upper corner of the right front. Ch 8, then sl st back into the same corner to form a loop. Fasten off with two 10-in/25-cm tails. Sew both tails through the corner repeatedly and weave them in separately. Confirm that the loop fits snugly over the chosen button.
Flower Belt Band and Ties
Make 1 in Fern Green. Leave 12-in/30-cm tails.
Ch 6.
Row 1: Sc in second ch from hook and across; turn — 5 sc.
Rows 2–149: Ch 1, sc in each st; turn — 5 sc. Do not fasten off.
First tie: Ch 46, sl st in second ch from hook and in each remaining ch — 45 sl sts. Fasten off.
Second tie: Join Fern Green at the opposite short end, ch 46, sl st in second ch from hook and in each remaining ch — 45 sl sts. Fasten off.
The finished band is approximately 27 in/69 cm, with an approximately 9-in/23-cm tie at each end.
Large Layered Belt Flower
Make 1. Leave a 15-in/38-cm Golden Yellow tail and a 20-in/51-cm Cream attachment tail.
Rnd 1: With Golden Yellow, make a magic ring. Ch 1 and work 6 sc in the ring; join — 6 sc. Fasten off Golden Yellow.
Rnd 2: Join Cream in any st. Rep (sl st in next st, ch 2, 3 dc in same st, ch 2, sl st in same st) 6 times — 6 inner petals.
Rnd 3: Working behind the petals, rep (ch 3, sl st around the post/base of the next Rnd-1 sc) 6 times — 6 loops.
Rnd 4: In each ch-3 loop work (sc, hdc, 5 dc, hdc, sc) — 6 outer petals and 54 sts. Fasten off with the Cream attachment tail.
Small Belt Flowers
Make 2. Use Golden Yellow for the centers and Cream for the petals. Leave a 15-in/38-cm attachment tail on each flower.
Rnd 1: With Golden Yellow, make a magic ring, ch 1, and work 5 sc in the ring; join — 5 sc. Fasten off.
Rnd 2: Join Cream. Rep (sl st in next st, ch 2, 3 dc in same st, ch 2, sl st in same st) 5 times — 5 petals. Fasten off with the attachment tail.
Assembly
- Block all flat pieces to the stated measurements without stretching.
- Place the dress bodices RS together. Sew each 18-st shoulder seam. Beginning at the lower edge, sew each side seam through Rows 1–8 only; leave Rows 9–16 open for the armholes. Secure the seam tails by weaving them in opposite directions.
- Quarter-mark the bodice lower edge and the skirt foundation edge. With RS together, align the skirt join with the center back. The bodice provides 54 front plus 54 back stitch positions, exactly matching the skirt’s 108 foundation stitches. Using the skirt’s 30-in/76-cm tail and mattress stitch or whip stitch, sew one skirt stitch to one bodice stitch around. Secure and weave in the tail.
- Place the bolero fronts and back RS together. Sew each 15-st front shoulder to the corresponding marked back shoulder. Beginning at each lower edge, sew the side seams through Rows 1–14; leave Rows 15–24 open for the armholes. Work both sleeves directly into these openings as instructed.
- With Cream, work one restrained finishing rnd of sc around the continuous bolero lower edge, front openings, and neckline. Place 1 sc in each foundation stitch, 2 sc around each dc row end, and 1 sc in each back-neck stitch. Place 3 sc in each lower-front corner. No universal total applies to this pickup rnd; keep it flat and make both fronts symmetrical. Fasten off and weave in.
- Make and secure the button loop at the right-front upper corner. Lay the bolero flat with the fronts aligned. Sew the button to the left front directly opposite the loop using doubled sewing thread. Pass through the button and fabric at least six times, knot on the WS, and bury the thread ends.
- Center the large flower on the belt band at Row 75. Center one small flower approximately 1.5 in/4 cm to each side. Using each Cream tail, sew around the flower center and through several petal bases without sewing the petal tips flat. Knot discreetly on the WS and weave the tails in separate directions. Use each Golden Yellow center tail to reinforce the center through the belt.
Finishing
Weave in every remaining tail. Wet-block gently, shaping all scallops and petals, and allow every piece to dry completely. The flower belt remains removable and is not sewn to the dress. Tie it at the back in a secure bow.
Customization
The safest visual customizations are changing the three-color palette or omitting the removable belt during wear; neither changes the written construction. To alter skirt or sleeve length, first reproduce the stated gauge and plan additions or removals only in even dc sections while preserving the final stitch count required by the scalloped edging. Any change to circumference, bodice depth, armhole depth, neckline, or overall size requires a complete mathematical redraft and a new fit sample. Do not simply add stitches to the foundation chains because the shoulder, waist, skirt, sleeve, and assembly counts depend on one another.
Common Mistakes to Avoid
- Counting the turning ch 3 inconsistently. It counts as the first dc on bodice and bolero rows.
- Twisting the skirt foundation chain before joining it.
- Missing one of the 12 increases on a skirt increase rnd.
- Closing too many dress or bolero side-seam rows and making the armholes too small.
- Picking up more or fewer than 40 sleeve stitches.
- Forcing the bolero perimeter edging to match an invented stitch total instead of using the stated pickup ratio.
- Attaching flowers through their petal tips, which prevents the petals from remaining dimensional.
- Weaving in sewing tails before assembly.
Troubleshooting
Why is the dress too wide or too narrow?
Recheck the blocked stitch gauge. At 18 dc per 4 in/10 cm, each 54-st bodice panel should be about 12 in/30.5 cm wide. A different stitch gauge changes both the chest and the skirt-to-bodice seam.
Why does the skirt ripple before the planned increases?
The foundation chain may be too loose, the working gauge may have changed, or an extra stitch may have been added at the join. Confirm 108 dc after Rnds 1–3 and count the beg ch 3 only once.
Why does a sleeve pucker at the armhole?
Confirm that the armhole was left open through Bolero Rows 15–24 and that exactly 40 dc were distributed as 20 across the front row ends and 20 across the back row ends. Redistribute those 40 pickups more evenly without changing the total.
Why is the bolero edging waving or pulling?
Two sc around every dc row end is the planned pickup ratio, but edge tension still matters. Work more loosely if the edge pulls and more firmly if it waves, while keeping the two fronts symmetrical.
Why will the button not pass through the loop securely?
Test the ch-8 loop against the 5/8-in/16-mm button before final fastening. The loop should pass over the button with gentle pressure and then sit snugly beneath it.
Why do the scallops not divide evenly?
Confirm the base count first. The skirt requires 180 sts for 30 six-stitch repeats. Each sleeve requires 28 sts for four seven-stitch repeats.
Care Instructions
Launder according to the yarn label. Use a gentle method suitable for the chosen fiber, reshape the garment, scallops, and flowers, and dry flat. Do not hang the wet garment. Inspect the button, loop, flower attachments, belt ties, and seams before every wear.
This garment has a button and long belt ties. It is not sleepwear. Use only with adult supervision, and keep the belt ties securely bowed.
Frequently Asked Questions
What size does this pattern make?
It is drafted as an approximate child size 4–5, with a 24-in/61-cm finished chest and approximately 2 in/5 cm of intended positive ease.
Is the belt sewn to the dress?
No. The flower belt is removable and ties securely at the back.
Are the sleeves sewn separately?
No. After the bolero shoulders and sides are assembled, each sleeve is worked directly into an armhole beginning with exactly 40 evenly distributed dc.
Can I use a different yarn weight?
Not without redrafting. Use a smooth, washable category 3 yarn and select the hook needed to match the stated blocked gauge.
Does the pattern use stuffing?
No. None of the components is stuffed.
Has this pattern been fit-tested?
No. The stitch mathematics and assembly relationships have been checked, but the design has not been physically crocheted or tested on a wearer. Make a sample and verify fit, neckline comfort, armhole pickup distribution, drape, yardage, and sleeve length before publication or gifting.