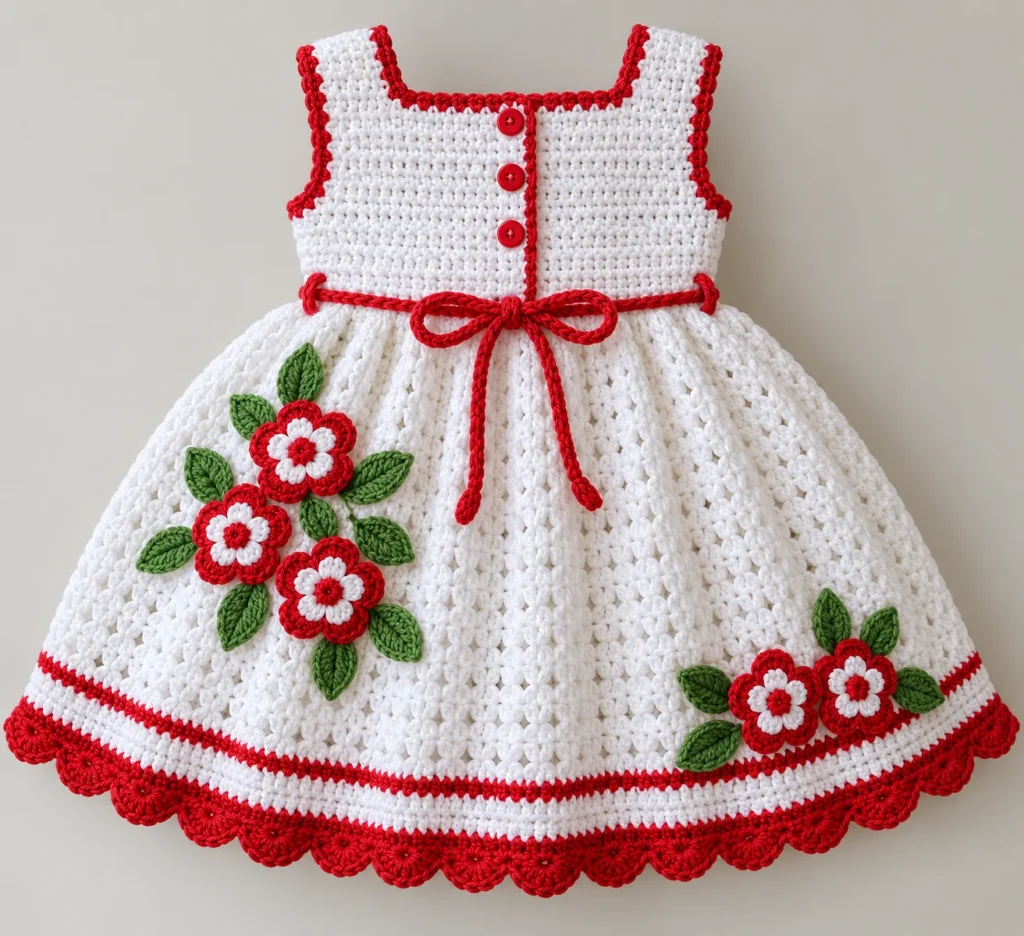
Red and White Crochet Baby Dress Pattern With Flowers
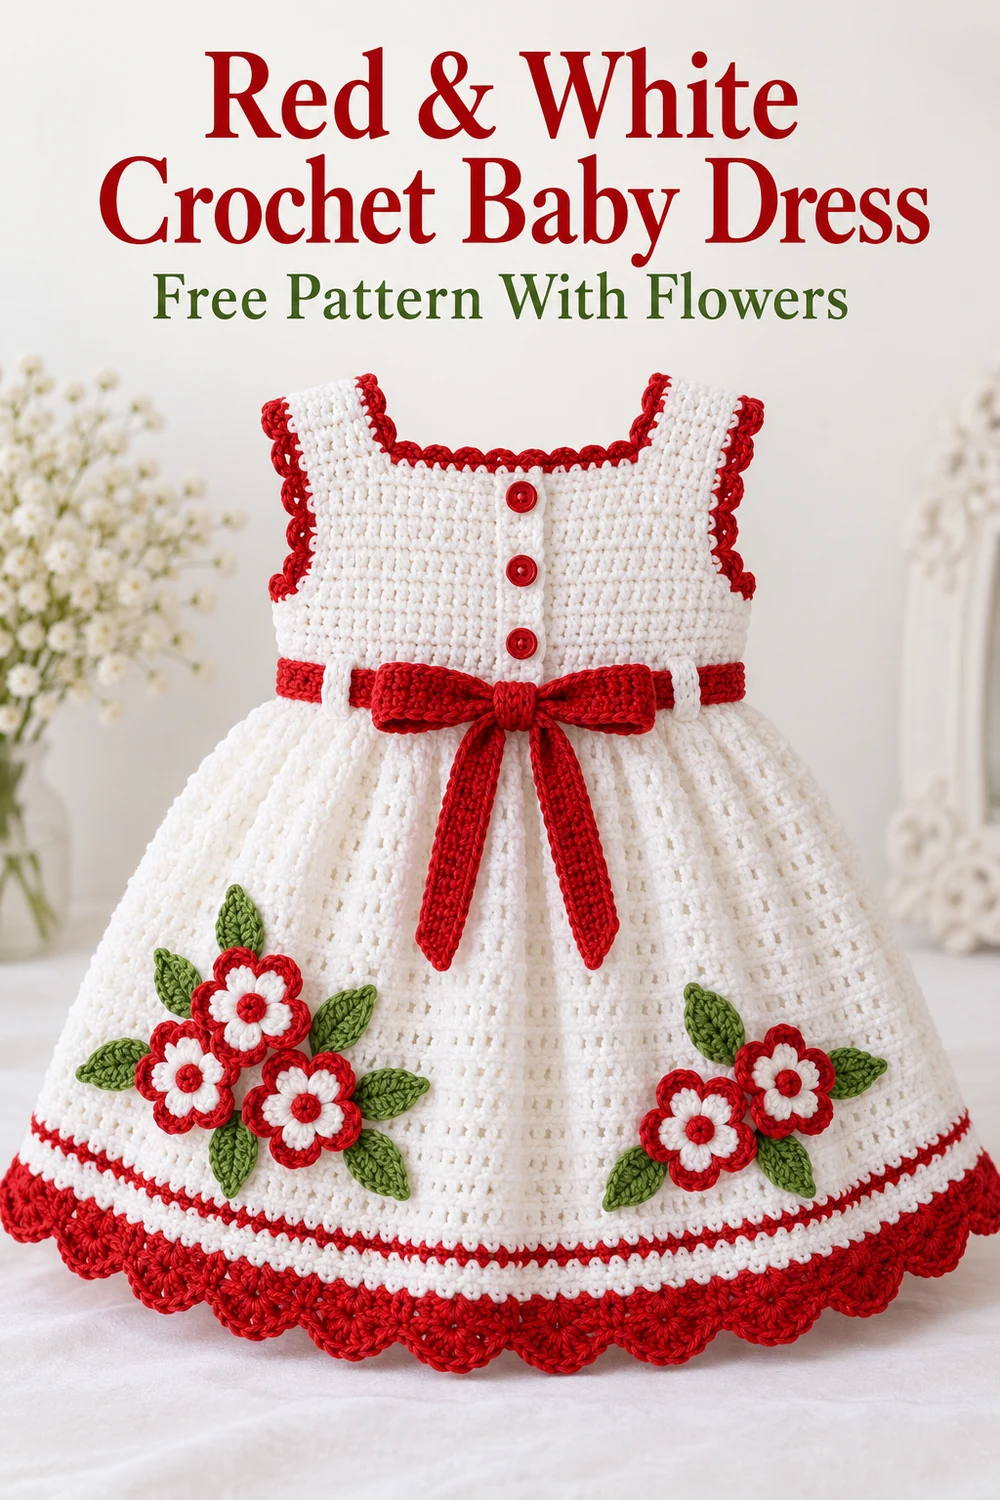
This original free crochet pattern creates a sleeveless baby dress with a fitted white square-neck bodice, a full white skirt, two red accent rounds, a red scalloped hem, and securely sewn floral decorations. The integral shoulder straps, center-back button opening, and decorative waist tie give the dress a polished finish without adding separate sleeves or a sewn waistband.
The pattern uses US crochet terminology and is designed for an intermediate crocheter. It is intended to fit approximately 6–12 months, but babies vary considerably, so choose the size by the finished measurements and the child’s actual measurements rather than age alone. The design has not been physically crocheted or wear-tested.
Pattern at a Glance
- Skill level: Intermediate
- Terminology: US crochet terms
- Construction: Three flat bodice pieces are seamed at the sides and shoulders. The skirt is worked downward in joined rounds from the assembled waist.
- Main color: White
- Accent colors: Red flowers, trim, stripes, hem, tie, and belt loops; green leaves
- Fit: Approximately 6–12 months, with 1–2 in/2.5–5 cm positive ease
- Special techniques: Foundation single crochet, shaping with sc2tog, working joined rounds, color changes, applied edgings, and sewn appliques
Visible Component Inventory
- 1 white front bodice with 2 integral shoulder straps
- 2 white back bodice halves, each with 1 integral shoulder strap
- 1 joined white skirt with 2 red accent rounds and a red scalloped hem
- 2 red armhole edgings
- 1 red neckline and back-opening edging with 3 integral button loops
- 3 securely sewn red buttons
- 1 red crocheted waist tie
- 2 red crocheted belt loops
- 5 red-and-white five-petal crochet flowers
- 10 green crochet leaves
Materials You’ll Need
- DK/light worsted weight, machine-washable yarn: Color A, white, approximately 500 yd/457 m
- DK/light worsted weight, machine-washable yarn: Color B, red, approximately 180 yd/165 m
- DK/light worsted weight, machine-washable yarn: Color C, leaf green, approximately 35 yd/32 m
- US G/6 (4 mm) crochet hook, or size needed to obtain gauge
- Yarn needle
- Stitch markers
- Scissors
- 3 flat red buttons, each 1/2 in/13 mm in diameter
- Rustproof sewing thread or matching yarn suitable for securing the buttons
Choose a smooth, baby-safe yarn with clearly identified fiber content and care instructions. No stuffing is used.
Gauge
18 sc and 20 sc rows = 4 in/10 cm after washing and blocking.
16 dc and 9 dc rows = 4 in/10 cm after washing and blocking.
Make, wash, and dry a generous swatch before beginning. Change hook size if necessary. Both stitch gauge and row gauge matter because they determine the chest, bodice length, armhole depth, and skirt length.
Finished Measurements
- Chest circumference: approximately 20 in/51 cm
- Waist circumference: approximately 20 in/51 cm
- Bodice length from shoulder to waist: approximately 7 in/18 cm
- Armhole depth: approximately 4.5 in/11.5 cm
- Skirt length from waist: approximately 10 in/25.5 cm
- Total dress length: approximately 17 in/43 cm
- Recommended positive ease: approximately 1–2 in/2.5–5 cm
Before attaching buttons or appliques, compare the blocked bodice chest and armhole depth with the intended child’s measurements.
Crochet Abbreviations
- beg = beginning
- ch = chain
- dc = double crochet
- fdc = foundation double crochet
- FO = fasten off
- hdc = half double crochet
- inc = increase
- rep = repeat
- rnd = round
- RS = right side
- sc = single crochet
- sc2tog = single crochet 2 together
- sk = skip
- sl st = slip stitch
- sp = space
- st(s) = stitch(es)
- WS = wrong side
Note: The approved construction begins with foundation single crochet, written below as “Fsc,” although the supplied abbreviation inventory lists “fdc.” The alternative starting-chain method is included for every foundation row, so no foundation-crochet technique is required.
Important Pattern Notes
- Ch 1 does not count as a stitch.
- Ch 2 at the beginning of a dc row or round does not count as a stitch.
- Join rounds with a sl st to the first stitch unless instructed otherwise.
- Turn after every flat row.
- Place the first stitch in the first stitch unless instructed otherwise.
- Stitch counts exclude chains used only for turning.
- The front and two back halves begin at the waist and are worked upward.
- The shoulder straps are integral to the bodice pieces.
- The center-back opening remains open above the waist. The first skirt round closes the lower edge into a round.
- Leave all specified sewing tails. Do not use glue for any component.
- Variable edging counts must be fitted to the blocked fabric. Use the same first-round count on both armholes.
- Read the complete pattern and safety notes before starting.
Complete Free Crochet Pattern
Front Bodice and Integral Straps
Make 1 in Color A. Leave a 24 in/61 cm beginning tail for the waist or side assembly if desired.
Row 1, RS: Fsc 44, turn. If foundation crochet is not used, ch 45, sc in second ch from hook and across, turn. (44 sc)
Row 2: Ch 1, sc across, turn. (44)
Row 3: Ch 1, sc2tog, sc in each st to last 2 sts, sc2tog, turn. (42)
Row 4: Rep Row 3. (40)
Row 5: Rep Row 3. (38)
Row 6: Rep Row 3. (36)
Row 7: Rep Row 3. (34)
Rows 8–22: Ch 1, sc across, turn. (34)
Left Integral Shoulder Strap
Row 23: Ch 1, sc in first 8 sts, turn, leaving 26 sts unworked. (8)
Rows 24–34: Ch 1, sc across, turn. (8)
FO, leaving a 20 in/51 cm shoulder-seaming tail.
Right Integral Shoulder Strap
Row 23: With RS facing, skip the center 18 neckline sts after the left strap and join Color A in the next st. Ch 1, sc in that st and each of the final 7 sts, turn. (8)
Rows 24–34: Ch 1, sc across, turn. (8)
FO, leaving a 20 in/51 cm shoulder-seaming tail.
Count check: 8 left-strap sts + 18 unworked neckline sts + 8 right-strap sts = 34 sts.
Two Mirrored Back Bodice Halves and Integral Straps
Make 2 in Color A. The same instructions make both pieces. Flip one half during assembly so the straight edges form the center-back opening and both decreased edges face the armholes.
Row 1, RS: Fsc 22, turn. Alternatively, ch 23, sc in second ch from hook and across, turn. (22 sc)
Row 2: Ch 1, sc across, turn. (22)
Row 3: Ch 1, sc2tog, sc across, turn. (21)
Row 4: Ch 1, sc2tog, sc across, turn. (20)
Row 5: Ch 1, sc2tog, sc across, turn. (19)
Row 6: Ch 1, sc2tog, sc across, turn. (18)
Row 7: Ch 1, sc2tog, sc across, turn. (17)
Rows 8–22: Ch 1, sc across, turn. (17)
Integral Back Strap
Row 23: Ch 1, sc in first 8 sts, turn, leaving 9 inner-neck sts unworked. (8)
Rows 24–34: Ch 1, sc across, turn. (8)
FO, leaving a 20 in/51 cm shoulder-seaming tail. Arrange the pieces with both decreased edges at the armholes and both 9-st unworked sections at the back neckline.
Count check: 8 strap sts + 9 unworked inner-neck sts = 17 sts on each back half.
Bodice Side and Shoulder Assembly
Gently block all three bodice pieces to the finished measurements before seaming. With WS together, use mattress stitch to sew each front side edge to the decreased outer edge of one back half, working from the waist through Row 22. Sew each 8-st front strap end to its corresponding 8-st back strap end. Keep both center-back edges completely open. Weave in the side- and shoulder-seam tails securely.
At the waist there are 44 front foundation stitches and 22 foundation stitches on each back half: 44 + 22 + 22 = 88 stitches.
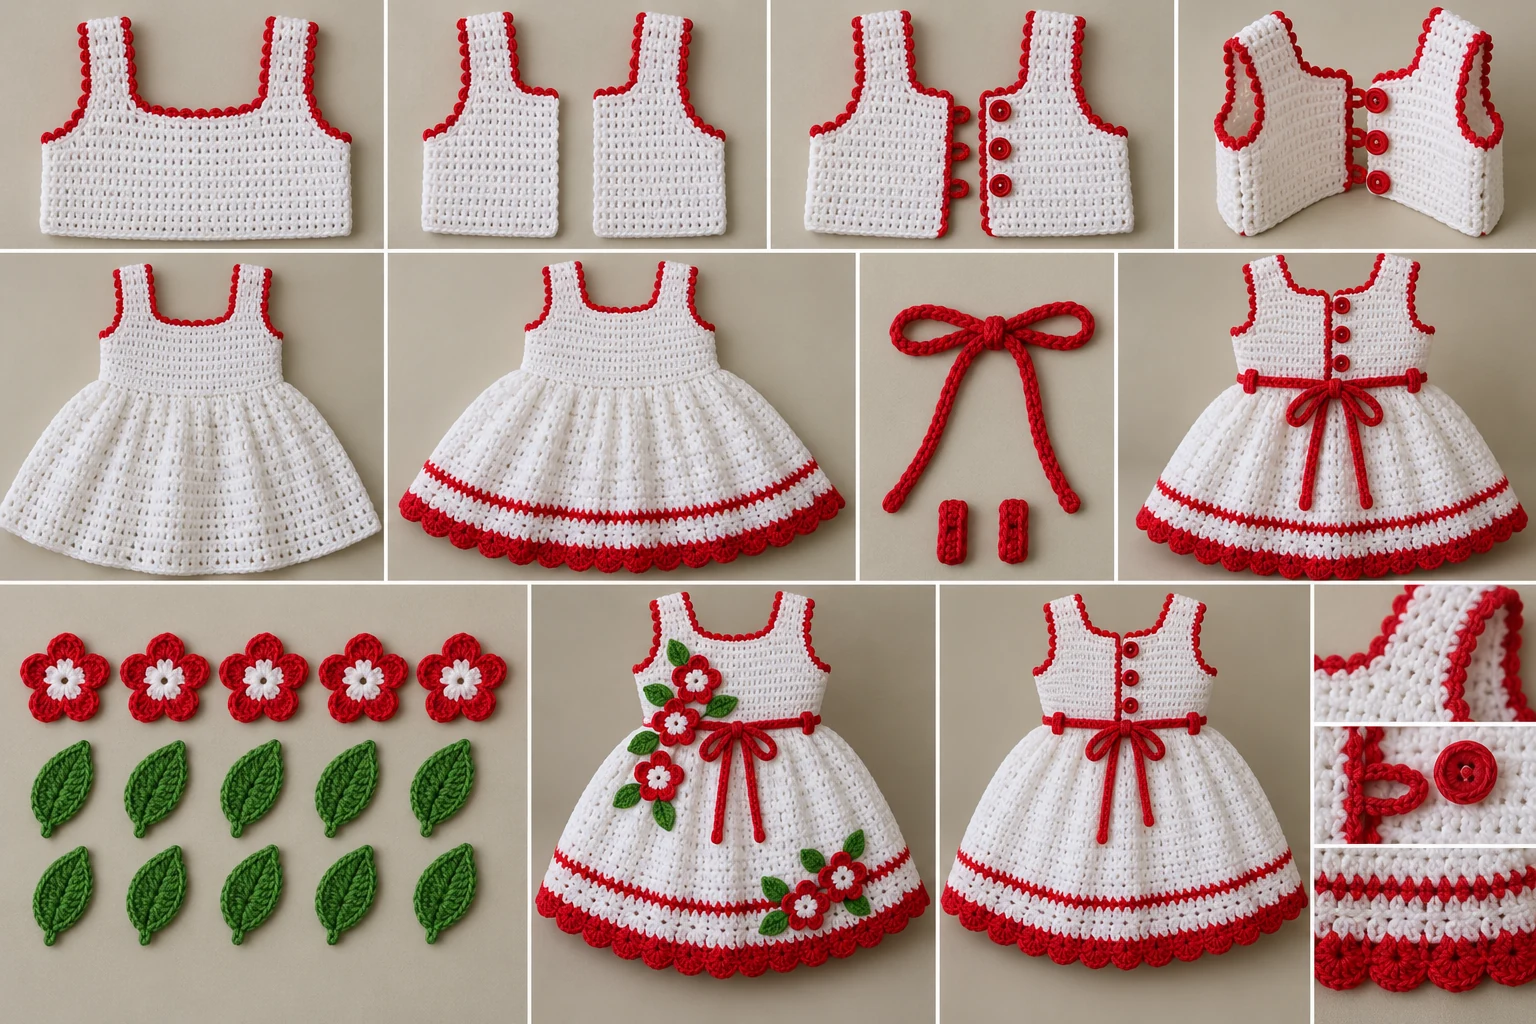
Skirt Setup, Increases, Straight Rounds, Color Changes, and Scalloped Hem
Work the skirt downward from the assembled bodice waist. With the bodice RS facing and the lower edge uppermost, join Color A at the center-back edge of the right back half. Work across both back halves and the front, placing exactly 1 stitch in each foundation stitch. The round closes across the center-back gap at waist level; the opening remains above it.
Rnd 1: Ch 1, sc in each of the 88 foundation sts; join. (88 sc)
Rnd 2: Ch 2, 2 dc in each st around; join. (176 dc)
Rnd 3: Ch 2, dc in each st around; join. (176)
Rnd 4: Ch 2, *dc in next 7 sts, 2 dc in next st; rep from * 22 times; join. (198)
Rnd 5: Ch 2, dc in each st around; join. (198)
Rnd 6: Rep Rnd 5. (198)
Rnd 7: Ch 2, *dc in next 8 sts, 2 dc in next st; rep from * 22 times; join. (220)
Rnds 8–10: Ch 2, dc in each st around; join. (220)
Change to Color B during the final yarn-over of the last stitch of Rnd 10. Cut Color A, leaving a 6 in/15 cm tail.
Rnd 11, Color B: Ch 2, dc in each st around; join. (220)
Change to Color A. Cut Color B, leaving a 6 in/15 cm tail.
Rnds 12–16, Color A: Ch 2, dc in each st around; join. (220)
Change to Color B after Rnd 16.
Rnd 17, Color B: Ch 2, dc in each st around; join. (220)
Change to Color A and cut Color B.
Rnds 18–21, Color A: Ch 2, dc in each st around; join. (220)
Change to Color B and cut Color A.
Rnd 22, scalloped hem: Ch 1, *sc in next st, sk next st, 5 dc in next st, sk next st; rep from * 55 times; join to first sc. (55 sc and 55 five-dc scallops)
FO Color B, leaving a 6 in/15 cm tail. Weave all color-change tails into the WS.
Count checks: Rnd 2 has 88 × 2 = 176 dc. Rnd 4 has 22 repeats of 9 stitches = 198 dc. Rnd 7 has 22 repeats of 10 stitches = 220 dc. Each hem repeat uses 4 base stitches, and 220 ÷ 4 = 55 scallops.
Armhole Edgings
Make 2 in Color B. With RS facing, join Color B at the underarm seam. Ch 1 and work sc evenly around the complete armhole, aiming for approximately 2 sc per 3 row ends and keeping the edge flat. Join to the first sc. Work 1 additional round of sc in every st, join, and FO with a 6 in/15 cm tail.
Repeat around the second armhole using the same first-round stitch count as the first. The exact count depends on the blocked row-edge tension and is intentionally not fixed.
Neckline, Back-Opening Edging, and Three Button Loops
Use Color B. With RS facing, join Color B at the lower-left center-back waist opening. Work sc evenly up the left back opening, across the back neckline, along both strap-neck edges and the front neckline, across the second back neckline, and down the right back opening to the waist. Use approximately 2 sc per 3 row ends on vertical edges and 1 sc in each exposed stitch. Keep the edging flat. Ch 1 and turn.
Return row: Sc upward along the right back opening. At positions approximately 3/4 in/2 cm, 2 1/4 in/5.5 cm, and 3 3/4 in/9.5 cm above the waist, make a loop by ch 6, sk no edging stitches, and sl st back into the same last-worked sc. Continue sc along the edging after each loop. Work sc around the complete neckline and down the left back opening.
There are exactly 3 chain-6 loops. Test each loop against its selected button before fastening off; the button should pass through with gentle resistance. Adjust loop length if the yarn behaves differently. FO with a 12 in/30 cm tail and weave it in securely.
Button Attachment
Lay the dress flat and align the back edges without stretching or overlapping them. Mark the left back opening directly opposite the 3 loops. Sew 1 button at each mark with strong matching yarn or rustproof thread. Pass through every button hole at least 6 times, knot securely on the WS, and bury the ends between stitches.
Inspect the buttons before every wear. If the dress may be used for unsupervised sleep, omit the buttons and sew the back opening closed instead.
Red Crocheted Waist Tie
Make 1 in Color B. Leave a 10 in/25 cm beginning tail. Ch 181. Sl st in second ch from hook and in each remaining ch. (180 sl sts)
FO, leaving a 10 in/25 cm tail. Thread each tail through a yarn needle, pass it back through at least 2 in/5 cm of the cord, and trim. The finished tie is approximately 40 in/102 cm long. Shorten it if necessary for safety. This tie is decorative and must never be tightened around a child.
Red Crocheted Belt Loops
Make 2 in Color B. Leave an 8 in/20 cm beginning tail. Ch 13. Sc in second ch from hook and across. (12 sc)
FO, leaving an 8 in/20 cm tail. Position 1 loop vertically over each side seam, centered across the bodice-and-skirt waist seam. Use the two tails to sew both short ends firmly to the waist, leaving the center free for the tie. Weave in the tails. Pass the tie through both loops and make a loose bow at center front only while the child is supervised.
Five Red-and-White Flowers
Make 3 flowers with Color B petals and Color A centers. Make 2 flowers with Color A petals and Color B centers. For every flower, leave a 12 in/30 cm tail in the petal color for sewing.
Center: With the center color, make a magic ring.
Rnd 1: Ch 1, work 5 sc in ring; join to first sc. (5 sc) Pull the ring tightly and secure the starting tail.
Join the petal color in any sc.
Rnd 2: *Sc in next sc, ch 3, 2 dc in the same sc, ch 3, sl st in the same sc; rep from * in each of the 5 sc. (5 petals)
FO with the 12 in/30 cm sewing tail.
Ten Green Leaves
Make 10 in Color C. Leave a 10 in/25 cm sewing tail. Ch 7.
Rnd 1: Sc in second ch from hook, hdc in next ch, dc in next 3 ch, hdc in last ch; rotate to work along the unused loops on the opposite side of the foundation chain; hdc in the same end ch, dc in next 3 ch, hdc in next ch, sc in final ch; join to first sc. (12 sts: 2 sc, 4 hdc, 6 dc)
FO with a second 10 in/25 cm tail. Retain both tails so the leaf base and tip can be secured during assembly.
Assembly
Flower and Leaf Placement
Arrange 3 flowers in a shallow cluster on the front-left skirt. Place the highest flower approximately 1 in/2.5 cm below the waist and keep every piece clear of the belt loop. Arrange the remaining 2 flowers on the front-right skirt approximately 2 in/5 cm above the scalloped hem.
Place 2 leaves beneath or beside each flower, using all 10 leaves. Pin every component temporarily and lift the dress to confirm that the skirt still hangs freely.
Use each flower’s petal-color tail to sew around the center and catch the outer tip of every petal. Use both leaf tails to sew the base, center spine, and tip of each leaf. Knot securely on the WS and bury each tail through at least 1 in/2.5 cm of dense fabric. Do not rely on glue.
Finishing
Weave in every remaining tail on the WS, changing direction at least once. Wash the dress according to the yarn label, shape it to the stated measurements, and dry it flat.
After drying, confirm that the side and shoulder seams lie flat, both armholes match, the center-back opening works freely, all 3 button loops are firm, the buttons and appliques cannot be pulled loose, and the tie slides through both belt loops. Recheck every attached piece before each wear because loose buttons or appliques are hazardous on infant clothing.
Customization
Safe customization should preserve the construction and stitch counts. You may substitute another washable DK/light worsted yarn after matching both gauges, reverse the red-and-white flower combinations, or choose a different contrasting color for Color B or Color C. You may also omit the decorative tie, buttons, flowers, or leaves; omitting a component is safer than attaching it insecurely.
Do not add skirt rounds or alter the bodice stitch counts casually. Changes affect proportions, yarn requirements, hem divisibility, and fit. If you need a different size, treat it as a full pattern grading project and recalculate the bodice, armholes, skirt increases, and hem repeat together.
Common Mistakes to Avoid
- Counting the ch-1 or ch-2 turning chains as stitches.
- Working a back decrease at the center-back edge instead of the outer armhole edge.
- Joining the center-back bodice opening above the waist.
- Missing a foundation stitch in Skirt Rnd 1; the round must contain exactly 88 sc.
- Losing an increase in Rnd 4 or Rnd 7, which prevents the 220-stitch hem from dividing into 55 repeats.
- Pulling armhole or neckline edging stitches too tightly and causing puckering.
- Failing to use the same first-round count on both armholes.
- Making the chain-6 loops without testing the actual buttons.
- Sewing only the centers of the flowers or only the bases of the leaves.
- Allowing the decorative tie to become tight around the child.
Troubleshooting
My bodice is too wide or too narrow.
Check the washed sc gauge. The front and back stitch counts must remain unchanged, so adjust the hook size or choose a yarn that produces 18 sc per 4 in/10 cm.
The armhole edging ripples.
Too many stitches were placed along the row ends. Remove the edging and work fewer stitches while keeping the fabric flat. Use that corrected count on the second armhole.
The armhole or neckline pulls inward.
The edging is too tight. Use slightly more evenly spaced stitches or a larger hook for the edging, without changing the underlying bodice.
My skirt count is wrong after an increase round.
Place a marker at the start and after every repeat. Rnd 4 must contain 22 repeats of 7 dc followed by an increase, producing 198 stitches. Rnd 7 must contain 22 repeats of 8 dc followed by an increase, producing 220 stitches.
The scallops do not meet evenly.
Confirm that Rnd 21 has exactly 220 stitches. Each scallop repeat consumes 4 base stitches, so the hem must contain exactly 55 repeats.
A button loop is loose or too small.
Test the loop before fastening off. Adjust the loop chain length for the actual yarn and button while retaining exactly 3 loops. Each button should pass through with gentle resistance and must not slip through accidentally.
The appliques make the skirt sag.
Reposition them so their weight is balanced, sew without pulling the skirt fabric, and confirm that each flower and leaf lies flat while the skirt hangs freely.
Care Instructions
Follow the yarn manufacturer’s washing instructions. A machine-washable baby-safe yarn is recommended, but gentle washing in a mesh laundry bag helps protect the scallops and appliques. Reshape the dress to its finished measurements and dry flat. Do not hang it while wet.
Before every wear, pull gently on every button, flower, leaf, belt loop, and tie attachment. Stop using the garment immediately if any piece loosens. The dress is not sleepwear, and the tie should be used only as a loose decorative bow under direct supervision.
Frequently Asked Questions
What size does this baby dress fit?
It is intended for approximately 6–12 months, with a finished chest of about 20 in/51 cm. Measure the child and allow approximately 1–2 in/2.5–5 cm positive ease rather than relying on age.
Can a beginner make this pattern?
An adventurous beginner familiar with shaping, joined rounds, color changes, and sewing may be successful, but the recommended skill level is intermediate.
Do I have to use foundation single crochet?
No. The pattern provides a standard starting-chain alternative for both the front and back bodice pieces.
Why is there no exact stitch count for the edgings?
The edgings are worked into blocked row ends, and row-end tension varies. Fitting approximately 2 sc per 3 row ends produces a flatter result than asserting an unreliable universal count. The two armholes should use matching first-round counts.
Can I replace the buttons with snaps?
That would change the approved closure and is not covered by this pattern. If using the specified buttons, attach all 3 securely and inspect them before every wear. For unsupervised sleep, omit the buttons and sew the opening closed.
Can I leave off the waist tie?
Yes. The tie is decorative and may be omitted without changing the dress construction.
Has the pattern been tested?
No. Its stitch arithmetic and assembly sequence have been checked, but the dress has not been physically crocheted or wear-tested. Make and wash a gauge swatch, compare the blocked bodice with the intended child, and inspect all closures and decorations carefully.