Rainbow Joy & Ultimate Cuteness
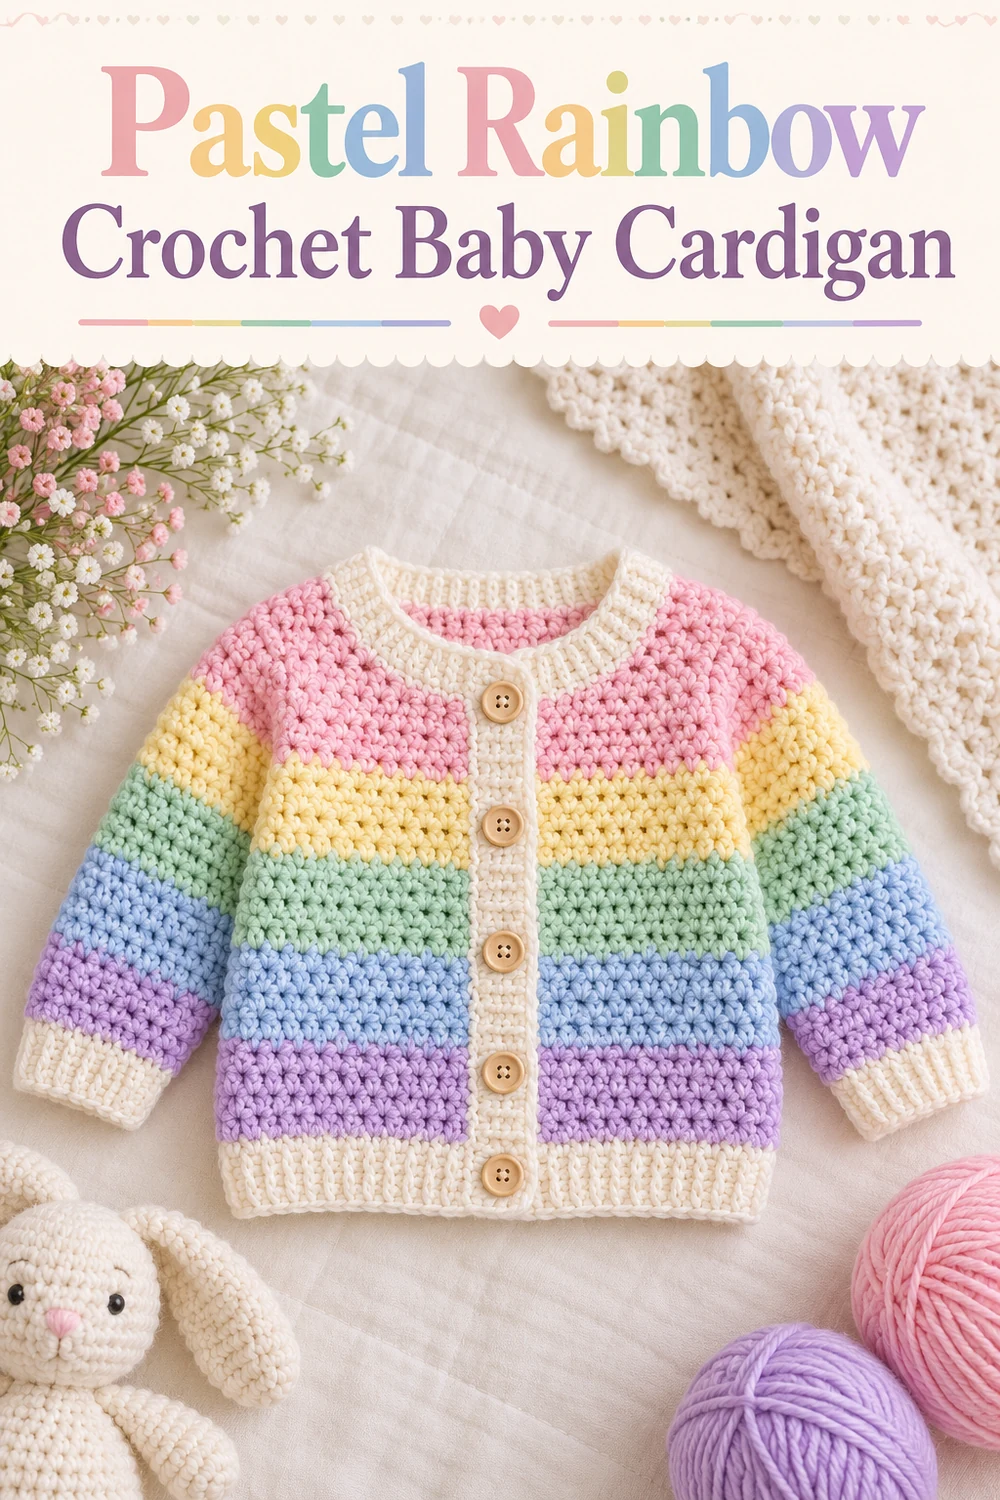
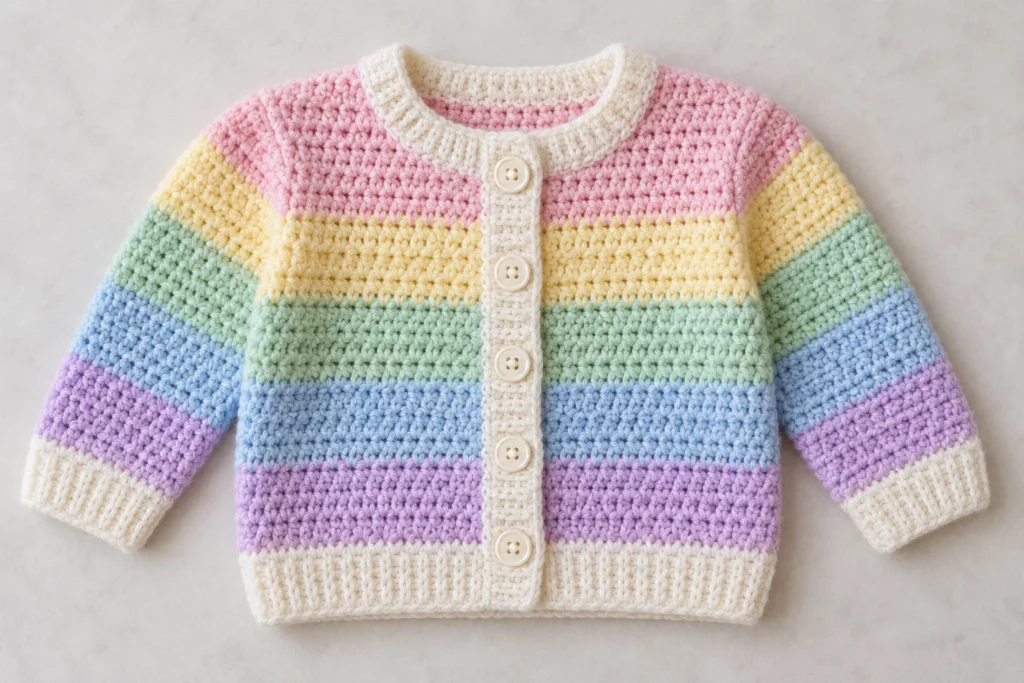
This Pastel Rainbow Crochet Baby Cardigan Pattern creates a classic button-front cardigan for a baby or toddler in one fully specified 12–18 month size. Soft pink, yellow, green, blue, and lavender stripes meet cream ribbed-look trim, a rounded crew neckline, long sleeves, and five buttons. The design is original and mathematically checked, but it has not been physically tested.

Pattern at a Glance
- Skill level: Confident beginner/intermediate
- Terminology: US crochet terms
- Size: 12–18 months
- Construction: Separate back, symmetrical fronts, and two flat sleeves; seamed shoulders, sides, sleeves, and armholes
- Main stitch: Single crochet
- Trim: Cream/off-white BLO single crochet
- Fit: Approximately 2–3 in (5–7.5 cm) positive ease
- Buttons: Five washable 1/2 in (13 mm) buttons
Materials You’ll Need
- DK/light worsted category 3 yarn, smooth and washable: approximately 650 yd (594 m) total
- Cream/off-white (C): 250 yd (229 m)
- Pastel pink (P): 80 yd (73 m)
- Pastel yellow (Y): 80 yd (73 m)
- Pastel green (G): 80 yd (73 m)
- Pastel blue (B): 80 yd (73 m)
- Pastel lavender (L): 80 yd (73 m)
- US G/6 (4 mm) crochet hook, or size required for gauge
- Tapestry needle, stitch markers, and scissors
- Five washable 1/2 in (13 mm) buttons
- Strong matching sewing thread and sewing needle
Use soft pastel shades rather than saturated primary colors. Using the same yarn line and fiber for every color will help the fabric behave consistently.
Gauge
16 sc and 18 rows = 4 in (10 cm) in standard single crochet after washing and drying as the cardigan will be treated. One stitch measures 0.25 in, and one row measures approximately 0.222 in.
Make a swatch at least 20 stitches wide and 24 rows tall. Wash, dry, and measure it before beginning. Change hook size if necessary because gauge determines the finished fit.
Finished Measurements
- Chest circumference: approximately 22 in (56 cm), excluding button-band overlap
- Back width: 11 in (28 cm)
- Body length: 10 in (25.5 cm)
- Armhole depth: 4 in (10 cm)
- Sleeve underarm length including cuff: approximately 9.25 in (23.5 cm)
- Upper sleeve circumference: 8 in (20.5 cm)
- Each front/button band: approximately 1.25 in (3 cm) wide
Measure the intended child and compare these measurements with a well-fitting garment. Choose by measurements rather than age alone.
Crochet Abbreviations
- BLO: back loop only
- ch: chain
- FO: fasten off
- rep: repeat
- RS: right side
- sc: single crochet
- sc2tog: single crochet 2 stitches together
- sk: skip
- sl st: slip stitch
- st(s): stitch(es)
- WS: wrong side
Special Stitches
Sc2tog: Insert the hook in the next stitch, yarn over and pull up a loop, insert the hook in the following stitch, yarn over and pull up a loop, then yarn over and draw through all three loops. Two stitches become one.
Standing sc: Place a slipknot on the hook, insert the hook in the indicated location, yarn over and pull up a loop, then yarn over and draw through both loops.
Important Pattern Notes
- Turning chains never count as stitches.
- The stripe sequence is P, Y, G, B, L, then it repeats from P.
- Complete the last yarn-over of the final sc before a color change with the new color.
- Because each stripe is five rows deep, cut the old color at every change and leave a 6 in (15 cm) tail.
- Work over no more than 1 in (2.5 cm) of a tail, then weave the remainder securely later.
- Keep the first and last stitches identifiable so no stitches are accidentally lost.
- All front shaping is worked at the center opening edge. The two fronts mirror one another.
- Compare the garment and sleeve measurements with the intended child before assembly.
Complete Free Crochet Pattern
Back Panel
With C, ch 45.
Row 1 (RS): Sc in second ch from hook and in each ch across; turn. 44 sc.
Rows 2–6: Ch 1, sc in BLO of each st across; turn. 44 sc. This forms the cream lower hem.
Rows 7–11: Join P. Ch 1, sc in each st across; turn. 44 sc.
Rows 12–16: With Y, work even in sc. 44 sc.
Rows 17–21: With G, work even in sc. 44 sc.
Rows 22–26: With B, work even in sc. 44 sc.
Rows 27–31: With L, work even in sc. 44 sc.
Rows 32–36: With P, work even in sc. 44 sc.
Rows 37–41: With Y, work even in sc. 44 sc.
Rows 42–45: With G, work even in sc. 44 sc.
FO, leaving a 24 in (61 cm) sewing tail. Mark the center 16 stitches along the final row for the back neck. The 14 stitches on either side are the shoulders.
Left Front Panel
The opening edge is at the beginning of every RS row. With C, ch 23.
Row 1 (RS): Sc in second ch from hook and across; turn. 22 sc.
Rows 2–6: Ch 1, sc BLO across; turn. 22 sc.
Rows 7–11 P; Rows 12–16 Y; Rows 17–21 G; Rows 22–26 B; Rows 27–31 L; Rows 32–36 P: Ch 1, sc across; turn. 22 sc after every row.
Row 37 (RS, Y): Ch 1, sc2tog over first 2 sts, sc across; turn. 21 sc.
Row 38: Ch 1, sc across to last 2 sts, sc2tog; turn. 20 sc.
Row 39: Ch 1, sc2tog, sc across; turn. 19 sc.
Row 40: Ch 1, sc across to last 2 sts, sc2tog; turn. 18 sc.
Row 41: Ch 1, sc2tog, sc across; turn. 17 sc.
Row 42 (G): Ch 1, sc across to last 2 sts, sc2tog; turn. 16 sc.
Row 43: Ch 1, sc2tog, sc across; turn. 15 sc.
Row 44: Ch 1, sc across to last 2 sts, sc2tog; turn. 14 sc.
Row 45: Ch 1, sc across. 14 sc. FO with a 24 in (61 cm) shoulder-seaming tail.
Right Front Panel
The opening edge is at the end of every RS row. With C, ch 23.
Rows 1–36: Work exactly as for the Left Front through Row 36. 22 sc.
Row 37 (RS, Y): Ch 1, sc across to last 2 sts, sc2tog; turn. 21 sc.
Row 38: Ch 1, sc2tog, sc across; turn. 20 sc.
Row 39: Ch 1, sc across to last 2 sts, sc2tog; turn. 19 sc.
Row 40: Ch 1, sc2tog, sc across; turn. 18 sc.
Row 41: Ch 1, sc across to last 2 sts, sc2tog; turn. 17 sc.
Row 42 (G): Ch 1, sc2tog, sc across; turn. 16 sc.
Row 43: Ch 1, sc across to last 2 sts, sc2tog; turn. 15 sc.
Row 44: Ch 1, sc2tog, sc across; turn. 14 sc.
Row 45: Ch 1, sc across. 14 sc. FO with a 24 in (61 cm) shoulder-seaming tail.
Sleeves (Make 2 Identically)
The sleeves are worked flat from cuff upward. With C, ch 21.
Row 1 (RS): Sc in second ch from hook and across; turn. 20 sc.
Rows 2–6: Ch 1, sc BLO across; turn. 20 sc. This forms the cuff.
Row 7 (P): Ch 1, 2 sc in first st, sc across to last st, 2 sc in last st; turn. 22 sc.
Rows 8–11: Ch 1, sc across; turn. 22 sc.
Row 12 (Y): Increase at both ends as for Row 7. 24 sc.
Rows 13–16: Work even. 24 sc.
Row 17 (G): Increase at both ends. 26 sc.
Rows 18–21: Work even. 26 sc.
Row 22 (B): Increase at both ends. 28 sc.
Rows 23–26: Work even. 28 sc.
Row 27 (L): Increase at both ends. 30 sc.
Rows 28–31: Work even. 30 sc.
Row 32 (P): Increase at both ends. 32 sc.
Rows 33–36: Work even. 32 sc.
Rows 37–41 (Y): Work even. 32 sc.
Rows 42–45 (G): Work even. 32 sc.
FO each sleeve with a 30 in (76 cm) tail for the sleeve and armhole seams. The sleeve color boundaries deliberately match the body row numbers, creating a coordinated stripe rhythm at the drop shoulder.

Assembly
Finishing and Blocking Before Assembly
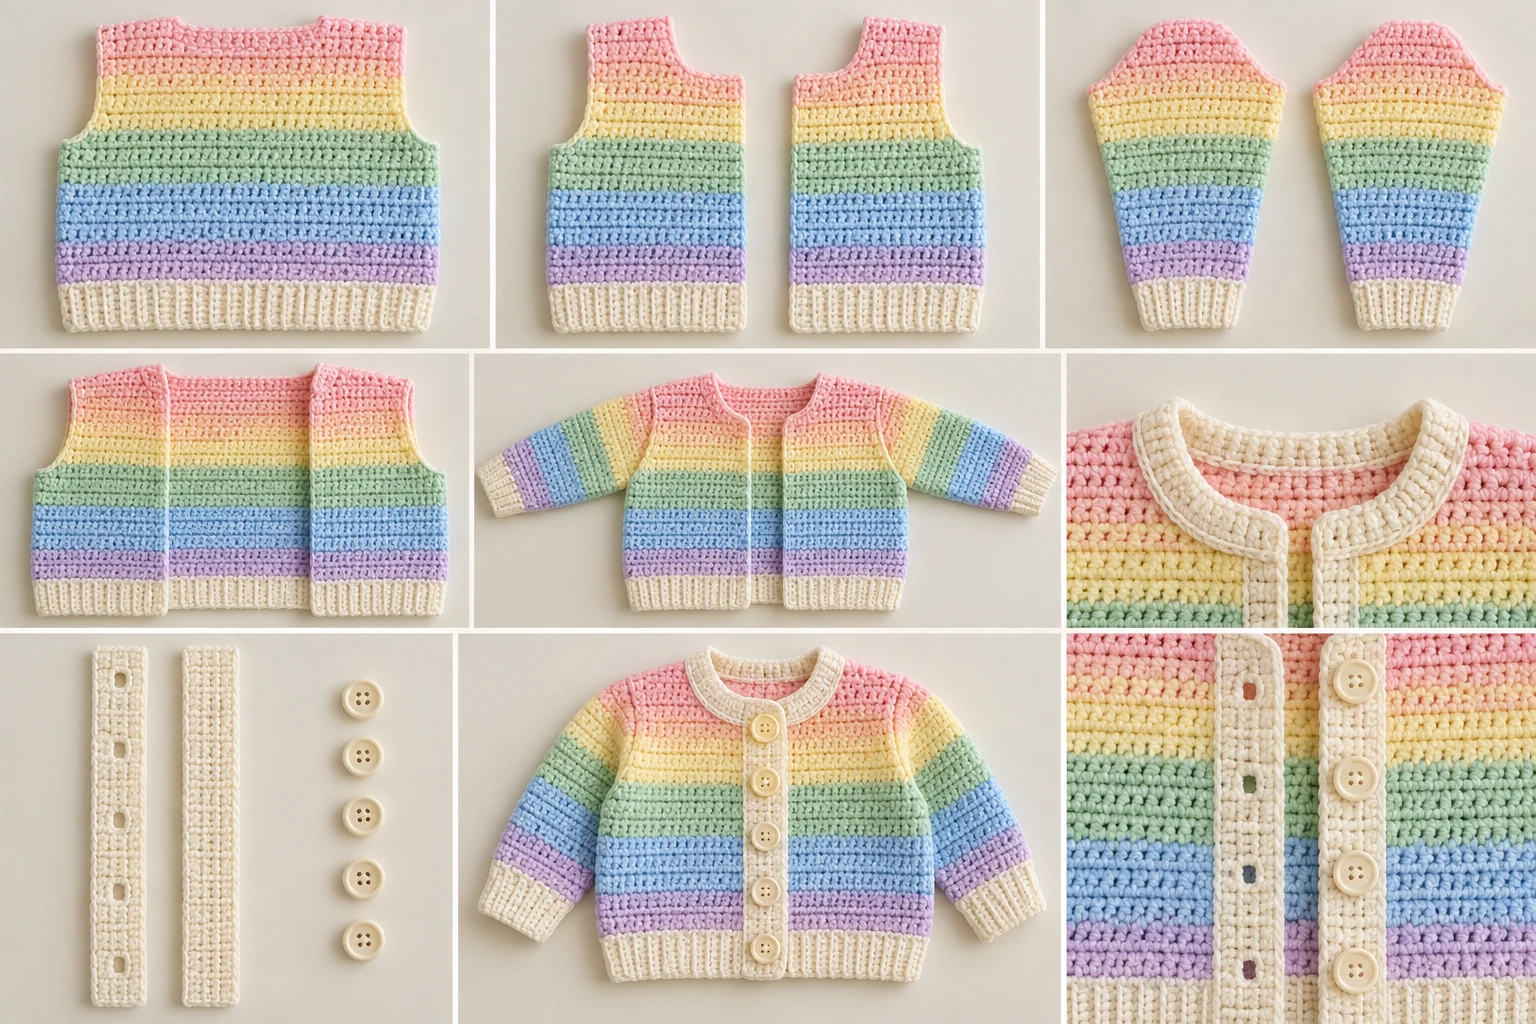
Weave in color-change tails on the WS, changing direction at least once. Leave the long assembly tails unworked. Gently wet-block every piece to the finished measurements without stretching the cream ribbed-look edges. Confirm that the fronts mirror one another and that both sleeves match.
Shoulder Assembly
Place the fronts on the back with RS together and side edges aligned. Each front has exactly 14 shoulder stitches. Seam those stitches to the corresponding outer 14 stitches of the back final row using the retained tails and mattress stitch or whipstitch. Leave the marked center 16 back stitches unseamed. Secure and weave in each shoulder tail.
Side Assembly and Armholes
With RS together, align each front side with its corresponding back side. Starting at the lower hem, seam Rows 1–27 together. Leave Rows 28–45 unseamed. The 18 row ends on the front plus 18 row ends on the back create one armhole with 36 available row ends. At row gauge, the opening is 4 in (10 cm) deep on each side and has an 8 in (20 cm) total edge. Use a separate 24 in (61 cm) length of C for each side seam, then secure and weave it in.
Sleeve Assembly and Insertion
Fold each sleeve lengthwise with RS together. Using its long tail, seam the long edges from the cuff through Row 45, matching rows and color changes exactly. Do not cut the remaining tail.
Turn the body and sleeve WS out. Insert the sleeve into the armhole. Align its seam with the underarm and align the center of the 32-stitch sleeve top with the shoulder seam. Mark both edges and quarter points.
Sew all 32 sleeve-top stitches evenly around the 36 armhole row ends. To reconcile the counts, pair two adjacent armhole row ends beneath one sleeve stitch four times, placing one eased pair in each quarter. Catch all the armhole edge fabric without gaps. Repeat for the second sleeve, then secure and weave in the tails.
Left Front Band
With RS facing and C, place a standing sc at the lower opening corner.
Row 1: Work exactly 1 sc into each of the 45 front-opening row ends; turn. 45 sc.
Rows 2–5: Ch 1, sc BLO across; turn. 45 sc.
FO with a 10 in (25 cm) tail. The completed band is approximately 1.25 in (3 cm) wide.
Right Buttonhole Band
With RS facing and C, begin at the neckline opening corner so Row 1 runs toward the lower hem.
Row 1: Work exactly 1 sc into each of the 45 front-opening row ends; turn. 45 sc.
Row 2: Ch 1, sc BLO across; turn. 45 sc.
Row 3, buttonholes: Ch 1, sc BLO in first 4 sts; [ch 1, sk next st, sc BLO in next 8 sts] 4 times; ch 1, sk next st, sc BLO in final 4 sts; turn. This consumes 45 positions and makes five one-chain buttonholes centered at positions 5, 14, 23, 32, and 41—exactly nine stitches apart.
Row 4: Ch 1, sc BLO in each sc and 1 sc in each ch-1 space; turn. 45 sc.
Row 5: Ch 1, sc BLO across. 45 sc.
FO with a 10 in (25 cm) tail. To use the opposite fastening convention, exchange which front receives the buttonholes without changing any count.
Cream Crew-Neck Band
With RS facing and C, begin at the outer top corner of the left front band.
Row 1: Work 5 sc evenly across the band top, 8 sc evenly along the left shaped neckline, 16 sc across the unworked back-neck stitches, 8 sc evenly along the right shaped neckline, and 5 sc across the right band top; turn. 42 sc.
Rows 2–5: Ch 1, sc BLO across; turn. 42 sc.
FO with a 12 in (30 cm) tail. If a gap remains, use the tail to join the short lower ends of the neck band neatly to the top edges of the front bands. Secure and weave it in. The band remains open at center front and forms a rounded crew neckline when worn.
Button Attachment
Lay the right buttonhole band over the left band with the lower hems and neckline edges aligned. Mark the left band directly beneath all five buttonholes. Using doubled strong matching sewing thread, sew one button at each mark. Pass through every button hole and the crocheted band at least six times, create a short thread shank, and knot securely on the WS. Pass the thread through the band for approximately 1 in (2.5 cm), knot again, and trim. Do not attach the buttons with yarn tails alone.
Safety: Buttons can present a choking hazard. An adult must inspect every button before every wear and repair any looseness immediately.
Finishing
Weave every remaining yarn tail for at least 1.5 in (4 cm), change direction, and weave another 1.5 in (4 cm) before trimming. Close visible assembly gaps. Wash and dry according to the yarn label, reshape the cardigan to the stated dimensions, and let it dry completely. Do not iron acrylic yarn. Confirm that the bands lie flat, the buttonholes are stable, the buttons pass through without excessive stretching, and both sleeves have matching stripes.
Customization Guidance
Body Length
Add or remove the same number of rows from all three body panels before Row 37. Preserve five-row pastel bands where possible and retain the top 18 unseamed rows for each armhole.
Sleeve Length
Add or remove equal plain rows within stripe sections on both sleeves. Keep the sleeves identical and retain a final top count of 32 stitches unless you also recalculate the armhole.
Width
For a custom size, add the same total number of stitches to the back and divide that amount equally between the two fronts. Recalculate the shoulders, back neck, front neck shaping, sleeve tops, and armholes; the supplied assembly arithmetic will no longer apply automatically.
Buttons and Colors
Choose buttons that pass easily through a one-chain opening but cannot slip out during movement. For larger buttons, replace each ch 1/sk 1 with ch 2/sk 2 and recalculate the adjacent sc so the row still consumes 45 positions. Keep C for every trim section and use muted pastel pink, yellow, green, blue, and lavender for the rainbow.
Common Mistakes to Avoid
- Counting the turning chain as a stitch, which changes the panel width.
- Missing the first or last sc and unintentionally narrowing a panel.
- Shaping both fronts in the same direction instead of mirroring their opening edges.
- Changing color after completing the last stitch instead of during its final yarn-over.
- Seaming beyond Row 27 and making the armhole too small.
- Trying to match 36 armhole row ends one-for-one with only 32 sleeve-top stitches.
- Picking up fewer or more than 45 stitches along a front opening.
- Stretching the front or neck edges while adding trim.
- Using yarn tails instead of strong sewing thread to attach buttons.
Troubleshooting
My gauge is too large or too small.
If the swatch is too large, try a smaller hook; if it is too small, try a larger hook. Make and wash another swatch before starting the garment.
The two fronts do not mirror one another.
Check where each decrease sits on RS rows. The Left Front opening is at the beginning of RS rows, while the Right Front opening is at the end. Both fronts must finish with 14 stitches.
The button band ripples or pulls.
Confirm that you picked up exactly one stitch in each of the 45 row ends. Do not add extra stitches at stripe boundaries or stretch the edge while working.
The sleeve does not fit the armhole.
Verify that the sleeve top has 32 stitches and the armhole has 36 row ends. Ease exactly four pairs of adjacent armhole row ends beneath single sleeve stitches, distributing one eased pair in each quarter.
The buttonholes are misplaced.
Row 3 must consume all 45 positions. The holes are centered at positions 5, 14, 23, 32, and 41, with nine stitches between consecutive centers.
Care Instructions
Follow the yarn manufacturer’s directions. For washable yarn, close the buttons, place the cardigan in a mesh laundry bag, and wash gently in cool water. Reshape and dry flat. Inspect all seams and every button before use, repairing any loose area immediately.
FAQs
Why are the body and sleeve stripes numbered alike?
The matching boundaries create a coordinated color rhythm. Exact horizontal alignment naturally changes as the child moves their arms.
Why are four armhole row-end pairs eased under sleeve stitches?
Each armhole contains 36 row ends, while its sleeve top contains 32 stitches. Pairing four sets of adjacent row ends resolves the difference exactly without changing the sleeve count.
Can I use saturated rainbow colors?
The intended design uses soft pastel pink, yellow, green, blue, and lavender. Saturated primary shades would change the specified visual character.
Can I substitute yarn?
Yes. Choose a soft yarn appropriate for children’s clothing and make sure the washed swatch matches 16 sc and 18 rows per 4 in (10 cm).
Can I make another age or size?
Yes, but age labels are unreliable. Work from finished measurements and recalculate all dependent stitch counts if you change the width or armhole size.
Has this pattern been physically tested?
No. It is an original, mathematically specified and checked construction plan, but no physical-testing claim is made.