Red White Blue Crochet Baby Dress Pattern with Flowers
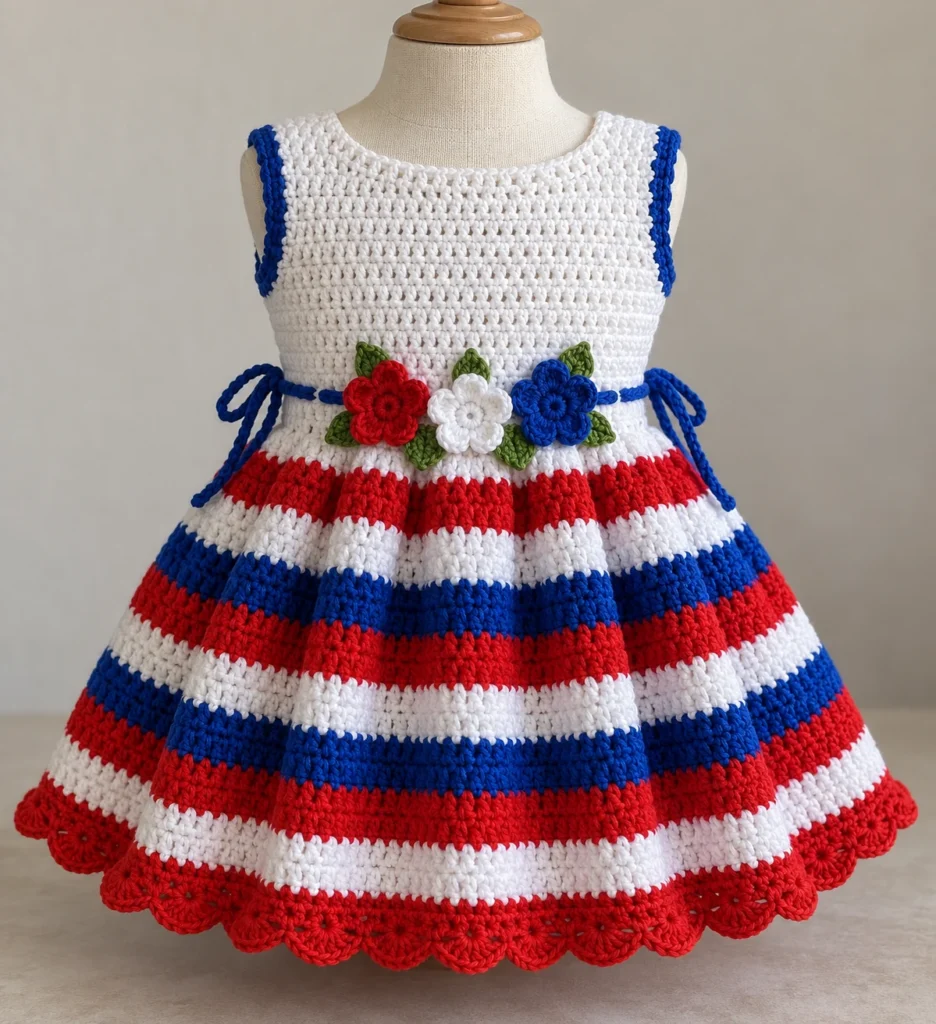
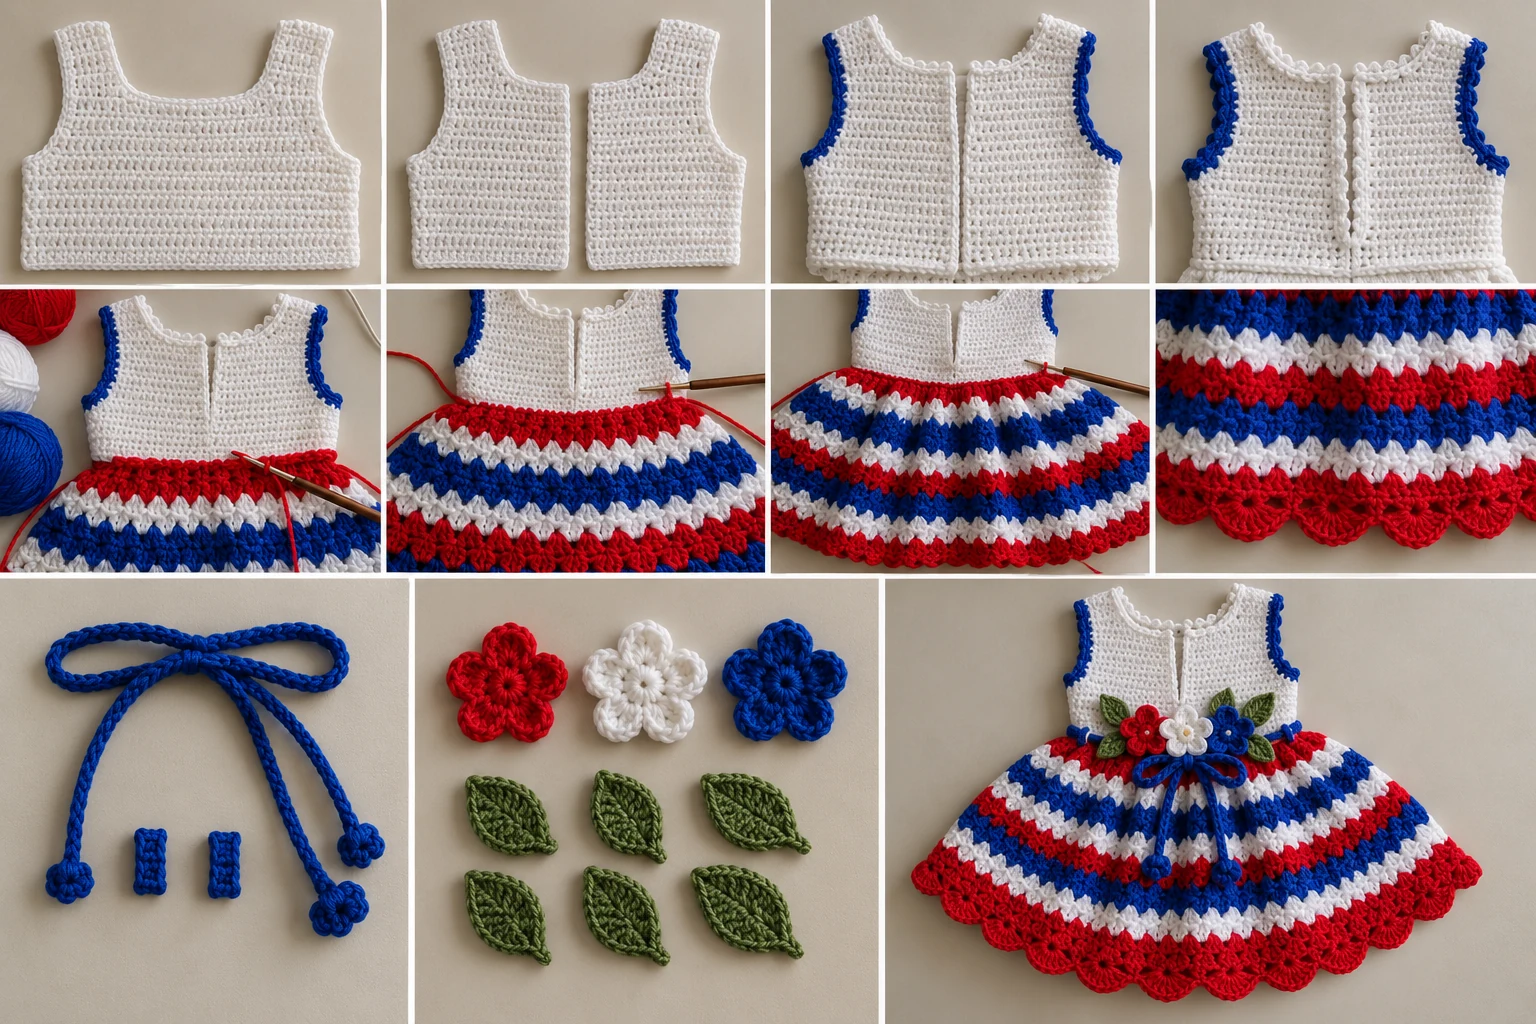
This original red white blue crochet baby dress pattern combines a softly gathered striped skirt with a simple white bodice, blue trim, a removable blue waist tie, and three colorful flowers with green leaves. Written in US crochet terminology for a suggested 6–12 month size, the dress is worked as two bodice panels that are seamed before the skirt is crocheted directly onto the waist.
Important: This design has been mathematically checked but has not been physically tested. Make and block a gauge swatch, compare the bodice with the intended child, and check all measurements before beginning the skirt. Buttons and the removable tie require attentive adult supervision.
Pattern at a Glance
- Skill level: Intermediate
- Terminology: US crochet terms
- Suggested size: 6–12 months
- Construction: Separate front and back bodice panels; seamed shoulders and lower sides; edgings added to the back slit, neckline, and armholes; skirt worked onto the joined bodice; belt, loops, flowers, and leaves made separately
- Turning: Bodice rows are turned; skirt rounds are not turned
- Visible crocheted pieces: One white front bodice, one white back bodice with center opening, one striped skirt, two white slit edgings, one white neckline edging, two blue armhole edgings, one blue belt, two blue belt loops, three five-petal flowers, and six green leaves
- Additional hardware: Two red sew-on buttons
Materials You’ll Need
- DK or light-worsted machine-washable yarn: approximately 250 yd white, 140 yd red, 170 yd royal blue, and 20 yd green
- US G/6 (4 mm) crochet hook, or size required to obtain gauge
- Yarn needle
- Locking stitch markers
- Removable pins
- Scissors
- Two 1/2 in red sew-on buttons
- Doubled sewing thread or strong matching yarn suitable for the button holes
Choose yarns from the same fiber family with similar yardage per unit weight so the colors wash, block, and wear consistently.
Gauge
16 dc and 8 dc rows = 4 in after gentle blocking. For edging calculations, 4 sc = approximately 1 in.
Make and block a swatch before beginning. Stitch counts govern the construction, but the blocked dimensions determine whether the dress will fit safely and comfortably.
Finished Measurements
- Chest circumference: approximately 22 in
- Shoulder to hem: approximately 12 in
- Bodice length: approximately 5 in
- Skirt length: approximately 7 in
- Armhole depth: approximately 3 in
- Closed neckline circumference: approximately 10 in
- Center-back opening depth: approximately 2 in
- Intended ease: approximately 2 in
Infant proportions vary. Measure the intended child and confirm the blocked bodice width, armhole depth, and head opening before attaching the skirt.
Crochet Abbreviations
- beg = beginning
- ch = chain
- dc = double crochet
- fdc = foundation double crochet
- fsc = foundation single crochet
- hdc = half double crochet
- rep = repeat
- rnd = round
- rsc = reverse single crochet
- sc = single crochet
- sl st = slip stitch
- sp = space
- st(s) = stitch(es)
Important Pattern Notes
- A turning ch-3 counts as the first dc unless the pattern expressly says otherwise.
- A turning ch-1 does not count as a stitch.
- Join rounds with a sl st to the first stitch.
- Do not turn the skirt rounds.
- Place a marker in the first stitch of each round.
- When joining at a numbered stitch, count from the first stitch of the preceding complete row.
- Foundation stitches may be replaced with a chain and setup row only if you independently preserve the stated stitch count and gauge.
- Fasten off the old color at every skirt color change instead of carrying it.
- Read the complete pattern and assembly sequence before starting.
Complete Free Crochet Pattern
Front Bodice Panel — Make 1 in White
Leave an 18 in beginning tail for the lower side seam.
Row 1: Fdc 44. Turn. (44 dc)
Rows 2–8: Ch 3, skip the first st, dc in each remaining st across. Turn. (44 dc)
Row 9, first shoulder: Ch 3, skip first st, dc in next 11 sts. Leave the remaining 32 sts unworked. Turn. (12 dc)
Row 10: Ch 3, skip first st, dc in each remaining st across. Fasten off with an 18 in shoulder-seaming tail. (12 dc)
Row 9, second shoulder: With the Row 8 right side facing, skip the center 20 sts and join white with a sl st in stitch 33. Ch 3, dc in stitches 34–44. Turn. (12 dc)
Row 10: Ch 3, skip first st, dc in each remaining st across. Fasten off with an 18 in shoulder-seaming tail. (12 dc)
The 20 unworked center stitches form the front neckline. Count check: 12 stitches for each shoulder plus 20 unworked neckline stitches equals the original 44 stitches.
Back Bodice Panel — Make 1 in White
Leave an 18 in beginning tail for the lower side seam.
Row 1: Fdc 44. Turn. (44 dc)
Rows 2–6: Ch 3, skip first st, dc in each remaining st across. Turn. (44 dc)
Row 7, first half: Ch 3, skip first st, dc in next 21 sts; leave 22 sts unworked. Turn. (22 dc)
Row 8, first half: Ch 3, skip first st, dc in each remaining st. Turn. (22 dc)
Row 9, first shoulder: Work across the outermost 12 sts only: ch 3, skip first st, dc in next 11 sts; leave the 10 center-back neck sts unworked. Turn. (12 dc)
Row 10: Ch 3, skip first st, dc in each remaining st. Fasten off with an 18 in shoulder-seaming tail. (12 dc)
Row 7, second half: With Row 6 right side facing, join white with a sl st in stitch 23. Ch 3, dc in stitches 24–44. Turn. (22 dc)
Row 8: Ch 3, skip first st, dc in each remaining st. Turn. (22 dc)
Row 9, second shoulder: Beginning at the outer side edge and leaving the 10 stitches nearest the center-back opening unworked, work ch 3 counted as the first dc and 11 more dc across the outermost 12 sts. Turn. (12 dc)
Row 10: Ch 3, skip first st, dc in each remaining st. Fasten off with an 18 in shoulder-seaming tail. (12 dc)
The two groups of 10 unworked stitches form the 20-stitch back neck. The division between the two halves forms the center-back slit. Count check: two 22-stitch halves equal 44 stitches; 12 shoulder stitches and 10 neck stitches are allocated on each half.
Shoulder and Side Seaming
- Block both panels to 11 in wide and 5 in high without stretching them.
- Place the panels with right sides together.
- Using the saved tails, sew each 12-stitch front shoulder to its corresponding 12-stitch back shoulder with mattress stitch or whipstitch. Secure and weave in the shoulder tails.
- For each side seam, align the lower edges and sew Front Rows 1–4 to Back Rows 1–4.
- Stop before Row 5. Rows 5–10 remain open, leaving six row ends on the front and six on the back for each armhole.
- Secure and weave in the side-seam tails, then turn the bodice right side out.
Center-Back Slit Edgings — Make 2 in White
Each slit edge contains four dc-row ends from Rows 7–10.
Wearer’s left button edge: Join white at the bottom of the slit. Ch 1; work 2 sc evenly into each of the four row ends. Fasten off with a 10 in tail. (8 sc)
Wearer’s right loop edge: Join white at the top of the slit and work toward the bottom. Ch 1; work 2 sc in each of the four row ends. Immediately after making edging sc 2 and edging sc 6, ch 3 and sl st back into the same sc to form a loop. The chains and securing slip stitches project from the edge and do not replace any base edging stitches. Fasten off with a 10 in tail. (8 base sc; 2 ch-3 loops)
Before attaching the buttons, verify that a 1/2 in button cannot pass through a loop. Adjust an individual loop by one chain if required by your yarn and tension.
Neckline Edging — White
With the right side facing, join white at the top of the wearer’s left slit edge. Work 1 sc in each of the 40 exposed neckline stitch tops: 20 across the back and 20 across the front. Also work 1 sc into each of the eight vertical row ends bordering the four two-row shoulder-neck steps. Distribute the stitches smoothly around the complete opening and finish at the top of the wearer’s right slit edge. Do not join across the back opening. Fasten off with a 12 in tail. (48 sc)
Armhole Edgings — Make 2 in Blue
Rnd 1: With the right side facing, join blue at the underarm seam. Ch 1. Work 2 sc in each of the six front row ends and 2 sc in each of the six back row ends. Join. (24 sc)
Rnd 2: Ch 1, rsc in each st around. Join. Fasten off with a 10 in tail. (24 rsc)
Repeat around the second armhole with the same tension.
Full Gathered Skirt — Work Directly onto the Bodice
Hold the bodice upside down with its right side facing. The 44 front and 44 back foundation stitches provide 88 lower-edge attachment points. Join red at one side seam.
Rnd 1, red: Ch 3 counted as dc. Work 2 dc in the same attachment point. In the next attachment point work 1 dc. Continue with 2 dc in the next point and 1 dc in the following point around. The initial ch-3 is part of the first 2-dc group. Join. (132 dc: 44 two-dc groups and 44 one-dc groups)
Rnd 2, red: Ch 3, skip first st, dc in every remaining st. Join. (132 dc)
Rnd 3, white: Join white in the first st. Ch 3, skip first st, dc in every remaining st. Join. Fasten off. (132 dc)
Rnd 4, white: Join white; repeat Rnd 3. (132 dc)
Rnd 5, blue: Join blue; repeat Rnd 3. (132 dc)
Rnd 6, blue: Repeat Rnd 3 in blue. (132 dc)
Rnd 7, red: Repeat Rnd 3 in red. (132 dc)
Rnd 8, red: Repeat Rnd 3 in red. (132 dc)
Rnd 9, white: Repeat Rnd 3 in white. (132 dc)
Rnd 10, white: Repeat Rnd 3 in white. (132 dc)
Rnd 11, blue: Repeat Rnd 3 in blue. (132 dc)
Rnd 12, blue: Repeat Rnd 3 in blue. (132 dc)
Rnd 13, red: Repeat Rnd 3 in red. (132 dc)
Rnd 14, red scalloped hem: Ch 1, sc in the first st, skip next 2 sts, 5 dc in next st, skip next 2 sts; repeat this six-stitch sequence around as follows: sc in next st, skip 2, 5 dc in next st, skip 2. Join to first sc. Fasten off with a 12 in tail. (22 scallops: 22 sc and 110 dc; 132 worked sts)
Fasten off at every color change. Weave the ends toward the bodice so they do not show through the scalloped hem.
Waist Tie Belt — Make 1 in Blue
Leave a 12 in beginning tail. Fsc 160, keeping the foundation relaxed and even. Fasten off with a 12 in tail. (160 sc; approximately 40 in at the stated gauge)
For an optional neater finish that does not alter the counted foundation, sl st loosely into the back bar of each foundation stitch, then fasten off. Do not allow this finishing row to tighten or shorten the belt.
Belt Loops — Make 2 in Blue
Leave an 8 in beginning tail. Ch 9. Sc in second ch from hook and in each remaining ch. Fasten off with an 8 in tail. (8 sc)
Make a second identical loop.
Five-Petal Flowers — Make 3
Make one red flower, one white flower, and one blue flower. Leave a 12 in finishing tail on each flower for sewing.
Center rnd: Make an adjustable ring, ch 1, work 10 sc into the ring, and join to the first sc. Pull the ring securely closed. (10 sc)
Petal rnd: Repeat five times: sl st in next sc; in the following sc work ch 2, 3 dc, ch 2, and sl st. Each repeat consumes two center stitches and creates one petal. Join if necessary, then fasten off with the 12 in sewing tail. (5 petals; 15 petal dc)
Leaves — Make 6 in Green
Leave a 10 in sewing tail. Ch 7. Working along the first side of the chain: sc in second ch from hook, sc in next ch, hdc in next 2 ch, dc in next ch, and 5 dc in the final ch. Rotate to work along the unused loops on the opposite side: dc in next ch, hdc in next 2 ch, sc in final 2 ch. Sl st to the first sc. Fasten off with a 10 in sewing tail. (15 sts: 6 sc, 4 hdc, 5 dc)
Repeat until you have six leaves.
Assembly
- Complete and block both bodice panels before seaming.
- Sew the shoulders and lower side seams, leaving all six row ends open on the front and back of each armhole.
- Add both center-back slit edgings, the neckline edging, and both armhole edgings.
- Crochet the skirt onto the joined lower edge of the bodice and complete the scalloped hem.
- Position one belt loop vertically over each side seam at the waist seam. Each eight-stitch loop should span approximately 2 in. Use both saved tails to sew only the top and bottom ends to the bodice, leaving the center free. Knot securely inside and weave in the ends.
- Thread the belt through both loops and center it so equal tie lengths extend at the back. The belt remains removable.
- Arrange the flowers across the front waist: red approximately 1 3/4 in left of center, white at center, and blue approximately 1 3/4 in right of center.
- Place two green leaves behind each flower, angled outward. Pin all nine motifs and confirm they remain entirely on the front of the garment.
- Using each leaf’s tail, sew around its center vein and lower edge.
- Sew each flower through all 10 center stitches, then make an additional small anchoring stitch beneath every petal. Petals must not be attached only at the center. Knot securely on the wrong side and weave in all motif tails.
- Close the center-back opening and mark a button position directly opposite each ch-3 loop.
- Using doubled sewing thread or a strong matching yarn that moves freely through the holes, sew one red button at each mark. Pass through every button hole at least six times, form a short thread shank, knot securely inside, and bury the ends. Verify that neither button can pull through its loop.
Finishing
- Weave every remaining yarn tail for at least 1 1/2 in in three directions.
- Confirm that all adjustable rings are firmly closed.
- Gently wet-block the dress to the finished measurements, keeping the flowers shaped and the hem level.
- Allow it to dry completely on a flat surface.
- Inspect the shoulder and side seams, flower petals, leaves, belt loops, and buttons before use.
Tie the removable belt in a flat bow only while the garment is being worn. Supervise the child, and remove the garment immediately if any attachment becomes loose.
Customization
You may rearrange the listed colors without changing the construction. For example, work the skirt’s prescribed two-round stripe sequence in a different order while retaining 132 stitches in every straight round and red for the planned scalloped hem if you want the sample appearance. The three flowers may likewise exchange red, white, and blue positions, but keep exactly three flowers and six leaves if you want to reproduce this design.
For fit adjustments, first make a gauge swatch and compare the blocked bodice with a well-fitting garment. Do not casually add stitches because the neckline, shoulders, skirt increase, and hem repeat depend on the stated counts. Length may be adjusted more safely by changing the height of straight skirt rounds, but doing so changes the stripe arrangement, finished length, and yarn requirement. Recheck proportions before proceeding.
If a button loop is slightly too small or large for the selected 1/2 in button, change that loop by one chain. Confirm that the button remains secure and cannot pull through.
Common Mistakes to Avoid
- Working into the first stitch after ch 3: The turning ch-3 counts as a dc, so skip the first stitch where instructed.
- Misplacing the second front shoulder: On Front Row 8, skip 20 center stitches and join in stitch 33 so stitches 33–44 form the 12-stitch shoulder.
- Closing too much of a side seam: Sew only Rows 1–4. Six row ends on each panel must remain open at each armhole.
- Replacing slit-edge stitches with button loops: The ch-3 loops project from edging sc 2 and 6. They do not replace either base sc.
- Missing the skirt’s initial increase: Rnd 1 alternates 2 dc and 1 dc over 88 attachment points to produce exactly 132 dc.
- Carrying colors through the skirt: Fasten off at each change to prevent floats and color shadows.
- Misaligning the hem repeat: The 132-stitch round divides into 22 six-stitch scallop repeats.
- Leaving petals loose: Anchor beneath every petal in addition to sewing through the flower center.
- Making the belt too tight: Keep the fsc and optional slip-stitch finish relaxed.
Troubleshooting
My bodice is not 11 inches wide.
Block your swatch and compare it with the stated gauge. If 44 dc are narrower or wider than 11 in, change hook size and swatch again. Do not add or remove bodice stitches without recalculating the neckline, shoulders, skirt attachment, and hem.
The armhole edging puckers.
Check that you made exactly 2 sc in each of six front row ends and six back row ends for 24 sc. Puckering can also indicate overly tight edging tension; use a larger hook for the edging if necessary.
The skirt count is not 132 after Rnd 1.
Confirm that the bodice has 88 lower-edge attachment points. Alternate 2 dc in one point and 1 dc in the next for 44 complete repeats. Remember that the opening ch-3 is included in the first 2-dc group.
The scallops do not meet evenly.
Recount the preceding round to confirm 132 stitches. Each scallop sequence consumes six stitches, and 132 divided by 6 gives exactly 22 repeats.
The back opening will not pass over the child’s head.
Do not force it. Before the garment is worn, verify the approximately 10 in closed neckline plus the 2 in center-back opening against the intended child. Infant head sizes vary, and an untested fit must be corrected before use.
The button loops seem insecure.
Confirm that each loop returns with a slip stitch to the same base sc, and test it with the selected button. Adjust by one chain if necessary. Reinforce the edging tail securely and inspect both loops and buttons before every wear.
Care Instructions
Follow the washing directions for the chosen yarn. For a machine-washable yarn, place the dress in a mesh laundry bag and use a gentle cycle with cool water. Fasten the buttons and remove the waist belt before laundering. Reshape the bodice, flowers, leaves, and scalloped hem, then dry flat. Avoid high heat unless the yarn manufacturer specifically permits it.
Before every wear, inspect the buttons, loops, belt, flowers, leaves, seams, and woven ends. Do not use the dress if any piece is loose.
Frequently Asked Questions
Is this pattern written in US terms?
Yes. All stitches and instructions use US crochet terminology.
What size does the pattern make?
It is designed as a suggested 6–12 month size with an approximately 22 in chest. Because babies vary considerably, compare every finished measurement with the intended child.
Is the pattern tested?
The construction and explicit stitch counts have been mathematically checked, but the pattern has not been physically tested. Swatching, blocking, measuring, and checking the head opening are essential.
Can I substitute worsted-weight yarn?
Only if you can obtain the stated blocked gauge and a fabric suitable for a baby garment. A heavier yarn may change drape, bulk, measurements, and required yardage.
Can I make the belt permanent?
The written design uses a removable belt threaded through two loops. Permanently attaching it would change the planned construction. Use the removable tie only with attentive adult supervision.
Why is the skirt worked onto the bodice?
Working directly into the 88 lower-edge attachment points creates a secure waist seam and makes it possible to increase evenly to 132 dc without sewing on a separate skirt.
How many motifs should I make?
Make exactly three five-petal flowers—one red, one white, and one blue—and six green leaves, with two leaves placed behind each flower.
Where do the buttons go?
Place both red buttons on the wearer’s left slit edging, directly opposite the two ch-3 loops on the wearer’s right edging.
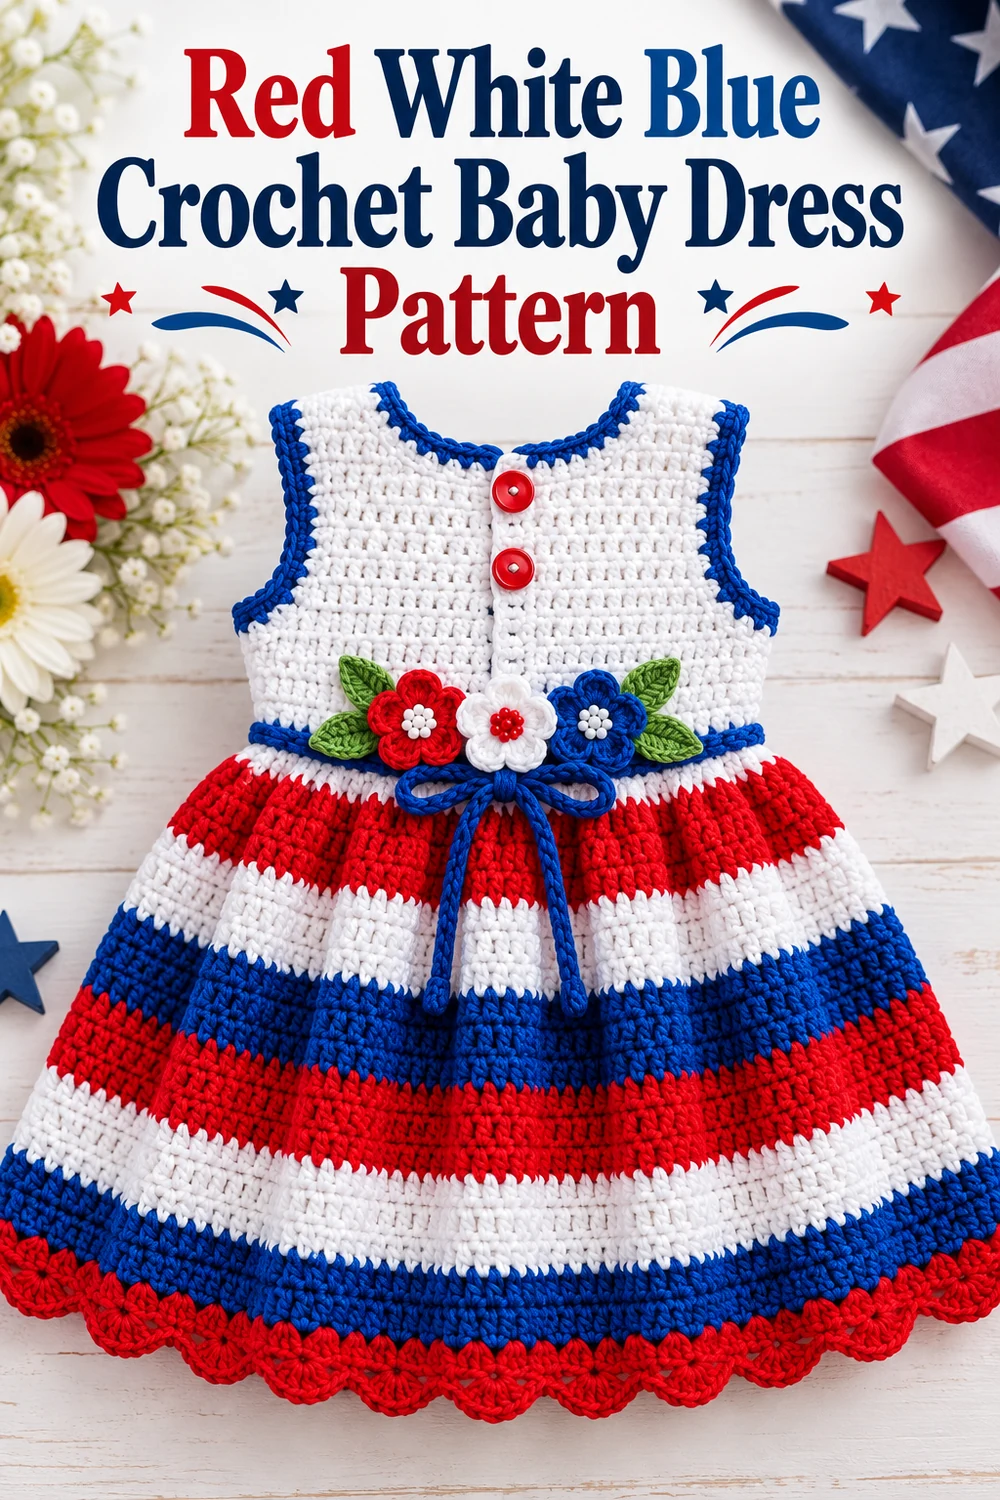
This red white blue crochet baby dress pattern is complete when the blocked measurements, all attachment points, the button fit, and the child’s head opening have been checked. Keep the finished dress for supervised wear and inspect every decorative and functional attachment regularly.