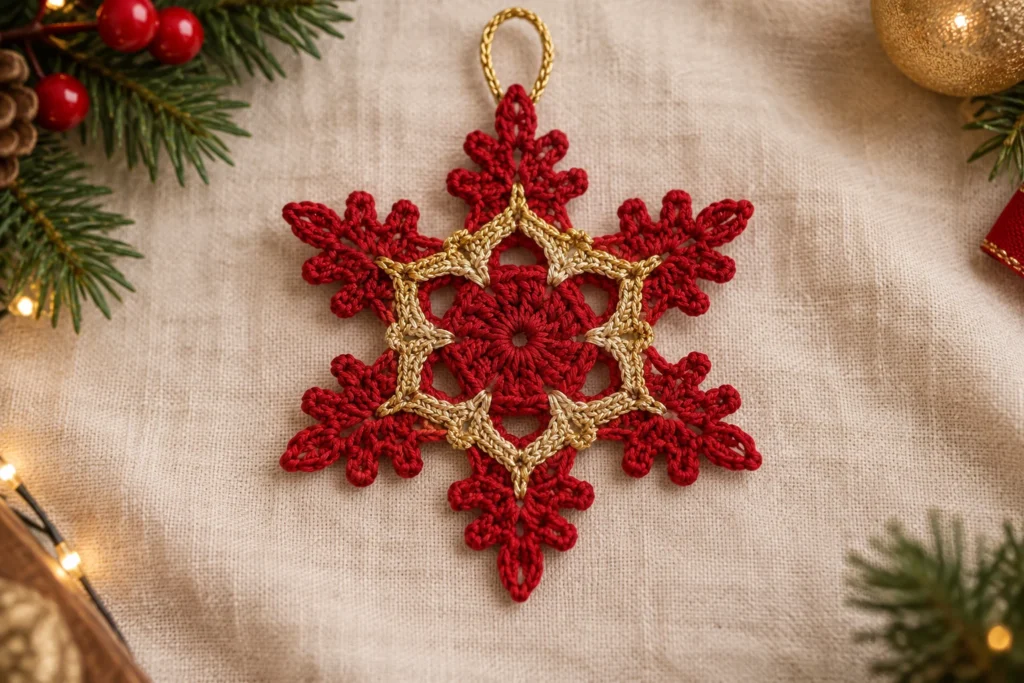
Red & Gold Crochet Snowflake Ornament
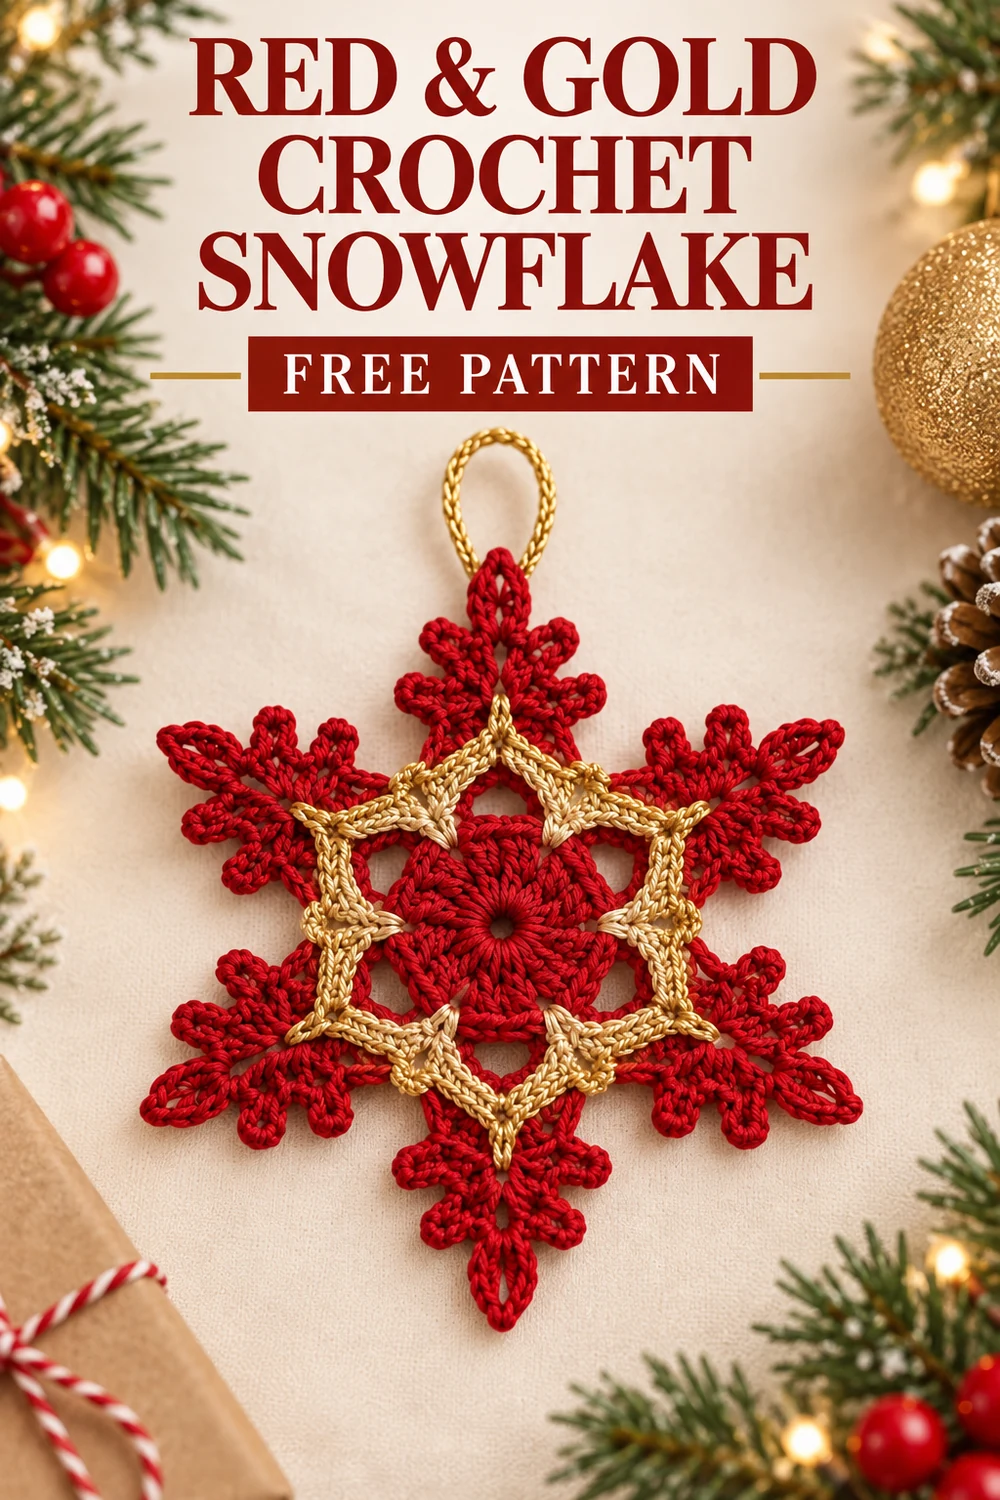
Add a bright, handmade accent to your holiday décor with this original Red & Gold Crochet Snowflake Ornament. The design combines a red center, a gold connector round, and six pointed red arms with decorative picots. A separate reinforced gold crochet loop provides a secure hanger without metal hardware.
This free crochet snowflake pattern uses US crochet terminology and is suitable for an adventurous beginner or intermediate crocheter. Its stitch counts have been mathematically reviewed, although the pattern is not claimed to have been physically tested. Read through the complete pattern before beginning.
Pattern at a Glance
- Skill level: Adventurous beginner/intermediate
- Terminology: US crochet terms
- Construction: Worked in joined rounds from the center outward; the hanging loop is made separately and sewn on
- Visible crocheted components: 1 main six-arm snowflake motif with a red center, gold connector round, and red-and-gold outer arms; 1 separate gold crocheted hanging loop
- Written components: Main Snowflake Motif (make 1), Hanging Loop (make 1), and Assembly, Blocking, and Finishing
- Colors: Color A is red; Color B is metallic gold or gold-colored
- Hardware: None
Materials You’ll Need
- Size 10 crochet cotton: approximately 10 yd (9 m) red
- Size 10 metallic gold or gold-colored crochet cotton: approximately 12 yd (11 m)
- 1.75 mm steel crochet hook, or the size needed to produce a firm fabric
- Yarn needle
- Scissors
- Rustproof pins and a blocking mat
- Optional: commercial fabric stiffener or a 1:1 mixture of white craft glue and water
Yarn and Color Key
Color A: Red crochet cotton.
Color B: Metallic gold or gold-colored crochet cotton of comparable weight.
Choose smooth, colorfast thread suitable for wet blocking. Make one motif and one hanging loop.
Gauge
Gauge is not critical, but the crochet should feel firm rather than loose. Round 1 should measure approximately 0.5 in (1.3 cm) across before blocking. Change hook size if your fabric is loose or your ornament differs substantially from the intended measurements.
Finished Measurements
The blocked snowflake measures approximately 4.5 in (11.5 cm) from one arm tip to the opposite tip. The folded and attached hanging loop extends approximately 2.5 in (6.5 cm) above the ornament.
These are intended blocked measurements. The final size can vary with thread, hook, tension, blocking, and stiffening.
Crochet Abbreviations
- beg = beginning
- ch = chain
- ch-sp = chain space
- dc = double crochet
- hdc = half double crochet
- rep = repeat
- rnd = round
- sc = single crochet
- sl st = slip stitch
- st(s) = stitch(es)
- tr = treble crochet
Important Pattern Notes
- The pattern is worked in joined rounds. Do not turn unless instructed.
- A chain at the beginning of a round does not count as a stitch.
- Picot: Chain the stated number, then slip stitch in the first chain made.
- Picot chains and their closing slip stitches are decorative elements. They are not included in the 48-base-stitch count for Round 4.
- Place every complete Round 4 arm sequence into one Round 3 ch-5 space.
- There are six arms positioned at 60-degree intervals after blocking.
- Leave every sewing tail at the length specified in the instructions.
- The hanger is crocheted separately and secured through multiple stitches. No metal hardware is used.
Complete Free Crochet Pattern
Main Snowflake Motif (Make 1)
With Color A, make an adjustable ring.
Rnd 1: Ch 1; work 12 sc into the ring. Pull the ring closed. Join with a sl st to the first sc. Count: 12 sc.
Stitch check: 12 sc worked into the adjustable ring = 12 sc.
Rnd 2: Ch 1. Beginning in the same st as the join, *sc in next st, ch 3, skip next st; rep from * 5 more times. Join with a sl st to the first sc. Fasten off Color A, leaving a 4 in (10 cm) tail. Count: 6 sc and 6 ch-3 spaces.
Stitch check: 1 sc and 1 ch-3 space per repeat × 6 repeats = 6 sc and 6 ch-3 spaces.
Rnd 3: Join Color B with a sl st in any ch-3 space. Ch 1, then work (sc, ch 5, sc) in the same space. Work (sc, ch 5, sc) in each of the remaining 5 ch-3 spaces. Join with a sl st to the first sc. Fasten off Color B, leaving a 4 in (10 cm) tail. Count: 12 sc and 6 ch-5 spaces.
Stitch check: 2 sc and 1 ch-5 space in each of 6 spaces = 12 sc and 6 ch-5 spaces.
Rnd 4: Join Color A with a sl st in any ch-5 space. Ch 1. In the same ch-5 space work: sc, make a ch-3 picot, hdc, dc, make a ch-3 picot, tr, make a ch-5 picot, tr, make a ch-3 picot, dc, hdc, make a ch-3 picot, sc. This forms 1 arm. In each of the remaining 5 ch-5 spaces, work the same complete arm sequence. Join with a sl st to the first sc. Fasten off Color A, leaving a 6 in (15 cm) tail. Count: 6 arms; 48 base stitches total, comprising 12 sc, 12 hdc, 12 dc, and 12 tr; plus 24 ch-3 picots and 6 ch-5 tip picots.
Stitch check: Each arm contains 2 sc + 2 hdc + 2 dc + 2 tr = 8 base stitches. Eight base stitches × 6 arms = 48 base stitches. Each arm also has four ch-3 picots and one ch-5 tip picot, giving 24 ch-3 picots and 6 ch-5 tip picots in total.
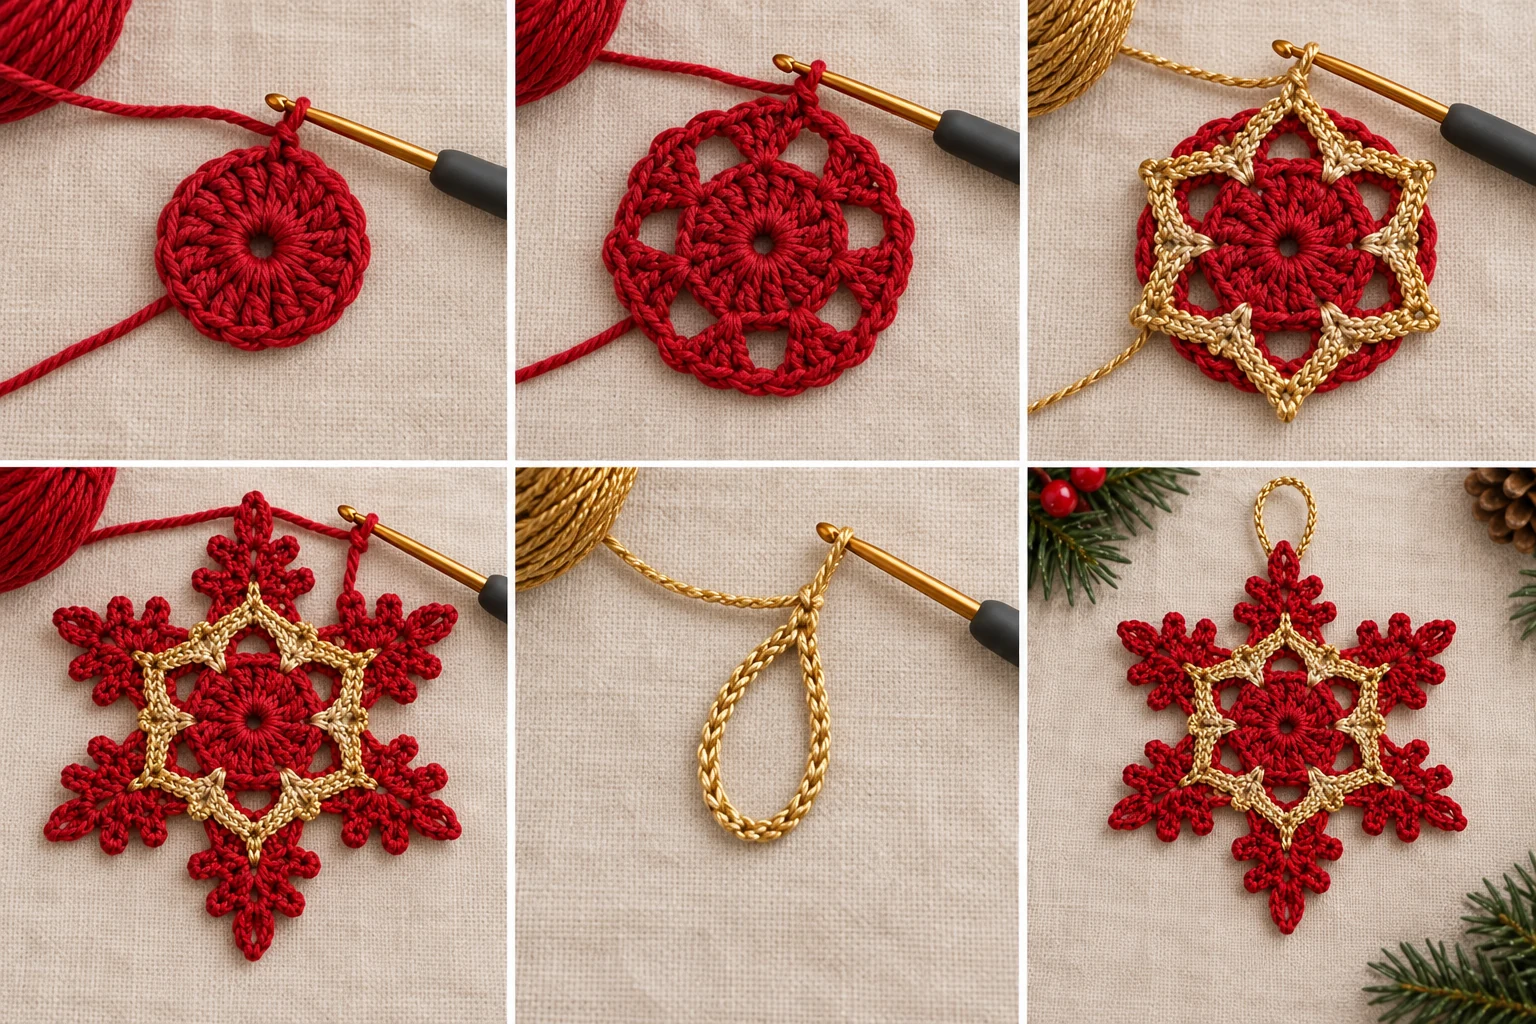
Hanging Loop (Make 1)
With Color B, leave an initial 8 in (20 cm) sewing tail and ch 32. Without twisting the chain, sl st in the first ch to form a ring. Working around the ring, sl st in each of the 32 chains. Join with a sl st to the first reinforcing sl st. Fasten off, leaving a second 8 in (20 cm) sewing tail. Count: 32 foundation chains and 32 reinforcing sl sts.
Stitch check: 1 reinforcing sl st in each of 32 foundation chains = 32 reinforcing sl sts.
Assembly
- On the wrong side, weave in the 4 in (10 cm) Color A tail from Rnd 2 and the 4 in (10 cm) Color B tail from Rnd 3. Change direction at least twice before trimming each tail.
- Use the 6 in (15 cm) final motif tail to neaten the Rnd 4 join if necessary. Weave it through at least 1 in (2.5 cm) of nearby stitches, change direction twice, and trim.
- Choose one ch-5 tip picot as the top of the snowflake. Flatten the hanging loop so its joining point rests behind that picot.
- Thread one hanging-loop tail through the yarn needle. Sew through the base of the selected tip picot and through both layers of the hanging loop three times, keeping the stitches on the wrong side.
- Repeat with the second hanging-loop tail from the opposite direction.
- Tie the two tails together with a firm square knot behind the tip. Weave each tail separately through at least 1 in (2.5 cm) of gold loop stitches, change direction once, and trim.
- Tug the loop gently to confirm that it does not shift.
Blocking and Finishing
- If the thread is colorfast, dampen the ornament. For a rigid ornament, apply a thin, even coat of diluted fabric stiffener, keeping the hanging loop mostly free of stiffener.
- Pin the center flat on a blocking mat.
- Arrange the 6 arms at even 60-degree intervals.
- Stretch each ch-5 tip picot outward to approximately 2.25 in (5.7 cm) from the center. Open the four smaller picots on every arm evenly.
- Confirm that opposite tips measure approximately 4.5 in (11.5 cm) apart and that the motif looks symmetrical.
- Allow the ornament to dry completely before removing the pins.
- Do not trim any remaining tails until every join and the hanging-loop attachment has been checked.
Customization Ideas
You can customize the ornament without changing its construction or stitch counts. Reverse Colors A and B for a gold-centered snowflake with red connectors, use matte gold instead of metallic thread, or select two different high-contrast holiday colors. A single-color version also works when both specified colors are replaced consistently with the same size 10 thread.
For a softer decoration, omit stiffener and wet-block only. For a firmer ornament, use a light, even stiffener application after confirming that the thread is colorfast. Keep the hanging loop flexible in either case.
Common Mistakes to Avoid
- Counting picots as base stitches: The picot chains and closing slip stitches are not part of the 48-base-stitch total in Rnd 4.
- Missing a space: Rnd 3 must end with six ch-5 spaces, one for each arm.
- Splitting an arm between spaces: Work every complete eight-base-stitch arm sequence into a single ch-5 space.
- Twisting the hanger: Check that the 32-chain foundation is untwisted before joining it into a ring.
- Using loose tension: Loose crochet may produce floppy arms and an oversized center.
- Trimming tails too early: Retain the specified tails until the joins and hanging loop are secure.
- Uneven blocking: Measure from the center and position the six arm tips at even 60-degree intervals.
Troubleshooting
Why do I have fewer than six arms?
Check Rnd 3. It should contain exactly six ch-5 spaces. Work one complete Rnd 4 arm into each of those spaces.
Why does an arm look unbalanced?
Verify the sequence on both sides of the central ch-5 tip picot. Each arm should read: sc, ch-3 picot, hdc, dc, ch-3 picot, tr, ch-5 picot, tr, ch-3 picot, dc, hdc, ch-3 picot, sc.
Why is the snowflake cupping?
Your tension may be tight, or the arm stitches may be crowded. Confirm that all eight base stitches and five picots of each arm are worked into the same ch-5 space. Careful blocking should flatten minor cupping.
Why is the snowflake floppy?
Use a smaller hook for firmer fabric or apply a thin coat of fabric stiffener during finishing. The final result depends on the thread and blocking because the design has not been physically tested.
Why does the hanging loop shift?
Confirm that each tail was sewn through the base of the chosen tip picot and both loop layers three times. The tails must be tied in a firm square knot, woven separately through the gold stitches, and checked with a gentle tug.
Care Instructions
Store the ornament flat in a dry box, away from direct sunlight and crushing pressure. If it becomes dusty, use a soft, dry brush. Avoid machine washing or wringing. If reshaping is necessary, first test the red and gold threads for colorfastness, then lightly dampen and re-block. An ornament treated with glue-based stiffener should not be soaked.
Frequently Asked Questions
Is this crochet snowflake worked in one piece?
The main six-arm motif is worked in one piece from the center outward. The gold hanging loop is a separate crocheted component that is sewn securely to one tip.
Does the pattern use US or UK terminology?
It uses US crochet terminology throughout.
How many crocheted components are there?
There are exactly two: one main snowflake motif and one gold hanging loop.
How many points does the ornament have?
It has six arms. Each arm includes four smaller ch-3 picots and one central ch-5 tip picot.
Do I need an ornament hook or jump ring?
No. The separately crocheted gold loop is the hanger, so no metal hardware is required.
Can I use ordinary yarn instead of size 10 thread?
You can experiment with another yarn weight, but it will change the dimensions and may require a different hook. To obtain the intended approximately 4.5 in (11.5 cm) blocked size, use comparable size 10 crochet cotton.
Has this pattern been physically tested?
The construction and explicit stitch counts have been mathematically reviewed, but the pattern is not claimed to have been physically tested. Measure and assess the ornament during blocking, particularly if you substitute materials.