Pocket Christmas Tree Wall Hanging: Free Crochet Pattern
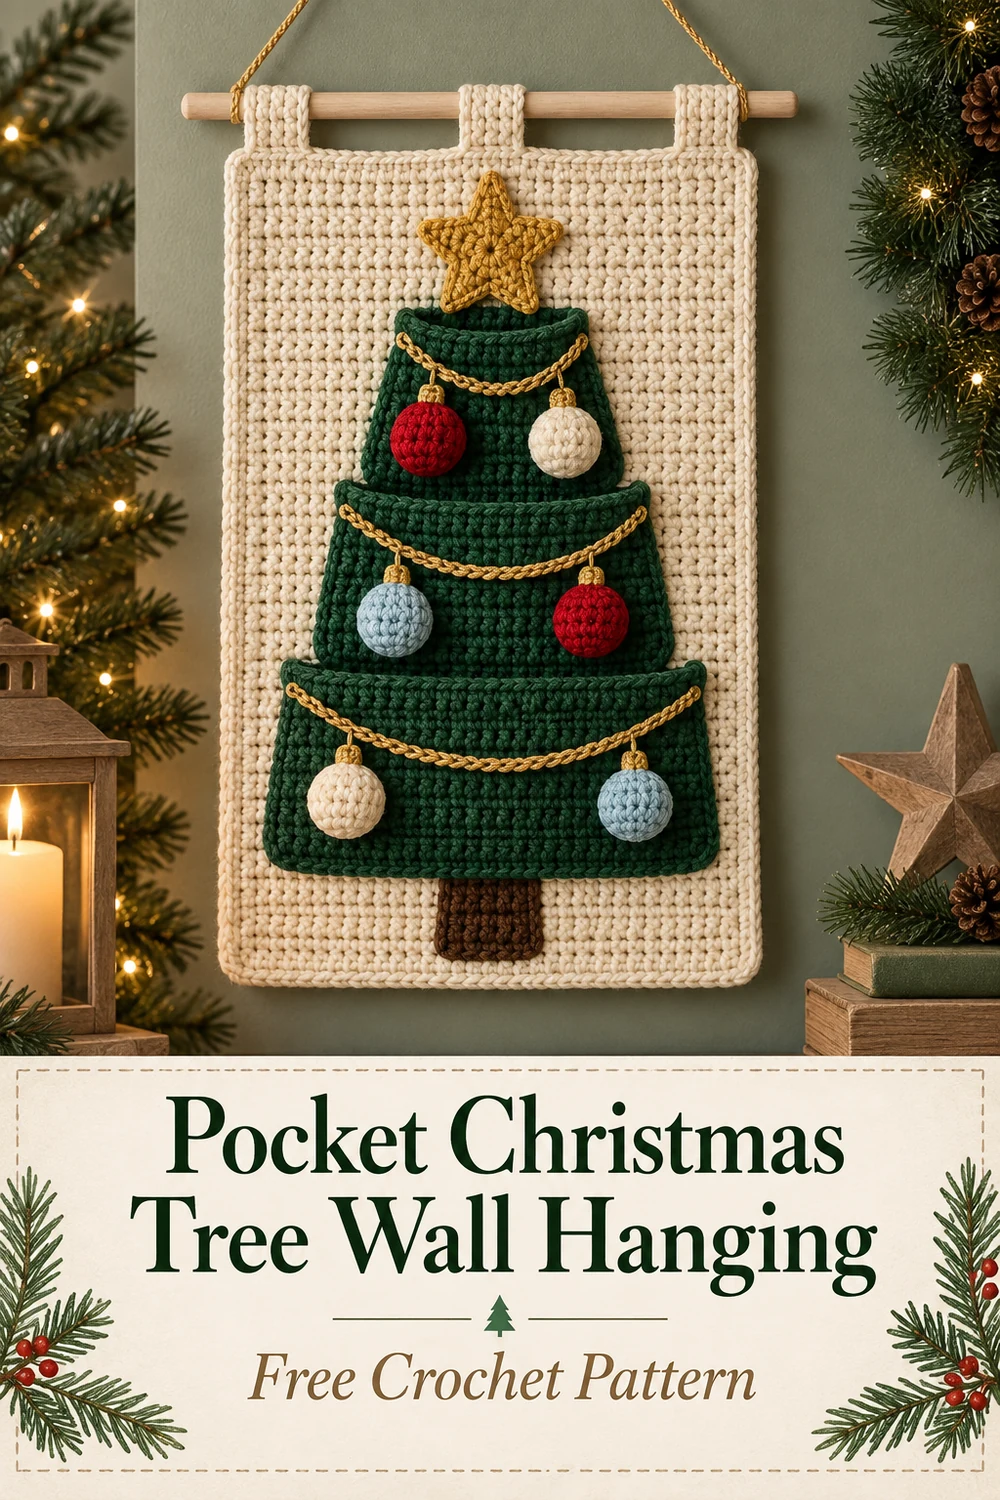
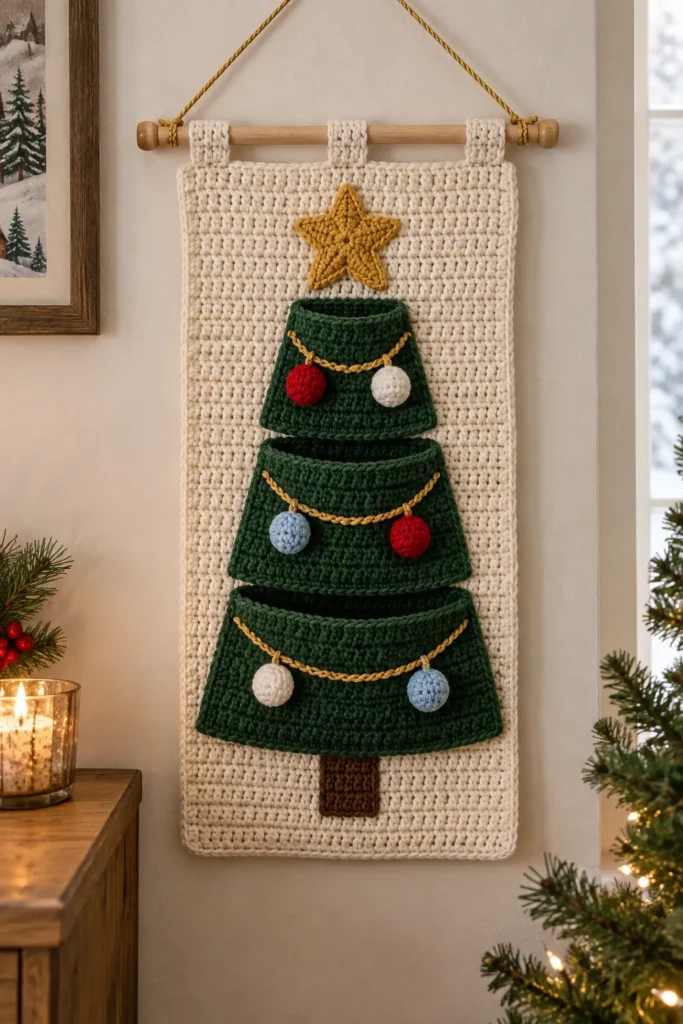
Create a festive piece of decorative storage with this original Pocket Christmas Tree Wall Hanging crochet pattern. Three graduated evergreen tiers form functional pockets for lightweight notes, gift cards, or flat treats, while a trunk, star, ornaments, and crocheted garland complete the tree. The finished panel hangs from three crocheted tabs on a wooden dowel.
This pattern uses US crochet terminology. It is decorative storage, not a toy. Do not place heavy, hot, sharp, or breakable objects in the pockets.
Pattern at a Glance
- Skill level: Confident beginner to intermediate
- Construction: One flat rectangular panel with a two-round border, three separately crocheted pockets, appliqués, cords, and three folded dowel tabs
- Techniques: Chains, slip stitches, single crochet, half double crochet, double crochet, increases, magic ring, joined rounds, seaming, and simple blocking
- Terminology: US crochet terms
- Working direction: The panel is worked flat. Each evergreen tier is worked from its narrow lower edge toward its wide pocket opening.
- Visible crocheted components: 1 bordered wall panel, 3 graduated evergreen pocket tiers, 1 tree trunk, 1 five-point star, 6 round ornaments, 1 garland cord, 3 dowel tabs, and 1 hanging cord
Materials You’ll Need
- Worsted-weight category 4 cotton or cotton-blend yarn:
- Color A, natural or cream: 250 yd (229 m)
- Color B, deep evergreen: 170 yd (155 m)
- Color C, brown: 15 yd (14 m)
- Color D, gold: 25 yd (23 m)
- Color E, red: 10 yd (9 m)
- Color F, white: 10 yd (9 m)
- Color G, pale blue: 10 yd (9 m)
- US H/8 (5 mm) crochet hook, or size needed to obtain gauge
- Tapestry needle
- Scissors
- Locking stitch markers
- Rustproof pins and blocking supplies
- One smooth wooden dowel measuring 14 in (35.5 cm) long and approximately 3/8 in (10 mm) in diameter
- Two securely fitted dowel finials or end caps larger than the tab openings
Yarn and Color Placement
Use Color A for the Wall Panel and Dowel Tabs. Use Color B for all three Evergreen Pocket Tiers. Use Color C for the Tree Trunk. Use Color D for the Five-Point Star, Garland Cord, and Hanging Cord. Make two Round Ornaments in Color E, two in Color F, and two in Color G.
Gauge
14 hdc and 13 rows = 4 in (10 cm) in the Wall Panel pattern before blocking.
Gauge matters for the panel and approximate pocket widths. Each pocket tier should have a firm fabric that can hold its shape. Gauge does not need to be exact for the small appliqués. If the panel does not approach the stated measurements, change hook size rather than changing the specified stitch or row counts, because those counts determine component placement.
Finished Measurements
- Blocked panel: approximately 12 in (30.5 cm) wide by 16 in (40.5 cm) tall, excluding the tabs, dowel, and hanging cord
- Tree assembly: approximately 10 in (25.5 cm) wide by 11 in (28 cm) tall
- Pocket openings, from top to bottom: approximately 6, 8, and 10 in (15, 20.5, and 25.5 cm) wide
Exact dimensions depend on yarn, tension, and blocking.
Crochet Abbreviations
- ch: chain
- dc: double crochet
- hdc: half double crochet
- inc: work 2 sc in the indicated stitch
- MR: magic ring
- rep: repeat
- Rnd: round
- RS: right side
- sc: single crochet
- sl st: slip stitch
- st(s): stitch(es)
- WS: wrong side
Important Pattern Notes
- Turning chains do not count as stitches.
- Join rounds with a sl st only where directed.
- Stated stitch totals count completed crochet stitches. Chains and skipped stitches are identified separately.
- Work all pocket tiers from their narrow lower edges toward their open upper edges.
- During assembly, sew the narrow foundation edge and both slanted sides of each tier, but leave its entire final row unsewn.
- The Wall Panel, pocket tiers, Tree Trunk, Dowel Tabs, Garland Cord, and Hanging Cord are worked flat. The Round Ornaments and Five-Point Star are worked in joined rounds.
- Leave the specified sewing tails. They are used during assembly.
- Block and dry-layout all components before permanent sewing.
Complete Free Crochet Pattern
Wall Panel — Make 1 in Color A
Ch 43.
Row 1 (WS): Hdc in 2nd ch from hook and in each remaining ch; turn. — 42 hdc.
Rows 2–52: Ch 1, hdc in each st across; turn. — 42 hdc.
Do not fasten off. Rotate the work to crochet around the complete rectangle.
Border Rnd 1 (RS): Ch 1, sc in each of the 42 sts across the last row, ch 2 at the corner, work 52 sc evenly down the first side edge—one sc in the end of each row—ch 2, work 42 sc across the unused loops of the foundation chain, ch 2, work 52 sc evenly up the second side edge, ch 2; join with sl st to first sc. — 188 sc and four ch-2 corner spaces.
Border Rnd 2: Ch 1, sc in each sc around and work (sc, ch 2, sc) in each ch-2 corner space; join with sl st to first sc. — 196 sc and four ch-2 corner spaces.
Fasten off and weave in both panel ends. Block to approximately 12 by 16 in (30.5 by 40.5 cm), keeping the rectangle square and flat.
Evergreen Pocket Tier A (Top) — Make 1 in Color B
Leave a 24 in (61 cm) beginning tail. Ch 15.
Row 1: Sc in 2nd ch from hook and in each ch across; turn. — 14 sc.
Row 2: Ch 1, 2 sc in first st, sc in each st to last st, 2 sc in last st; turn. — 16 sc.
Row 3: Rep Row 2. — 18 sc.
Row 4: Rep Row 2. — 20 sc.
Row 5: Rep Row 2. — 22 sc.
Row 6: Rep Row 2. — 24 sc.
Fasten off with a 24 in (61 cm) sewing tail. The 24-stitch edge is the pocket opening.
Evergreen Pocket Tier B (Middle) — Make 1 in Color B
Leave a 30 in (76 cm) beginning tail. Ch 21.
Row 1: Sc in 2nd ch from hook and in each ch across; turn. — 20 sc.
Row 2: Ch 1, 2 sc in first st, sc in each st to last st, 2 sc in last st; turn. — 22 sc.
Rows 3–7: Rep Row 2, increasing by 2 sts per row. — 24, 26, 28, 30, and 32 sc.
Fasten off with a 30 in (76 cm) sewing tail. The 32-stitch edge is the pocket opening.
Evergreen Pocket Tier C (Bottom) — Make 1 in Color B
Leave a 36 in (91.5 cm) beginning tail. Ch 27.
Row 1: Sc in 2nd ch from hook and in each ch across; turn. — 26 sc.
Row 2: Ch 1, 2 sc in first st, sc in each st to last st, 2 sc in last st; turn. — 28 sc.
Rows 3–8: Rep Row 2, increasing by 2 sts per row. — 30, 32, 34, 36, 38, and 40 sc.
Fasten off with a 36 in (91.5 cm) sewing tail. The 40-stitch edge is the pocket opening.
Tree Trunk — Make 1 in Color C
Leave a 12 in (30.5 cm) beginning tail. Ch 9.
Row 1: Sc in 2nd ch from hook and in each ch across; turn. — 8 sc.
Rows 2–6: Ch 1, sc in each st across; turn. — 8 sc.
Fasten off with a 12 in (30.5 cm) sewing tail.
Five-Point Star — Make 1 in Color D
Make an MR.
Rnd 1: Ch 1, work 10 sc in MR; tighten ring and join with sl st to first sc. — 10 sc.
Rnd 2: Rep the following sequence 5 times: sl st in next sc, ch 3, dc in 3rd ch from hook, ch 3, sl st in the same base sc, skip next sc. Each rep forms one point. After the fifth rep, join to the first sl st if necessary. — 15 worked sts total: 10 sl sts and 5 dc; 30 chains; all 10 base sc are consumed by 5 worked and 5 skipped base sts.
Fasten off with an 18 in (45.5 cm) sewing tail. Gently shape the five points.
Round Ornaments — Make 6
Make two in Color E, two in Color F, and two in Color G. For each ornament, leave an 8 in (20.5 cm) finishing tail.
Rnd 1: Make an MR, ch 1, work 6 sc in MR; tighten ring and join with sl st to first sc. — 6 sc.
Rnd 2: Ch 1, work 2 sc in each sc around; join with sl st to first sc. — 12 sc.
Fasten off with the specified sewing tail. Weave in the starting tail only.
Garland Cord — Make 1 in Color D
Leave a 10 in (25.5 cm) beginning tail. Ch 70. Sl st in 2nd ch from hook and in each remaining ch. — 69 sl st.
Fasten off with a 10 in (25.5 cm) sewing tail. Do not stretch the cord during assembly.
Dowel Tabs — Make 3 in Color A
For each tab, leave a 12 in (30.5 cm) beginning tail. Ch 7.
Row 1: Sc in 2nd ch from hook and in each ch across; turn. — 6 sc.
Rows 2–8: Ch 1, sc in each st across; turn. — 6 sc.
Fasten off with a 12 in (30.5 cm) sewing tail. Do not weave in the tails; they secure the tabs.
Hanging Cord — Make 1 in Color D
Leave a 14 in (35.5 cm) beginning tail. Ch 81. Sl st in 2nd ch from hook and in each remaining ch. — 80 sl st.
Fasten off with a 14 in (35.5 cm) sewing tail.
Assembly
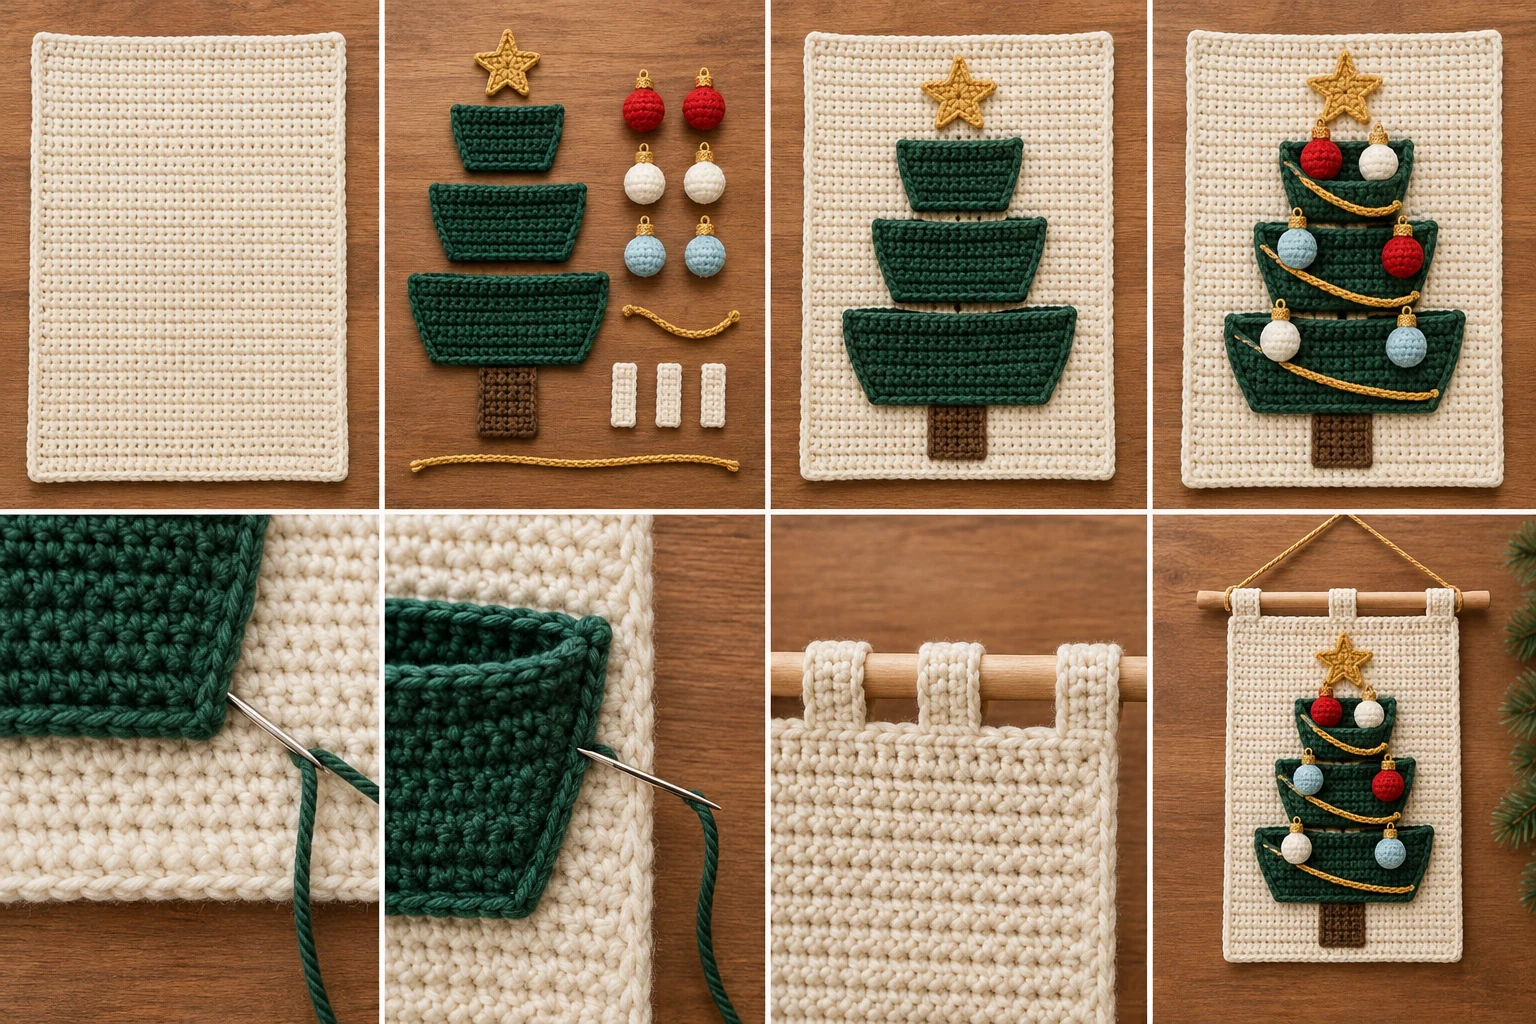
- Place the blocked Wall Panel RS up in portrait orientation. Mark its vertical centerline. Take all placement measurements inside the border.
- Center the Tree Trunk with its lower edge approximately 1 in (2.5 cm) above the inside edge of the lower border. Using its two tails and matching Color C, whipstitch all four edges to the panel. Keep the stitches within the panel fabric without piercing the border. Knot securely on the WS and weave in the tails.
- Position Evergreen Pocket Tier C RS up and centered. Lay its narrow 26-stitch foundation edge over the upper 1/2 in (1.3 cm) of the trunk, with the wide 40-stitch final row pointing upward. Pin the narrow lower edge and both slanted side edges to the panel. Using the two Color B tails, sew the foundation edge and both slanted sides firmly to the panel with small whipstitches. Leave the entire 40-stitch final row unsewn as the pocket opening. Knot on the WS and weave in the tails.
- Center Evergreen Pocket Tier B with its narrow 20-stitch edge overlapping the upper portion of Tier C by approximately 1 in (2.5 cm). Confirm that Tier C’s open edge can still lift forward. Sew Tier B’s narrow edge and both slanted sides through Tier B and the Wall Panel, taking care not to catch the front layer of Tier C. Leave all 32 stitches of Tier B’s final row open. Secure and weave in the tails.
- Center Evergreen Pocket Tier A with its narrow 14-stitch edge overlapping Tier B by approximately 1 in (2.5 cm). Sew the narrow edge and slanted sides directly to the panel without catching the front layer of Tier B. Leave all 24 stitches of its final row open. Secure and weave in the tails.
- Center the Five-Point Star above Tier A, leaving approximately 1/2 in (1.3 cm) between the star and the panel’s inner top border. With its Color D tail, make small stitches around the inner base of every point, leaving the outer points free for definition. Secure on the WS and weave in the tail.
- Drape the Garland Cord in two shallow curves across the green tiers. Begin near the upper-left side of Tier A, cross Tier B, turn near its right side, and finish near the lower-left area of Tier C. Keep every pocket opening clear. Using Color D, tack the garland at both ends, at each change of direction, and every 1 1/2 to 2 in (4 to 5 cm). Do not pull the cord tight. Secure and weave in all garland tails.
- Arrange two Round Ornaments on each tier, alternating colors and keeping every ornament at least 1/2 in (1.3 cm) below its pocket opening. With each ornament’s finishing tail, sew around its outer edge while catching only the pocket’s front fabric—not the Wall Panel. Secure the tail inside the pocket and weave it into the pocket fabric.
- Place the three Dowel Tabs evenly along the top edge: one centered and one approximately 1 1/2 in (3.8 cm) in from each upper corner. Fold each tab in half around the dowel so its first and last rows meet at the panel’s upper back edge. Remove the dowel before sewing. With both tails, sew the two short tab ends securely to the WS of the panel immediately below the upper border. Stitch through the tab ends and panel fabric several times, knot securely, and weave in the tails. Keep each folded loop free.
- Slide the dowel through all three tabs. Securely fit one finial or end cap to each end. The finials must be larger than the tab openings so the dowel cannot slide out.
- Tie one Hanging Cord end around the dowel immediately inside the left outer tab with a double knot. Tie the other end immediately inside the right outer tab, matching the tail lengths and centering the hanging apex. Use the yarn tails to stitch through each knot and cord several times. Knot again, then weave each tail through at least 2 in (5 cm) of cord. Do not rely on an unreinforced slip knot.
Finishing
Lightly steam or spot-block the appliqués without flattening the pockets. Never let a hot iron touch the yarn. Check that all three pocket openings remain completely free, the panel hangs level, and every decorative component is firmly attached. Tug-test the three tabs, both reinforced hanging-cord ends, and the fitted dowel end stops before hanging the project.
Customization Ideas
You may choose different yarn colors while preserving the specified yarn weight, component quantities, stitch counts, and construction. A neutral panel makes the green tree stand out, but a pale blue, gray, or deep red background can also create a seasonal look. The six ornaments may be distributed in any alternating color arrangement, provided there are still two ornaments on each tier and each remains at least 1/2 in (1.3 cm) below an opening.
For a subtler design, use one accent color for all six ornaments. For a bright design, select three high-contrast shades. Avoid adding heavy decorations, and do not alter the pocket stitch or row counts if you want the pieces to retain the planned proportions and placements.
Common Mistakes to Avoid
- Counting turning chains as stitches: The turning chains in this pattern do not count as stitches.
- Missing the edge increases: Every increase row of a pocket tier places 2 sc in both the first and last stitch, adding exactly 2 stitches.
- Sewing a pocket closed: Only attach the narrow foundation edge and two slanted sides. Leave the entire wide final row open.
- Catching a lower pocket while attaching an upper one: Sew each upper tier to the Wall Panel without piercing the front layer of the tier below.
- Attaching ornaments through the panel: Ornaments should be sewn only to the front fabric of their pocket.
- Pulling the garland tight: A tight garland can distort the pockets and restrict their openings.
- Changing counts to fix size: Adjust hook size to correct gauge. Changing stitch or row quantities affects placement.
- Using unsecured hardware: The dowel requires properly fitted end stops larger than the tab openings.
Troubleshooting
My Wall Panel is not 12 by 16 inches.
Measure your gauge before changing the pattern. If the panel is too small, try a larger hook; if it is too large, try a smaller hook. Keep the specified 42 hdc and 52 rows so the border and component placement remain consistent.
My pocket tier does not have the correct final count.
Confirm that Row 1 begins in the second chain from the hook. On every following row, work 2 sc in the first stitch and 2 sc in the last stitch. Tier A ends with 24 sc after Row 6, Tier B ends with 32 sc after Row 7, and Tier C ends with 40 sc after Row 8.
The pockets are difficult to open.
Check that each final row is entirely unsewn. Also inspect the overlapping tiers, garland tacks, and ornament stitches. None should catch a pocket opening or connect the pocket front to the Wall Panel.
The panel bows after assembly.
The garland or appliqué stitches may be too tight. Ease or redo the affected tacks, then spot-block the panel flat. Decorative pieces should lie securely without pulling the background fabric inward.
The hanging cord slides along the dowel.
Each end should sit immediately inside an outer tab. Reinforce each double knot by stitching through the knot and cord several times, knotting again, and weaving the tail through at least 2 in (5 cm) of cord.
Care Instructions
Remove all contents before cleaning. If the chosen yarn’s label permits washing, hand-wash the crocheted portion gently in cool water with mild detergent after removing the dowel and any removable hardware. Do not twist or wring. Press out excess water in a towel, reshape the panel and pockets to their stated dimensions, and dry flat. Spot cleaning is preferable when the hardware or yarn is not washable. Store flat or loosely rolled to avoid creasing the appliqués and pockets.
Frequently Asked Questions
Are the tree tiers real pockets?
Yes. Each tier is attached along its narrow lower edge and two slanted sides while its entire wide final row remains open.
What can the pockets hold?
Use them for lightweight notes, gift cards, or flat treats. Do not use them for heavy, sharp, hot, or breakable items.
Can I use acrylic yarn?
Acrylic yarn of the same worsted weight can work, but its drape and response to blocking differ from cotton. Make a gauge swatch, use gentle blocking appropriate for the fiber, and never touch acrylic with a hot iron.
Can I omit the wooden dowel?
The written construction is designed around a 14 in (35.5 cm) dowel, three folded tabs, two secure end stops, and a reinforced hanging cord. Omitting it would require a different hanging structure that is not covered by this pattern.
Why are the pocket tiers worked from narrow to wide?
The paired edge increases create the graduated triangular shapes. The wide final rows become the three functional pocket openings.
Has a physical sample been tested?
The construction and explicit stitch counts have been mathematically checked, but no physical sample testing is claimed. Check gauge, block the panel, and dry-layout every component before permanent assembly.