Mini Fairy House DIY: How to Turn a Wood Log into Magical Wall Decor
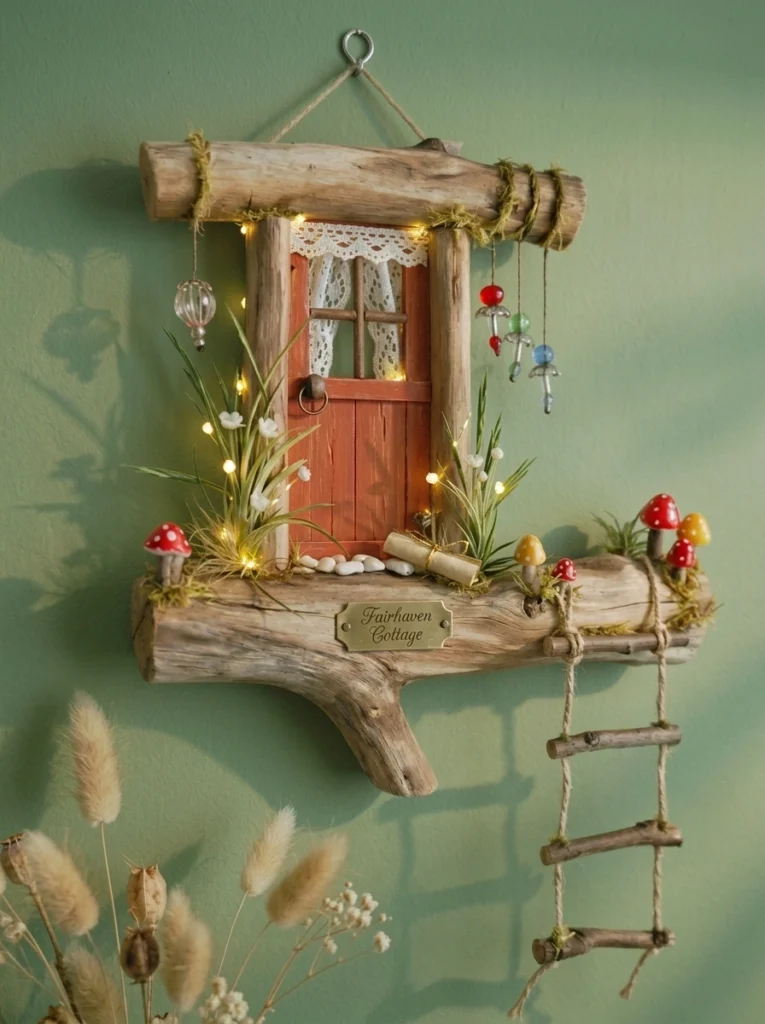
There’s a special kind of magic in taking something as simple as a fallen branch or small wood log and transforming it into a tiny, storybook-worthy fairy house. This DIY wood log fairy house wall decor project is one of the most charming ways to bring a whimsical, handmade touch into your home — whether you’re decorating a fairy garden, a bedroom wall, a bookshelf, or a cozy reading nook.
Unlike many decor crafts that require specialty tools or expensive materials, this project celebrates natural imperfection. Every log has its own shape, bark texture, and personality, which means no two fairy houses will ever look exactly alike. If you love the look of miniature, nature-inspired decor, this is a project you’ll want to try again and again.
In this guide, we’ll cover everything you need to know: the full supply list, detailed step-by-step instructions, styling ideas, display suggestions, and answers to common questions. By the end, you’ll be ready to create your own enchanting piece of fairy house wall art.
Why Wood Log Fairy Houses Are So Popular
Miniature fairy houses have become a beloved trend across home decor, gardening, and DIY communities — and it’s easy to understand why. They combine the rustic charm of natural materials with the storybook whimsy of fairy tale imagery. A wood log version takes this even further by leaning into an organic, earthy aesthetic that pairs beautifully with cottage-core, woodland, and boho interior styles.
Here’s what makes this particular project so appealing:
- Uses natural, often free materials: A wood log or thick branch can often be found in your own backyard, at a local park (with permission), or purchased inexpensively at a craft store.
- One-of-a-kind results: Because every log is unique, your fairy house will have a shape and texture that’s impossible to replicate exactly.
- Low cost: Beyond the log itself, most supplies are inexpensive and widely available at craft stores.
- Versatile decor: This piece works equally well as wall art, a shelf accent, or a fairy garden centerpiece.
- A relaxing, creative process: Sanding, painting, and adding tiny details is a wonderfully mindful, low-pressure craft activity.
Whether you’re an experienced crafter or picking up a paintbrush for the first time in years, this project is approachable and deeply satisfying to complete.
What You’ll Need: The Complete Supply List
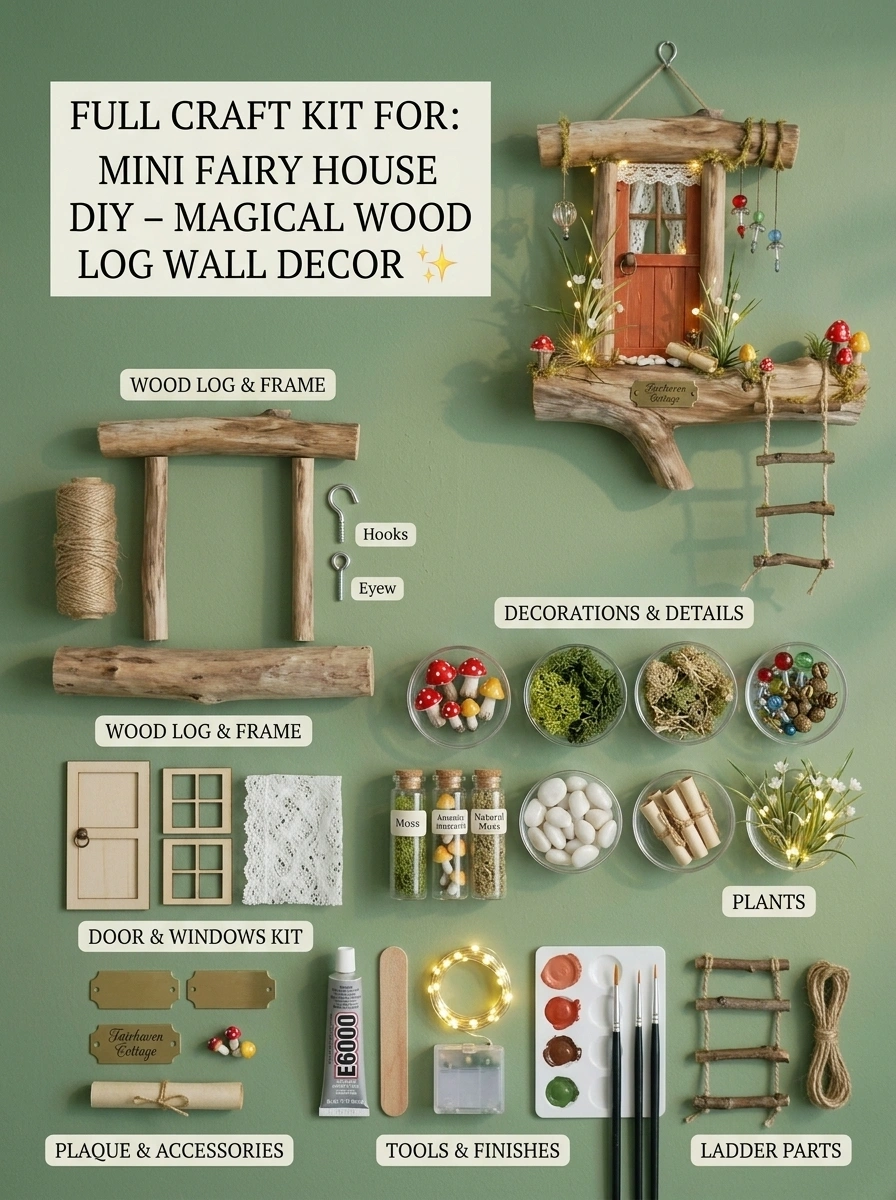
Before you begin, gather all your materials so the process flows smoothly from start to finish.
Essential Supplies
- Small wood log or thick branch – Look for one with a relatively flat or flattenable section to serve as the “front” of your fairy house. A diameter of roughly 3–6 inches works well for most designs.
- Acrylic paint – Used for painting the door, windows, and any additional decorative details onto the wood surface.
- Mini artificial flowers and greenery – These add color, texture, and a lush, garden-fresh feel around the entrance.
- Tiny decorative windows – Pre-made miniature windows (often found in dollhouse or fairy garden craft sections) give your house an instantly charming, finished look.
- Small wooden door – A miniature door, either purchased or handmade from craft wood, becomes the focal point of your design.
- Strong craft glue – A durable adhesive is essential for securing lightweight decorative pieces to a textured wood surface.
Optional Extras
- Miniature mushrooms – A classic fairy garden touch that adds whimsy and scale.
- Moss – Both natural dried moss and artificial moss work beautifully to soften the base of your design and fill in gaps.
- Beads – Small beads can be used as doorknobs, path stones, or decorative accents along window sills.
- Tiny lights – A few micro battery-powered LED lights tucked near the windows add a soft, magical glow, especially if displayed in a dim room or evening setting.
Having all these supplies ready before you start will help the project move along smoothly without interruptions.
Step-by-Step Instructions: How to Make Your Wood Log Fairy House
Follow these steps to turn your plain wood log into a charming piece of fairy house wall decor.
Step 1: Clean and Dry the Wood Log Thoroughly
Start by giving your log a good clean. Brush off any loose dirt, debris, or bark fragments, and wipe it down with a slightly damp cloth if needed. If your log was collected outdoors, it’s a good idea to let it dry out completely and check for any signs of insects or excess moisture before bringing it into your crafting space. Allow it to air dry fully — any dampness can interfere with paint adhesion later.
Step 2: Carefully Shape or Sand the Front to Create a Flat Surface
Using sandpaper or a small sanding block, smooth down a section of the log to create a relatively flat “front” surface. This flattened area will serve as the canvas for your door and windows. You don’t need a perfectly smooth finish — a bit of natural texture actually adds to the charm — but a stable, even surface will make painting and gluing much easier.
Take your time with this step, working in gentle strokes and checking your progress often. If you’re using a rotary tool or craft knife for more precise shaping, always work carefully and away from your body.
Step 3: Paint a Tiny Fairy-House Door and Windows
Once your surface is prepped, it’s time to bring your fairy house to life with paint. Using acrylic paint, sketch out or freehand:
- A small door shape, complete with a simple frame
- One or two window outlines, spaced naturally along the flattened surface
- Optional details like a tiny doorknob, window shutters, or a welcome mat
Acrylic paint adheres well to wood and comes in a wide range of colors, making it easy to achieve anything from a rustic, earthy palette to a bright, storybook-inspired look. Let each layer dry completely before moving on to avoid smudging.
Step 4: Add Miniature Flowers, Moss, and Greenery Around the Entrance
Now for one of the most delightful parts of the process — decorating the entrance. Using your strong craft glue, begin attaching:
- Small clusters of artificial flowers near the base of the door
- Strips or clumps of moss to soften the transition between the door and the natural wood texture
- Tiny greenery sprigs climbing up the sides of the “house” for a lush, overgrown cottage look
Layering these elements gradually, rather than all at once, will help you achieve a natural, balanced composition rather than a cluttered one.
Step 5: Decorate with Tiny Details to Give Your Fairy House Personality
This is where your fairy house truly becomes your own. Consider adding:
- Miniature mushrooms tucked near the base
- Small beads as a doorknob or lining a tiny pathway
- A few tiny lights nestled near the windows for a soft glow
- A small wooden ladder, bench, or fence piece for extra storytelling detail
Every added detail gives your fairy house more character and helps it feel like a lived-in, magical little home. Don’t be afraid to experiment — this step has no strict rules, only creative possibilities.
Step 6: Attach a Hanging Loop or Small Wall-Mounting Piece to the Back
Once your design is complete and fully dry, flip the log over and attach a hanging mechanism to the back. Depending on your log’s shape and weight, you might use:
- A small sawtooth picture hanger, screwed or glued into the back
- A sturdy loop of wire threaded through a small drilled hole
- A wall-mounting bracket sized appropriately for the log’s weight
Make sure whatever hanging method you choose is secure and rated to support the weight of your finished piece, especially if you’ve added heavier embellishments like beads or wooden accents.
Step 7: Hang It on Your Wall and Enjoy Your Magical Fairy World
With your hanger securely attached, find the perfect spot to display your creation — a gallery wall, a nursery, a reading nook, or even an outdoor covered patio. Step back and admire the tiny magical world you’ve created from little more than a wood log and a bit of imagination.
Creative Variations to Try
Once you’ve mastered the basic technique, there are countless ways to customize and expand on this project.
Seasonal Themes
- Spring: Bright florals, pastel-painted doors, and fresh greenery
- Autumn: Warm orange and brown tones, tiny acorns, and dried leaf accents
- Winter: White “snow” texture paint, silver beads, and soft white lights
Style Variations
- Rustic cottage: Natural wood tones, simple painted details, and moss accents
- Enchanted forest: Deep greens and purples, mushroom clusters, and tiny glowing lights
- Storybook cottage: Bright, saturated colors with a cheerful painted door and flower boxes
Multiple Log Display
Rather than creating just one fairy house, consider making a small series of two or three logs in varying sizes. Grouped together on a wall or shelf, they create the impression of an entire miniature fairy village, each with its own unique door, window style, and decorative theme.
Adding a Fairy Figurine
For an extra touch of whimsy, glue a small fairy figurine near the entrance or peeking out from behind a window, as if she’s just stepped outside her tiny home.
Where to Display Your Wood Log Fairy House
This craft’s rustic, natural material makes it especially versatile for both indoor and outdoor display.
- Gallery wall: Combine several fairy houses with other nature-inspired art for a whimsical wall display.
- Bookshelf or mantel: Lean it against a stack of books or display it upright among other decor pieces.
- Fairy garden: Nestle it into an outdoor or potted fairy garden setup alongside other miniature accessories.
- Nursery or kid’s room: A soft, magical addition to a child’s space, especially when paired with tiny lights.
- Front entryway: A charming, nature-inspired welcome for guests.
Because the log itself is a natural material, this piece also works beautifully as an outdoor-friendly decor item, provided you use weather-resistant paint and sealant for prolonged outdoor display.
Tips for a Long-Lasting Fairy House
To keep your wood log fairy house looking its best for years to come:
- Seal painted areas with a clear wood sealant or varnish, especially if the piece will be displayed outdoors or in a humid space.
- Choose weather-resistant florals if you plan to hang your fairy house outside, as some artificial flowers can fade or become brittle over time in direct sunlight.
- Store extra moss and embellishments in a dry place so you can easily do minor touch-ups down the road.
- Reinforce the hanging mechanism periodically, particularly if the piece is heavier or displayed in a high-traffic area.
- Dust gently with a soft brush or cloth to preserve the fine details of your miniature decorations.
Frequently Asked Questions
What kind of wood log works best for this project? A log with a relatively straight, flattenable section works best, ideally with a diameter between 3 and 6 inches. Softer woods are easier to sand and shape, while harder woods offer more durability for long-term display.
Do I need to seal the wood before painting? While not strictly necessary, applying a thin wood sealant before painting can help acrylic paint adhere more evenly, especially on rougher or more porous wood surfaces.
Can I use real moss instead of artificial moss? Yes, natural dried moss works wonderfully for this project and blends seamlessly with the organic texture of the log. Just note that natural moss may change color or texture over time, especially with sun exposure.
How do I make my own miniature door and windows if I can’t find pre-made ones? You can create simple doors and windows using thin craft wood, popsicle sticks, or even cardstock, then paint and detail them by hand before gluing them onto your flattened log surface.
Is this project safe for kids to help with? Yes, with some supervision during the sanding and gluing steps. The painting and decorating stages are especially well-suited for kids, who often enjoy adding their own creative touches like tiny mushrooms, beads, or flowers.
Can I add lights to this design? Absolutely. Small battery-powered micro LED lights can be tucked behind windows or nestled among the greenery for a soft, magical glow, particularly striking in dim lighting or in the evening.
Final Thoughts
A DIY wood log fairy house is a beautiful example of how a little creativity can turn something as simple as a fallen branch into a treasured piece of handmade decor. With just a handful of affordable supplies — paint, tiny florals, a miniature door, and a bit of patience — you can craft a completely unique, nature-inspired fairy house that brings warmth and whimsy to any wall, shelf, or garden space.
So gather your log, your paints, and your favorite miniature embellishments, and let your imagination lead the way. Once your finished fairy house is hanging proudly on your wall, you’ll have created not just a decoration, but a tiny magical world all your own.
Happy crafting!