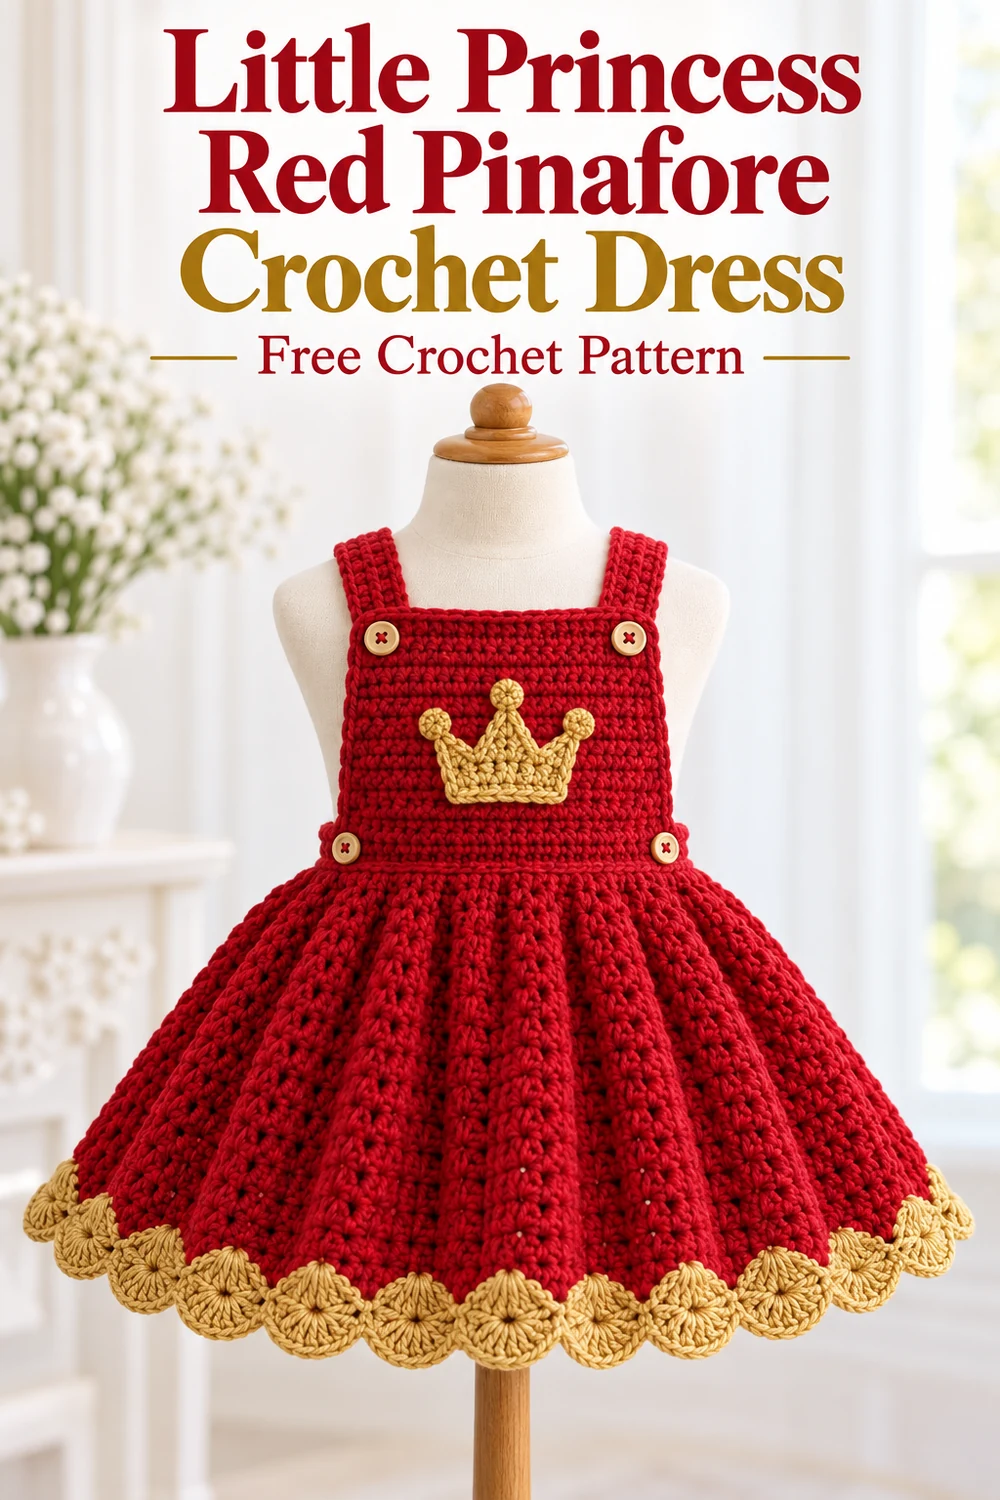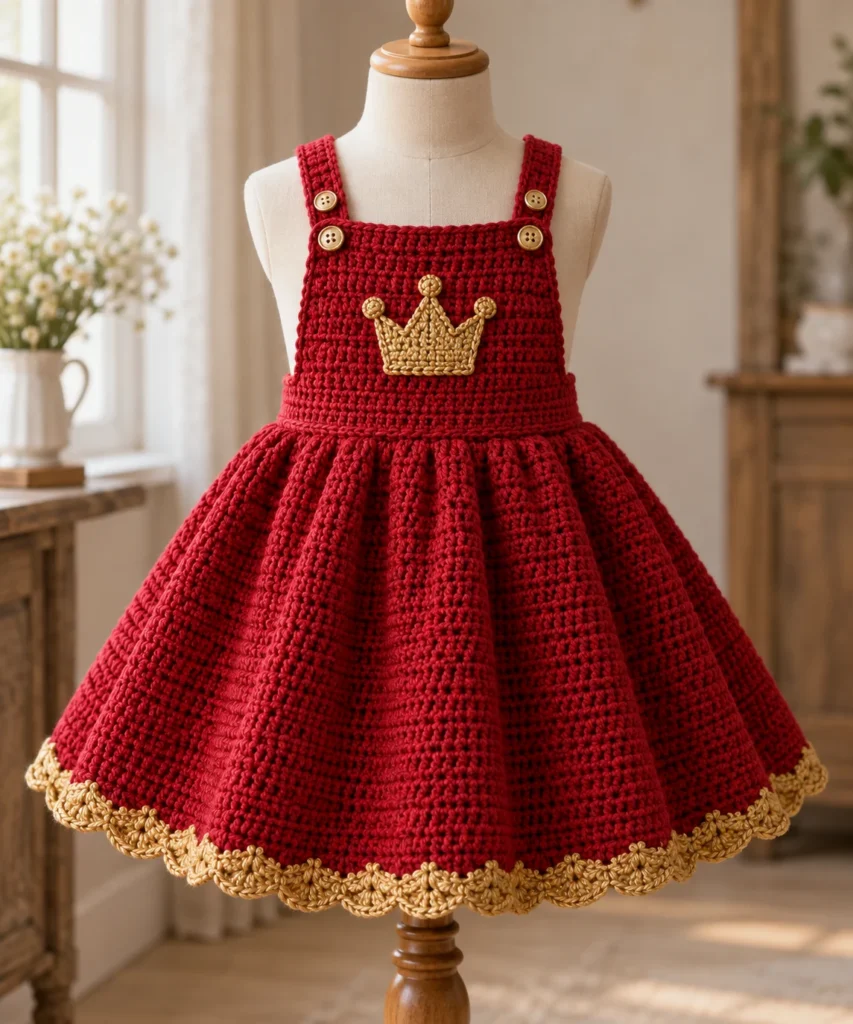
Little Princess Red Pinafore Crochet Dress
Create a bright red child’s pinafore with a gently flared skirt, shaped front bib, crossed adjustable straps, a gold crown appliqué, and a matching gold scalloped hem. This original free crochet pattern is written in US terminology and is designed for approximately age 2–3 years.
Important: Make and wash a gauge swatch before beginning. Pin the bib and straps in place and check the garment on the intended wearer before permanent sewing. This is a decorative garment, not sleepwear.
Pattern at a Glance
- Skill level: Confident beginner to intermediate
- Terminology: US crochet terms
- Construction: A flat waistband and skirt panel is joined at the center back. The separately crocheted bib, two adjustable shoulder straps, and crown appliqué are sewn in place.
- Size: Approximately 2–3 years
- Colors: Red main fabric with gold crown and integrated hem edging
- Turning chains: Ch 1 does not count as a stitch. Ch 3 counts as the first dc unless stated otherwise.
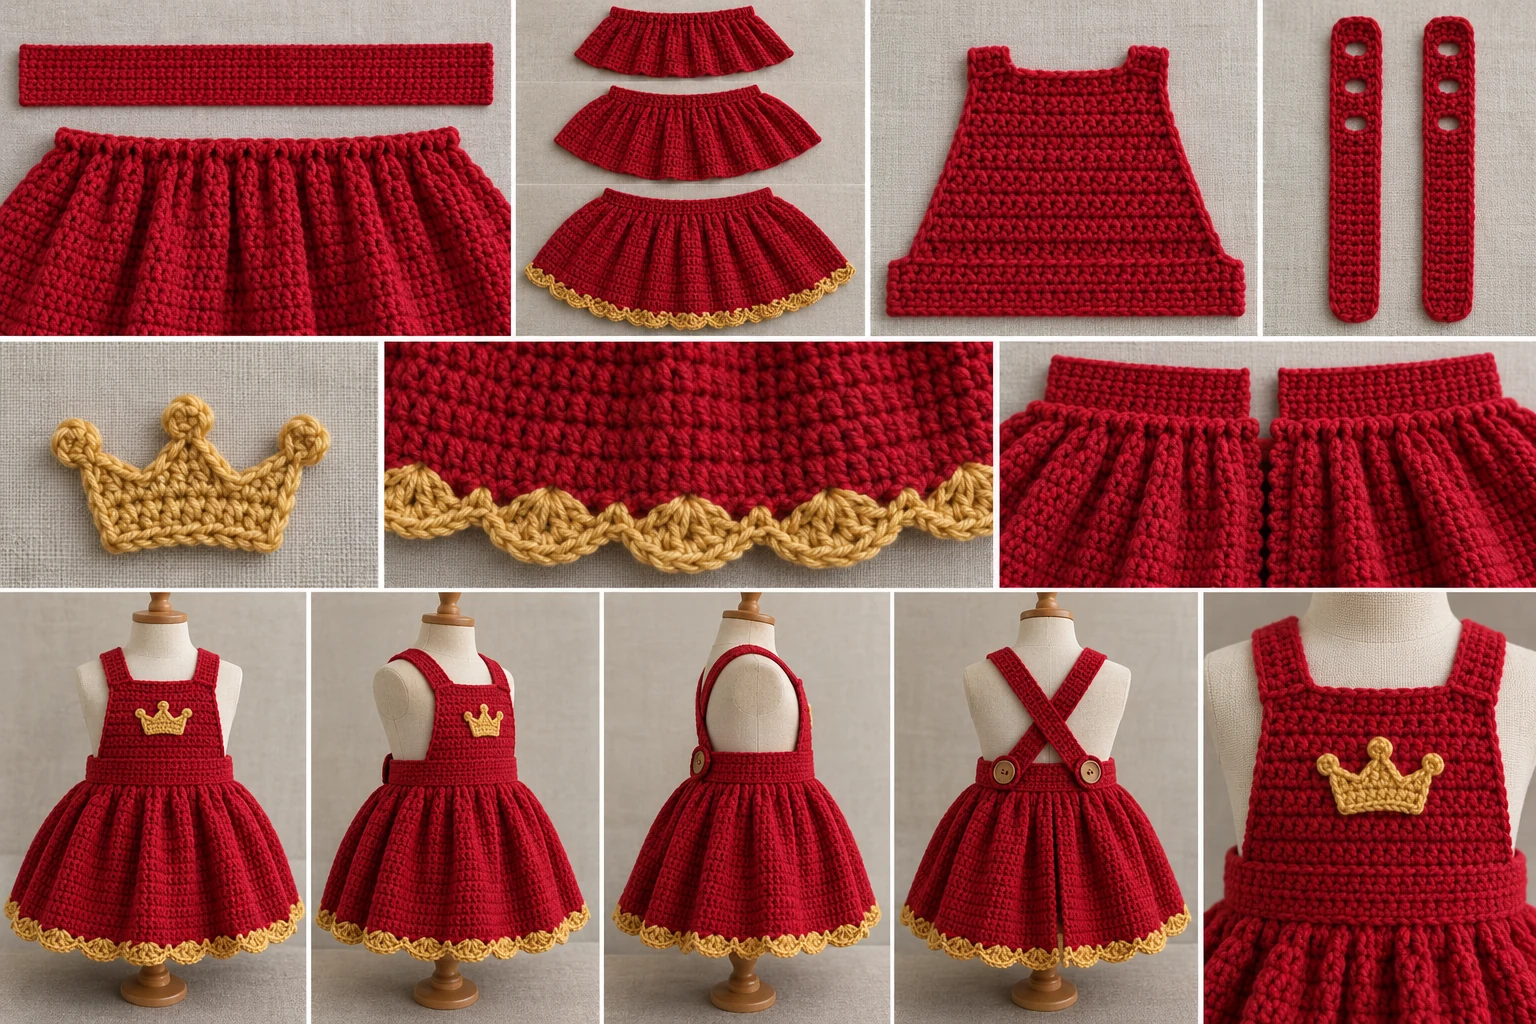
Visible Crocheted Components
- Red waistband and skirt panel: 1
- Red front bib: 1
- Red adjustable shoulder straps: 2
- Gold crocheted crown appliqué: 1
- Gold crocheted hem edging: integrated into the skirt
Materials You’ll Need
- DK or light-worsted yarn: 650 yd/595 m red
- DK or light-worsted yarn: 25 yd/23 m gold
- US G/6 (4 mm) crochet hook, or size required to obtain gauge
- Yarn needle
- Removable stitch markers
- Scissors
- Four washable buttons, each 0.75 in/19 mm
- Sewing needle
- Strong matching sewing thread
Use smooth, washable yarn of a similar fiber and weight for both colors.
Gauge
- 16 sc and 18 sc rows = 4 in/10 cm
- 14 dc and 8 dc rows = 4 in/10 cm
Make and wash a gauge swatch. Gauge is essential because both the stitch and row gauges affect the garment dimensions.
Finished Measurements
- Waist circumference: 22 in/56 cm
- Skirt length from waistband: 14 in/35.5 cm
- Bib: approximately 9 in/23 cm wide at the base, 6 in/15 cm wide at the top, and 6.75 in/17 cm tall
- Adjustable straps: approximately 15 in/38 cm long
The skirt has a center-back opening above a sewn lower seam. Adjust the skirt length by working more or fewer plain skirt rows, allowing approximately 0.5 in/1.25 cm per row.
Crochet Abbreviations
- beg = beginning
- ch = chain
- dc = double crochet
- hdc = half double crochet
- rep = repeat
- RS = right side
- sc = single crochet
- sk = skip
- sl st = slip stitch
- st(s) = stitch(es)
- WS = wrong side
Important Pattern Notes
- Turn after every row.
- Work through both loops unless instructed otherwise.
- Ch 1 does not count as a stitch.
- Ch 3 counts as the first dc unless stated otherwise.
- To make an sc decrease over the first or last two stitches: insert the hook in the first stitch and draw up a loop, insert the hook in the next stitch and draw up a loop, yarn over, and draw through all three loops.
- Leave the specified sewing tails when fastening off.
- The bib perimeter edging has no prescribed stitch count because the required side pickup rate depends on row height. Space those stitches evenly so the bib lies flat.
- Try the pinned bib and straps on the intended child before permanent sewing because torso length varies.
Complete Free Crochet Pattern
Component 1: Waistband and Skirt Panel — Make 1 in Red
Waistband
Ch 73.
Row 1 (RS): Sc in second ch from hook and in each ch across. 72 sc.
Rows 2–4: Ch 1, sc in each st across. 72 sc. Do not fasten off after Row 4.
Rotate the work clockwise. The skirt is worked from the long edge of the waistband. Distribute the stitches evenly, placing one stitch in each row-end position represented by the 72 original waistband stitches.
Skirt
Skirt Row 1 (RS): Ch 1, work 72 sc evenly across the long edge. 72 sc.
Row 2: Ch 3, dc in the same st as ch 3, 2 dc in each remaining st. Count the turning ch as a dc. 144 dc.
Rows 3–7: Ch 3, dc in each remaining st across. 144 dc.
Row 8: Work 12 groups of 11 ordinary dc positions followed by an increase of 2 dc in the next st. Replace the first dc of the first group with ch 3; then dc in the next 10 sts, 2 dc in the next st. Continue with 11 dc followed by 2 dc in the next st across. 156 dc.
Rows 9–14: Ch 3, dc in each remaining st across. 156 dc.
Row 15: Work 12 groups of 12 ordinary dc positions followed by an increase of 2 dc in the next st. Replace the first dc of the first group with ch 3; then dc in the next 11 sts, 2 dc in the next st. Continue with 12 dc followed by 2 dc in the next st across. 168 dc.
Rows 16–24: Ch 3, dc in each remaining st across. 168 dc.
Row 25, gold edging: Join gold at the first st. Ch 1, sc in first st, sk next 2 sts, 5 dc in next st, sk next 2 sts; rep from the beginning across. 28 scallops. Fasten off gold and weave in its ends. Fasten off red, leaving a 30 in/76 cm tail for the back seam.
Component 2: Front Bib — Make 1 in Red
Ch 37.
Row 1: Sc in second ch from hook and across. 36 sc.
Rows 2–6: Ch 1, sc across. 36 sc.
Row 7: Ch 1, sk first st, sc in each st to the last st, and leave the last st unworked. 34 sc.
Row 8: Ch 1, sc across. 34 sc.
Row 9: Ch 1, sc decrease over the first 2 sts, sc to the last 2 sts, sc decrease over the last 2 sts. 32 sc.
Row 10: Ch 1, sc across. 32 sc.
Row 11: Repeat Row 9. 30 sc.
Row 12: Ch 1, sc across. 30 sc.
Row 13: Repeat Row 9. 28 sc.
Row 14: Ch 1, sc across. 28 sc.
Row 15: Repeat Row 9. 26 sc.
Row 16: Ch 1, sc across. 26 sc.
Row 17: Repeat Row 9. 24 sc.
Rows 18–28: Ch 1, sc across. 24 sc.
Bib Edging
Ch 1 and sc across the top. Work 2 sc in the top corner, sc evenly down the side, 2 sc in the lower corner, sc across the unused foundation loops, 2 sc in the next corner, and sc evenly up the final side. Sl st to the first edging sc. Keep the edging flat without puckering. Fasten off with a 30 in/76 cm sewing tail.
Component 3: Adjustable Shoulder Straps — Make 2 in Red
For each strap, ch 61.
Row 1: Sc in second ch from hook and across. 60 sc.
Rows 2–3: Ch 1, sc across. 60 sc.
Row 4: Ch 1, sc in first 40 sts, *ch 2, sk next 2 sts, sc in next 4 sts; rep from * twice more, sc in final 2 sts. 60 positions, including six chains forming three buttonholes.
Fasten off, leaving a 20 in/51 cm sewing tail at the solid end. Weave in the buttonhole-end tail. Repeat for the second strap.
Component 4: Crown Appliqué — Make 1 in Gold
Ch 16.
Row 1: Sc in second ch from hook and across. 15 sc.
Row 2: Ch 1, *sc in next st, hdc in next st, work 3 dc in next st, hdc in next st, sc in next st; rep from * twice more. 21 sts forming three crown points.
Fasten off, leaving a 20 in/51 cm sewing tail. Block gently into a crown shape.
Assembly
- Block all crocheted components to the stated measurements before joining.
- Lay the waistband flat with the skirt below it and RS facing. Mark the center. Center the bib’s 36-stitch foundation edge over the middle 36 waistband stitches, leaving 18 waistband stitches free on each side. Overlap the bib foundation edge onto the upper half of the waistband by 0.5 in/1.25 cm. Using the bib tail, sew through both layers with small whipstitches across the entire bib base. Secure the tail by weaving it through the seam in three directions.
- With WS together, align the two back skirt edges. Using the long red skirt tail, mattress-stitch from the hem upward through Skirt Rows 25 to 7, matching the rows exactly. Backstitch securely and weave in the tail. Leave Skirt Rows 1–6 and the entire waistband open as the center-back dressing placket.
- Sew two buttons to the outside of the left waistband end. Position one button 0.5 in/1.25 cm from the top edge and the other 0.5 in/1.25 cm from the lower edge. Use doubled strong thread and make at least six passes through each button. Knot on the WS and bury the thread ends. Use spaces between stitches at the opposite waistband end as button loops. Test that both buttons pass through snugly. If the fabric is loose, reinforce each selected space with several matching-thread blanket stitches.
- Position the solid end of each strap behind the upper bib, placing each strap’s inner edge 2 in/5 cm from the bib center. Overlap by 1 in/2.5 cm. Using the attached tail, sew a rectangle around each overlap and add a diagonal cross inside it. Weave each tail through the seam in three directions.
- Place the garment on the intended wearer or a correctly sized dress form. Cross the straps at the back. Without stretching the fabric, mark comfortable strap angles and the appropriate buttonholes. Remove the garment. Sew one button securely to each back half of the waistband, approximately 3 in/7.5 cm from its center-back edge. Use doubled thread with at least six passes, knot on the WS, and bury the ends. Button each strap through its best-fitting hole; the remaining holes provide adjustment.
- Center the gold crown on the bib with its lower edge approximately 2 in/5 cm above the bib base. Using the gold tail, sew around the base and each crown point with small whipstitches. Avoid carrying thread across long distances on the WS. Knot securely beneath the appliqué and bury the tail.
Finishing
Weave in every remaining end. Lightly wet-block the assembled dress, keeping all buttonholes open and the crown points clearly defined. Inspect every seam and button before use.
Customization Ideas
- Skirt length: Add or remove plain dc rows, allowing approximately 0.5 in/1.25 cm per row. Preserve the shaping rows and finish with the gold edging.
- Fit: Use the three buttonholes on each strap to adjust the torso length without stretching the crochet.
- Color: Substitute another main color and contrast color while using smooth, washable yarns of the same weight.
- Appliqué placement: Pin the crown before sewing and confirm that it remains centered when the garment is worn.
Do not add length or move rear buttons until you have checked the pinned garment on the intended wearer.
Common Mistakes to Avoid
- Counting ch 1 as a stitch or forgetting that ch 3 counts as the first dc.
- Adding a dc beside the turning ch on plain dc rows and accidentally increasing the stitch count.
- Missing one of the 12 evenly spaced increases on Skirt Rows 8 or 15.
- Pulling the bib edging too tightly, causing the sides to cup.
- Closing the entire center back instead of leaving Skirt Rows 1–6 and the waistband open.
- Attaching the strap buttonhole ends to the bib. The solid ends are sewn behind the bib; the buttonhole ends cross at the back.
- Sewing the rear strap buttons permanently before checking the fit.
- Using yarn alone to attach buttons. Use doubled strong sewing thread and inspect it frequently.
Troubleshooting
Why does my skirt have the wrong stitch count?
Confirm 72 sc in Skirt Row 1 and 144 dc after doubling in Row 2. Rows 3–7 remain at 144. Row 8 adds 12 stitches for 156, and Row 15 adds another 12 for 168. Mark each increase group before crocheting a shaping row.
Why is the bib leaning to one side?
Check that both edge decreases were completed on Rows 9, 11, 13, 15, and 17. Confirm the row-end counts before continuing.
Why is the bib edging rippling or puckering?
Change the side pickup spacing. Too many picked-up stitches cause rippling; too few cause puckering. The edging should lie flat, so its exact count is intentionally flexible.
Why are the strap buttonholes too tight?
Check that each hole was made with ch 2 over two skipped stitches. Block the straps with the holes open. Do not force a button that could damage the fabric.
Why does the dress not match the expected measurements?
Recheck both stitch gauge and row gauge after washing the swatch. Yarn behavior and individual tension can change the finished dimensions substantially. Confirm the waistband against the intended wearer before permanent assembly.
Care Instructions
Follow the yarn manufacturer’s care label. For best results, place the dress in a mesh laundry bag, wash gently in cool water with mild detergent, and reshape it flat to dry. Keep the crown points defined and the buttonholes open while drying. Avoid high heat unless the yarn label specifically permits it. Inspect the buttons, strap attachments, back seam, and crown before every wear.
Frequently Asked Questions
What crochet terminology does this pattern use?
It uses standard US crochet terms.
Can I make the skirt longer?
Yes. Add plain dc rows before the gold edging, allowing approximately 0.5 in/1.25 cm of extra length per row. Keep the established 168-stitch count on added rows.
Can I omit the crown?
The crown is one of the specified components of this design. If making the complete Little Princess dress, crochet and attach it as written.
How are the straps adjusted?
Each strap has three buttonholes. Cross the straps at the back and select the holes that provide a comfortable fit without stretching the crochet.
How much of the back seam remains open?
Seam upward from the hem through Skirt Rows 25 to 7. Leave Skirt Rows 1–6 and the waistband open for dressing.
Is this garment safe for sleep?
No. It is a decorative child’s garment, not sleepwear. Buttons can be a choking hazard. Keep the garment away from children who mouth objects, supervise young children, inspect the hardware regularly, and discontinue use if any button or seam loosens.
Has this garment been physically tested?
No physical testing is claimed. Verify the fit, construction, and security of all hardware before use.