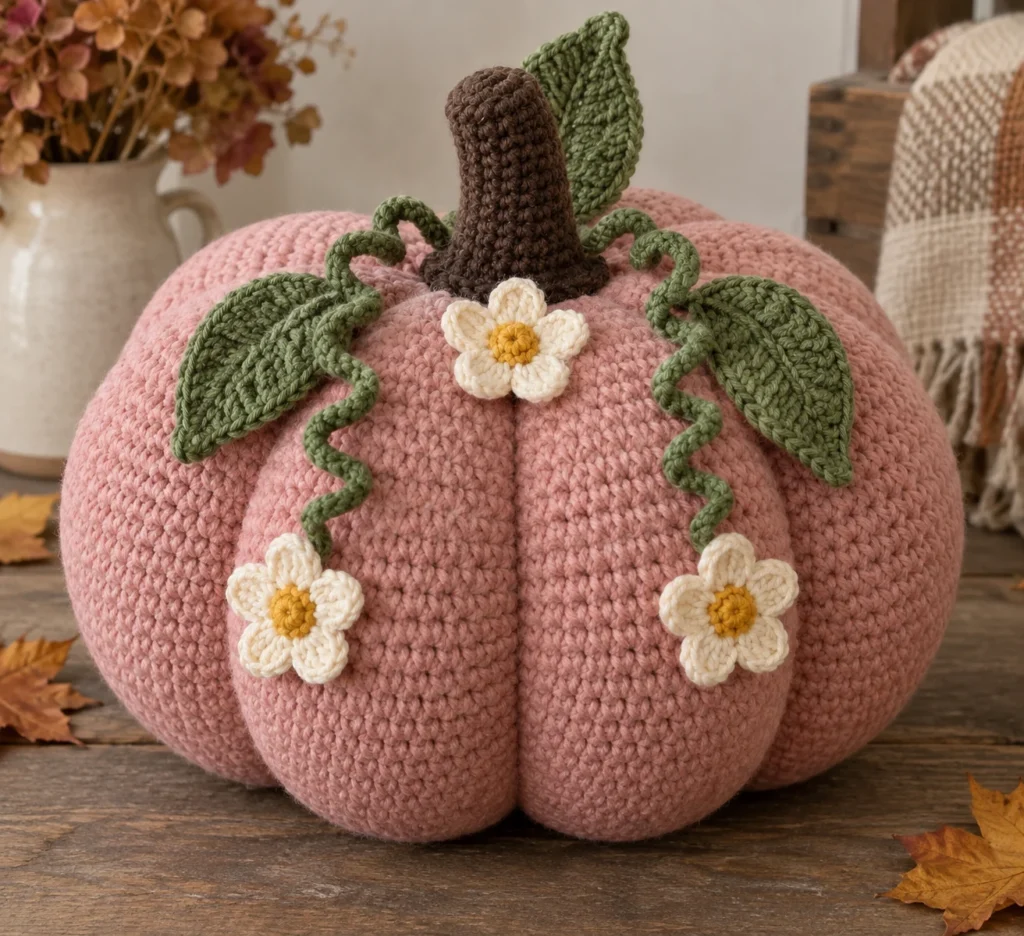
Large Pink Crochet Pumpkin Pattern with Flowers and Vines
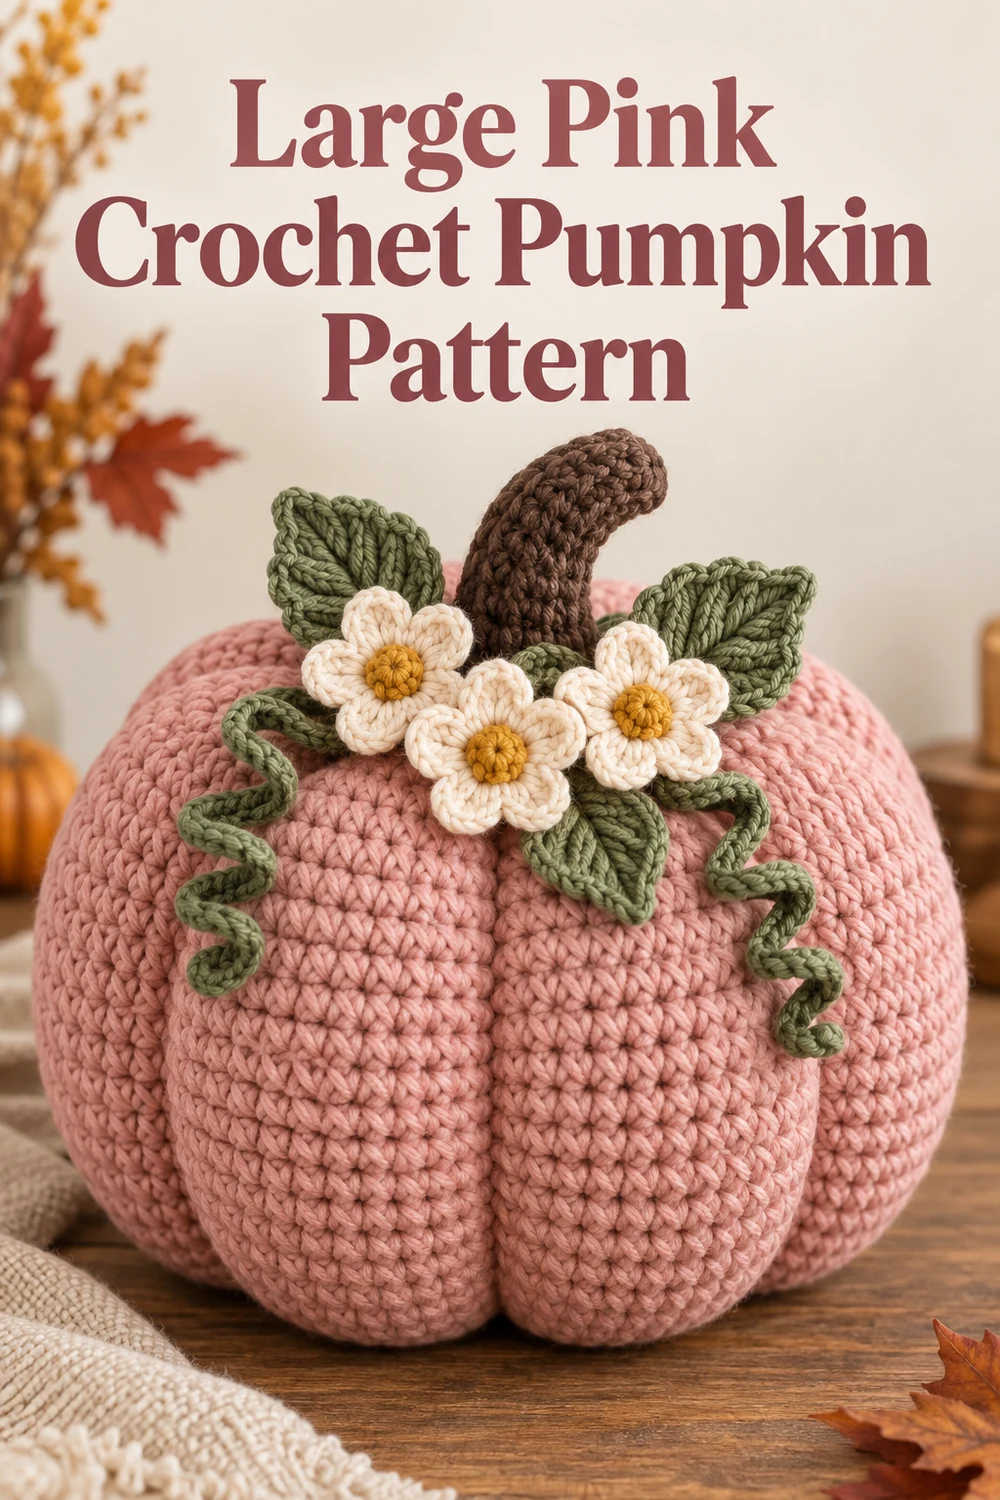
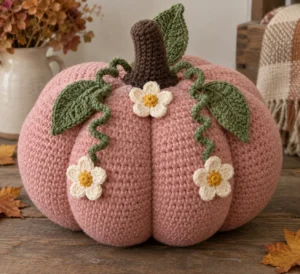
Create a soft, generously sized fall centerpiece with a dusty-pink pumpkin, tall brown stem, curling green vines, sculpted leaves, and cream flowers with golden centers. This original free crochet pattern uses US crochet terminology and includes every crocheted component shown in the finished design.
Pattern at a Glance
- Skill level: Intermediate
- Terminology: US crochet terms
- Construction: The body and stem are worked in continuous rounds. The vines, leaves, and flowers are made separately and sewn to the finished pumpkin.
- Visible crocheted components: 1 pink pumpkin body, 1 brown stem, 2 green spiral vines, 3 green leaves, and 3 cream five-petal flowers with yellow centers.
- Total pieces: 10 crocheted pieces.
- Working method: Use one strand of yarn throughout.
Materials You’ll Need
- Category 4 worsted-weight yarn: 500 yd/457 m dusty pink (Color A)
- 55 yd/50 m dark brown (Color B)
- 90 yd/82 m leafy green (Color C)
- 45 yd/41 m cream (Color D)
- 8 yd/7.5 m golden yellow (Color E)
- 5.5 mm (I-9) crochet hook
- Removable stitch marker
- Yarn needle
- Scissors
- Approximately 14–18 oz/400–510 g polyester fiberfill
- Six 40 in/102 cm lengths of strong pink yarn for sculpting
No wire, buttons, beads, safety eyes, or other rigid hardware are used.
Gauge
13 sc and 14 rounds = 4 in/10 cm in firmly worked single crochet.
Exact gauge is helpful but not critical, but the fabric must be dense enough to conceal the stuffing. Make a flat swatch and change hook size if necessary.
Finished Measurements
- Finished pumpkin: approximately 12 in/30.5 cm across and 9 in/23 cm tall, including the stem
- Unadorned stuffed body: approximately 12 in/30.5 cm across and 7.5 in/19 cm tall
- Each leaf: approximately 4.5 in/11.5 cm long
- Each flower: approximately 3 in/7.5 cm across
Finished dimensions can vary with gauge, fiberfill density, and the tension of the sculpting strands.
Crochet Abbreviations
- beg = beginning
- BLO = back loop only
- ch = chain
- dc = double crochet
- dec = single crochet decrease over the next 2 stitches
- FLO = front loop only
- hdc = half double crochet
- inc = 2 single crochet in the indicated stitch
- MR = magic ring
- R = round
- sc = single crochet
- sl st = slip stitch
- st(s) = stitch(es)
- tr = treble crochet
Important Pattern Notes
- Work firmly enough that the stuffing does not show.
- Unless a join is explicitly stated, rounds are continuous. Place a removable marker in the first stitch of each continuous round and move it upward as you work.
- An inc means working 2 sc in one stitch.
- For an invisible sc decrease, insert the hook under the front loop of each of the next 2 stitches, yarn over and pull through 2 loops, then yarn over and pull through both loops.
- Stitch counts exclude chains unless stated otherwise.
- Complete every component before beginning assembly.
- The stuffed body should measure approximately 12 in/30.5 cm wide before sculpting. Fiberfill density may affect this measurement.
- Adjust the six sculpting strands evenly by eye. The grooves should be comparable in depth without exposing the stuffing.
Complete Free Crochet Pattern
Component 1: Pumpkin Body — Make 1 in Color A
Leave an 18 in/46 cm beginning tail for closing and reinforcement. Work in continuous rounds.
R1: Make an MR; 6 sc in ring. (6)
R2: Inc in each st around. (12)
R3: [Sc in next st, inc in next st] 6 times. (18)
R4: [Sc in next 2 sts, inc in next st] 6 times. (24)
R5: [Sc in next 3 sts, inc in next st] 6 times. (30)
R6: [Sc in next 4 sts, inc in next st] 6 times. (36)
R7: [Sc in next 5 sts, inc in next st] 6 times. (42)
R8: [Sc in next 6 sts, inc in next st] 6 times. (48)
R9: [Sc in next 7 sts, inc in next st] 6 times. (54)
R10: [Sc in next 8 sts, inc in next st] 6 times. (60)
R11: [Sc in next 9 sts, inc in next st] 6 times. (66)
R12: [Sc in next 10 sts, inc in next st] 6 times. (72)
R13–28: Sc in each st around. (72 each round)
R29: [Sc in next 10 sts, dec] 6 times. (66)
R30: [Sc in next 9 sts, dec] 6 times. (60)
R31: [Sc in next 8 sts, dec] 6 times. (54)
R32: [Sc in next 7 sts, dec] 6 times. (48)
R33: [Sc in next 6 sts, dec] 6 times. (42)
R34: [Sc in next 5 sts, dec] 6 times. (36)
Begin stuffing. Add fiberfill in small pieces, keeping the base broad and flat.
R35: [Sc in next 4 sts, dec] 6 times. (30)
R36: [Sc in next 3 sts, dec] 6 times. (24)
Firmly stuff the perimeter and center without stretching the fabric.
R37: [Sc in next 2 sts, dec] 6 times. (18)
R38: [Sc in next st, dec] 6 times. (12)
Finish stuffing before the opening becomes smaller.
R39: Dec 6 times. (6)
Fasten off with an 18 in/46 cm tail. Thread the tail through the front loops of the final 6 stitches, pull the opening closed, knot securely inside the opening, and bury the tail through the stuffing.
Sculpt the Six Pumpkin Sections
- Thread one prepared 40 in/102 cm pink strand onto the yarn needle.
- Enter through the closed bottom center and exit at the closed top center, leaving a 5 in/13 cm tail at the bottom.
- Carry the yarn straight down the outside and re-enter at the bottom center. Pull only until a clear groove forms.
- Repeat the same path once to reinforce the groove.
- Knot both ends securely at the bottom center and bury them.
- Repeat with the remaining five strands, spacing the grooves evenly at approximately 60-degree intervals. Adjust the tension before knotting so all six sections are equally rounded and the strands remain concealed in the grooves.
Component 2: Stem — Make 1 in Color B
Leave a 24 in/61 cm finishing tail for sewing. Work from the closed top downward in continuous rounds.
R1: Make an MR; 6 sc in ring. (6)
R2: Inc in each st around. (12)
R3: BLO sc in each st around. (12)
R4–10: Sc in each st around. (12 each round)
R11: FLO [sc in next st, inc in next st] 6 times. (18)
R12: [Sc in next 2 sts, inc in next st] 6 times. (24)
Fasten off, retaining the long tail. Lightly stuff only R2–10, leaving the 24-stitch flange flat.
Components 3–4: Spiral Vines — Make 2 in Color C
Leave an 18 in/46 cm beginning tail for attachment.
Ch 41. Starting in the second ch from the hook, work 3 sc in each of the next 40 chains. (120 sc)
The strip will curl naturally. Fasten off with a 6 in/15 cm tail and weave this short tail securely through several stitches. Retain the beginning tail for assembly.
Components 5–7: Leaves — Make 3 in Color C
Leave a 15 in/38 cm beginning tail for sewing. Ch 13.
Working into the back bumps and starting in the second ch from the hook: sl st in next ch, sc in next ch, hdc in next ch, dc in next ch, tr in next 4 ch, dc in next ch, hdc in next ch, sc in next ch, 3 sc in final ch. Rotate to work along the unused loops on the opposite side of the foundation chain: sc in next loop, hdc in next loop, dc in next loop, tr in next 4 loops, dc in next loop, hdc in next loop, sc in next loop, sl st in final loop. (25 sts)
Fasten off with a 6 in/15 cm tail. Weave in only the short finishing tail and retain the beginning tail for assembly.
Components 8–10: Five-Petal Flowers — Make 3
Each flower is one crocheted piece with a Color E center and Color D petals. Leave a 15 in/38 cm beginning tail in Color E for sewing.
R1, Color E: Make an MR; 5 sc in ring. Join with sl st to first sc. (5)
R2, Color D: Join Color D in any sc. In each of the 5 center stitches work: sl st, ch 2, 3 dc, ch 2, sl st. This makes 5 petals.
After the fifth petal, fasten off Color D with a 6 in/15 cm tail. Weave the Color D tail securely behind the petals. Retain the Color E tail for assembly.
Count note: Each petal contains 2 sl sts and 3 dc, for 5 worked stitches. Across five petals, that is 25 worked stitches plus 20 chains.
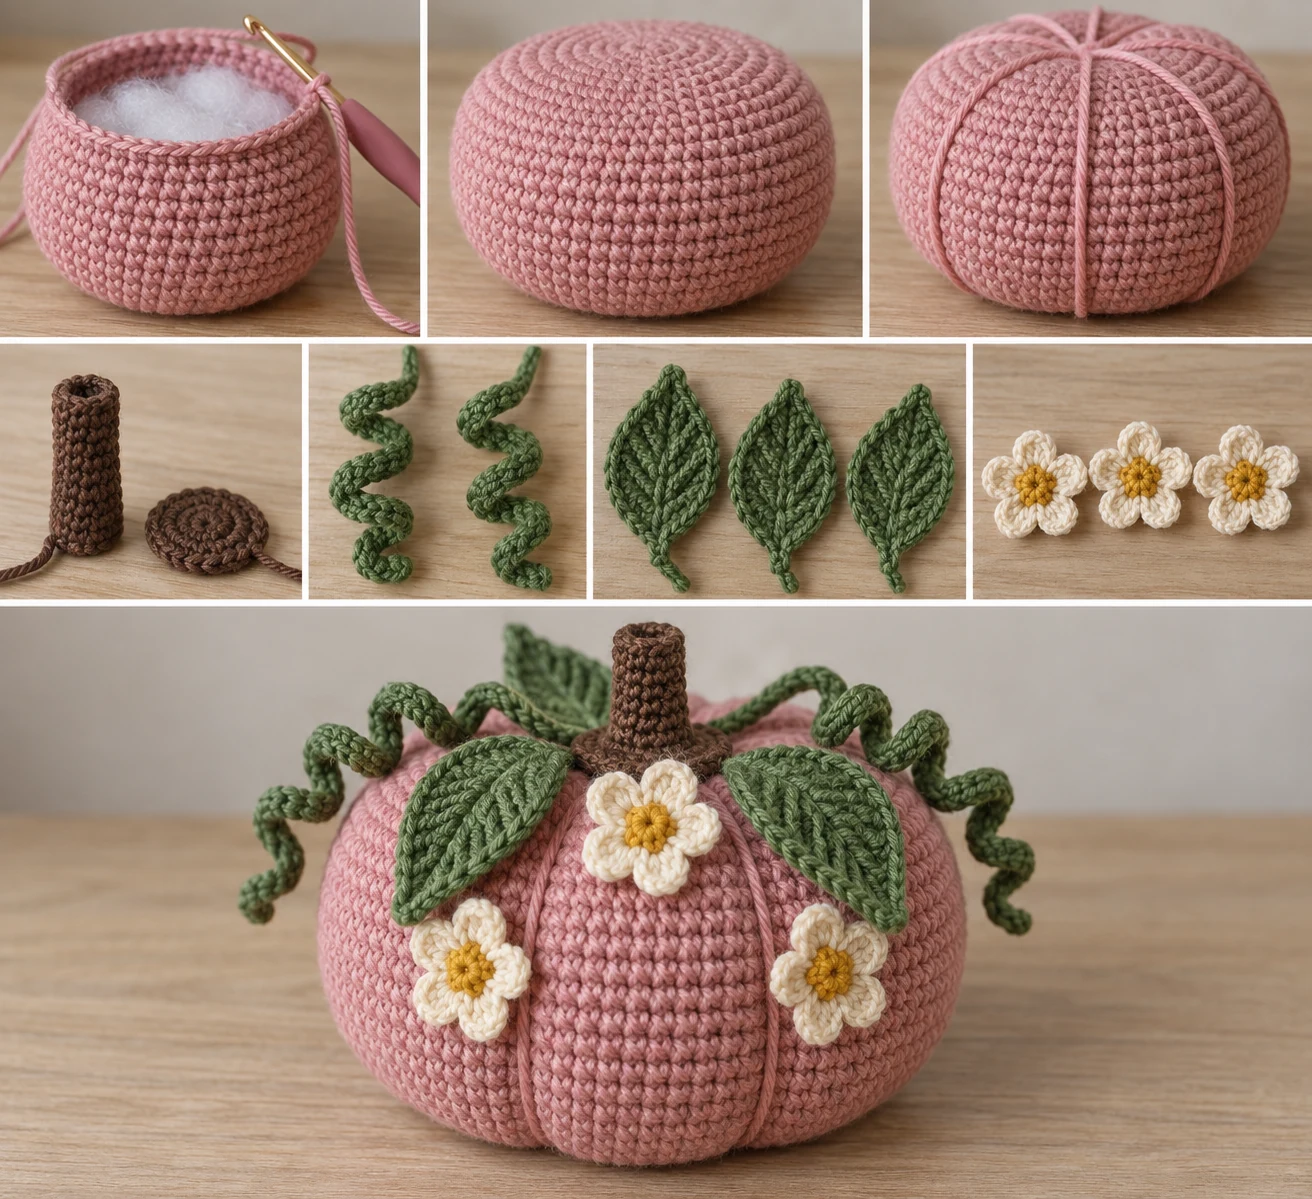
Assembly
- Complete, stuff, close, and sculpt the pumpkin body before attaching any decorations.
- Center the stem flange over the top closure. With the retained brown tail and small whipstitches, sew every stitch of the 24-stitch flange to the body. Pass through full body stitches without piercing completely through the pumpkin. Make a second reinforcing pass around the flange, knot beneath it, and bury the tail.
- Position the two vines on opposite sides of the stem. With each retained green tail, sew the vine’s first three foundation-chain links beneath the stem flange, making three passes through each link. Knot beneath the flange and bury the tail. Leave the coils free to drape down separate pumpkin sections.
- Arrange one leaf at the front-left of the stem, one at the front-right, and one behind the stem. Tuck their narrow bases beneath the flange and point their tips outward. With each retained tail, sew the bottom 1 in/2.5 cm of the leaf to the body using at least six small stitches. Knot beneath the leaf and bury the tail. Leave the rest of each leaf free.
- Place one flower between the two front leaves, one approximately 3 in/7.5 cm down the left-front groove, and one approximately 3 in/7.5 cm down the right-front groove. With each retained yellow tail, sew through all 5 center stitches and the corresponding body stitches twice. Knot behind the flower and bury the tail. Keep the cream petals free.
- Guide each vine through the decoration cluster so its spiral remains visible. Reposition any coil that obscures a flower. Do not glue or permanently tack the free length.
Finishing
- Confirm that every beginning and finishing tail is knotted where specified and buried for at least 2 in/5 cm.
- Redistribute the stuffing by hand to restore six evenly rounded sections.
- Shape the stem upright.
- Fan the three leaves outward.
- Open all flower petals and separate the vine coils.
- Inspect every sewn attachment and reinforce it if it shifts under a gentle pull.
Customization Ideas
You may change the yarn colors while retaining the stated yarn weight, quantities, component counts, and construction. Muted peach, mauve, or warm coral can replace dusty pink; the leaves and vines can be worked in olive or sage; and the flowers can be made in another pale shade. For a smaller or larger result, use a different yarn weight with a suitable hook, but expect the finished measurements and yarn requirements to change. Do not omit or add rounds if you want to preserve the checked stitch progression.
Common Mistakes to Avoid
- Losing the beginning of a round: Move the stitch marker after every continuous round.
- Joining body rounds: The body and stem are worked continuously except where the flower center specifically calls for a join.
- Overstuffing: Excess fiberfill can stretch the stitches and make the filling visible.
- Uneven grooves: Space the six sculpting strands at roughly 60-degree intervals and adjust all six before securing them.
- Stuffing the stem flange: Stuff only R2–10. The 24-stitch flange must remain flat for sewing.
- Flattening the decorations: Sew only the specified bases and centers so the leaves, petals, and vine coils retain dimension.
- Confusing chains with worked stitches: Chains are excluded from counts unless the pattern states otherwise.
Troubleshooting
Why is stuffing visible?
Your tension may be too loose or the body may be overfilled. Use a smaller hook if needed and add fiberfill gradually in small pieces.
Why is the pumpkin tall instead of broad?
Compress and redistribute the filling toward the perimeter and base. Confirm your gauge and avoid packing too much fiberfill into the center.
Why do the grooves have different depths?
Before knotting the sculpting strands, loosen the deepest grooves and gently tighten the shallowest ones. No strand should cut into the fabric or reveal stuffing.
Why is a vine not curling?
Confirm that you worked 3 sc into each of all 40 foundation chains. Twist the completed strip gently in the direction of its natural curl.
Why does a leaf count differ from 25 stitches?
The first long side contains 11 stitches, the tip contains 3 sc, and the second long side contains 11 stitches. Check that all four tr were made on each side and that the final sl st was not skipped.
How do I count the flower petals?
Each petal contains 2 sl sts and 3 dc, totaling 5 worked stitches. Across five petals, that is 25 worked stitches plus 20 chains.
Care Instructions
Spot-clean according to the yarn label. Blot rather than rub, reshape the six sections and decorations while damp, and dry flat. Do not wring, hang, or apply high heat. Store without heavy objects on top so the stem, leaves, flowers, and coils retain their shape.
Frequently Asked Questions
Is this pattern written in US terms?
Yes. All stitch names and abbreviations use US crochet terminology.
How many pieces do I crochet?
Ten: 1 pumpkin body, 1 stem, 2 spiral vines, 3 leaves, and 3 flowers.
Are the yellow centers separate pieces?
No. Each yellow center and its cream petals form one flower component.
Do I need wire or other hardware?
No. The design uses no wire, buttons, beads, safety eyes, or rigid hardware.
Can I glue on the decorations?
No. Follow the specified doubled sewing passes. Sewing produces secure attachments while preserving the dimensional petals, leaves, and coils.
Can children play with the finished pumpkin?
This pattern is designed as soft seasonal décor. Check every seam and attachment regularly, and supervise use according to the materials and yarn manufacturer’s guidance.
Does the finished size have to be exact?
No. The stated size is approximate and depends on gauge, yarn, stuffing density, and sculpting tension.