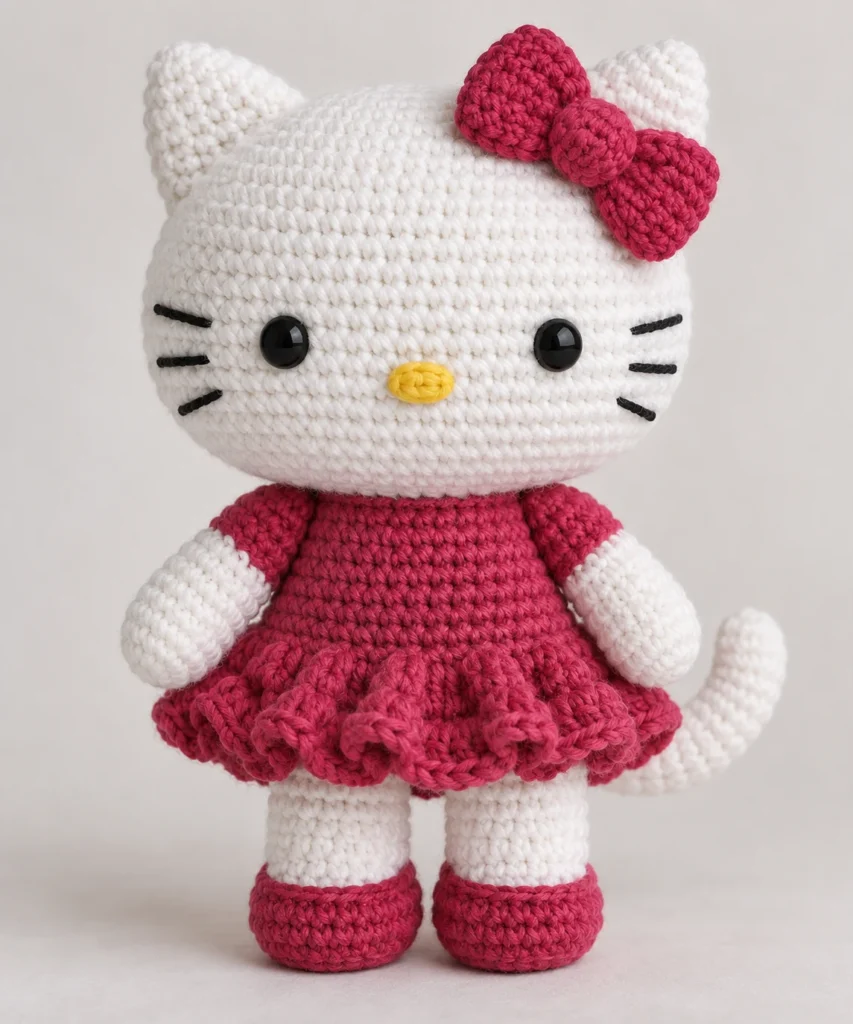
Hello Kitty Amigurumi Crochet Pattern
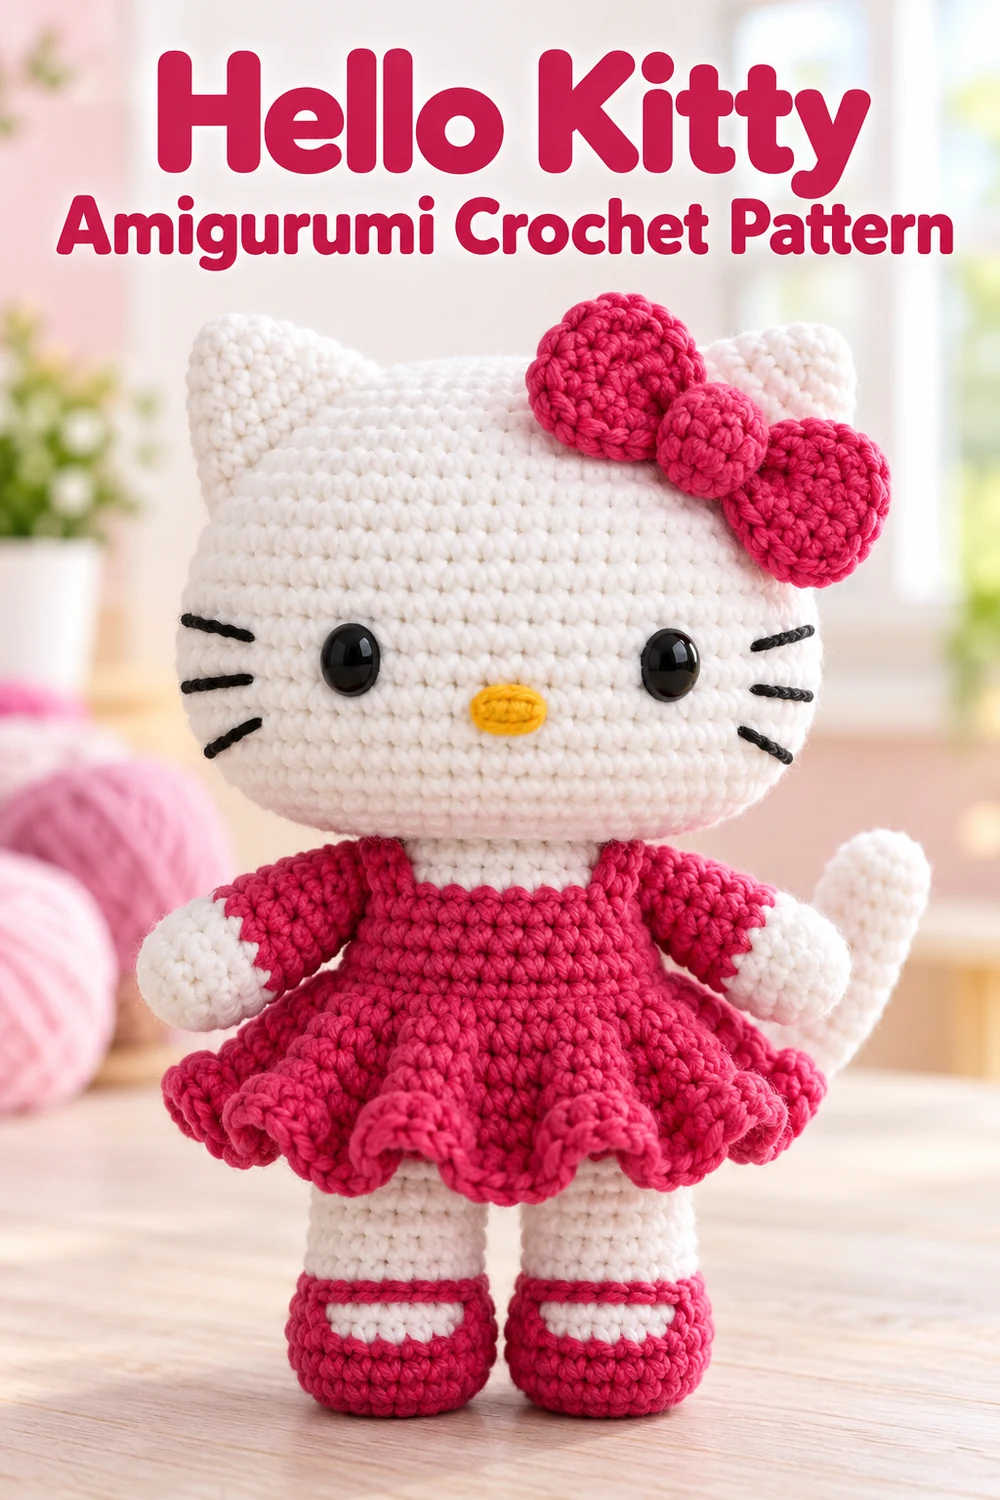
Create a compact white cat doll with a broad oval head, pointed ears, a raspberry-pink dress and ruffled skirt, matching shoes, a curved tail, and a three-piece bow. This original free pattern uses US crochet terminology and produces an approximately 8.5 in (21.5 cm) tall amigurumi when worked to gauge.
Skill level: Intermediate. You should be comfortable working continuous rounds, changing colors, making invisible decreases, embroidering facial details, and sewing small stuffed pieces together.
Safety note: Safety eyes can present a choking hazard and are not appropriate for children under three. For a baby-safe doll, embroider the eyes securely instead.
Pattern at a Glance
- Terminology: US crochet terms
- Construction: Separate head, ears, torso, arms, legs, tail, and bow; the skirt ruffle is worked into unused front loops on the torso.
- Working method: Continuous rounds except for the joined skirt rounds and bow rows.
- Finished height: Approximately 8.5 in (21.5 cm)
- Main colors: White and raspberry pink, with yellow and black facial details
- Visible crocheted pieces: One head, two ears, one dress-clad torso, two arms, two legs with integrated shoes, one tail, one surface-worked skirt ruffle, two bow loops, and one bow center band
- Additional details: Two eyes, one embroidered yellow nose, and six embroidered black whiskers
Materials You’ll Need
- Worsted-weight category 4 smooth yarn in white: approximately 95 yd (87 m)
- Worsted-weight category 4 smooth yarn in raspberry pink: approximately 65 yd (59 m)
- Yellow yarn for the nose: approximately 1 yd (1 m)
- Black embroidery yarn or smooth black yarn for the whiskers: approximately 2 yd (2 m)
- 3.25 mm crochet hook
- Two 9 mm black safety eyes with locking washers, or black yarn for embroidered eyes
- Polyester fiberfill
- Removable stitch marker
- Yarn needle
- Pins
- Scissors
- Optional washable fabric adhesive, used only to stabilize knots inside inaccessible areas
Use yarns of the same weight throughout. Cotton or a cotton-acrylic blend will help the small shapes and embroidered details remain crisp.
Gauge
20 sc × 22 rounds = 4 in (10 cm) in continuous single-crochet rounds before stuffing.
Exact gauge is less important than a firm, gap-free fabric. If stuffing can be seen between your stitches, use a smaller hook while maintaining the written stitch counts.
Finished Measurements
- Assembled doll: approximately 8.5 in (21.5 cm) tall
- Head: approximately 4.75 in (12 cm) wide
- Torso including skirt: approximately 3.25 in (8.25 cm) long
- Each arm: approximately 2.5 in (6.5 cm) long
- Each leg: approximately 2.75 in (7 cm) long
- Each ear: approximately 1.4 in (3.5 cm) tall
- Tail: approximately 2.25 in (5.5 cm) long
Crochet Abbreviations
- ch = chain
- st(s) = stitch(es)
- sl st = slip stitch
- sc = single crochet
- inc = work 2 sc in one stitch
- dec = invisible single-crochet decrease over 2 stitches
- BLO = back loop only
- FLO = front loop only
- MR = magic ring
- R = round
- Row = row
- rep = repeat
- FO = fasten off
Important Pattern Notes
- Work in continuous spirals unless the instructions specify rows or joined rounds.
- Place a marker in the first stitch of every continuous round and move it upward after each round.
- Numbers in parentheses are the stitch totals at the end of the round or row.
- An increase turns one source stitch into two stitches. A decrease turns two source stitches into one stitch.
- To change color, work the final yarn-over of the preceding stitch with the new color.
- Stuff firmly enough to hold the shape without stretching the fabric or exposing fiberfill.
- Pin the ears, limbs, tail, bow, and head before sewing. Small gauge differences can affect visual balance.
- This is an original, arithmetically checked construction plan; it is not presented as a physically sample-tested pattern.
Complete Free Crochet Pattern
Head — Make 1 in White
- R1: Work 6 sc in MR. (6)
- R2: Inc in each st around. (12)
- R3: [Sc 1, inc] 6 times. (18)
- R4: [Sc 2, inc] 6 times. (24)
- R5: [Sc 3, inc] 6 times. (30)
- R6: [Sc 4, inc] 6 times. (36)
- R7–R13: Sc in each st around. (36 each round)
- R14: [Sc 4, dec] 6 times. (30)
- R15: [Sc 3, dec] 6 times. (24)
- R16: [Sc 2, dec] 6 times. (18)
- R17: [Sc 1, dec] 6 times. (12)
- R18: Dec 6 times. (6)
Pause after R10 to install the eyes between R9 and R10, spaced 8 stitches apart when counted across R9. Insert each post from the right side and press its washer fully onto the post inside the head. Check that the eyes are level and symmetrical before locking the washers. If embroidering the eyes, omit the hardware and add vertical black satin stitches during finishing.
After R16, stuff the head firmly and shape it into a gently flattened oval. Add the last stuffing after R17. After R18, FO with a 10 in (25 cm) tail. Thread the tail through the front loops of the final 6 stitches, pull the opening closed, knot securely, and bury the tail.
Ears — Make 2 in White
- R1: Work 6 sc in MR. (6)
- R2: Sc in each st around. (6)
- R3: Inc in each st around. (12)
- R4: Sc in each st around. (12)
- R5: [Sc 1, inc] 6 times. (18)
- R6–R7: Sc in each st around. (18 each round)
FO with an 18 in (46 cm) sewing tail. Do not stuff. Flatten the opening into a slightly curved base of 9 paired stitches.
Torso with Integrated Dress — Make 1
Begin at the lower edge with raspberry yarn.
- R1: Work 6 sc in MR. (6)
- R2: Inc in each st around. (12)
- R3: [Sc 1, inc] 6 times. (18)
- R4: [Sc 2, inc] 6 times. (24)
- R5: [Sc 3, inc] 6 times. (30)
- R6–R10: Sc in each st around. (30 each round)
- R11: BLO sc in each st around. (30)
- R12: [Sc 3, dec] 6 times. (24)
- R13: Sc in each st around. (24)
- R14: [Sc 2, dec] 6 times. (18)
- Change to white.
- R15: Sc in each st around. (18)
- R16: [Sc 1, dec] 6 times. (12)
The unused front loops from R11 must remain accessible for the skirt. FO with a 24 in (61 cm) sewing tail. Stuff the lower torso firmly and the neck edge moderately so the opening remains flat enough to attach securely to the head.
Skirt Ruffle — Make 1 in Raspberry
This visible surface-work section is crocheted directly into the unused front loops of torso R11. Hold the torso upside down with its base toward you. Join raspberry yarn with a sl st to any unused front loop.
- R1: Ch 1, inc in each of the 30 unused front loops; join with a sl st to the first sc. (60)
- R2: Ch 1, sc in each st around; join with a sl st to the first sc. (60)
- R3: Ch 1, sc in each st around; join with a sl st to the first sc. (60)
FO with a 4 in (10 cm) tail. Weave the tail through the wrong side of the skirt and adjacent torso stitches.
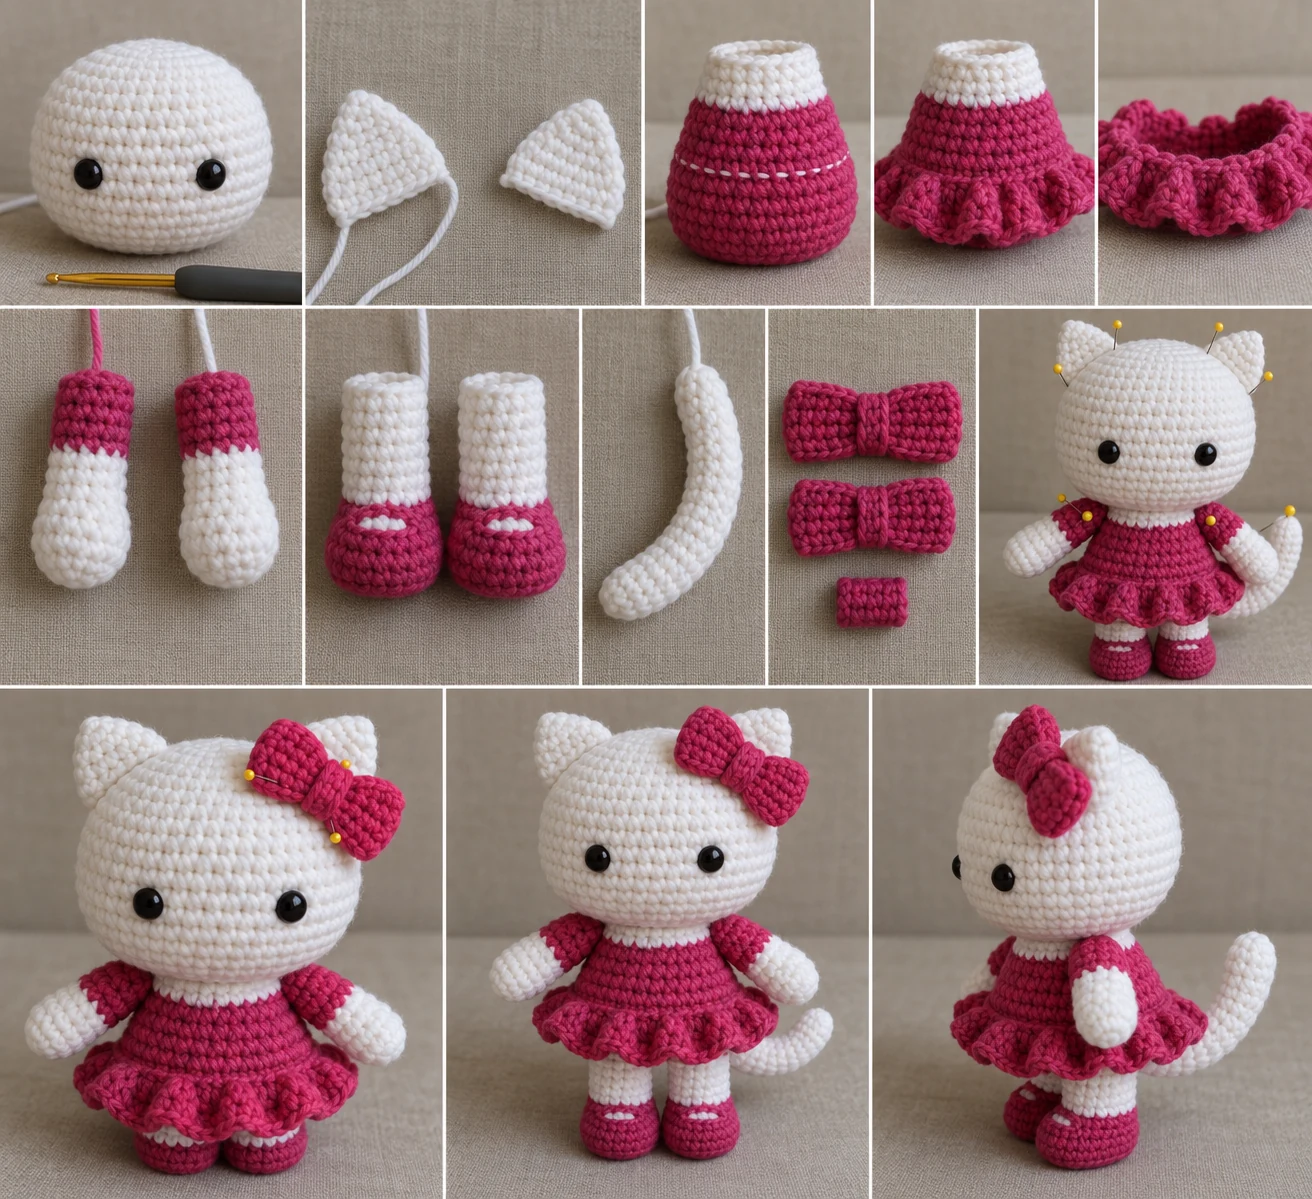
Arms — Make 2
Begin with white yarn.
- R1: Work 6 sc in MR. (6)
- R2: Inc in each st around. (12)
- R3–R6: Sc in each st around. (12 each round)
- R7: [Sc 2, dec] 3 times. (9)
- Change to raspberry.
- R8–R11: Sc in each st around. (9 each round)
Lightly stuff only the lower two-thirds. Flatten the opening into 4 paired stitches, with 1 stitch positioned at each fold. FO with an 18 in (46 cm) sewing tail.
Legs — Make 2
Begin with raspberry yarn for the shoes.
- R1: Work 6 sc in MR. (6)
- R2: Inc in each st around. (12)
- R3: [Sc 1, inc] 6 times. (18)
- R4–R6: Sc in each st around. (18 each round)
- R7: [Sc 1, dec] 6 times. (12)
- Change to white.
- R8–R12: Sc in each st around. (12 each round)
Stuff each shoe firmly and each upper leg lightly. Flatten the opening into 6 paired stitches. FO with an 18 in (46 cm) sewing tail.
Tail — Make 1 in White
- R1: Work 6 sc in MR. (6)
- R2: Inc in each st around. (12)
- R3–R8: Sc in each st around. (12 each round)
Stuff lightly, leaving the final round unstuffed so the base can flatten. Bend the tail gently into a curve. FO with an 18 in (46 cm) sewing tail.
Bow Loops — Make 2 in Raspberry
Ch 7.
- Row 1: Beginning in the second ch from the hook, sc in each ch across; turn. (6)
- Rows 2–4: Ch 1, sc in each st across; turn. (6 each row)
FO after Row 4 with a 12 in (30 cm) tail on each loop. Weave in each starting tail. Pinch each rectangle at its center, wrap its sewing tail twice around the pinch, and secure the wrap without cutting the remaining tail.
Bow Center Band — Make 1 in Raspberry
Ch 4.
- Row 1: Beginning in the second ch from the hook, sc in each ch across; turn. (3)
- Rows 2–5: Ch 1, sc in each st across; turn. (3 each row)
FO with a 12 in (30 cm) sewing tail. Weave in the starting tail.
Embroidered Facial Details
Nose: With yellow yarn, make a horizontal satin-stitch nose centered between the eyes and positioned between head R10 and R11. Span approximately 2 stitches and pass through the same entry points several times to form an oval about 0.3 in (8 mm) wide. Knot securely inside the head or bury the yarn deeply through the stuffing.
Whiskers: With black yarn, embroider three straight whiskers on each cheek. Position the upper pair near R10, the middle pair near R11, and the lower pair near R12. Each whisker should span approximately 3 stitches and angle slightly away from the nose. Secure and bury every end.
Assembly
- Complete every crocheted component. Install the eyes, embroider the nose and six whiskers, finish stuffing, and weave in all tails that are not reserved for sewing.
- Attach the ears: Position their inner lower corners near head R3 and outer lower corners near R6, leaving approximately 7 stitches between the inner corners. With each ear tail, whipstitch both layers of the flattened base through the head stitches. Do not add stuffing. Knot securely and bury the tails through the head.
- Attach the legs: Sew the legs to the underside of the torso across torso R2–R5, with their inner edges approximately 2 stitches apart. Point the raspberry shoe sections forward. Sew through both layers of each flattened opening and the corresponding torso stitches twice for strength. Knot and bury the tails inside the torso.
- Attach the arms: Position the arms on opposite sides of the torso, with their flattened upper edges spanning torso R14–R16. Angle them slightly forward. Sew through both layers of each upper edge, then knot and bury the tails.
- Attach the tail: Position the tail on the back-right side of the torso across R7–R10. Keep its curved tip visible beyond the skirt. Stitch around the entire flattened base, knot securely, and bury the tail.
- Join the head and torso: Center the torso beneath the head. Rest the 12-stitch torso opening against the lower head over approximately head R15–R17. Using the torso’s long tail, sew twice around the neck opening, passing through one torso stitch and one head stitch on every pass. Add a final pinch of stuffing before closing any remaining gap. Knot securely and bury the tail through the torso.
- Assemble the bow: Place the two pinched loops side by side with their centers touching. Use one remaining loop tail to sew the centers together, then knot and trim or bury that tail. Wrap the center band around both pinches, overlap its short ends at the back, and stitch the overlap closed with the band tail.
- Attach the bow: Place it immediately below the doll’s left ear, slightly overlapping the ear base without covering the eye. Use both remaining bow tails to sew the back of the center band and the inner edges of the loops to the head. Make several independent passes, knot securely, and bury both tails through the head.
Finishing
Gently shape the head into a broad oval and smooth any uneven stuffing. Arrange the skirt ruffle, curve the tail, and check that the doll stands or sits evenly. Confirm that both eye washers are fully locked and cannot rotate or pull through the stitches. Tug-test the bow, ears, arms, legs, tail, head, and torso joins individually. Do not trim a structural tail until its knot is secure and buried.
Customization Ideas
- Substitute another dress-and-shoe color while keeping all yarns in the same weight.
- Embroider the eyes instead of using safety eyes for a softer, baby-safe face.
- Use cotton yarn for crisp definition or a cotton-acrylic blend for a slightly softer finish.
- Adjust the bow placement to the opposite ear if desired; do not alter its component count or construction.
- Add subtle blush with a textile-safe method, taking care not to introduce detachable pieces.
Common Mistakes to Avoid
- Losing track of continuous rounds: Always mark the first stitch, especially during the head and torso shaping.
- Using the torso’s front loops in R11: Work R11 in BLO so all 30 front loops remain available for the skirt.
- Adding extra increases to skirt R2: Only skirt R1 increases. Work exactly 60 sc in both R2 and R3.
- Overstuffing flat attachments: Leave ear openings unstuffed and the limb and tail bases flexible enough to flatten.
- Locking uneven eyes: Inspect the face from the front and above before pressing the washers fully into place.
- Sewing before pinning: Pin every paired component so the ears, arms, and legs remain symmetrical.
- Hiding the tail behind the skirt: Angle the tail so its curved tip remains visible beyond the ruffle.
Troubleshooting
Why can I see stuffing between the stitches?
Your tension may be too loose for amigurumi. Move to a smaller hook without changing the written stitch counts, and avoid overstuffing.
Why does my skirt have more than 60 stitches?
Increase only in skirt R1, working 2 sc into each of the 30 unused front loops. R2 and R3 contain one sc in each of the 60 stitches with no increases.
Why is the head round instead of broadly oval?
Stuff evenly, then gently compress the top and bottom while shaping the sides outward. Do not add so much fiberfill that the fabric becomes rigid.
Why do the arms or legs twist?
Continuous-round pieces naturally spiral. Rotate each piece into the desired orientation, pin it in place, and verify the shoes face forward before sewing.
Why does the neck wobble?
Add a final pinch of stuffing at the neck, keep the 12-stitch torso opening flat against the head, and sew twice around the full opening with close, even stitches.
What should I do if the eyes are not level?
Reposition them before locking the washers. Once the washers are secured, removal may damage the fabric; embroidered eyes are easier to revise.
Care Instructions
Follow the care directions on the yarn label. Spot-clean when possible. If the selected yarn permits washing, hand-wash gently in cool water, avoid twisting or wringing, press out moisture in a towel, reshape the head, skirt, bow, and tail, and dry flat. Recheck every seam and safety-eye washer after cleaning.
Frequently Asked Questions
Is this pattern written in US terms?
Yes. Every stitch and abbreviation uses US crochet terminology.
Can a beginner make this doll?
An adventurous beginner can follow it, but experience with continuous rounds, invisible decreases, color changes, embroidery, and assembly will help.
Can I use a different yarn weight?
Yes, but the finished size and yarn requirements will change. Use one consistent yarn weight and choose a hook that creates dense fabric.
Are the shoes separate pieces?
No. Each raspberry shoe is integrated into its leg before the yarn changes to white.
Is the dress removable?
No. The raspberry torso forms the dress, and its ruffle is crocheted directly into the unused front loops of torso R11.
How many separate bow pieces are crocheted?
Three: two raspberry bow loops and one raspberry center band.
How can I make the doll safer for a child under three?
Replace the safety eyes with firmly embroidered black eyes, secure and bury every yarn end, and omit any removable embellishments.
Has the stitch math been checked?
Yes. The explicit round and row totals have been checked arithmetically. Personal tension and final placement should still be evaluated while you work because the construction has not been claimed as physically sample-tested.