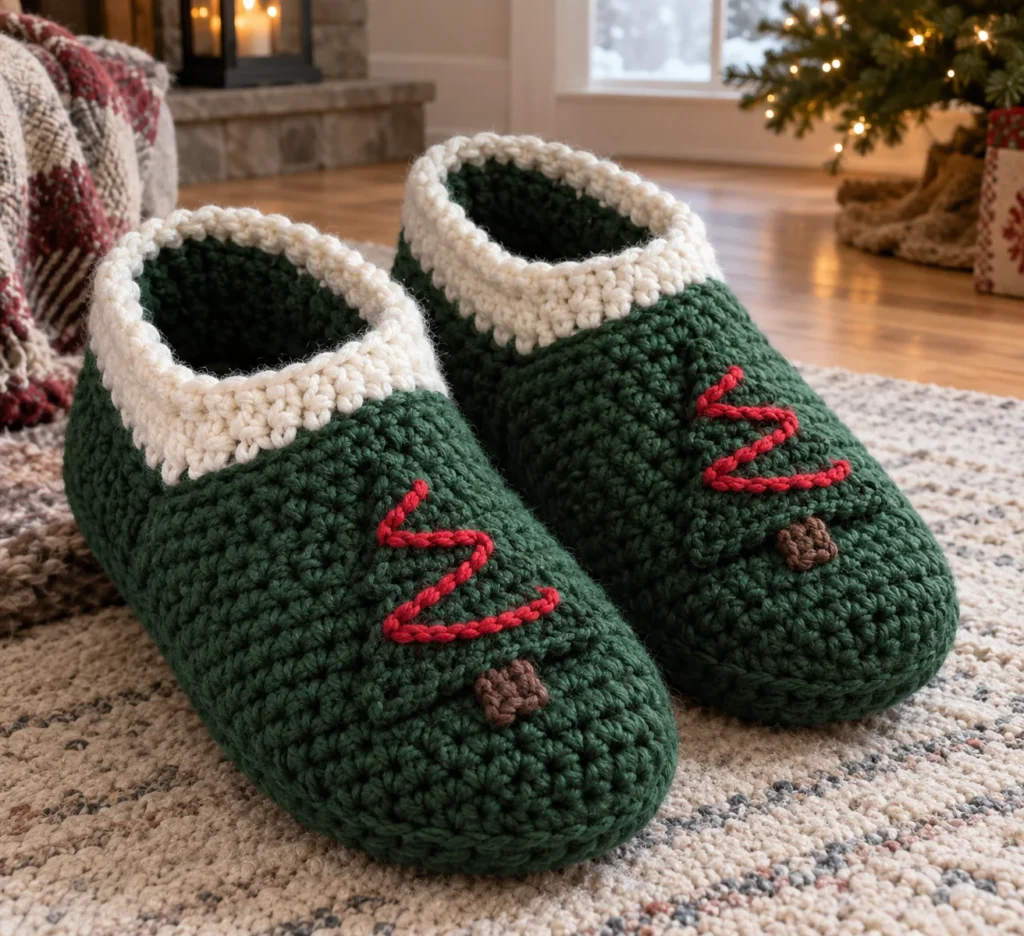
Green Christmas Slippers Crochet Pattern
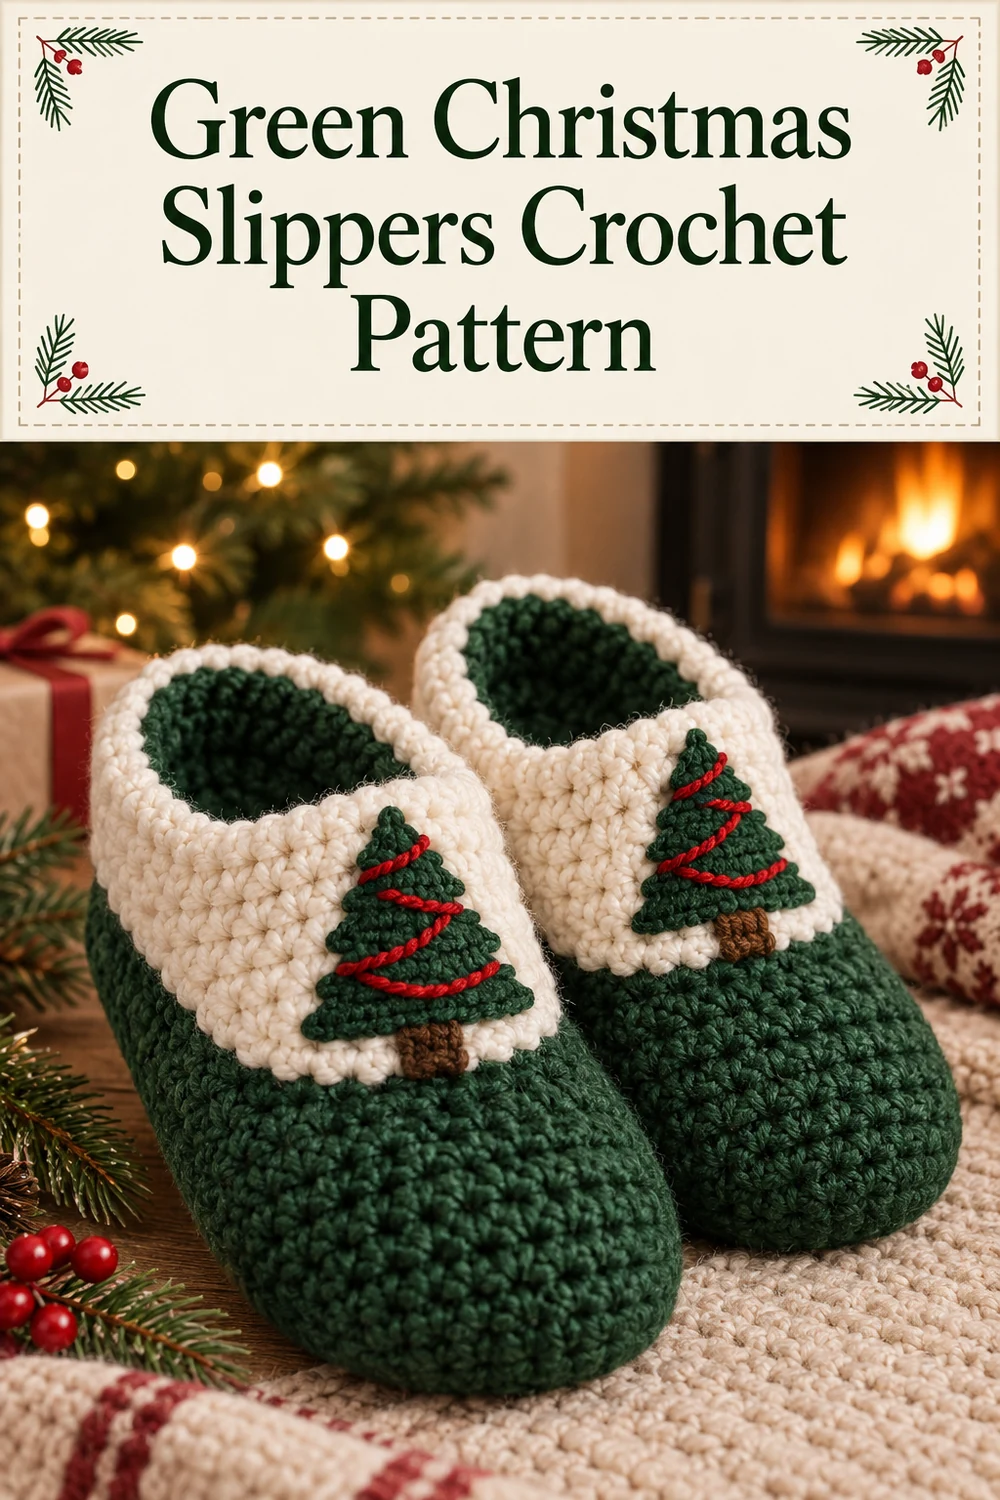
Bring a little handmade holiday cheer indoors with these cozy green Christmas slippers. This original free crochet pattern pairs a dense oval sole with a shaped closed-toe upper, tapered heel-and-side band, snowy white cuff, and a dark-green Christmas-tree appliqué trimmed with a red chain garland.
The instructions use US crochet terminology and make one adult medium pair. Every component is named below, and the stitch counts and attachment points have been mathematically checked. The design has not been physically test-crocheted, so check your gauge, compare the sole with the wearer’s foot, and try on the slippers before permanently attaching the decorations.
Pattern at a Glance
- Skill level: Confident beginner to intermediate
- Terminology: US crochet terms
- Construction: Flat components are sewn around an oval sole; the cuff is crocheted directly onto the assembled slipper.
- Size: Adult medium, intended for an approximately 9–9.5 in/23–24 cm foot
- Primary stitches: Chain, slip stitch, single crochet, half double crochet, increases, and single-crochet decreases
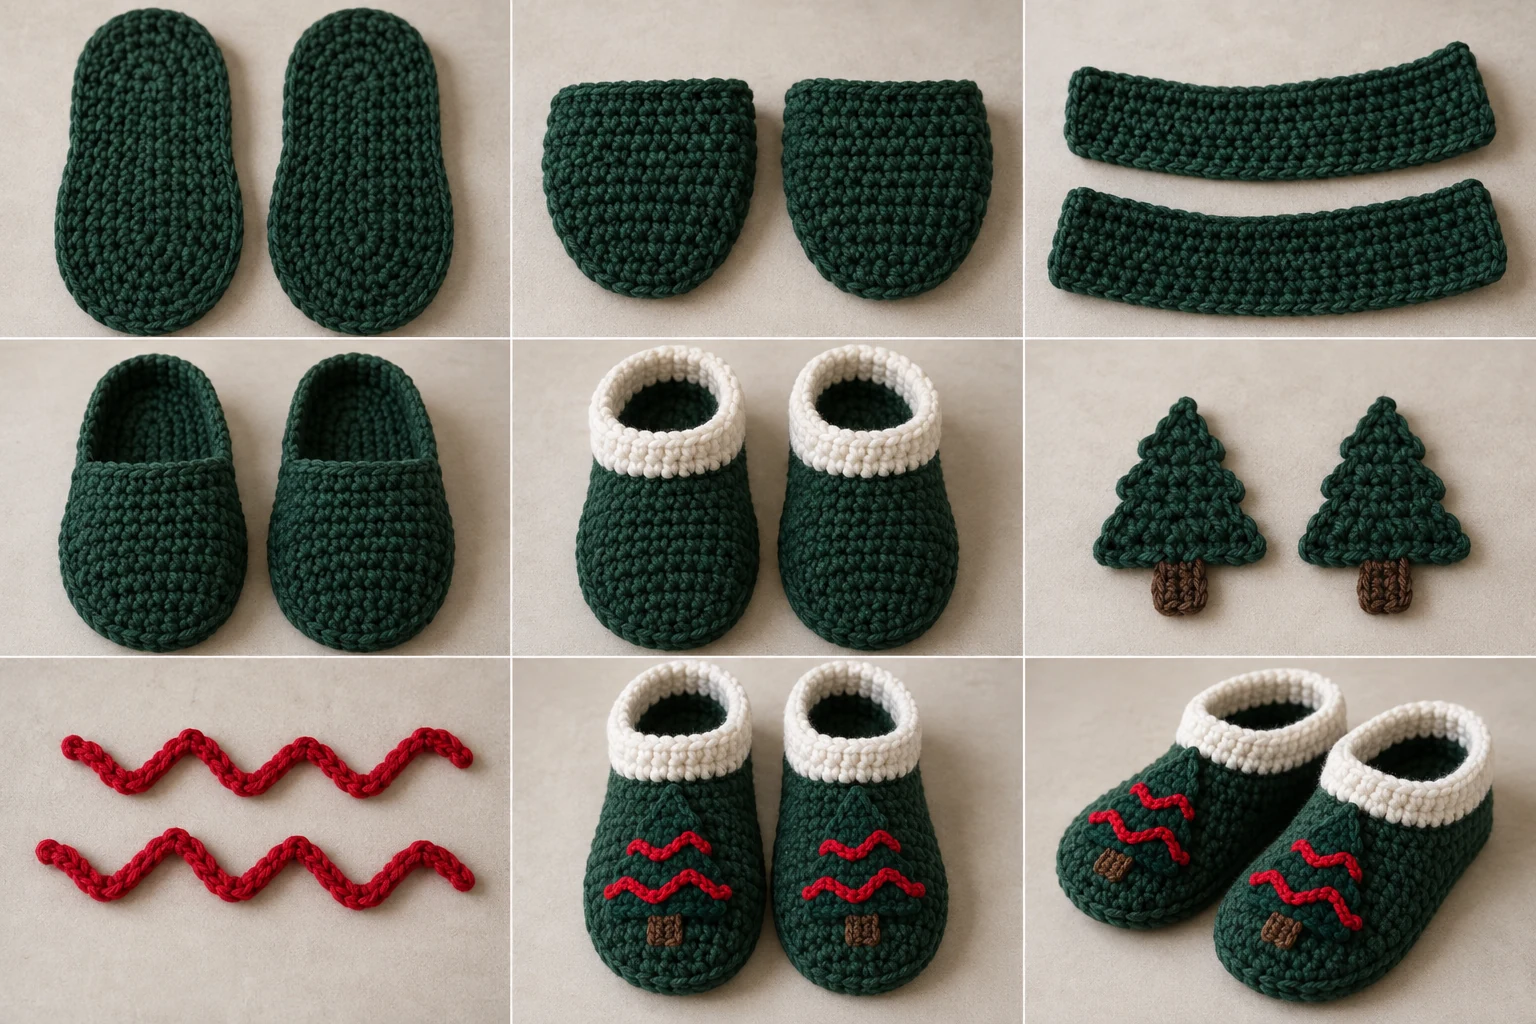
- Components: 2 soles, 2 toe vamps, 2 heel-and-side bands, 2 cuffs, 2 Christmas-tree appliqués with trunks, and 2 chain garlands
- Use: Indoor slippers only; plain crocheted soles are not inherently slip-resistant.
Materials You’ll Need
- Bulky-weight category 5 yarn: 220 yd/201 m forest green for the soles and slipper bodies
- Bulky-weight category 5 yarn: 25 yd/23 m white for the cuffs
- Bulky-weight category 5 yarn: 15 yd/14 m dark green for the trees
- Bulky-weight category 5 yarn: 5 yd/4.5 m brown for the trunks
- Bulky-weight category 5 yarn: 8 yd/7.5 m red for the garlands
- US J/10 (6 mm) crochet hook, or the size needed to obtain gauge
- Yarn needle
- Removable stitch markers
- Scissors
- Flexible measuring tape
Choose yarns with similar fiber content and care requirements. Optional commercial nonslip fabric paint may be added according to the manufacturer’s instructions, but it is not part of the crocheted construction. This design uses no buttons, beads, bells, or other hardware.
Gauge
12 sc and 13 rows = 4 in/10 cm in firmly worked single crochet after light blocking.
Gauge and finished measurements matter more than hook size. The fabric should be dense, with no large gaps. Make and measure a swatch before beginning, then confirm the blocked sole dimensions before assembly.
Finished Measurements
- Sole: approximately 10 in/25.5 cm long by 4 in/10 cm wide
- Opening: approximately 13 in/33 cm unstretched around
- Toe-vamp depth: approximately 3 in/7.5 cm
- Heel height before cuff: approximately 2.5 in/6.5 cm
- Cuff height: approximately 1 in/2.5 cm
Crochet Abbreviations
- beg = beginning
- ch = chain
- hdc = half double crochet
- inc = work 2 sc in the indicated stitch
- rep = repeat
- rnd = round
- RS = right side
- sc = single crochet
- sc2tog = single crochet 2 stitches together
- sl st = slip stitch
- st(s) = stitch(es)
- WS = wrong side
Important Pattern Notes
- Beginning chains do not count as stitches.
- Join rounds with a sl st to the first stitch unless instructed otherwise.
- Do not turn the sole rounds. Turn all flat rows.
- Place a marker in the first stitch of every sole round.
- Make two of each listed flat component. Work one cuff directly onto each assembled slipper.
- Leave the specified sewing tails and weave all other ends securely into the WS.
- The vamp has 48 defined attachment points: 7 row-end spaces, 34 Row-8 stitches, and 7 row-end spaces.
- The sole perimeter has 82 stitches: 48 are assigned to the vamp and 34 to the heel-and-side band.
- The opening contains 40 positions: 20 across the vamp foundation edge and 20 across Heel-Band Row 8.
- No stuffing is used.
Complete Free Crochet Pattern
Sole (Make 2 in Forest Green)
Ch 24.
Rnd 1: Work 2 sc in second ch from hook, sc in next 21 ch, 5 sc in last ch. Rotate to work along the unused loops on the opposite side of the foundation chain, sc in next 21 ch, then 3 sc in the same chain that held the first 2 sc; join. 52 sts.
Rnd 2: Ch 1, inc in each of next 2 sts, sc in next 21 sts, inc in each of next 5 sts, sc in next 21 sts, inc in each of last 3 sts; join. 62 sts.
Rnd 3: Ch 1, (sc in next st, inc in next st) twice, sc in next 21 sts, (sc in next st, inc in next st) 5 times, sc in next 21 sts, (sc in next st, inc in next st) 3 times; join. 72 sts.
Rnd 4: Ch 1, (sc in next 2 sts, inc in next st) twice, sc in next 21 sts, (sc in next 2 sts, inc in next st) 5 times, sc in next 21 sts, (sc in next 2 sts, inc in next st) 3 times; join. 82 sts.
Fasten off, leaving a 36 in/91 cm sewing tail. Lightly block each sole to approximately 10 in/25.5 cm long by 4 in/10 cm wide.
Identify the broader five-increase end as the toe. Mark 48 consecutive stitches centered around this end as the front section. The remaining 34 consecutive stitches form the rear section. Place a marker at each boundary.
Toe Vamp (Make 2 in Forest Green)
The foundation edge will form the front half of the foot opening. Ch 21.
Row 1: Sc in second ch from hook and in each remaining ch; turn. 20 sts.
Row 2: Ch 1, 2 sc in first st, sc in next 18 sts, 2 sc in last st; turn. 22 sts.
Row 3: Ch 1, 2 sc in first st, sc in next 20 sts, 2 sc in last st; turn. 24 sts.
Row 4: Ch 1, 2 sc in first st, sc in next 22 sts, 2 sc in last st; turn. 26 sts.
Row 5: Ch 1, 2 sc in first st, sc in next 24 sts, 2 sc in last st; turn. 28 sts.
Row 6: Ch 1, 2 sc in first st, sc in next 26 sts, 2 sc in last st; turn. 30 sts.
Row 7: Ch 1, 2 sc in first st, sc in next 28 sts, 2 sc in last st; turn. 32 sts.
Row 8: Ch 1, 2 sc in first st, sc in next 30 sts, 2 sc in last st. 34 sts.
Fasten off, leaving a 36 in/91 cm sewing tail. The attachment boundary comprises 7 row-end spaces down one side, all 34 stitches of Row 8, and 7 row-end spaces up the other side, for 48 attachment points. Row 1 and its foundation edge remain unsewn to form the opening.
Heel-and-Side Band (Make 2 in Forest Green)
Ch 35.
Row 1: Sc in second ch from hook and in each remaining ch; turn. 34 sts.
Row 2: Ch 1, sc2tog, sc in next 30 sts, sc2tog; turn. 32 sts.
Row 3: Ch 1, sc2tog, sc in next 28 sts, sc2tog; turn. 30 sts.
Row 4: Ch 1, sc2tog, sc in next 26 sts, sc2tog; turn. 28 sts.
Row 5: Ch 1, sc2tog, sc in next 24 sts, sc2tog; turn. 26 sts.
Row 6: Ch 1, sc2tog, sc in next 22 sts, sc2tog; turn. 24 sts.
Row 7: Ch 1, sc2tog, sc in next 20 sts, sc2tog; turn. 22 sts.
Row 8: Ch 1, sc2tog, sc in next 18 sts, sc2tog. 20 sts.
Fasten off, leaving a 36 in/91 cm sewing tail.
Christmas-Tree Appliqué with Trunk (Make 2)
With dark green, ch 2.
Tree Row 1: Work 2 sc in second ch from hook; turn. 2 sts.
Tree Row 2: Ch 1, 2 sc in each st; turn. 4 sts.
Tree Row 3: Ch 1, 2 sc in first st, sc in next 2 sts, 2 sc in last st; turn. 6 sts.
Tree Row 4: Ch 1, 2 sc in first st, sc in next 4 sts, 2 sc in last st; turn. 8 sts.
Tree Row 5: Ch 1, 2 sc in first st, sc in next 6 sts, 2 sc in last st; turn. 10 sts.
Tree Row 6: Ch 1, 2 sc in first st, sc in next 8 sts, 2 sc in last st. 12 sts.
Fasten off the dark-green yarn and weave in the end.
Trunk Row 1: With RS facing, identify the center 2 stitches of Tree Row 6. Join brown in the first center stitch, ch 1, sc in that stitch and the next center stitch; turn. 2 sts.
Trunk Row 2: Ch 1, sc in each st. 2 sts.
Fasten off, leaving a 24 in/61 cm tail for sewing down the complete appliqué.
Chain Garland (Make 2 in Red)
Leaving an 8 in/20 cm initial tail, ch 18. Fasten off, leaving another 8 in/20 cm tail. Each garland contains 18 chains. Do not stretch it during attachment.
Assembly
- Attach the toe vamp: Match one vamp to one sole with the RS facing outward. Center the 34 stitches of Vamp Row 8 across the toe end of the marked 48-stitch front section. The remaining 14 front sole stitches correspond one-to-one with the 7 row-end spaces on each vamp side. Using the vamp tail and a whipstitch through both loops of each sole stitch, attach exactly 48 vamp boundary points to exactly 48 front sole stitches. Do not twist the vamp or skip an attachment point. Keep the Row-1 foundation edge free.
- Attach the heel-and-side band: Position Heel-Band Row 1 over the remaining 34 sole stitches. Using a long tail, whipstitch its 34 stitches one-to-one to those 34 sole stitches. The tapered band must rise from the sole with Row 8 at the top.
- Close the body: Bring each vertical heel-band edge to the adjacent vertical vamp edge. Sew the 7 intervals between the band’s 8 rows to the corresponding 7 intervals between the vamp’s 8 rows. Secure the upper and lower corners. Repeat at the other side. This leaves the 20-position vamp foundation edge and 20-stitch Heel-Band Row 8 open.
- Repeat the preceding steps for the second slipper. Weave the sole and body assembly tails securely into the WS.
Cuff (Work 1 Directly on Each Slipper in White)
Before beginning, confirm that the exposed vamp foundation edge has 20 positions and Heel-Band Row 8 has 20 stitches. With RS facing, join white at one side seam of the opening.
Rnd 1: Ch 1, work 20 sc evenly across the exposed vamp foundation edge—one sc in each of its 20 chain positions—then sc in each of the 20 stitches of Heel-Band Row 8; join. 40 sts.
Rnd 2: Ch 1, hdc in each st around; join. 40 sts.
Rnd 3: Ch 1, sc in each st around; join. 40 sts.
Fasten off, leaving a 6 in/15 cm tail. Weave it securely into the WS of the cuff.
Finishing and Decoration
- Let each slipper rest flat with its toe pointing away from the opening. Center one tree on the vamp, positioning its tip approximately 0.5 in/1.3 cm below the white cuff and keeping its trunk above the sole seam. Try on the slipper and adjust the tree if it interferes with the toe bend.
- Using the brown sewing tail and small matching stitches around the complete outer edge, sew down the trunk and tree. Pass through the vamp only—not through the sole or interior band. Knot securely on the WS and weave in the tail.
- Lay one red chain over the tree in a shallow zigzag with three passes. Use its two tails to tack down the ends. With a separate 12 in/30 cm length of red yarn, tack the chain at each of its two direction changes. Keep the garland flat and free of snagging loops. Knot and weave all red ends into the WS of the vamp.
- Repeat for the second slipper, mirroring the placement if desired.
- Weave in every remaining end. Lightly steam or wet block without flattening the shaped upper, then allow the slippers to dry completely.
Customization
Keep the written stitch counts and construction unchanged when making this size, but personalize the slippers through color. Try a lighter evergreen body, cream cuff, metallic-look red yarn without abrasive fibers, or contrasting trees. Use yarns of the same weight and similar structure so the finished components remain compatible.
For a modest fit adjustment, first change hook size only after swatching: a smaller hook produces denser, smaller pieces, while a larger hook produces larger, looser pieces. Because this design’s 82 sole stitches, 48 vamp points, 34 band stitches, and 40 opening positions depend on one another, adding or removing isolated stitches would require a full regrading of every connected component. For substantially different foot sizes, use a properly graded pattern rather than altering only the foundation chain.
If extra traction is desired, apply optional commercial nonslip fabric paint only to the exterior underside of the finished soles and follow its curing and care directions exactly.
Common Mistakes to Avoid
- Confusing the toe and heel: The broader five-increase end of the sole is the toe end.
- Counting beginning chains: The ch 1 at the start of a row or round never counts as a stitch.
- Attaching the wrong vamp edge: Sew the 7 side spaces, 34 stitches of Row 8, and 7 opposite side spaces to the sole. Leave the foundation edge open.
- Misallocating the sole: Mark all 48 front stitches before sewing; exactly 34 stitches must remain for the heel-and-side band.
- Stretching the heel band: Match its 34 Row-1 stitches one-to-one with the rear 34 sole stitches.
- Picking up the cuff unevenly: Work exactly 20 stitches across the vamp opening edge and 20 across the heel band.
- Sewing through the whole slipper: Attach the appliqué through the vamp fabric only.
- Leaving loose garland loops: Tack both ends and both direction changes securely.
Troubleshooting
Why does my sole have the wrong stitch count?
Recount each straight 21-stitch section and every increase group. The correct round totals are 52, 62, 72, and 82 stitches. A missed increase at either curved end changes both the shape and the later attachment allocation.
Why will the vamp not fit the marked front section?
Confirm that Vamp Row 8 has 34 stitches and that you are counting exactly 7 row-end spaces on each side. Together they make 48 attachment points. Mark these points before sewing and pair them one-to-one with the 48 front sole stitches.
Why is the opening twisted or uneven?
The vamp foundation edge and Heel-Band Row 8 must both remain at the top. Check component orientation before closing the side seams, and align the 7 intervals between the 8 rows on each adjoining edge.
Why does my cuff ruffle?
A ruffled cuff usually has too many pickup stitches or overly loose tension. Confirm exactly 40 stitches in Cuff Rnd 1: 20 across the vamp and 20 across the heel band.
Why is the slipper too small or too large?
Compare your gauge and blocked sole measurements with the pattern. The target sole is approximately 10 in/25.5 cm by 4 in/10 cm. Individual tension and yarn structure can change the fit even when the same hook size is used.
Why does the tree buckle?
Position the appliqué on a relaxed vamp and use small sewing stitches without pulling the tail tightly. Try on the slipper before permanent placement so the tree stays clear of the toe bend.
Care Instructions
Follow the care directions for the most delicate yarn used. Hand washing in cool water with mild detergent is the safest general approach. Do not wring. Reshape the slippers to their finished measurements and dry them flat away from direct heat. Check the appliqués, garlands, seams, and any optional nonslip coating regularly; repair loose yarn before wearing. Never wear these slippers while wet, and use caution on smooth floors.
Frequently Asked Questions
Is this pattern written in US or UK terms?
It uses US crochet terminology throughout.
How many slippers does the pattern make?
The listed quantities make one matching pair: two soles, two vamps, two heel-and-side bands, two directly worked cuffs, two tree appliqués with trunks, and two red chain garlands.
Is the pattern seamless?
No. The sole, vamp, heel-and-side band, and appliqué are made separately and sewn together. Each cuff is then crocheted directly around its slipper opening.
Can I omit the Christmas-tree decoration?
Yes. The tree and garland are decorative and do not affect the structural stitch counts. The green body and white cuff remain unchanged.
Are the soles nonslip?
No. Smooth crocheted soles are not inherently slip-resistant. These slippers are intended for indoor use, and optional commercial nonslip fabric paint may be applied to the exterior underside according to its manufacturer’s directions.
Has this design been physically tested?
The construction and explicit stitch counts have been mathematically checked, but the design is not claimed to have been physically test-crocheted. Match the stated gauge, confirm the sole measurements, and check the fit as you work.