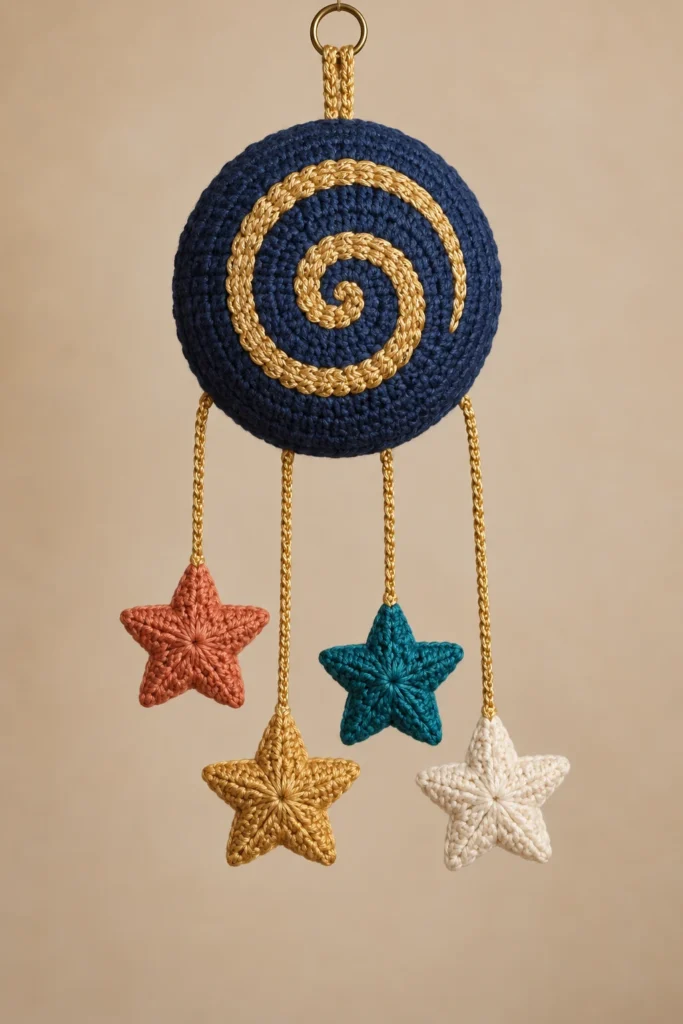
Four Stars Spiral Crochet: Free Decorative Hanging Pattern
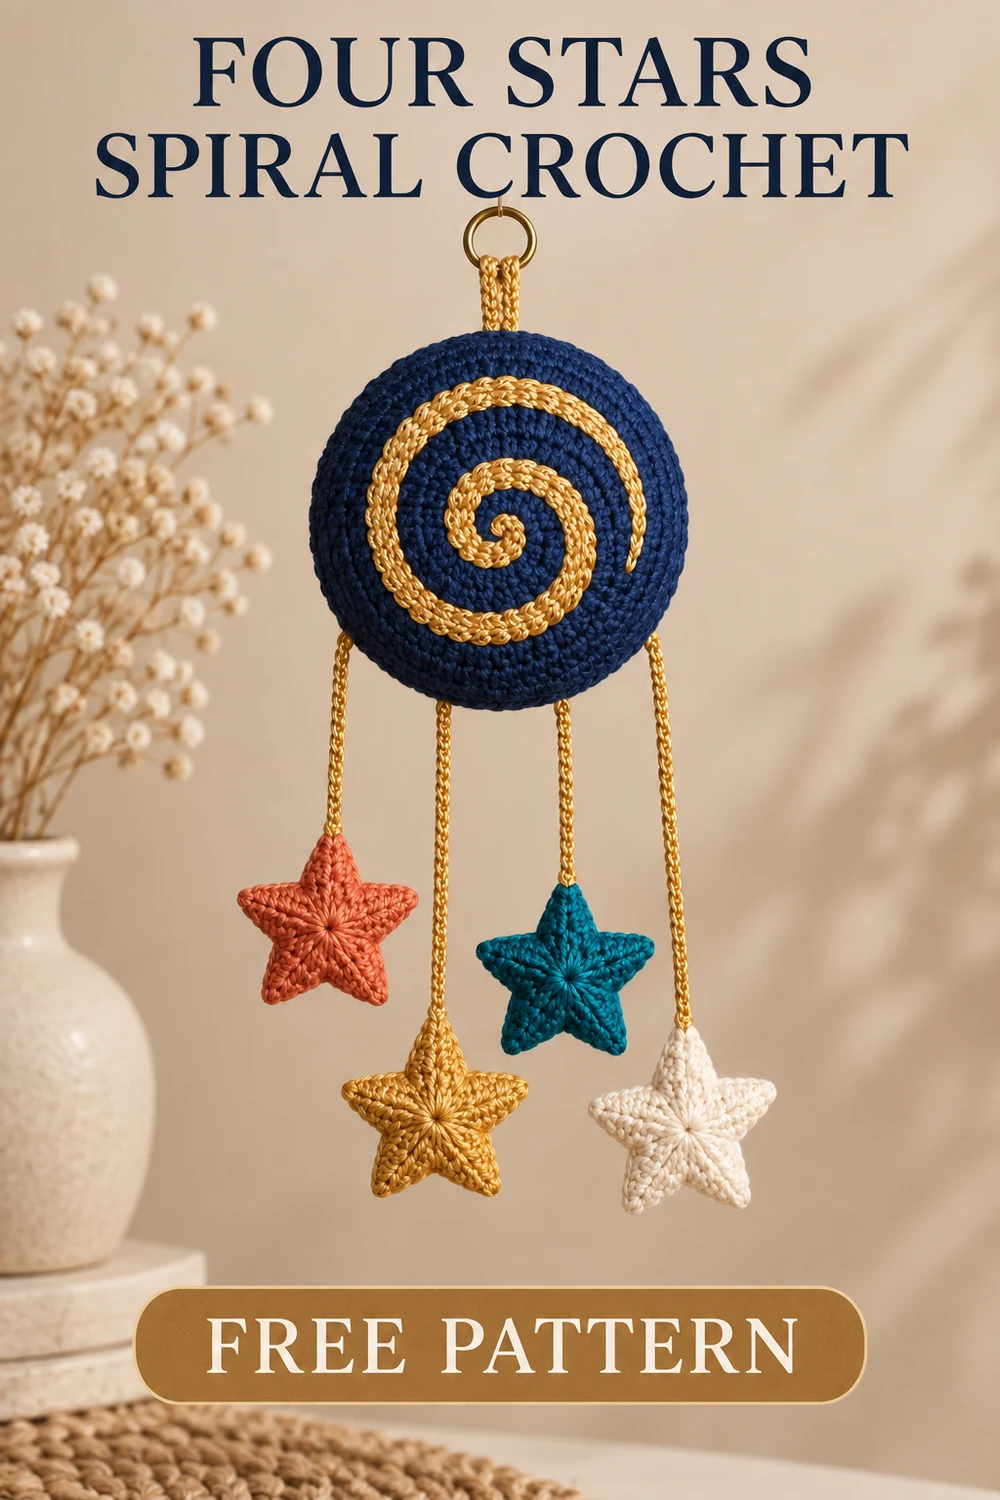
Create a celestial hanging with a softly stuffed midnight-blue medallion, a raised gold spiral, four colorful five-point stars, staggered crocheted connector cords, and a reinforced hanging loop. This original pattern uses US crochet terminology and produces decorative décor rather than a toy.
Pattern at a Glance
- Skill level: Confident beginner to intermediate
- Terminology: US crochet terms
- Construction: Two stuffed medallion disks, one spiral appliqué, four two-sided stars, four connector cords, one hanging loop, and one metal ring
- Techniques: Magic ring, continuous rounds, joined rounds, increases, picots, slip-stitch cords, joining through two layers, light stuffing, and sewn assembly
- Approximate finished height: 20 in/51 cm, excluding the metal ring
- Use: Decorative hanging only; this is not a toy and must not support weight
Visible Component Inventory
- 1 stuffed central medallion made from 1 front disk, 1 back disk, and 1 joining round
- 1 surface-crocheted spiral appliqué
- 4 two-sided five-point stars, each made from 2 matching panels, for 8 star panels total
- 4 crocheted star connector cords
- 1 crocheted hanging loop
- 1 metal hanging ring
Materials You’ll Need
- Medium-weight/category 4 smooth acrylic or cotton yarn:
- Color A, midnight blue: 70 yd/64 m
- Color B, gold: 65 yd/60 m
- Color C, coral: 20 yd/18 m
- Color D, teal: 20 yd/18 m
- Color E, ivory: 20 yd/18 m
- US G/6 (4 mm) crochet hook, or size needed to obtain gauge
- Removable stitch marker
- Yarn needle
- Scissors
- Rust-resistant 1 in/25 mm welded metal ring
- Approximately 0.5 oz/14 g polyester fiberfill
Gauge
16 sc and 18 rows = 4 in/10 cm in firm single crochet worked flat. Exact gauge is not critical, but the fabric should be firm enough to prevent fiberfill from showing. Adjust the hook size if necessary.
Finished Measurements
- Medallion: approximately 5 in/12.5 cm in diameter
- Each star: approximately 3.25 in/8 cm from point to point
- Connector cords: approximately 4.5, 5.5, 6.5, and 7.5 in/11.5, 14, 16.5, and 19 cm
- Hanging loop: approximately 8 in/20 cm before folding
- Complete hanging: approximately 20 in/51 cm tall, excluding the metal ring
Measurements are calculated estimates and may vary with yarn, tension, blocking, and stuffing.
Crochet Abbreviations
- beg = beginning
- ch = chain
- dc = double crochet
- hdc = half double crochet
- inc = 2 single crochet in the indicated stitch
- MR = magic ring
- rem = remaining
- rep = repeat
- rnd(s) = round(s)
- sc = single crochet
- sl st = slip stitch
- st(s) = stitch(es)
- tr = treble crochet
- yo = yarn over
Important Pattern Notes
- Ch 1 at the beginning of a joined round does not count as a stitch.
- The medallion disks are worked in continuous spirals. Mark the first stitch and move the marker after every round.
- The star rounds are joined.
- Distribute all disk increases exactly as written to preserve the circular shape.
- Leave every sewing tail at least 12 in/30 cm unless a different length is specified.
- Slip stitches used only for joining, fastening off, or making picots are excluded from round totals unless specifically listed.
- Each star point uses two consecutive stitches from Rnd 1. Its eight body stitches are sc, hdc, dc, tr, tr, dc, hdc, and sc. The ch-2 picot is decorative and consumes no base stitch.
- During star joining, work through corresponding body stitches only. Do not work into the picot slip stitches; leave each ch-2 picot free.
Special Techniques
Magic ring: Form an adjustable loop, work the specified stitches into it, and pull the tail firmly closed.
Picot: Ch 2, then sl st in the second ch from the hook. The picot sits between the two stitch groups that form a star point.
Surface placement: Pin the entire appliqué in position before sewing so the curve and spacing remain even.
Complete Free Crochet Pattern
Front Medallion Disk (Make 1 in Color A)
Rnd 1: Make 6 sc in MR. Do not join. (6)
Rnd 2: Inc in each st around. (12)
Rnd 3: [Sc in next st, inc in next st] 6 times. (18)
Rnd 4: [Sc in next 2 sts, inc in next st] 6 times. (24)
Rnd 5: [Sc in next 3 sts, inc in next st] 6 times. (30)
Rnd 6: [Sc in next 4 sts, inc in next st] 6 times. (36)
Rnd 7: [Sc in next 5 sts, inc in next st] 6 times. (42)
Rnd 8: [Sc in next 6 sts, inc in next st] 6 times. (48)
Rnd 9: [Sc in next 7 sts, inc in next st] 6 times. (54)
Rnd 10: [Sc in next 8 sts, inc in next st] 6 times. (60)
Sl st in the next st and fasten off, leaving a 12 in/30 cm tail. Mark this piece as the front disk.
Back Medallion Disk (Make 1 in Color A)
Repeat Rnds 1–10 of the Front Medallion Disk. (60 sts after Rnd 10)
Sl st in the next st, but do not fasten off. Mark this piece as the back disk.
Raised Spiral Appliqué (Make 1 in Color B)
Leave an 18 in/46 cm beginning tail. Ch 91. Starting in the second ch from the hook, sl st loosely in each ch across. (90 sl sts)
Fasten off, leaving an 18 in/46 cm tail. The completed cord should curve without puckering.
Gold Star Panels (Make 2 in Color B)
Rnd 1: Make 10 sc in MR. Join with sl st to first sc. (10)
Rnd 2: Ch 1. Repeat the following point sequence 5 times: in next st work (sc, hdc, dc, tr), make picot, and in next st work (tr, dc, hdc, sc). Join with sl st to first sc. (40 body sts, 5 picots)
Fasten off the first panel with a 12 in/30 cm tail. Do not fasten off the second panel.
Coral Star Panels (Make 2 in Color C)
Work both panels exactly as given for the Gold Star Panels. Fasten off the first panel with a 12 in/30 cm tail and leave the working yarn attached to the second. Each panel has 40 body sts and 5 picots.
Teal Star Panels (Make 2 in Color D)
Work both panels exactly as given for the Gold Star Panels. Fasten off the first panel with a 12 in/30 cm tail and leave the working yarn attached to the second. Each panel has 40 body sts and 5 picots.
Ivory Star Panels (Make 2 in Color E)
Work both panels exactly as given for the Gold Star Panels. Fasten off the first panel with a 12 in/30 cm tail and leave the working yarn attached to the second. Each panel has 40 body sts and 5 picots.
Connector Cords (Make 4 in Color B)
Connector Cord 1: Leave a 12 in/30 cm tail, ch 21, then sl st in the second ch from the hook and in each rem ch. (20 sl sts) Fasten off with a 12 in/30 cm tail.
Connector Cord 2: Leave a 12 in/30 cm tail, ch 26, then sl st in the second ch from the hook and in each rem ch. (25 sl sts) Fasten off with a 12 in/30 cm tail.
Connector Cord 3: Leave a 12 in/30 cm tail, ch 31, then sl st in the second ch from the hook and in each rem ch. (30 sl sts) Fasten off with a 12 in/30 cm tail.
Connector Cord 4: Leave a 12 in/30 cm tail, ch 36, then sl st in the second ch from the hook and in each rem ch. (35 sl sts) Fasten off with a 12 in/30 cm tail.
Hanging Loop (Make 1 in Color B)
Leave an 18 in/46 cm tail. Ch 41. Starting in the second ch from the hook, sl st in each ch across. (40 sl sts) Fasten off, leaving an 18 in/46 cm tail.
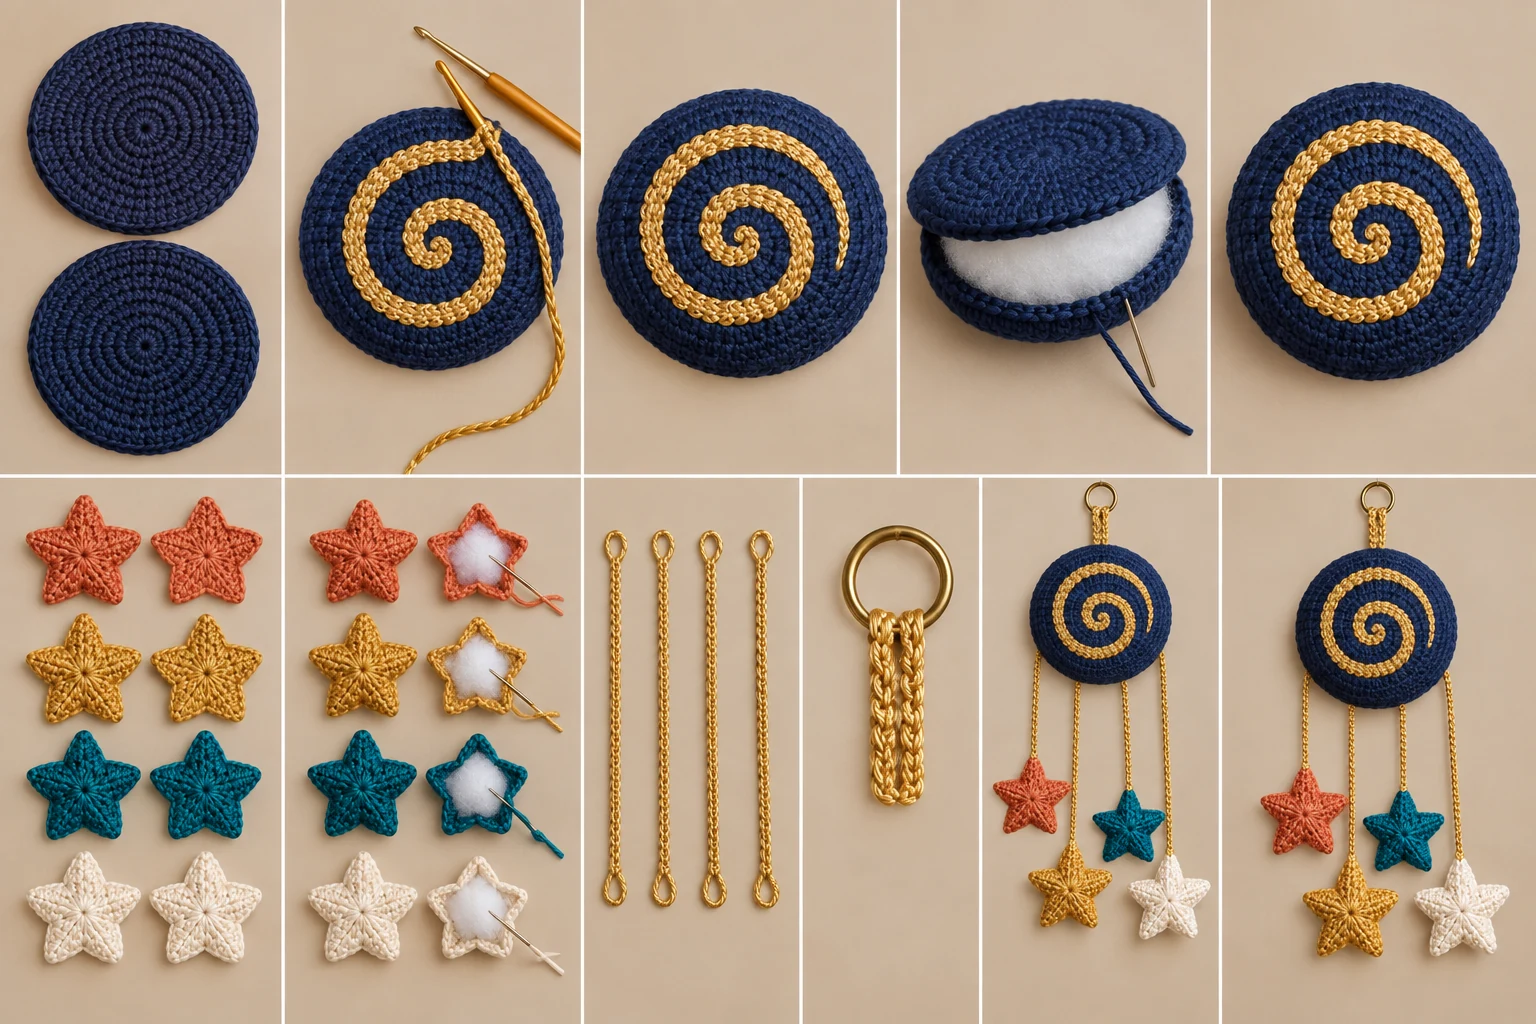

Assembly
Star Panel Joining Rounds (Make 4)
- Pair the two panels of one color with wrong sides together. Align all five points and all five picots.
- Using the working yarn attached to the second panel, insert the hook through both layers. Ch 1, then sc through both layers in each pair of corresponding body stitches. Work 8 joining sc around each point and leave both picots free. (40 sc)
- Before working the final 8 sc, insert a very small tuft of fiberfill. Spread it evenly and keep the star nearly flat. Do not overstuff.
- Complete the final 8 sc, join with sl st to the first sc, and fasten off with a 12 in/30 cm tail.
- Weave the center and joining tails through several stitches, reverse direction once, and trim.
- Repeat for the gold, coral, teal, and ivory stars.
Apply the Spiral Appliqué
- Lay the front medallion disk right side up. Position one end of the gold appliqué at its center.
- Coil the cord clockwise in an open spiral. Leave approximately 0.25 in/6 mm between neighboring turns and finish approximately 0.5 in/1.25 cm inside the outer edge. Adjust the spacing evenly; this does not alter the stitch counts.
- Pin the entire spiral before sewing.
- Using the two long appliqué tails and additional Color B as needed, attach the cord with small couching stitches spaced approximately 0.25–0.375 in/6–10 mm apart. Catch only the front disk.
- Secure each end with three passes through nearby stitches, knot on the wrong side, and weave in.
Medallion Joining Round
- Place the embellished front and back disks wrong sides together, aligning all 60 stitches. The working yarn remains attached to the back disk.
- Ch 1 and sc through both layers in each pair of corresponding stitches.
- After 50 sc, add fiberfill evenly. Keep the medallion softly padded and flat without distorting its circular edge.
- Work the final 10 sc. (60 sc)
- Join with sl st to the first sc and fasten off with a 12 in/30 cm tail. Weave in securely.
Attach the Four Stars
- Orient the medallion so the spiral begins at the center and its outer end curves toward the upper right.
- Across the lower half of the joining round, mark attachment positions at approximately 7 o’clock, 8:30, 3:30, and 5 o’clock. Keep at least 6 joining stitches between neighboring positions.
- From left to right, assign Connector Cord 2 to the coral star, Connector Cord 4 to the gold star, Connector Cord 3 to the teal star, and Connector Cord 1 to the ivory star. This creates the asymmetric cascade.
- At each marked position, use one cord tail to sew the cord around the post of one medallion joining sc with at least four tight passes.
- Knot securely, then weave the tail through the stuffed edge for at least 1 in/2.5 cm before trimming.
- Center the opposite cord end behind the valley between the two upper points of its assigned star.
- Use the cord tail to sew through both star layers with at least four passes. Knot securely, bury the tail inside the star, and trim.
- Check that no connector cord crosses another.
Metal Ring Attachment and Hanging Loop
- Fold the hanging loop in half around the welded metal ring. The ring should be captured at the fold and both cord ends should be even.
- Position the two ends together at 12 o’clock on the medallion joining round.
- Using both long tails, sew each end independently around the posts of three adjacent joining stitches. Make at least four passes per end.
- Tie the two tails together with a square knot on the back.
- Thread each tail separately through the stuffed edge for at least 1.5 in/4 cm, reverse direction through several stitches, and trim.
- Tug firmly by hand on the ring, hanging loop, connector cords, and stars. None of the sewn attachments should shift. This is only an assembly-security check; the finished hanging must not support weight.
Finishing
Shape the medallion and star points gently with your fingers. If needed, pin only the unstuffed star tips and lightly steam from a distance. Never touch acrylic yarn with a hot iron. Let every component dry completely, remove all markers, and inspect the project for exposed fiberfill, loose stitches, and unsecured tails.
Customization Ideas
You may substitute colors while preserving the listed yarn weight, quantities, component count, and construction. A pale medallion with a dark contrasting spiral creates a different mood, while four tonal stars produce a quieter design. Cotton gives crisp stitch definition; acrylic generally feels lighter and softer. Avoid changing cord stitch counts unless you intentionally want different hanging lengths, and keep the specified left-to-right cord assignment if you want the illustrated cascade.
Common Mistakes to Avoid
- Losing the beginning of a medallion round: Move the stitch marker after every round.
- Accidentally adding star stitches: Each point uses exactly two Rnd 1 stitches and contains eight body stitches plus one picot.
- Joining through picots: Work the 40 joining sc through the body stitches only, leaving all picots free.
- Working slip stitches too tightly: Relax tension on the spiral, cords, and loop so they remain flexible and do not twist.
- Overstuffing: Both medallion and stars should be softly padded, not rounded like balls.
- Sewing the spiral through both disks: Apply it to the front disk before joining the medallion.
- Weak attachments: Use every specified pass, knot, and buried-tail length.
Troubleshooting
Why is my medallion wavy?
Your increases may be misplaced, your tension may have changed, or your hook may be too large. Confirm the round totals of 6, 12, 18, 24, 30, 36, 42, 48, 54, and 60, then lightly shape the disks before joining.
Why does my medallion cup?
Check for missed increases and verify that Rnd 10 contains 60 stitches. Very tight tension can also cause cupping, so move up a hook size if needed while retaining a firm fabric.
Why are my star points uneven?
Confirm that every point is worked over two consecutive base stitches in the same order: sc, hdc, dc, tr, picot, tr, dc, hdc, sc.
Why does a cord twist or pucker?
The slip stitches are probably too tight. Remake the cord with looser, consistent tension, taking care not to split the foundation chains.
Why is the spiral difficult to position?
Pin its center and outer end first, then distribute the intervening turns. Maintain approximately 0.25 in/6 mm between turns and couch it only after the complete curve looks balanced.
Care Instructions
Dust gently or spot-clean with cool water and mild detergent. Blot without twisting, reshape, and dry flat. Do not machine wash unless every yarn and fiberfill label permits it, and remove the metal ring first only if it can be detached without damaging the loop. Keep the hanging away from moisture, open flame, pets, cribs, and children’s play areas.
Frequently Asked Questions
Is this pattern written in US terms?
Yes. All stitch names and abbreviations use US crochet terminology.
Is the project suitable as a baby mobile or toy?
No. It is decorative décor with cords, stuffing, and metal hardware. Keep it away from cribs and play areas.
Can I omit the fiberfill?
The approved construction uses light stuffing in the medallion and all four stars. Omitting it changes the intended finished structure.
How many star panels do I make?
Make eight panels: two gold, two coral, two teal, and two ivory. Each matching pair forms one two-sided star.
Do the picots count among the 40 star body stitches?
No. Each panel has 40 body stitches and five separate picots. During joining, work 40 sc through corresponding body stitches and leave the picots free.
Can I use a different yarn weight?
You can, but it will change the measurements, yardage, firmness, and hardware proportions. Use one yarn weight consistently throughout and select a hook that creates dense fabric.
Has the finished size been physically tested?
The measurements are calculated estimates based on the specified gauge and construction. The pattern has not been claimed as physically tested, so results may vary with materials, tension, stuffing, and blocking.