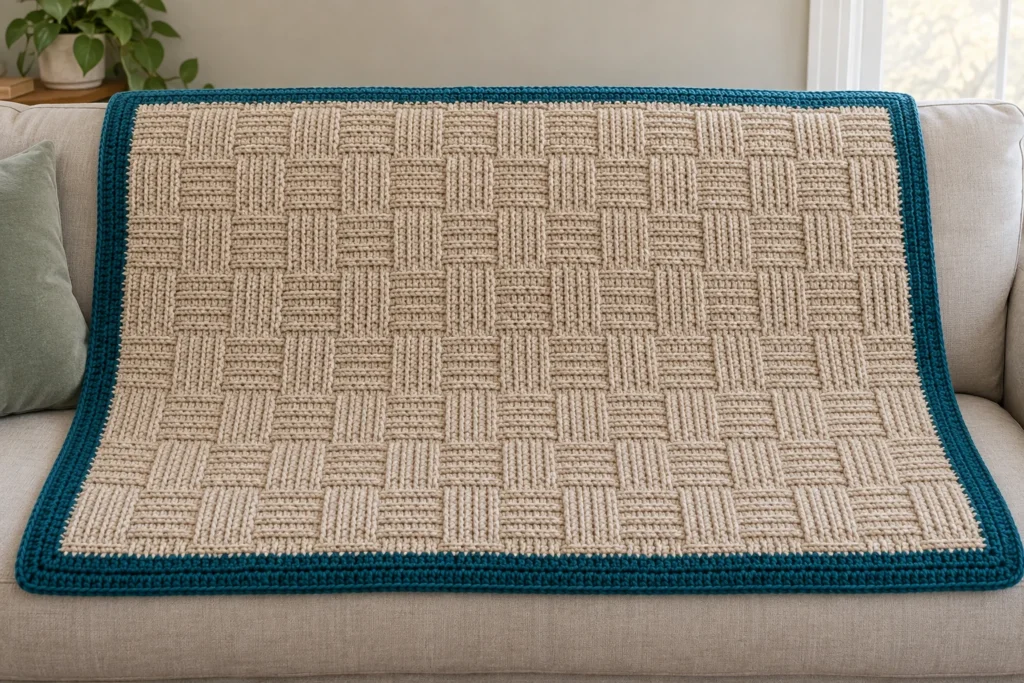
Easy Crochet Textured Basketweave Blanket
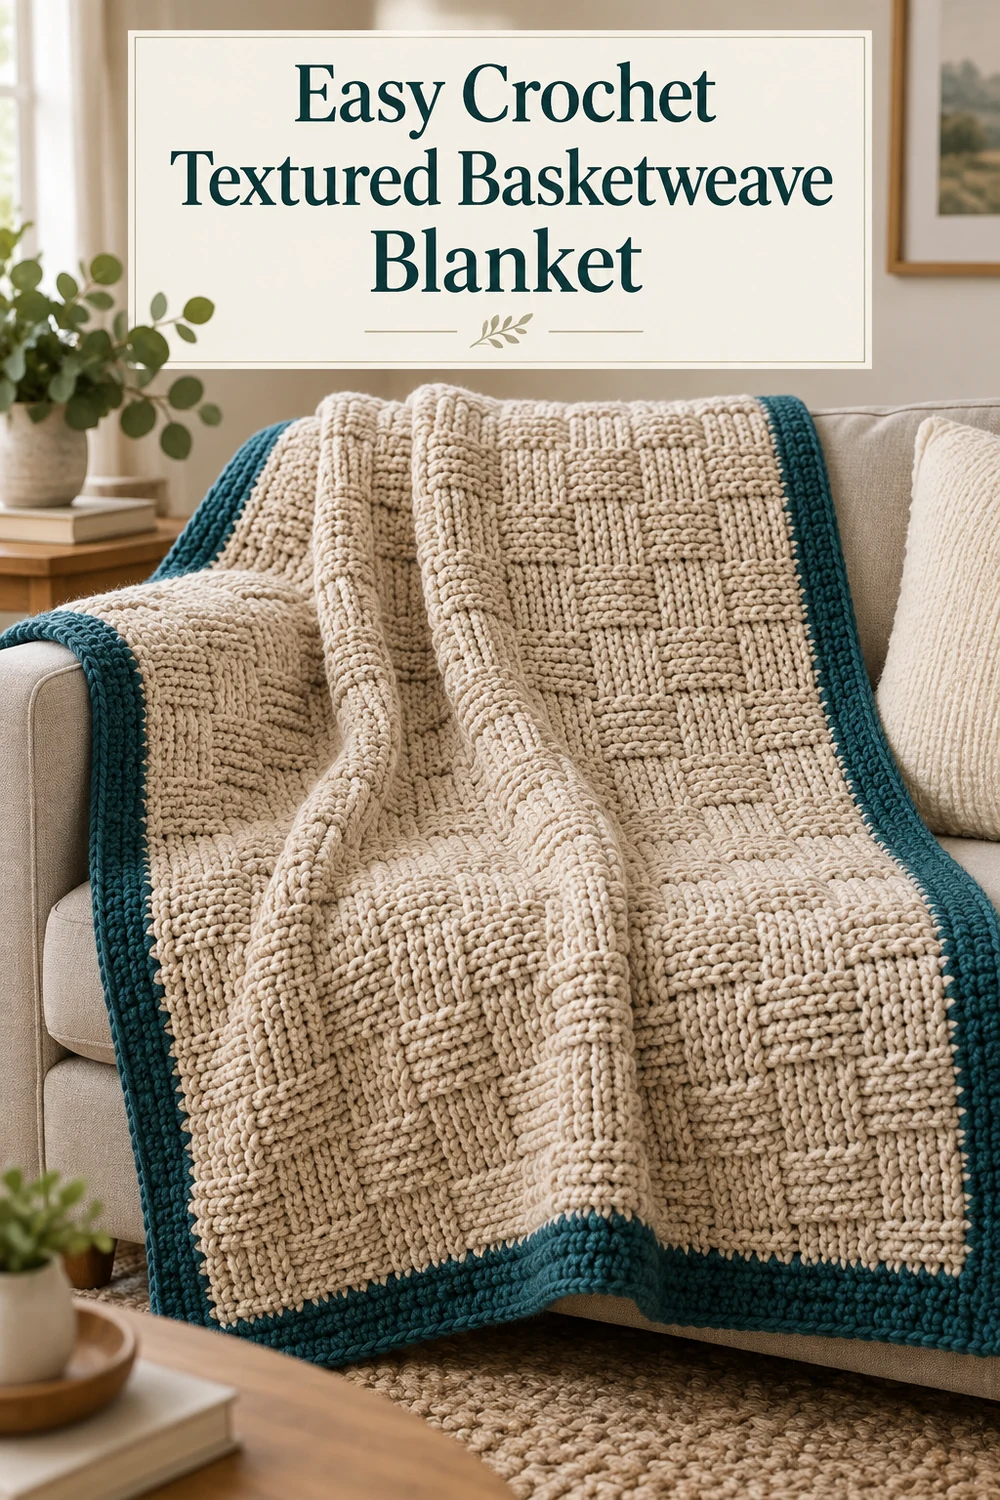
This Easy Crochet Textured Basketweave Blanket combines deeply textured post stitches with a clean, contrasting border. The blanket is worked as one rectangular panel in Color A, so there are no motifs to join or seams to sew. A continuous four-round border in Color B completes the design.
The pattern uses US crochet terminology and is suitable for an easy/intermediate crocheter who is comfortable with double crochet and ready to practice front-post and back-post stitches.
Pattern at a Glance
- Construction: One rectangular panel worked flat, followed by one continuous border worked in joined rounds.
- Visible crocheted components: One Color A basketweave blanket panel and one four-round Color B border.
- Written components: Basketweave blanket panel, continuous border, and finishing and tail management.
- Skill level: Easy/intermediate.
- Terminology: US crochet terms.
- Seaming: None.
- Special techniques: Front-post double crochet, back-post double crochet, and reverse single crochet.
Materials You’ll Need
- Worsted-weight category 4 acrylic or washable wool-blend yarn, approximately 220 yd/201 m per 100 g skein.
- Color A, oatmeal: 8 skeins, approximately 1,760 yd/1,609 m.
- Color B, deep teal: 2 skeins, approximately 440 yd/402 m.
- US I/9 (5.5 mm) crochet hook, or the size needed to obtain gauge.
- Locking stitch markers.
- Yarn needle.
- Scissors.
No stuffing, fasteners, or hardware are used.
Gauge
14 dc or post sts and 8 rows = 4 in/10 cm in the established basketweave pattern, measured after gentle blocking.
Gauge is important for achieving the stated finished size. Make a swatch that includes both FPdc and BPdc, then wash or block it as you intend to treat the finished blanket. Use a larger hook if your swatch is too small or a smaller hook if it is too large. Yardage may vary with gauge and yarn choice.
Finished Measurements
- Main panel before border: Approximately 37 1/4 in/94.5 cm wide × 40 1/2 in/103 cm long.
- Finished blanket after border and blocking: Approximately 41 in/104 cm wide × 44 1/4 in/112.5 cm long.
Crochet Abbreviations
- beg = beginning
- BPdc = back post double crochet
- ch = chain
- dc = double crochet
- FPdc = front post double crochet
- rep = repeat
- rnd = round
- sc = single crochet
- sl st = slip stitch
- st(s) = stitch(es)
Special Stitches
Front Post Double Crochet (FPdc)
Yarn over, insert the hook from front to back and then to front around the post of the indicated stitch, yarn over and pull up a loop; complete as for a dc.
Back Post Double Crochet (BPdc)
Yarn over, insert the hook from back to front and then to back around the post of the indicated stitch, yarn over and pull up a loop; complete as for a dc.
Reverse Single Crochet
Working from left to right, insert the hook into the stitch immediately to the right, yarn over and pull up a loop, yarn over and draw through both loops.
Important Pattern Notes
- The turning ch-3 counts as the first dc throughout the panel.
- Do not work into the stitch directly below the turning chain.
- Every panel row contains 130 sts, including the turning ch-3.
- FPdc and BPdc are worked around the post of the indicated stitch rather than into its top loops.
- Keep the first and last stitch of every panel row as an ordinary dc. These stitches create stable edges for the border.
- Turn after every panel row.
- The basketweave texture changes orientation after every four post-stitch rows.
- In the border, the corner groups are separate from the specified stitches placed along each edge.
- Place a marker in the center stitch of every 3-sc corner group and move it upward after each increasing round.
Complete Free Crochet Pattern
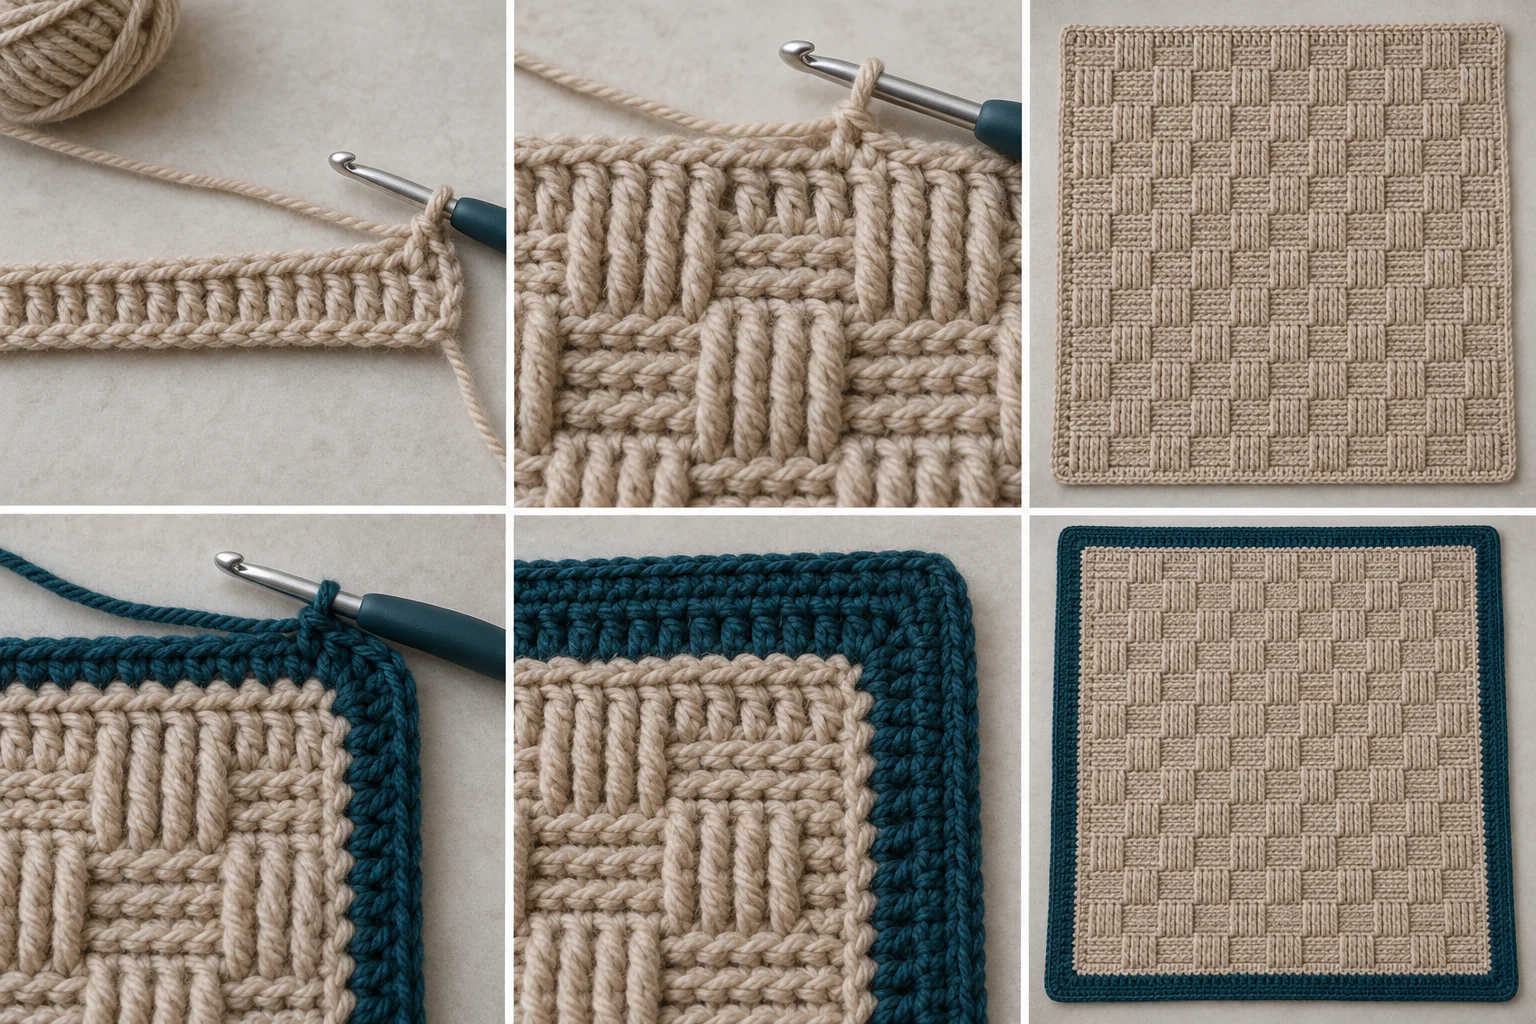
Component 1 — Basketweave Blanket Panel, Make 1 in Color A
Leave an 8 in/20 cm starting tail. Ch 132.
Row 1: Dc in 4th ch from hook; dc in each remaining ch across. The 3 skipped chains count as the first dc. Turn. 130 sts.
Row 2: Ch 3, skip first st, *FPdc around each of next 4 sts, BPdc around each of next 4 sts; rep from * 15 more times, dc in top of turning ch. Turn. 130 sts.
Rows 3–5: Rep Row 2, always working each post stitch around the post stitch directly below it. Turn. 130 sts.
Row 6: Ch 3, skip first st, *BPdc around each of next 4 sts, FPdc around each of next 4 sts; rep from * 15 more times, dc in top of turning ch. Turn. 130 sts.
Rows 7–9: Rep Row 6, always working each post stitch around the post stitch directly below it. Turn. 130 sts.
Rows 10–81: Rep Rows 2–9 nine more times. There are 81 total rows: Row 1 plus ten complete 8-row texture sequences.
At the end of Row 81, do not fasten off until you have checked that both short edges contain 130 sts and each long edge contains 81 row ends. Fasten off Color A, leaving an 8 in/20 cm tail.
Component 2 — Continuous Border, Make 1 in Color B
Work the border in joined rnds with the right side facing. The corner groups do not replace any of the specified 130 short-edge stitches or 162 long-edge stitches.
Rnd 1: Join Color B with a sl st in the corner gap immediately before the first row end on a long edge, leaving an 8 in/20 cm tail. Ch 1, work 3 sc in the same corner gap; place a marker in the center sc. Work 2 sc in each of the 81 row ends down the first long edge (162 sc). Work 3 sc in the next corner gap; mark center sc. Work 1 sc into the base of each of the 130 panel sts across the foundation edge. Work 3 sc in the next corner gap; mark center sc. Work 2 sc in each of the 81 row ends up the second long edge (162 sc). Work 3 sc in the final corner gap; mark center sc. Work 1 sc in each of the 130 sts across Row 81. Join with sl st to first sc. 596 sc.
Rnd 2: Ch 1, sc in each st around, working 3 sc in each marked corner st and moving each marker to the center sc of the new corner group. Join with sl st to first sc. 604 sc.
Rnd 3: Ch 1, sc in each st around, working 3 sc in each marked corner st and moving each marker to the center sc of the new corner group. Join with sl st to first sc. 612 sc.
Rnd 4: Ch 1; reverse sc in each st around with no increases, including one reverse sc in every corner stitch. Join with sl st to first reverse sc. 612 reverse sc. Fasten off, leaving an 8 in/20 cm tail.
Stitch-Count Check
- Panel foundation row: 132 chains − 3 skipped chains + 1 turning chain counted as the first dc = 130 sts.
- Panel texture rows: 1 edge dc + (16 repeats × 8 post sts) + 1 edge dc = 130 sts.
- Border Rnd 1: 130 top + 130 bottom + (2 sides × 81 row ends × 2 sc) + (4 corners × 3 sc) = 596 sts.
- Border Rnd 2: 596 previous sts + (4 corner increases × 2 added sts) = 604 sts.
- Border Rnd 3: 604 previous sts + (4 corner increases × 2 added sts) = 612 sts.
- Border Rnd 4: 612 sts worked without increases = 612 reverse sc.
Assembly
No sewing or component attachment is required. The border is crocheted directly around the completed blanket panel, and the joined border rounds form one continuous finish.
Finishing and Tail Management
Using a yarn needle, weave every starting, joining, and ending tail at least 3 in/7.5 cm through stitches of the same color. Reverse direction and weave back through several stitches to help secure each tail.
Gently wet-block or steam-block according to the yarn label. Never touch acrylic yarn directly with a hot iron. Shape the blanket to the stated finished measurements, square all four corners, and allow it to dry completely. Trim the woven tails only after blocking.
Customization Ideas
- Color: Use a solid panel and contrasting border as written, or choose two shades with less contrast for a quieter finish. Keep all four border rounds in one Color B so the visible construction remains unchanged.
- Yarn fiber: Choose a washable category 4 yarn appropriate for the blanket’s intended use. Always make and block a gauge swatch because different fibers can change the drape and dimensions.
- Width: For a mathematically compatible custom width, use a starting chain that is a multiple of 8 plus 4. The resulting row will contain a multiple of 8 plus 2 stitches, allowing one ordinary dc at each edge and complete 8-stitch texture repeats between them.
- Length: After Row 1, work complete 8-row texture sequences so the alternating four-row blocks remain balanced.
If you change the width or number of rows, the written border counts and yardage will no longer apply. Count the stitches on both short edges and the row ends on both long edges, place 2 sc in every row end, retain four 3-sc corner groups in Rnd 1, and recalculate every round before continuing.
Common Mistakes to Avoid
- Working into the first stitch after ch 3: The turning chain already counts as the first dc. Working into the stitch directly below it adds an unwanted stitch.
- Skipping the final turning chain: The last dc of each panel row goes into the top of the previous row’s turning ch.
- Working through top loops instead of around posts: FPdc and BPdc must encircle the stitch post to create the basketweave relief.
- Changing the texture too soon: Work four rows in one post-stitch arrangement before reversing the blocks for four rows.
- Replacing edge stitches with corners: In Border Rnd 1, complete every specified edge stitch as well as each separate 3-sc corner group.
- Losing the corner center: Keep each marker in the center sc of its corner group so Rnds 2 and 3 increase in the correct place.
- Adding increases in Rnd 4: Work exactly one reverse sc in every stitch, including each corner stitch.
Troubleshooting
Why does my panel have more than 130 stitches?
Check the beginning of the row first. After ch 3, skip the stitch directly below the chain. Also make sure the final dc is worked only once in the top of the turning chain.
Why do my basketweave blocks look uneven?
Confirm that each block contains exactly four post stitches and that each row has sixteen complete 8-stitch repeats between the two ordinary edge dc. Consistent tension around the posts also helps the blocks sit evenly.
Why is the panel narrowing?
The final dc may be missing. Count 128 post stitches between the beginning turning chain and the final dc, for 130 sts total.
Why is the border ruffling?
First verify that Rnd 1 has exactly 2 sc in each of the 81 row ends, 1 sc in each of the 130 stitches along both short edges, and four separate 3-sc corners. Ruffling can also indicate a hook or tension that is too loose.
Why are the border corners curling inward?
Check that Rnds 2 and 3 each contain 3 sc in every marked corner stitch. Missing a corner increase removes two stitches from that round and can pull the corner inward.
My reverse single crochet feels awkward. What should I do?
Keep the working yarn relaxed, move from left to right, and avoid tightening each stitch until the next one is formed. Practice on a swatch before working the final round if the technique is new to you.
Care Instructions
Follow the care directions for your chosen yarn. For a washable acrylic or wool-blend yarn, use cool water and a gentle cycle or hand wash as directed by the label. Avoid bleach and high heat. Reshape the blanket while damp and dry flat when possible. Store it clean and completely dry, folded loosely rather than hanging, to protect the textured fabric from stretching.
Frequently Asked Questions
Is this basketweave blanket worked in separate squares?
No. The basketweave panel is one rectangle worked flat from the foundation chain upward. The block effect comes entirely from alternating FPdc and BPdc stitches.
Does the turning chain count as a stitch?
Yes. The ch-3 counts as the first dc in every panel row.
How many stitches should each panel row have?
Every panel row has exactly 130 sts, including the turning ch-3.
How many rows are in the panel?
The completed panel has 81 rows: one foundation dc row followed by ten complete 8-row texture sequences.
Which side should face me while adding the border?
Keep the right side of the panel facing you while working the joined border rounds.
Can I omit the reverse single crochet round?
Rnd 4 is part of the finished design and provides its defined outer edge. Omitting it would change the approved pattern, appearance, finished dimensions, and final stitch count.
Is any sewing required?
No assembly sewing is needed. Only the yarn tails must be woven securely into stitches of the same color.