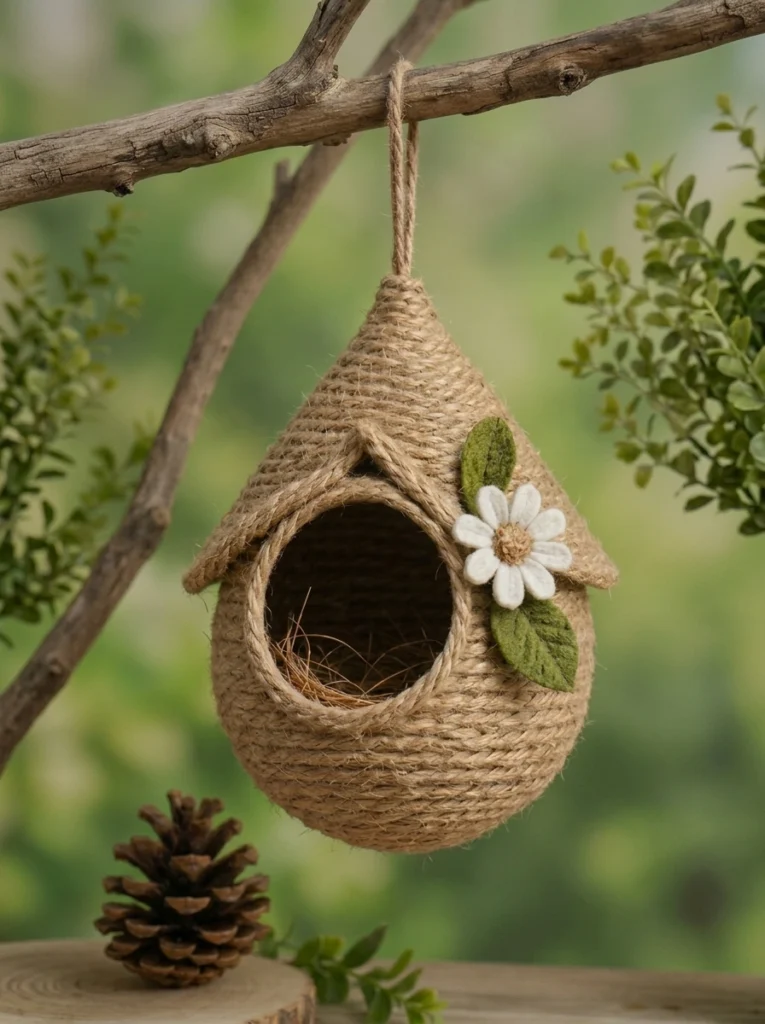
There’s something wonderfully satisfying about creating a functional piece of decor with your own hands, especially one that welcomes a little wildlife into your outdoor space. This DIY rope birdhouse is exactly that kind of project — simple enough for a relaxed afternoon of crafting, yet beautiful enough to become a standout feature in your garden. Made from little more than ordinary rope, glue, and a balloon, this rustic birdhouse proves that some of the most charming decor comes from the most unexpected materials.
Whether you’re an experienced crafter or someone looking for an easy weekend project, this rope birdhouse tutorial will walk you through everything you need: the supplies, the step-by-step process, styling ideas, placement tips, and answers to common questions. By the end, you’ll have a handmade piece that’s both a cozy shelter for visiting birds and a beautiful accent for your outdoor space.
Why a Rope Birdhouse Is Such a Charming DIY Project
Birdhouses have long been a beloved garden accessory, offering both function and visual charm. But traditional wooden birdhouses can require carpentry skills, power tools, or precise measurements that make the project feel out of reach for casual crafters. A rope birdhouse flips that idea entirely — it relies on a simple wrapping and molding technique that anyone can master, regardless of crafting experience.
Here’s what makes this project so appealing:
- No woodworking skills required: The entire structure is built by wrapping rope, so there’s no cutting, sawing, or nailing involved.
- Budget-friendly: Rope, glue, and a balloon are inexpensive and often already on hand.
- Naturally rustic aesthetic: The organic texture of jute or cotton rope gives the birdhouse a handcrafted, farmhouse-inspired look that fits beautifully into garden and patio decor.
- A relaxing, meditative process: Wrapping the rope layer by layer is a slow, calming craft activity — perfect for an easy afternoon project.
- A genuinely functional result: Unlike purely decorative crafts, this birdhouse can offer real shelter for small birds when placed thoughtfully in your garden.
Whether you’re drawn to this project for its simplicity, its rustic charm, or its usefulness in your garden, it’s a wonderfully rewarding craft to try.
What You’ll Need: The Complete Supply List
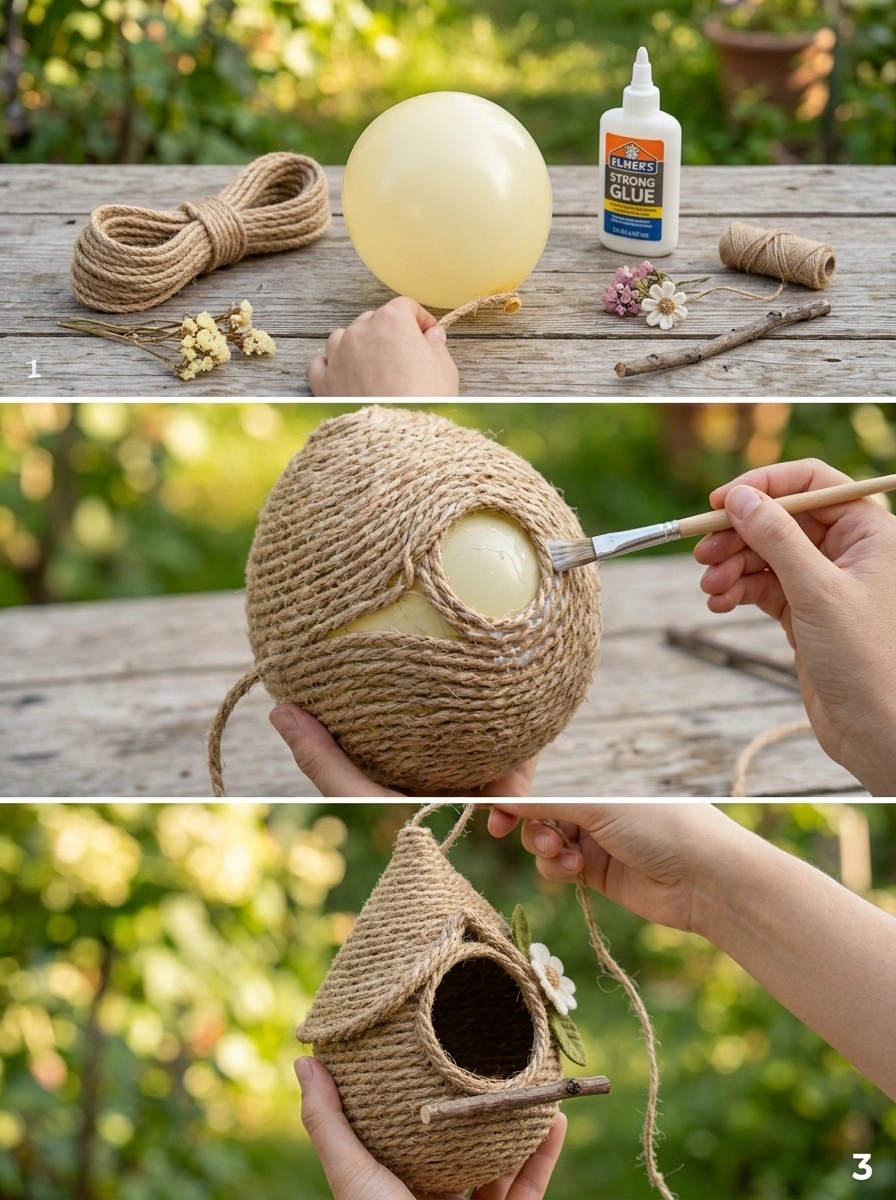
Before you begin, gather your materials so you can move through each step without interruption.
Essential Supplies
- Natural jute rope or thick cotton rope – This forms the entire structure of your birdhouse, so choose a rope that’s sturdy but still flexible enough to wrap smoothly.
- Small balloon or round mold – This acts as the form your rope will wrap around, giving the birdhouse its rounded shape. A balloon offers flexibility in sizing, while a round mold (like a foam ball) provides more consistent structure.
- Strong craft glue – This is essential for helping the rope hold its shape as it dries, so choose a glue formulated for fabric or multi-surface use.
- Small wooden perch – A tiny wooden dowel or twig placed beneath the entrance gives visiting birds a place to land.
- Twine for hanging – Once your birdhouse is complete, twine allows you to hang it securely from a tree branch or hook.
- Scissors – For trimming rope ends and cutting twine to length.
Optional Extras
- Dried flowers or greenery – A lovely way to add extra charm and a personalized touch to the finished birdhouse.
Having everything laid out ahead of time will help the wrapping process go smoothly, especially since you’ll want to work somewhat continuously while the glue is still workable.
Step-by-Step Instructions: How to Make Your Rope Birdhouse
Follow these steps to transform simple rope into a beautiful, functional birdhouse.
Step 1: Inflate a Balloon to the Size You Want for Your Birdhouse
Start by inflating your balloon to your desired birdhouse size. A medium-sized balloon, roughly the size of a grapefruit, works well for a classic birdhouse shape, but you can adjust the size depending on your preference. Tie off the balloon securely, and consider setting it in a bowl or cup while you work to keep it stable and prevent it from rolling around.
If you’d prefer a more uniform, symmetrical shape, a round foam mold is a great alternative to a balloon, though a balloon offers the benefit of easy removal once the glue has dried.
Step 2: Wrap the Rope Around the Balloon in Overlapping Layers
Begin wrapping your rope around the balloon, starting at the top or bottom and working your way around in slightly overlapping layers. Take your time with this step — the goal is to create even coverage across the entire surface, with each wrap slightly overlapping the previous one to eliminate gaps.
As you wrap, periodically adjust the rope to maintain a rounded, birdhouse-like shape. Depending on the size of your balloon, this step can take a bit of patience, but the process itself is quite relaxing once you settle into a rhythm.
Step 3: Apply Glue as You Go to Help the Rope Hold Its Shape
As you continue wrapping, apply craft glue along the rope in small sections to help it adhere to itself and maintain its shape as it dries. Working in manageable sections — rather than trying to glue the entire rope length at once — will give you more control and help prevent overly messy application.
Press each wrapped layer gently as you go to ensure good contact between the rope and the glue, which will help create a sturdy, well-bonded structure once everything dries.
Step 4: Leave a Small Opening for the Birds to Enter
As you wrap, intentionally leave a small circular gap in the rope coverage to serve as the birdhouse’s entrance. This opening should be sized appropriately for small birds — typically around 1 to 1.5 inches in diameter, depending on the species you hope to attract. Positioning this opening slightly above the center of the balloon will give your finished birdhouse a balanced, classic silhouette.
Step 5: Allow the Glue to Dry Completely and Carefully Remove the Balloon
Once you’ve fully wrapped the balloon and are happy with the shape and coverage, set the piece aside to dry completely. This step requires patience — depending on the glue you’re using and the humidity in your space, full drying can take anywhere from several hours to a full day or more.
Once the rope structure feels firm and fully hardened, carefully pop or deflate the balloon and gently remove it from the inside of your rope shell. Take your time with this step to avoid disturbing the dried rope structure. If you used a foam mold rather than a balloon, you may be able to leave it in place for extra structural support, depending on your preference.
Step 6: Add a Small Wooden Perch Beneath the Opening
Using your craft glue, attach a small wooden perch — such as a short dowel, twig, or even a decorative wooden bead on a stick — just beneath the entrance opening. This small addition not only adds charm to your finished birdhouse but also gives visiting birds a natural spot to land before entering.
Allow the glue to fully set before moving on to ensure the perch is securely attached.
Step 7: Attach Twine and Hang Your Finished Birdhouse from a Sturdy Tree Branch
Finally, attach a length of twine to the top of your birdhouse, either by threading it through the rope structure itself or by looping it securely around the top and knotting it firmly. Once your hanger is secure, find a sturdy tree branch or hook in your garden and hang your finished rope birdhouse.
Step back and admire your handmade creation — a simple, rustic birdhouse crafted entirely from rope, ready to welcome visiting birds to your outdoor space.
Creative Variations to Try
Once you’ve mastered the basic rope-wrapping technique, there are plenty of ways to customize your birdhouse and make it your own.
Rope Material Variations
- Jute rope: Offers a classic, earthy, farmhouse look with a slightly rough texture.
- Cotton rope: Provides a softer, smoother finish and a more refined appearance.
- Colored or dyed rope: For a bolder look, try dyeing your rope beforehand or choosing pre-colored rope for a playful pop of color.
Decorative Additions
- Dried flowers or greenery: Glue small dried florals around the entrance for a garden-inspired accent.
- Small beads or charms: Add subtle decorative details around the base or near the perch.
- Layered rope colors: Wrap sections of the birdhouse in two different rope colors or textures for a two-toned design.
Size Variations
Try making a few different-sized birdhouses using balloons of varying sizes. Grouped together and hung at different heights, a cluster of rope birdhouses creates a charming, layered display in your garden or on a covered patio.
Shape Variations
While a rounded shape is classic, you can experiment with slightly oval or elongated balloon shapes for a more unique silhouette, or add a small rope “roof” accent above the entrance for extra visual interest.
Where to Display Your Rope Birdhouse
This rustic, handmade birdhouse works beautifully in a variety of outdoor (and even some indoor) settings.
- Garden trees: Hang from a sturdy branch for a natural, welcoming touch that also offers real shelter for visiting birds.
- Patio or porch: A charming accent piece for covered outdoor spaces.
- Balcony: A small-space-friendly way to bring a bit of rustic charm to apartment living.
- Farmhouse-style interiors: Displayed indoors as a decorative piece, a rope birdhouse fits beautifully into farmhouse, boho, or coastal-inspired decor themes.
- Garden parties or outdoor events: A handmade rope birdhouse also makes for a charming decorative accent at rustic-themed gatherings.
Since this piece is made primarily from rope and glue, it’s best suited for covered or moderately sheltered outdoor spaces to protect it from prolonged exposure to heavy rain.
Tips for a Long-Lasting Rope Birdhouse
To help your handmade rope birdhouse stay beautiful and functional for as long as possible:
- Use a strong, weather-resistant glue if you plan to display your birdhouse outdoors, as this will help it hold up better against humidity and temperature changes.
- Choose a sheltered hanging spot like a covered patio, porch, or a tree with dense foliage to protect the rope from direct, prolonged rain exposure.
- Apply a clear sealant spray over the finished rope structure for added durability and weather resistance, especially if displaying it outdoors year-round.
- Check the hanging twine periodically, especially if displayed outdoors where wind and movement can gradually loosen knots.
- Bring it indoors during severe weather like heavy storms to help extend the life of the piece.
Frequently Asked Questions
What type of rope works best for this project? Natural jute rope is a popular choice for its classic, rustic texture, while thick cotton rope offers a softer, smoother finish. Both work well, so the choice largely comes down to your desired aesthetic.
Can I use a foam ball instead of a balloon? Yes, a round foam mold can be used instead of a balloon and offers the benefit of added structural support, since it can be left inside the finished birdhouse rather than removed.
How long does the glue need to dry before removing the balloon? Drying times vary depending on the glue used and environmental humidity, but it’s generally best to allow several hours to a full day of drying time to ensure the rope structure is fully hardened before removing the balloon.
Is this birdhouse actually functional for birds, or just decorative? While this rope birdhouse can serve as a decorative accent, its rounded shape and appropriately sized entrance opening also make it a genuinely usable shelter option for small birds when hung in a suitable, sheltered outdoor location.
Will the rope birdhouse hold up in rain? Since it’s made primarily from rope and glue, this birdhouse is best suited for covered or sheltered outdoor spaces. Using a weather-resistant glue and a clear protective sealant can help improve its durability against light moisture, though prolonged heavy rain exposure isn’t recommended.
Can I make this project with kids? Yes, with some supervision, especially during the balloon inflation and glue application steps. Kids often enjoy the tactile, hands-on process of wrapping the rope and can help with decorative touches like adding dried flowers or greenery.
Final Thoughts
A DIY rope birdhouse is a wonderful example of how ordinary materials can be transformed into something both beautiful and functional with just a bit of creativity and patience. Using nothing more than rope, glue, and a simple balloon mold, you can craft a charming, rustic birdhouse that adds handmade warmth to your garden while offering a cozy little shelter for visiting birds.
So gather your materials, find a comfortable spot to work, and enjoy the slow, satisfying process of wrapping your very own rope birdhouse into shape. Once it’s hanging proudly from a tree branch, you’ll have created a piece that’s equal parts rustic decor and genuine backyard hospitality.
Would you try making this at home?