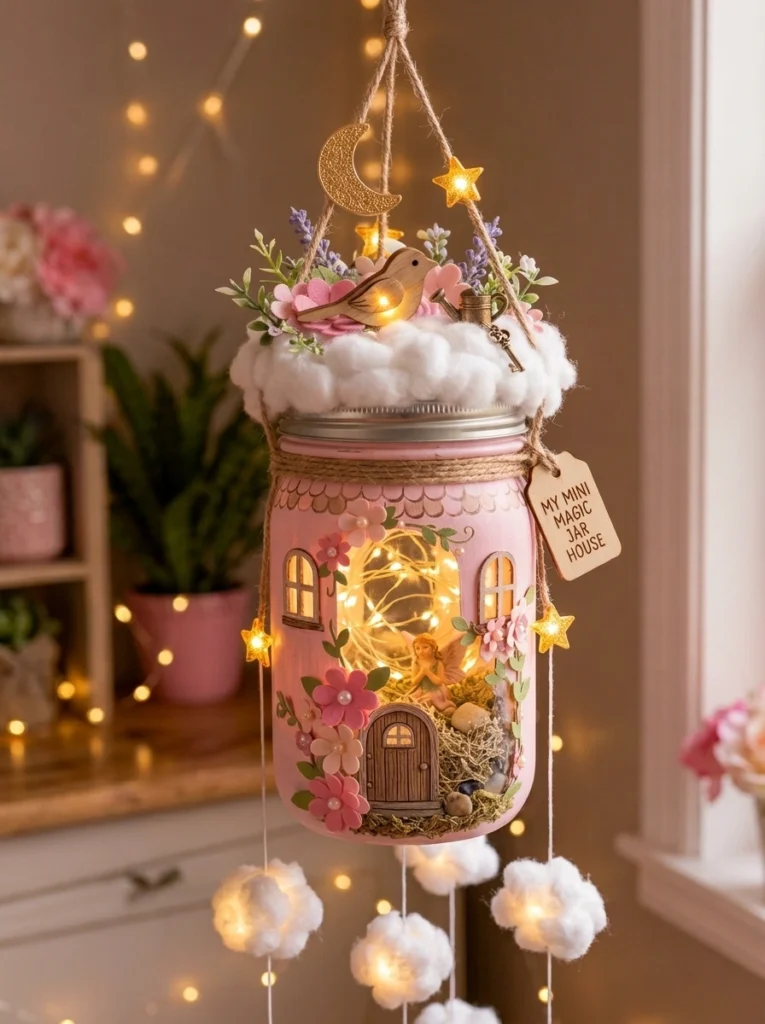
DIY Mason Jar Fairy House Hanging Decor: A Magical & Whimsical Craft Anyone Can Make
There’s something undeniably enchanting about tiny glowing worlds. Whether it’s the flicker of string lights through frosted glass or the sight of a miniature door tucked between painted flowers, a DIY mason jar fairy house has a way of turning an ordinary corner of your home into something straight out of a storybook. If you’ve been searching for a craft project that’s budget-friendly, beginner-approachable, and guaranteed to spark joy, this is it.
In this guide, we’ll walk through everything you need to know to create your own mason jar fairy house hanging decor — from the supplies you’ll need, to step-by-step instructions, styling tips, and creative variations. By the end, you’ll have a one-of-a-kind piece of whimsical decor perfect for your garden, patio, balcony, bedroom, or any cozy outdoor nook.
Why Mason Jar Fairy Houses Are the Perfect DIY Project
Fairy gardens and fairy houses have surged in popularity over the past few years, and it’s easy to see why. They combine the charm of miniature crafting with the accessibility of upcycled materials. A mason jar — something most of us already have sitting in a kitchen cabinet — becomes the canvas for an entire tiny universe.
Here’s what makes this project so appealing:
- Affordable: Most supplies can be found at a local craft store or even repurposed from things you already own.
- Customizable: No two fairy houses ever look the same. You can paint, decorate, and embellish yours to reflect your personal style.
- Versatile decor: Hang it in a garden, on a porch, in a bedroom window, or even indoors as a nightlight.
- Beginner-friendly: You don’t need advanced crafting skills — just patience and a love for tiny details.
- A wonderful gift idea: Handmade fairy houses make thoughtful, personal gifts for birthdays, housewarmings, or just because.
Whether you’re an experienced crafter or trying your hand at DIY home decor for the first time, this project is approachable, relaxing, and rewarding.
What You’ll Need: The Complete Supply List
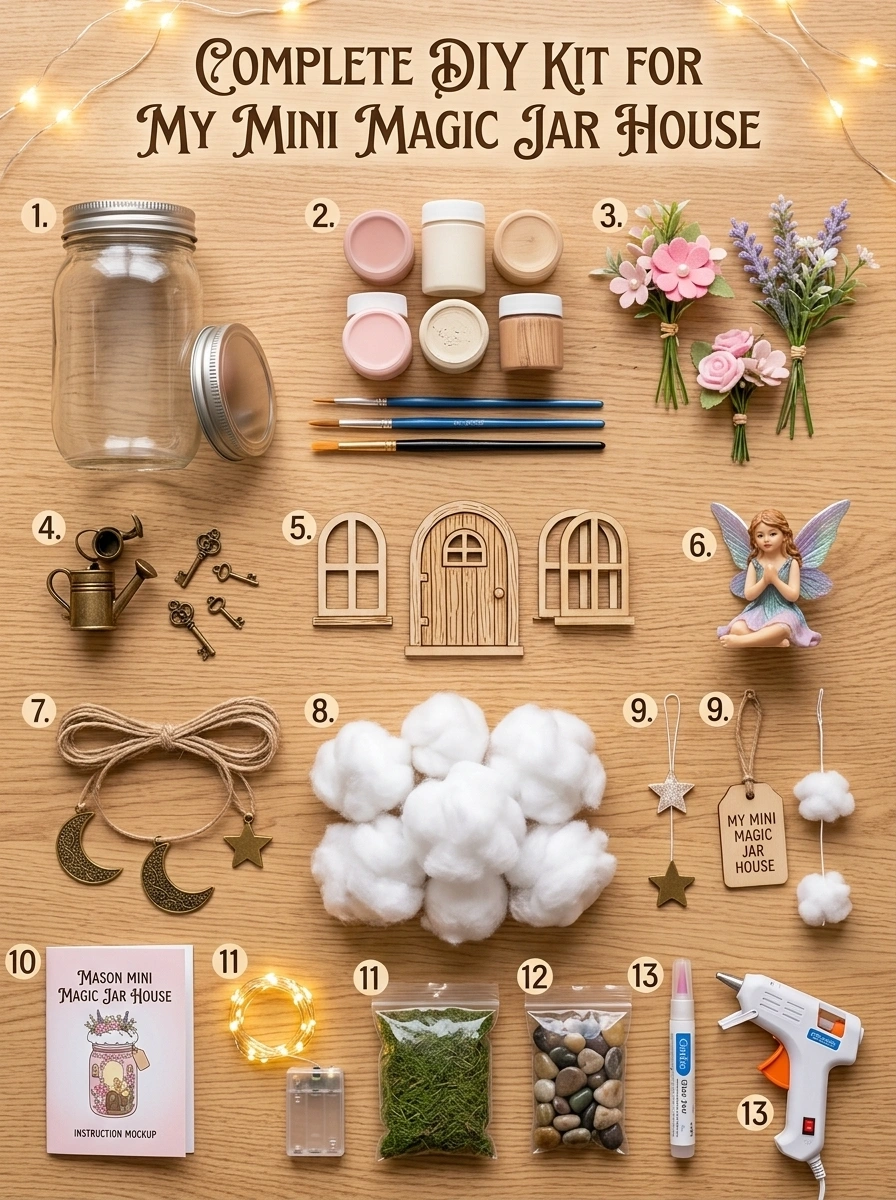
Before diving into the steps, gather your materials. Having everything ready ahead of time makes the process smoother and more enjoyable.
Essential Supplies
- Mason jar with lid – Any size works, but a medium jar (16–32 oz) offers the best balance between visibility and detail space.
- Battery-powered fairy lights – LED string lights are ideal since they stay cool to the touch and are safe for both kids and outdoor use.
- Acrylic or glass paint – Used to create the fairy-house exterior, windows, doors, and other painted details.
- Artificial flowers and greenery – Small florals and faux moss add texture and a garden-fresh look.
- Miniature fairy or garden decorations – Tiny figurines, mushrooms, or garden accessories to bring the scene to life.
- Twine or strong hanging cord – This will become the hanger, so choose something durable enough to support the jar’s weight.
- Craft glue – A strong adhesive (hot glue or a multi-surface craft glue) will keep everything secure.
Optional Extras
- Tiny wooden sticks – Great for framing a door or creating a rustic fence effect.
- Decorative stones – Useful for a pathway design or added texture around the base.
Having these supplies on hand means you can move through the entire project in an afternoon, without needing to make multiple trips to the store.
Step-by-Step Instructions: How to Make Your Mason Jar Fairy House
Now for the fun part. Follow these steps to transform a plain glass jar into a glowing, magical little home.
Step 1: Clean and Dry the Jar Completely
Start with a clean canvas. Wash your mason jar thoroughly with warm, soapy water to remove any labels, residue, or dust. Dry it completely — any leftover moisture can interfere with paint adhesion later on. If your jar has a stubborn label, a bit of rubbing alcohol or a vinegar soak can help loosen the adhesive.
Step 2: Paint the Jar to Create a Fairy-House Look
This is where your fairy house really starts to take shape. Using acrylic or glass paint, begin outlining the general structure of a tiny house directly on the glass. Think about elements like:
- A base color for “walls” (soft pastels, weathered wood tones, or cottage-core neutrals work beautifully)
- A contrasting roofline, even if it’s just a painted suggestion near the top
- Texture details like brick patterns, wood-plank lines, or a stone foundation
Glass paint is especially nice for this project because it allows light to shine through unevenly painted or translucent areas, creating a soft glow effect once your fairy lights go in.
Let each layer dry fully before adding the next — rushing this step can smudge your design.
Step 3: Add Tiny Windows, a Door, and Miniature Details
Once your base coat is dry, it’s time to bring personality into the design. Paint or glue on:
- Small square or arched windows (you can even paint tiny “curtains” or shutters)
- A front door, complete with a doorknob dot or a mini wreath
- Decorative flourishes like vines climbing the walls, a chimney, or a welcome mat
This is the step where your fairy house transforms from “painted jar” to “tiny magical home.” Take your time here — small details make the biggest visual impact.
Step 4: Place Battery-Powered Fairy Lights Inside the Jar
Gently coil your battery-powered fairy lights and place them inside the jar. Because these lights run on batteries rather than a plug, they’re safe to use anywhere — no outlet required. This makes your fairy house perfect for hanging in the garden, on a tree branch, or from a porch hook.
Battery-powered lights are essential here for both safety and flexibility. They also typically include a small on/off switch, so you can hide the battery pack behind foliage or greenery for a seamless look.
Step 5: Decorate the Lid with Greenery and Flowers
The lid is your fairy house’s “roof” and deserves just as much attention as the jar itself. Using craft glue, attach:
- Artificial moss or greenery as a base layer
- Small artificial flowers in complementary colors
- A miniature fairy figurine or garden accessory as a whimsical focal point
If you’re using optional tiny wooden sticks or decorative stones, this is a great place to incorporate them — think of a little stick fence or a pebble pathway leading to the “door.”
Step 6: Attach Twine or Cord to Create a Secure Hanger
Cut a length of twine or strong cord — long enough to hang comfortably from a hook, branch, or ceiling — and wrap it securely around the neck of the lid or through small holes if your lid design allows. Tie a firm knot and double-check that it can support the jar’s weight before hanging.
For extra security, especially with heavier jars, consider crisscrossing the twine around the lid several times or using a wire wrap underneath the twine for reinforcement.
Step 7: Hang Your Magical Fairy House and Enjoy the Glow
Once everything is secure, find the perfect spot to hang your creation. Turn on the fairy lights and watch as your mason jar fairy house comes to life with a soft, magical glow — ideal for cozy evenings on the patio or a whimsical touch in your bedroom.
Creative Variations to Try
One of the best parts of this DIY project is how endlessly customizable it is. Here are a few creative twists to consider:
Seasonal Themes
- Spring/Summer: Bright florals, pastel colors, and butterfly accents
- Fall: Warm oranges and browns, tiny acorns, and mini pumpkins
- Winter/Holiday: White “snow” texture paint, silver accents, and twinkling white lights
Color Palette Ideas
- Cottage-core neutrals (cream, sage green, soft brown)
- Pastel fairy tale tones (lavender, blush pink, mint)
- Moody enchanted forest (deep greens, purples, and gold accents)
Size Variations
Try making a few different sizes and hanging them together in a cluster for a magical “fairy village” effect. Small jars can become quaint cottages, while larger jars can be transformed into grander fairy manors complete with multiple windows and elaborate rooflines.
Alternative Hanging Styles
Instead of a simple twine loop, try braided twine, decorative ribbon, or even a chain-and-twine combination for a more elevated look.
Where to Display Your Mason Jar Fairy House
This craft is as versatile in placement as it is in design. Consider these ideas:
- Garden or Patio: Hang from a tree branch, shepherd’s hook, or pergola for an enchanted outdoor feel.
- Balcony: A small-space-friendly way to add charm to apartment living.
- Bedroom or Nursery: A soft, glowing nightlight alternative that doubles as decor.
- Front Porch: Welcome guests with a whimsical touch near your entryway.
- Wedding or Party Decor: Line a pathway or hang several along a fence for a magical event atmosphere.
Because the lights are battery-powered, you’re not limited by proximity to an outlet — giving you the freedom to hang your fairy house virtually anywhere.
Tips for Long-Lasting Fairy House Decor
To keep your mason jar fairy house looking magical for as long as possible:
- Use outdoor-rated paint sealant if you plan to display it outside year-round, protecting the design from rain and UV fading.
- Choose weather-resistant artificial flowers for outdoor use, as some cheaper florals can fade or become brittle in direct sun.
- Check batteries periodically and keep spares on hand so your fairy house never goes dark.
- Bring it indoors during harsh weather like heavy storms or freezing temperatures to extend its lifespan.
- Reinforce the hanger every few months, especially if displayed outdoors where wind and movement can loosen knots over time.
Frequently Asked Questions
Can I use real flowers instead of artificial ones? While fresh flowers offer a beautiful natural look, they’ll wilt relatively quickly, especially in a sealed jar environment. Artificial flowers and greenery are recommended for a decor piece meant to last.
What size mason jar works best? Medium-sized jars (roughly 16–32 oz) tend to offer the best balance — large enough to fit lights and decorations comfortably, but not so large that the piece becomes unwieldy to hang.
Do I need special paint for glass? Acrylic paint can work, but glass paint is formulated to adhere better to smooth surfaces and often allows for a more translucent, glowing effect once your lights are added.
How long do battery-powered fairy lights last? This varies by brand and light type, but many battery-powered LED string lights can run for 48–100+ hours before needing new batteries, especially if you use them intermittently rather than leaving them on constantly.
Is this project kid-friendly? Yes! With some adult supervision for the painting and gluing steps, this is a wonderful family craft activity. Battery-powered lights also eliminate the safety concerns associated with plug-in lighting or candles.
Final Thoughts
A DIY mason jar fairy house is more than just a craft project — it’s a small act of creativity that brings warmth, whimsy, and a touch of magic into everyday spaces. With just a handful of affordable supplies and a little patience, you can create a completely unique piece of hanging decor that reflects your personal style, whether that’s cottage-core charm, enchanted forest mystique, or pastel fairy-tale sweetness.
So gather your mason jar, fairy lights, and miniature decorations, and let your imagination guide the process. Once you hang your finished fairy house and watch it glow in the evening light, you’ll understand exactly why this whimsical DIY trend has captured so many hearts.
Why Handmade Decor Like This Matters
In a world of mass-produced home goods, there’s a growing appreciation for decor that carries a personal touch. A mason jar fairy house isn’t something you’ll find identical on every shelf at a big-box store — it’s shaped by your own color choices, your steady (or wonderfully imperfect) paintbrush strokes, and the little decorative flourishes only you would think to add. That individuality is part of what makes handmade crafts so satisfying to create and so meaningful to display or gift.
This project also fits neatly into the broader cottage-core and fairy-garden aesthetic that has become a favorite across home decor blogs, social media, and seasonal markets. It’s the kind of craft that photographs beautifully, making it a popular choice for anyone building a content library around DIY projects, garden inspiration, or whimsical home styling.
Budget Breakdown: How Affordable Is This Craft?
One of the biggest draws of this project is how little it costs to put together, especially if you already have basic craft supplies on hand. Here’s a rough idea of what you might spend if starting from scratch:
- Mason jar: $2–$5 (or free if repurposed from your kitchen)
- Battery-powered fairy lights: $5–$10
- Acrylic or glass paint: $5–$8 for a small multi-color set
- Artificial flowers and greenery: $3–$7 depending on quantity
- Miniature fairy or garden decorations: $3–$10
- Twine or hanging cord: $2–$4
- Craft glue: $2–$5
All told, you’re likely looking at a total cost of around $20–$40 for a single fairy house, and much less if you’re making several at once, since supplies like paint, glue, and twine typically yield enough for multiple projects. Buying miniatures and florals in bulk packs is a great way to stretch your budget further if you plan on creating a whole fairy village.
Making It a Group Activity
This craft also shines as a group activity. It’s simple enough for kids (with supervision during the gluing and painting steps) yet detailed enough to keep adults engaged and creatively satisfied. Consider these ideas for turning it into a shared experience:
- Craft nights with friends: Set out a table of shared supplies — paints, miniatures, florals — and let everyone create their own unique version.
- Birthday party activity: A fairy-themed birthday party pairs perfectly with a mason jar fairy house station, letting kids decorate their own to take home.
- Family bonding project: A rainy afternoon activity that results in a keepsake decoration for a child’s room.
- Community or classroom craft: Teachers and group leaders often use similar projects to teach fine motor skills, color theory, and creative storytelling, since each child can imagine a little backstory for their fairy’s home.
Because the core supplies are inexpensive and widely available, it’s easy to scale this project up for a group without a big investment.
A Craft Worth Repeating
Once you’ve made your first mason jar fairy house, don’t be surprised if you find yourself wanting to make more. Many crafters end up building an entire collection — each jar telling its own tiny story, whether it’s a cozy cottage, a whimsical toadstool home, or an elegant garden manor. Displayed together, a cluster of glowing fairy houses creates a truly magical focal point for any space, indoors or out.
Whether you’re crafting one as a gift, a personal decor piece, or the start of a growing fairy village, this DIY mason jar fairy house is proof that a little glass jar, some paint, and a string of lights can go a long way toward creating everyday magic.
Happy crafting!