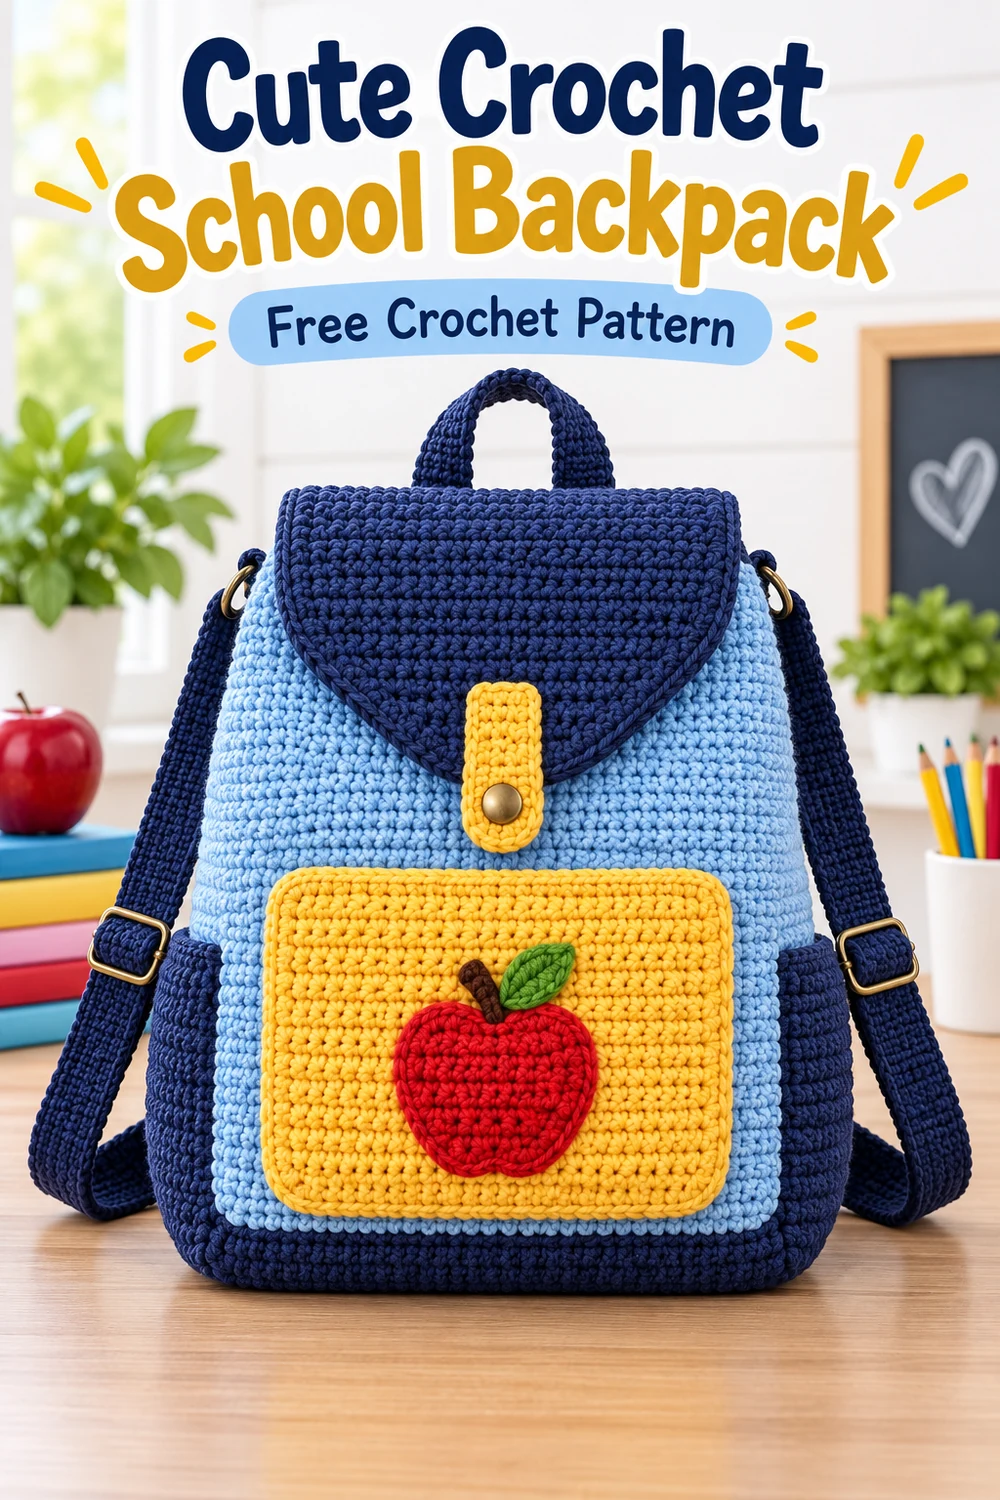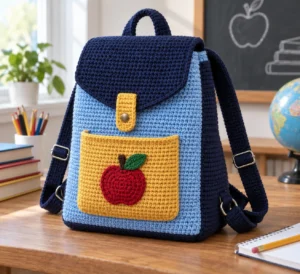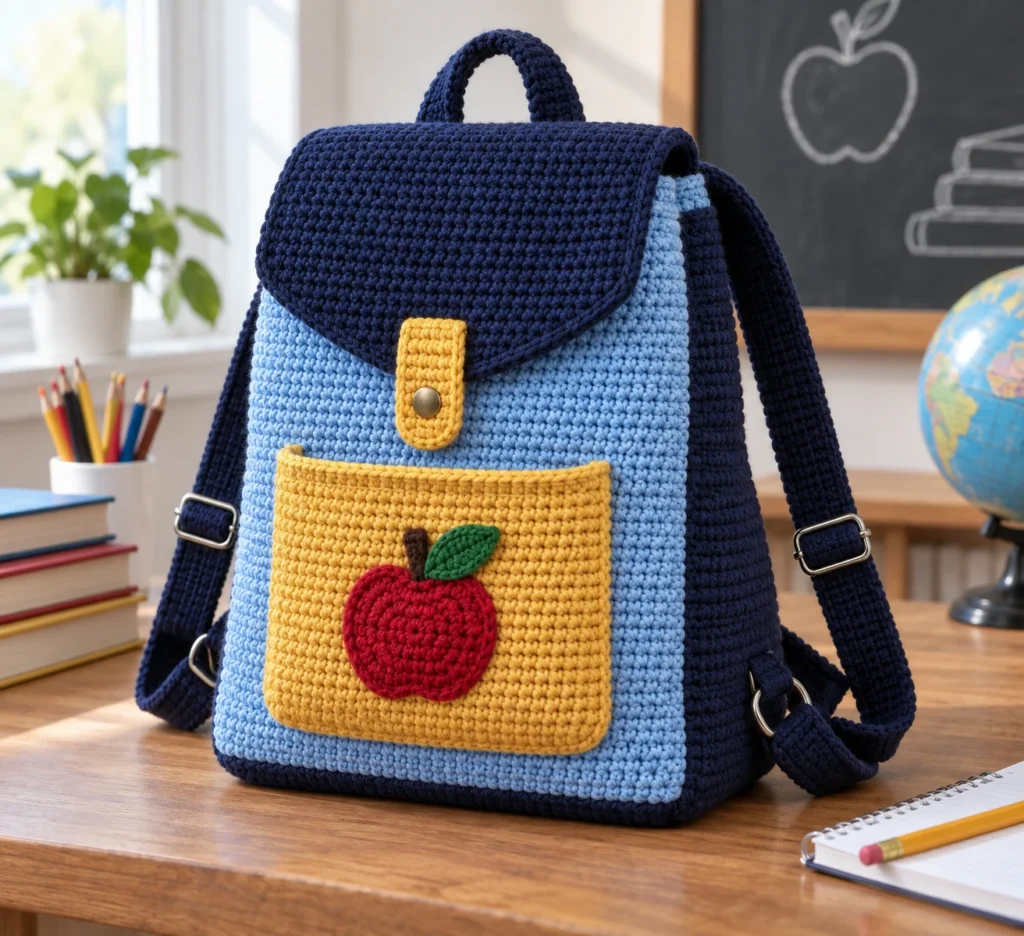
Cute Crochet School Backpack: Free Crochet Pattern
Make a cheerful, child-sized crochet backpack with a sky-blue body, sturdy navy gusset and straps, a golden-yellow front pocket, and a layered apple appliqué. This original US-terms pattern uses dense single crochet for a practical fabric and includes adjustable shoulder straps, reinforced attachment points, a top handle, a tapered flap, and a magnetic closure.
Skill level: Intermediate
Construction: The front and back are worked flat, then joined by one continuous side-and-bottom gusset. Every remaining piece is crocheted separately and securely sewn in place. The backpack is not stuffed.
Pattern at a Glance
- Dense, flat single-crochet construction
- Two sky-blue body panels
- One continuous navy side-and-bottom gusset
- Tapered navy flap with golden-yellow closure tab
- Golden-yellow front pocket with layered apple appliqué
- Two adjustable crocheted shoulder straps with sliders and D-rings
- Reinforced upper anchors, lower hardware tabs, and top handle
- US crochet terminology
- Turning chains do not count as stitches
Complete Component Inventory
- Front panel: 1 in sky blue
- Back panel: 1 in sky blue
- Side-and-bottom gusset: 1 in navy
- Top flap: 1 in navy
- Front pocket: 1 in golden yellow
- Shoulder straps: 2 in navy
- Upper strap-anchor tabs: 2 in navy
- Lower D-ring tabs: 2 in navy
- Top handle: 1 in navy
- Flap closure tab: 1 in golden yellow
- Apple appliqué: 1 in red
- Apple leaf: 1 in green
- Apple stem: 1 in brown
Materials You’ll Need
- Worsted-weight category 4 washable yarn: sky blue, 500 yd/457 m
- Worsted-weight category 4 washable yarn: navy, 400 yd/366 m
- Worsted-weight category 4 washable yarn: golden yellow, 130 yd/119 m
- Worsted-weight category 4 washable yarn: red, 20 yd/18 m
- Worsted-weight category 4 washable yarn: green, 5 yd/5 m
- Worsted-weight category 4 washable yarn: brown, 2 yd/2 m
- US G/6 (4 mm) crochet hook, or size required to obtain gauge
- Yarn needle
- Removable stitch markers
- Scissors and ruler
- Two 1-in/25-mm rectangular strap sliders
- Two 1-in/25-mm D-rings
- One 3/4-in/19-mm sew-on magnetic snap
- Matching sewing thread and sharp hand-sewing needle
Choose a smooth, plied cotton or firm cotton/acrylic blend. The listed yarn amounts include a practical allowance. An optional removable lining may be added only after the specified crocheted construction is complete.
Gauge
15 sc and 15 rows = 6 in (15 cm) in unblocked single crochet, equivalent to 2.5 stitches and 2.5 rows per inch.
Work a swatch measuring at least 20 stitches by 20 rows. The fabric should be firm and dense enough that the contents do not show through. Change hook size as needed to match gauge.
- Body width: 30 stitches ÷ 2.5 = 12 in
- Body height: 34 rows ÷ 2.5 = 13.6 in
- Gusset width: 8 stitches ÷ 2.5 = 3.2 in
- Gusset length: 98 rows ÷ 2.5 = 39.2 in, matching two 13.6-in sides plus one 12-in bottom
Finished Measurements
- Backpack: approximately 12 in (30.5 cm) wide, 13 1/2 in (34.5 cm) high, and 3 1/4 in (8.5 cm) deep, excluding handle and straps
- Front pocket: approximately 7 1/4 × 4 3/4 in (18.5 × 12 cm)
- Flap: approximately 9 1/2 in (24 cm) wide at the attached edge and 7 1/4 in (18.5 cm) long
- Each shoulder strap: approximately 2 in (5 cm) wide and 28 in (71 cm) long
- Top handle before attachment: approximately 11 1/4 in (28.5 cm) long
- Closure tab: approximately 2 × 5 1/2 in (5 × 14 cm)
Crochet Abbreviations
- beg = beginning
- ch = chain
- dc = double crochet
- hdc = half double crochet
- inc = 2 single crochet in the indicated stitch
- rem = remaining
- rep = repeat
- RS = right side
- sc = single crochet
- sc2tog = single crochet 2 stitches together
- sl st = slip stitch
- st(s) = stitch(es)
- WS = wrong side
Important Pattern Notes
- Turning chains do not count as stitches.
- Turn after every flat row unless the instructions say otherwise.
- Place the first sc in the first stitch and the last sc in the final stitch.
- To make sc2tog: insert the hook in the next stitch and draw up a loop; repeat in the following stitch; yarn over and draw through all three loops.
- Use mattress stitch through corresponding edge loops for assembly unless another method is specified.
- Distribute sewing evenly. Do not gather the crocheted fabric.
- Leave every instructed sewing tail untrimmed until its assembly step is complete.
- All measurements are based on the stated gauge. Do not stretch pieces while measuring.
Complete Free Crochet Pattern
Front and Back Panels — Make 2 in Sky Blue
For each panel, ch 31.
Row 1: Sc in second ch from hook and in each rem ch; 30 sc.
Rows 2–34: Ch 1, sc in each st across; 30 sc.
Fasten off. On the front panel, leave a 36-in/91-cm tail at each lower corner by joining separate lengths later for gusset seaming. Do the same on the back panel. Mark the top edge of each panel.
Count check: Every row contains 30 sc. Each side edge has exactly 34 row-end units, and the bottom edge has 30 stitches.
Side-and-Bottom Gusset — Make 1 in Navy
Ch 9.
Row 1: Sc in second ch from hook and in each rem ch; 8 sc.
Rows 2–98: Ch 1, sc in each st across; 8 sc.
Fasten off, leaving a 36-in/91-cm tail at both ends. Place markers after Rows 34 and 64.
Alignment check: Rows 1–34 correspond to one panel side, Rows 35–64 correspond to the 30-stitch bottom, and Rows 65–98 correspond to the other panel side. The required attachment length is 34 + 30 + 34 = 98 units.
Top Flap — Make 1 in Navy
Ch 25.
Row 1: Sc in second ch from hook and in each rem ch; 24 sc.
Rows 2–10: Ch 1, sc across; 24 sc.
Row 11: Ch 1, sc2tog, sc in next 20 sts, sc2tog; 22 sts.
Row 12: Ch 1, sc across; 22 sc.
Row 13: Ch 1, sc2tog, sc in next 18 sts, sc2tog; 20 sts.
Row 14: Ch 1, sc across; 20 sc.
Row 15: Ch 1, sc2tog, sc in next 16 sts, sc2tog; 18 sts.
Row 16: Ch 1, sc across; 18 sc.
Row 17: Ch 1, sc2tog, sc in next 14 sts, sc2tog; 16 sts.
Row 18: Ch 1, sc across; 16 sc.
Do not turn.
Edging: Ch 1, work 18 sc evenly down the first side edge, 16 sc across the tapered end, 18 sc evenly up the second side edge, and 24 sc across the foundation edge; 76 sc total. Join with sl st to the first edging sc.
Fasten off, leaving a 48-in/122-cm sewing tail at the center of the 24-sc foundation edge.
Decrease checks: Row 11 is 1 sc2tog + 20 sc + 1 sc2tog = 22 stitch units. Rows 13, 15, and 17 similarly total 20, 18, and 16 stitches.
Front Pocket — Make 1 in Golden Yellow
Ch 19.
Row 1: Sc in second ch from hook and in each rem ch; 18 sc.
Rows 2–12: Ch 1, sc across; 18 sc.
Do not turn.
Pocket edging: Ch 1, work 12 sc evenly down the first side, 18 sc across the foundation edge, 12 sc up the second side, and 18 sc across the top; 60 sc. Join with sl st.
Fasten off, leaving a 48-in/122-cm tail for sewing.
Shoulder Straps — Make 2 in Navy
For each strap, ch 6.
Row 1: Sc in second ch from hook and in each rem ch; 5 sc.
Rows 2–70: Ch 1, sc across; 5 sc.
Fasten off, leaving a 24-in/61-cm tail at each end. Each strap measures approximately 2 in/5 cm wide and 28 in/71 cm long. Do not stretch while measuring.
Upper Strap-Anchor Tabs — Make 2 in Navy
For each tab, ch 6.
Row 1: Sc in second ch from hook and in each rem ch; 5 sc.
Rows 2–8: Ch 1, sc across; 5 sc.
Fasten off, leaving a 24-in/61-cm sewing tail. Each tab contains 40 sc stitch units in its rectangular fabric before seaming.
Lower D-Ring Tabs — Make 2 in Navy
For each tab, ch 6.
Row 1: Sc in second ch from hook and in each rem ch; 5 sc.
Rows 2–10: Ch 1, sc across; 5 sc.
Fasten off, leaving a 24-in/61-cm sewing tail. Each tab contains 50 sc stitch units before folding.
Top Handle — Make 1 in Navy
Ch 6.
Row 1: Sc in second ch from hook and in each rem ch; 5 sc.
Rows 2–28: Ch 1, sc across; 5 sc.
Fasten off, leaving a 24-in/61-cm tail at both ends. The flat piece measures approximately 11 1/4 in/28.5 cm long.
Flap Closure Tab — Make 1 in Golden Yellow
Ch 6.
Row 1: Sc in second ch from hook and in each rem ch; 5 sc.
Rows 2–14: Ch 1, sc across; 5 sc.
Fasten off, leaving a 30-in/76-cm sewing tail. The tab measures approximately 2 × 5 1/2 in (5 × 14 cm).
Apple Appliqué — Make 1 in Red
Work in continuous rounds and mark the first stitch.
Round 1: Make an adjustable ring and work 6 sc in the ring; 6 sc.
Round 2: Inc in each st around; 12 sc.
Round 3: [Sc in next st, inc in next st] 6 times; 18 sc.
Round 4: [Sc in next 2 sts, inc in next st] 6 times; 24 sc.
Round 5: Sc in each st around; 24 sc.
Apple cleft: Sl st in next st, skip next st, 5 dc in next st, skip next st, sl st in next st. Leave all other Round-5 stitches unworked.
Fasten off, leaving a 30-in/76-cm sewing tail. Flatten the apple with the cleft at the top.
Count checks: Round 2 has six increases, producing 12 sc. Round 3 has six repeats of one sc plus one increase, producing 18 sc. Round 4 has six repeats of two sc plus one increase, producing 24 sc.
Apple Leaf — Make 1 in Green
Ch 7. Beginning in the second ch from the hook, work sl st, sc, hdc, dc, hdc, then 3 sc in the final ch. Rotate to work into the unused loops on the opposite side of the foundation chain; work hdc, dc, hdc, sc, sl st; 13 sts around the perimeter.
Fasten off, leaving an 18-in/46-cm sewing tail.
Count check: Five stitches down the first side + 3 sc in the end chain + five stitches up the opposite side = 13 stitches.
Apple Stem — Make 1 in Brown
Ch 6. Sl st in second ch from hook and in each of next 4 ch; 5 sl sts.
Fasten off, leaving an 18-in/46-cm sewing tail.
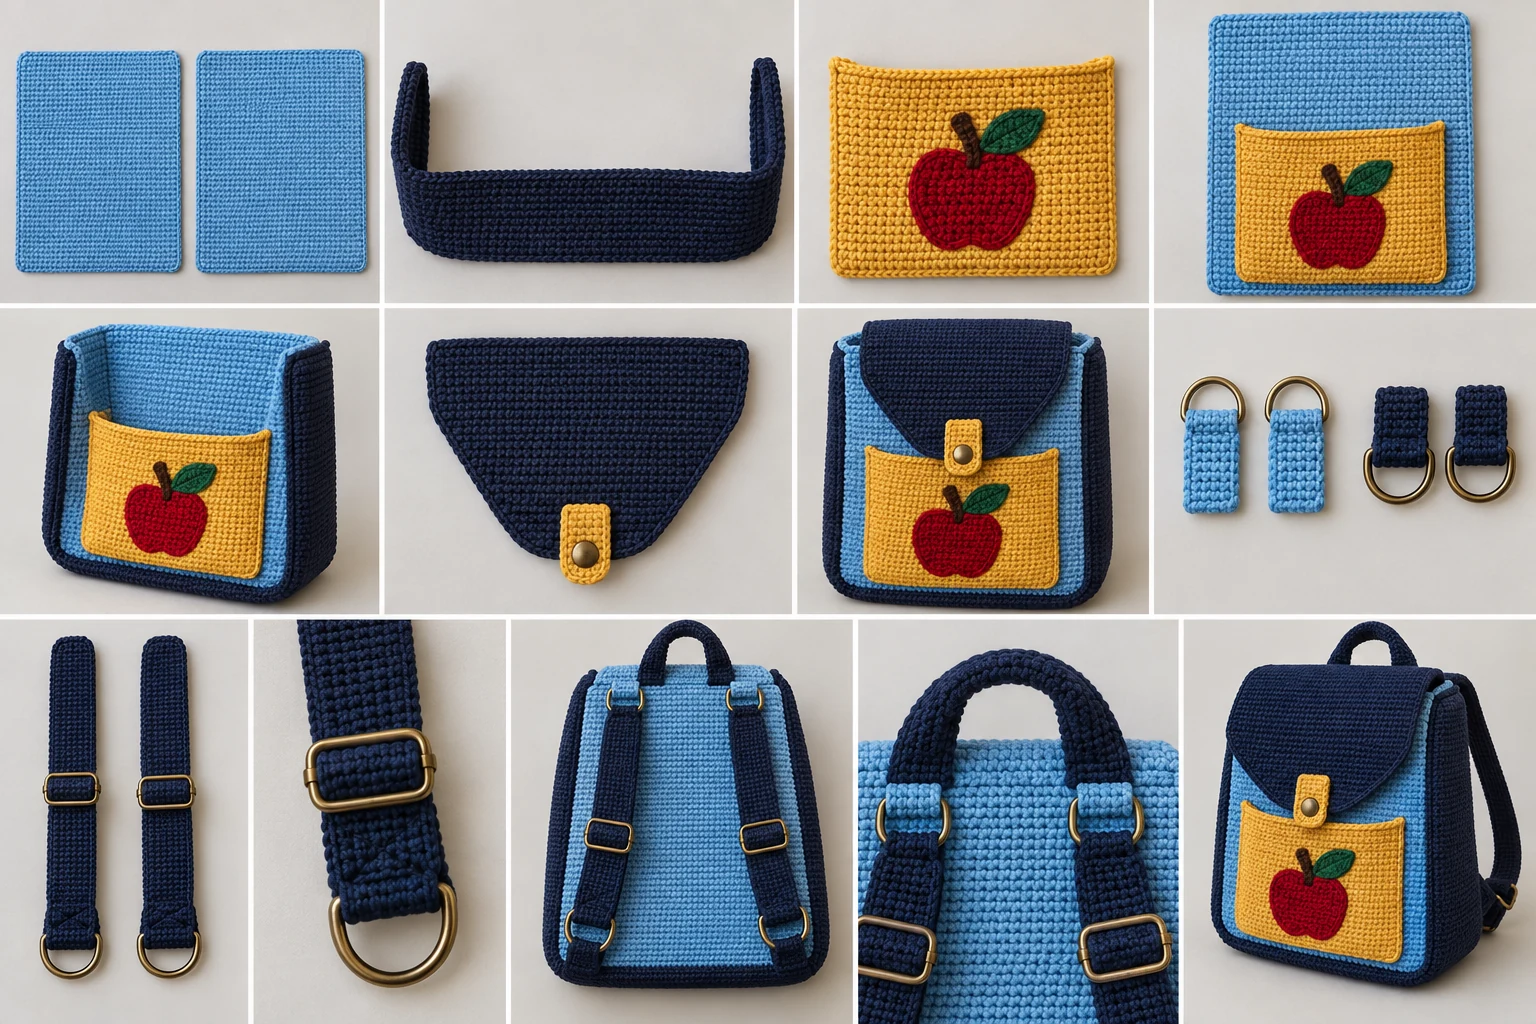
Assembly
- Block the pieces. Gently block every crocheted piece to the stated dimensions without stretching. Allow all pieces to dry completely.
- Decorate the pocket. Center the red apple on the pocket with its lower edge approximately 1 in/2.5 cm above the pocket foundation edge. Sew around the apple using its red tail. Place the brown stem behind the apple cleft and sew all five slip stitches securely. Angle the green leaf beside the stem and sew around its full perimeter. Knot the tails on the WS, weave each tail through at least 1 in/2.5 cm of dense fabric, reverse direction, and trim.
- Attach the pocket. Place the pocket RS outward on the front panel and center it horizontally. Position its bottom edge 3 in/7.5 cm above the panel bottom. Pin without stretching. Using the pocket tail, sew down one side, across the bottom, and up the other side through both layers. Leave the 18-stitch top edge open. Reinforce each upper corner with three additional passes through a 1-in/2.5-cm area. Weave in the tail on the inside.
- Join the front panel to the gusset. Place the gusset and front panel with RS together. Align gusset Row 1 with the top of one 34-row panel side, the Row-34 marker with the first bottom corner, the Row-64 marker with the second bottom corner, and Row 98 with the top of the opposite side. Sew exactly 34 gusset row ends to the first 34 panel row ends, 30 gusset row ends to the 30 bottom stitches, and 34 gusset row ends to the second 34 panel row ends. Ease only at the two corners; do not gather. Reinforce each corner with two extra passes.
- Add the back panel. Attach the back panel to the free long edge of the gusset using the same 34 + 30 + 34 alignment. Confirm that both panel top edges remain open and level. Turn the bag RS out.
- Attach the flap. Center the flap’s 24-stitch foundation edge on the back panel top edge. Leave three panel stitches uncovered at each side because (30 − 24) ÷ 2 = 3. The flap should extend away from the bag. Sew the flap foundation edge securely to the back panel through the flap edging and panel stitches. Add a second line of backstitch immediately below the first for reinforcement. The flap folds forward over the opening.
- Attach the closure tab. Center the closure tab on the WS of the flap’s 16-stitch tapered end. Overlap the final three tab rows with the flap and sew a reinforced rectangle plus an X through both layers. The remaining 11 rows extend below the flap.
- Install the magnetic snap. Separate the snap halves. Using matching sewing thread rather than yarn, sew one half to the inside face of the free closure-tab end, centered three rows above its tip. Close the flap naturally without pulling and mark where the snap meets the front panel above the pocket. Sew the mating half at that point, keeping every stitch above the pocket opening. Make at least two complete passes through every hole in each snap half. Knot securely on the hidden side and cover exposed thread ends beneath nearby crochet stitches. Confirm that the snap engages without distorting the flap.
- Install the D-rings. Fold each lower D-ring tab around the straight side of one D-ring so five rows lie on each side of the ring. Sew the two short tab ends together. Position one folded tab over each gusset side, centered 2 in/5 cm above the bottom corner, with the ring projecting outward and the joined tab ends resting against the bag. Sew a reinforced 2 × 2-in/5 × 5-cm rectangle and an X through the tab ends and gusset. Do not sew through the D-ring. Make two full passes around the rectangle and X.
- Attach the upper anchors. Position the two upper strap-anchor tabs vertically on the back panel. Center each tab 3 in/7.5 cm from its nearest side edge, with its top edge 1 in/2.5 cm below the bag opening. Sew all four edges of each tab to the back panel, then sew an X across its interior. Do not catch the flap. Make two full passes around every outline and X.
- Attach the shoulder straps. Sew one short end of each shoulder strap to an upper anchor tab using its 24-in/61-cm tail. Overlap five strap rows with the tab and sew a reinforced rectangle plus an X through both layers. Ensure that both straps descend without twisting.
- Thread the adjustable straps. Thread each free strap end through a rectangular slider, around the corresponding lower D-ring, and back through the slider according to the slider manufacturer’s double-back threading path. Fold the final four strap rows to the WS and sew the fold down across its full width three times, creating a permanent stop that cannot pull through the slider. Adjust both straps evenly. Confirm that the hardware lies flat and each strap is captured by both bars of its slider.
- Attach the handle. Center the handle on the back panel top, placing its ends 3 in/7.5 cm apart and immediately below the flap seam. Overlap four handle rows at each end against the back panel. Sew a reinforced rectangle and X through each overlap, making two complete passes. Let the center of the handle arch freely. Keep the handle stitches separate from the shoulder-strap anchor seams.
- Finish the interior. Weave every remaining yarn tail into the bag interior for at least 1 in/2.5 cm, reverse direction, weave another 1 in/2.5 cm, and trim. Do not trim a structural tail until its seam has been inspected.
Finishing and Safety Check
- Confirm that the pocket top and bag top remain open.
- Confirm that every other pocket and gusset edge is closed.
- Verify that the gusset has 98 attachment units on each face and neither body panel is gathered.
- Tug firmly by hand on the handle, both upper strap anchors, both D-ring tabs, and both folded strap stops. Repair any seam that shifts.
- Check that the sliders are double-threaded and capture each strap with both bars.
- Check that both D-rings are completely enclosed by their tabs.
- Confirm that the magnetic snap is immobile and no metal edge cuts into the yarn.
This handmade backpack is intended for light school supplies. It must not be used to carry a child, pet, or unusually heavy load.
Customization Ideas
You may personalize the backpack without changing its structural stitch counts. Substitute colors while keeping one yarn weight and fiber type throughout, add surface embroidery after the panels are complete, or omit the apple appliqué for a plain pocket. A removable fabric lining may be added after all specified crochet construction is finished. Keep added decoration away from the pocket opening, magnetic snap, gusset seams, sliders, and reinforced strap attachments.
Do not lengthen a strap simply by stretching it. If a different strap length is required, maintain five stitches in every row and calculate the number of rows from your measured row gauge before crocheting both straps identically. Any departure from the specified 70-row straps changes the tested geometry of the written plan and should be checked carefully against the intended wearer.
Common Mistakes to Avoid
- Counting the turning chain as a stitch, which widens the flat pieces.
- Missing the first or final stitch of a row, which makes the panels taper.
- Joining the gusset without markers after Rows 34 and 64.
- Trying to match gusset stitches to panel stitches along the sides instead of matching one gusset row end to one panel row-end unit.
- Stretching the gusset or panels during seaming, causing ripples or a twisted bag.
- Sewing the pocket’s 18-stitch top edge closed.
- Attaching the flap off-center instead of leaving three uncovered panel stitches on each side.
- Catching the flap while sewing the upper strap anchors.
- Twisting a shoulder strap before threading its slider and D-ring.
- Using yarn instead of matching sewing thread for the magnetic snap.
- Trimming structural tails before checking the reinforced seams.
Troubleshooting
My body panel is not 12 inches wide.
Count the row: it must contain 30 sc. If the count is correct, the difference is caused by gauge. Make a larger swatch and change hook size until 15 sc measures 6 in/15 cm.
The gusset does not reach around the panel.
Confirm that the gusset contains exactly 98 rows and each body panel has 34 rows. The alignment must be 34 row ends along the first side, 30 row ends across the bottom, and 34 row ends along the second side. If those counts are correct, compare the gauge of the pieces and reblock gently without stretching.
The backpack puckers at the seams.
Remove the affected seam and redistribute the units one for one. Ease only around the two lower corners. Do not pull the sewing yarn tightly enough to gather either layer.
The flap sits crooked.
Confirm that its 24-stitch foundation edge is centered over the 30-stitch back-panel edge, leaving exactly three panel stitches uncovered at each side. Also check that the panel top edges are level.
The flap closure pulls the front panel upward.
The snap position was likely marked while the flap was under tension. Remove the front snap half, close the flap naturally without pulling, mark the relaxed meeting point above the pocket, and reinstall it securely.
The straps slip through the sliders.
Check the slider manufacturer’s double-back path. Each strap must pass around the corresponding D-ring, return through the slider, and be captured by both slider bars. The final four rows must be folded to the WS and sewn across their full width three times.
The apple will not lie flat.
Flatten the red circle with the decorative cleft at the top, pin it before sewing, and distribute the perimeter without stretching. Attach the stem behind the cleft and the leaf beside the stem only after the apple position is secure.
Care Instructions
Follow the washing directions for the chosen yarn. For best results, hand-wash or use a gentle cycle with cool water and mild detergent. Close the magnetic snap, place the backpack in a laundry bag if machine washing is permitted, and avoid bleach. Reshape the panels, gusset, pocket, flap, handle, and straps while damp, then dry flat. Do not hang the wet backpack by its handle or straps. Inspect all hardware and reinforced seams after washing and before reuse.
Frequently Asked Questions
Is this pattern written in US terms?
Yes. All crochet terminology and abbreviations use US terms.
Can a beginner make this backpack?
A confident beginner may be comfortable crocheting the pieces, but the pattern is rated intermediate because accurate counting, shaped flap decreases, hardware installation, reinforced sewing, and careful assembly are essential.
Is the backpack worked in the round?
No. The structural pieces are worked flat. Only the apple appliqué is worked in continuous rounds.
Does the backpack need stuffing?
No. This is an unstuffed functional bag.
Why does the gusset have 98 rows?
It must travel down one 34-row panel side, across the 30-stitch bottom, and up the opposite 34-row side. The exact total is 34 + 30 + 34 = 98 attachment units.
Can I omit the sliders and make fixed straps?
The written construction specifically uses two sliders and two D-rings to create adjustable straps. Omitting them changes the approved strap assembly and requires an independently planned attachment method.
Can I use plastic snaps instead of a magnetic snap?
A substitution may behave differently in dense crochet. The specified component is one 3/4-in/19-mm sew-on magnetic snap attached with matching sewing thread. Any substitute must be securely installed and must not distort or cut the fabric.
May I add a lining?
Yes. Add an optional removable lining only after completing and inspecting the specified crocheted construction. Do not cover hardware attachments until their seams have been checked.
How much weight can the backpack carry?
Use it only for light school supplies. Handmade crochet and hand-sewn hardware attachments are not rated for unusually heavy loads, and the bag must never be used to carry a child or pet.