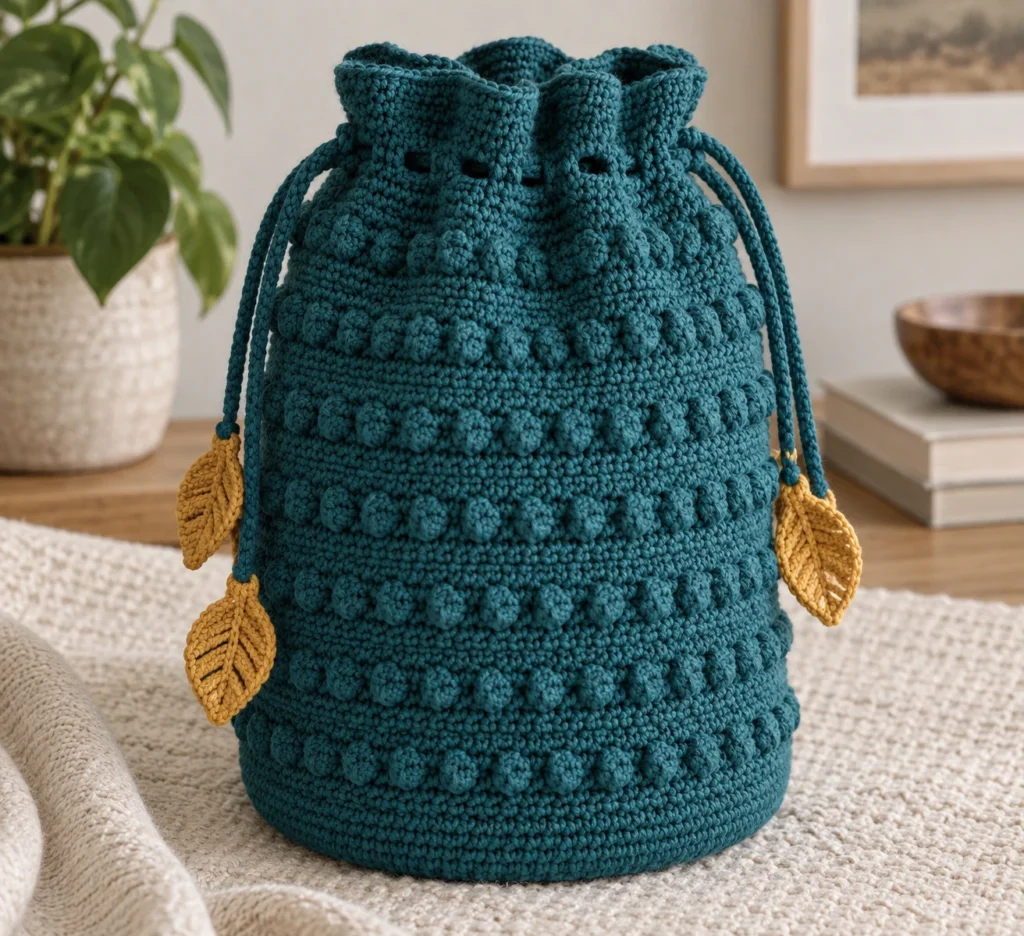
Crochet Textured Drawstring Bucket Bag
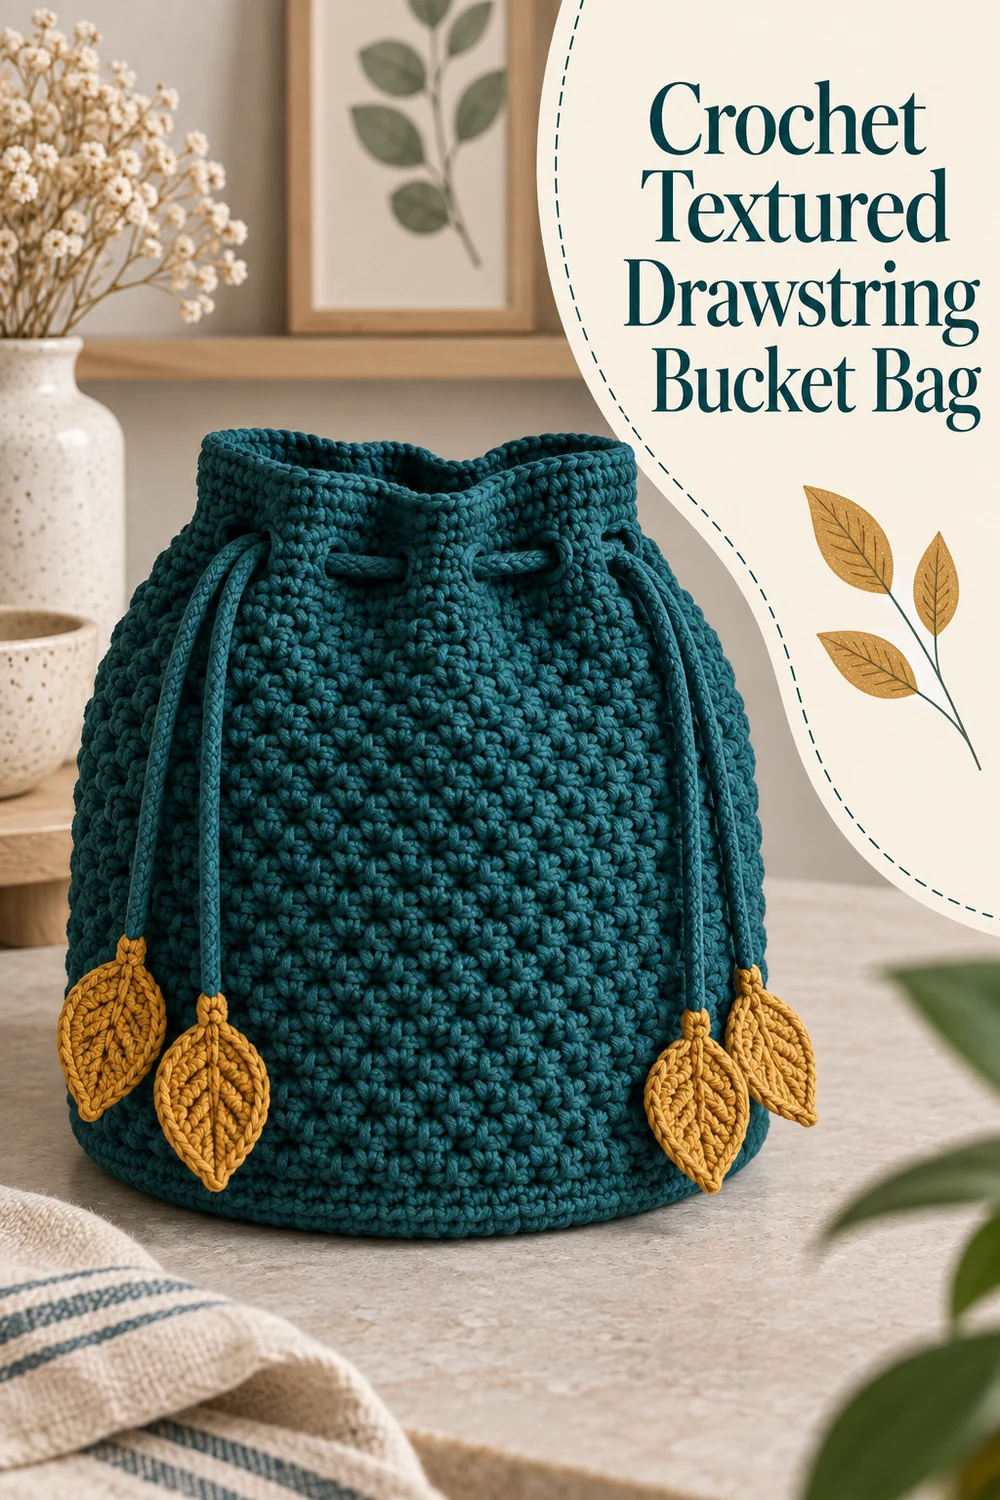
Make a practical, richly textured bucket bag with a flat circular base, raised pebble stitches, a crocheted eyelet channel, two opposing drawstrings, and four decorative leaves. This original free crochet pattern is worked in US crochet terminology and requires no lining, stuffing, zipper, beads, or purchased hardware.
The bag is crocheted from the center of the base upward as one continuous shell in joined rounds. Two cords travel through all 16 eyelets from opposite starting points, allowing the rim to close evenly when both pairs of ends are pulled.
Pattern at a Glance
- Skill level: Intermediate
- Terminology: US crochet terms
- Construction: Circular base and body worked upward in joined rounds
- Main color: Deep teal
- Accent color: Ochre
- Closure: Two crocheted drawstrings threaded through 16 crocheted eyelets
- Written components: One main bag shell, two drawstrings, and four decorative leaves
- Total crocheted pieces: Seven
- Hardware: None
Visible Component Inventory
Before beginning, confirm that the finished project will contain every visible crocheted component listed below:
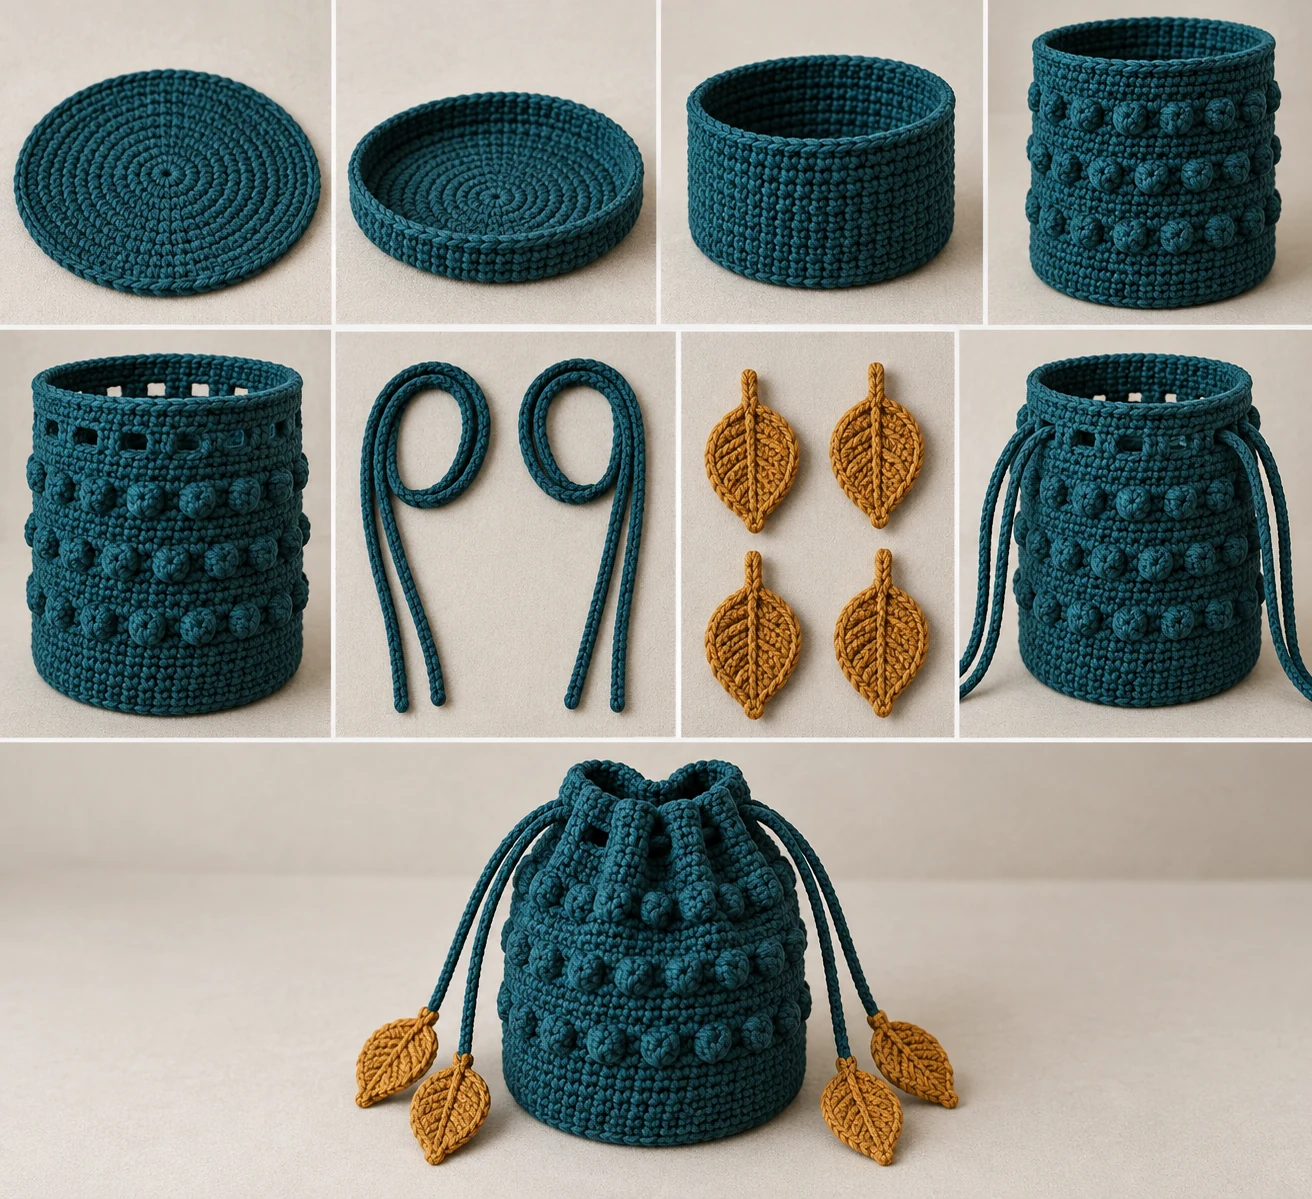
- One main bag shell consisting of a circular base, textured bucket body, eyelet channel, and reverse-single-crochet rim.
- Two crocheted drawstrings.
- Four decorative crocheted leaves, with one attached to each drawstring end.
Materials You’ll Need
- Medium-weight category 4 cotton or cotton-blend yarn: approximately 440 yd (402 m) total
- Color A, deep teal: approximately 400 yd (366 m) for the shell and two drawstrings
- Color B, ochre: approximately 40 yd (37 m) for four leaves
- US G/6 (4 mm) crochet hook, or the size needed to obtain gauge
- Locking stitch marker
- Yarn needle
- Scissors
- Optional removable pins for arranging the leaves during assembly
No purchased hardware, stuffing, zipper, beads, or lining is used.
Gauge
16 sc and 16 rounds = 4 in (10 cm) in joined sc rounds after light blocking.
Work your gauge swatch in the round. Exact gauge matters for both the finished dimensions and the strength of the fabric. A denser fabric may be preferable when the bag will hold small or relatively heavy contents, but changing gauge will also change the finished measurements and yarn requirements.
Finished Measurements
- Base: approximately 7.5 in (19 cm) across
- Circumference: approximately 24 in (61 cm)
- Height: approximately 9.5 in (24 cm), excluding drawstrings
- Each unstretched drawstring: approximately 30 in (76 cm)
Measurements are based on the blocked gauge.
Crochet Abbreviations
- beg = beginning
- BLO = back loop only
- ch = chain
- dc = double crochet
- hdc = half double crochet
- rep = repeat
- rnd(s) = round(s)
- RS = right side
- sc = single crochet
- sc2tog = single crochet 2 stitches together
- sl st = slip stitch
- st(s) = stitch(es)
- tr3tog = 3-treble-crochet cluster
- WS = wrong side
- yo = yarn over
Although sc2tog is included for reference, no decreases are required in this pattern.
Special Stitches and Techniques
Adjustable Ring
Form an adjustable yarn loop, work the stated stitches into the loop, and pull the tail firmly to close its center.
Invisible-Style Join
Remove the working loop after completing the final stitch. Insert the hook from back to front through the first stitch, catch the working loop, and pull it through. Continue as directed. A conventional sl-st join may be substituted, although it will create a more visible seam.
tr3tog in One Stitch
[Yo twice, insert the hook in the indicated st, yo and pull up a loop, then (yo and draw through 2 loops) twice] 3 times in the same st. Yo and draw through all 4 loops on the hook. The completed cluster counts as one stitch. Push the cluster toward the RS of the fabric.
Reverse Single Crochet
Working from left to right, insert the hook in the stitch immediately to the right, yo and pull up a loop, then yo and draw through both loops. Each reverse sc counts as one edging stitch.
Important Pattern Notes
- Turning chains do not count as stitches.
- Join each round to its first stitch unless an invisible-style join is specified.
- Place a marker in the first stitch and move it upward after every round.
- Work each base increase into the final stitch of its repeat.
- Round 13 is worked in the back loops to establish the fold where the flat base turns into the side wall.
- All tr3tog clusters must face the outside of the bag.
- Keep the tr3tog clusters loose enough that they do not pull the body inward.
- The completed shell should contain 96 stitch positions throughout the body, eyelet channel, and rim.
- The design has not been physically tested. Check your gauge, fabric density, eyelet size, and finished cord length before final assembly.
Complete Free Crochet Pattern
Component 1: Main Bag Shell — Make 1 in Color A
Leave an 8 in (20 cm) beginning tail for securing the center. Make an adjustable ring.
Rnd 1: Ch 1, work 8 sc into ring; join. Pull ring closed. (8 sc)
Rnd 2: Ch 1, work 2 sc in each st around; join. (16 sc)
Rnd 3: Ch 1, [sc in next st, 2 sc in next st] 8 times; join. (24 sc)
Rnd 4: Ch 1, [sc in next 2 sts, 2 sc in next st] 8 times; join. (32 sc)
Rnd 5: Ch 1, [sc in next 3 sts, 2 sc in next st] 8 times; join. (40 sc)
Rnd 6: Ch 1, [sc in next 4 sts, 2 sc in next st] 8 times; join. (48 sc)
Rnd 7: Ch 1, [sc in next 5 sts, 2 sc in next st] 8 times; join. (56 sc)
Rnd 8: Ch 1, [sc in next 6 sts, 2 sc in next st] 8 times; join. (64 sc)
Rnd 9: Ch 1, [sc in next 7 sts, 2 sc in next st] 8 times; join. (72 sc)
Rnd 10: Ch 1, [sc in next 8 sts, 2 sc in next st] 8 times; join. (80 sc)
Rnd 11: Ch 1, [sc in next 9 sts, 2 sc in next st] 8 times; join. (88 sc)
Rnd 12: Ch 1, [sc in next 10 sts, 2 sc in next st] 8 times; join. (96 sc)
Rnd 13: Ch 1, working in BLO, sc in each st around; join. This fold line turns the work upward. (96 sc)
Textured Body
Rnd 14: Ch 1, sc in each st around; join. (96 sc)
Rnd 15: Ch 1, [sc in next 3 sts, tr3tog in next st] 24 times; join. (96 sts)
Rnd 16: Ch 1, sc in each st around; join. (96 sc)
Rnd 17: Ch 1, [tr3tog in next st, sc in next 3 sts] 24 times; join. (96 sts)
Rnds 18–45: Rep Rnds 14–17 seven more times, ending after a repeat of Rnd 17. Every round contains 96 sts. The complete textured section contains eight four-round repeats.
Rnd 46: Ch 1, sc in each st around; join. (96 sc)
Eyelet Channel and Rim
Rnd 47: Ch 1, [sc in next 5 sts, ch 1, skip next st] 16 times; join. Treat each ch-1 space as one position. (80 sc, 16 ch-1 spaces; 96 positions)
Rnd 48: Ch 1, sc in each sc and each ch-1 space around; join. (96 sc)
Rnd 49: Ch 1, sc in each st around; join. (96 sc)
Rnd 50: Ch 1, reverse sc in each st around; use an invisible-style join to the first reverse sc. (96 reverse sc)
Fasten off with an 8 in (20 cm) tail. On the WS, weave the ending tail through at least 2 in (5 cm) of stitches, reverse direction, and weave it through another 1 in (2.5 cm). Use the beginning tail to close and reinforce the adjustable-ring center. Weave that tail securely in two directions.
Component 2: Drawstrings — Make 2 in Color A
For each drawstring, leave an 8 in (20 cm) beginning tail. Ch 111 loosely.
Sl st in the second ch from the hook and in each remaining ch. (110 sl sts)
Fasten off with an 8 in (20 cm) tail. Do not weave in either tail because they will be used to attach the leaves. Each cord should measure approximately 30 in (76 cm).
Before assembly, compare each cord with the bag. If your gauge produces a cord shorter than the bag circumference plus 6 in (15 cm), add foundation chains before working the slip stitches. Record the adjustment and make both cords identically.
Component 3: Decorative Leaves — Make 4 in Color B
For each leaf, leave a 10 in (25 cm) beginning tail. Ch 8.
Leaf round: Beginning in the second ch from the hook, sl st in next ch, sc in next ch, hdc in next ch, dc in next 2 chs, hdc in next ch, 3 sc in last ch; rotate the foundation chain and work into the unused loops on its opposite side: hdc in next ch, dc in next 2 chs, hdc in next ch, sc in next ch, sl st in final ch. (15 sts)
Fasten off with a 10 in (25 cm) tail. Weave the ending tail down the center spine to the foundation end, then leave it there for attachment. The leaf should now have two attachment tails at the same end.
Stitch-Count Check
- The circular base increases by 8 stitches per round: 8, 16, 24, 32, 40, 48, 56, 64, 72, 80, 88, and 96.
- Rounds 13–46 retain 96 stitches. Each raised-pebble round has 24 repeats of four completed stitches, including one tr3tog that counts as one stitch.
- Round 47 contains 80 sc plus 16 ch-1 spaces, giving 96 total positions.
- Rounds 48–50 each contain 96 stitches.
- Each drawstring has 111 foundation chains, one skipped turning chain, and 110 slip stitches.
- Each leaf contains 6 stitches down the first side, 3 sc at the end, and 6 stitches up the opposite side, for 15 stitches.
- The complete project contains 1 shell, 2 drawstrings, and 4 leaves: 7 crocheted pieces total.
Assembly
- Lightly wet-block the shell over a flat circular base or clean bowl approximately 7.5 in (19 cm) wide. Keep the base flat, the wall upright, and all eyelets open. Allow the shell to dry completely.
- Identify the 16 eyelets and number them consecutively around the rim. From the outside, insert the first drawstring through eyelet 1. Weave the cord alternately inside and outside through every eyelet, then bring its second end out through eyelet 16. Both ends should meet on the same side of the bag.
- From the outside, insert the second drawstring through eyelet 9, directly opposite eyelet 1. Weave it alternately through every eyelet, then bring its second end out through eyelet 8. Its ends should meet opposite the first cord. Confirm that there are no crossed cords inside the channel and that pulling both pairs closes the rim evenly.
- At one cord end, overlap the final 0.5 in (1.3 cm) of cord with the foundation end of one leaf. Using the cord tail and both leaf tails, sew repeatedly through the cord and the lower three stitches of the leaf. Make at least six firm passes distributed across the join.
- Knot the tails together on the back of the leaf with a square knot. Weave each tail separately through the dense leaf stitches in opposite directions for at least 1 in (2.5 cm), then trim. Repeat at all four cord ends.
- Pull both drawstrings simultaneously to close the bag. Tie each pair in an overhand bow or knot so the leaves remain visible below it.
Hardware and Attachment Safety
No commercial hardware is used. The 16 ch-1 eyelets are the structural cord connectors. Before using the bag, inspect every eyelet and confirm that it is fully enclosed by the stitches of Round 48 with no split yarn. The leaves are decorative end stops rather than load-bearing handles. Do not use the drawstrings as shoulder straps.
Finishing
Weave any remaining tails into the WS in two directions. Check the adjustable-ring center, the invisible rim join, all 16 eyelets, and each sewn leaf connection. Test the closure by pulling the two pairs of cord ends at the same time. If the rim gathers unevenly, reopen it and check the threading path before using the bag.
Customization Ideas
- Color: Use one color for the entire project or choose a contrasting leaf color. Keep the yarn category and fiber behavior consistent with the materials specification.
- Cord length: Cord length may be adjusted for personal gauge. Both cords must receive exactly the same adjustment and must remain at least the bag circumference plus 6 in (15 cm).
- Texture definition: A smooth, firmly twisted yarn will make the raised clusters more visible, while a softly spun yarn will create a gentler surface.
- Fabric density: Use the hook needed to create a firm but flexible fabric. If changing hook size, make a new swatch and expect the finished size and yarn usage to change.
Do not omit eyelets, alter their spacing, or add unplanned structural attachments; the two-cord assembly relies on 16 evenly spaced openings.
Common Mistakes to Avoid
- Counting the turning chain as a stitch and accidentally adding a stitch at the join.
- Working Round 13 through both loops instead of the BLO, which weakens the intended base-to-wall fold line.
- Counting the partial legs of a tr3tog separately. Each completed cluster counts as one stitch.
- Pulling clusters too tightly, causing the bucket body to narrow.
- Failing to treat each ch-1 space in Round 47 as one of the 96 positions.
- Making one drawstring longer than the other after adjusting the starting chain.
- Threading both cords from the same side instead of starting them at opposite eyelets.
- Weaving in the drawstring or leaf tails before the leaves have been attached.
- Relying on the decorative leaves as handles or load-bearing stops.
Troubleshooting
Why is the base cupping?
First verify the stitch count for the affected round. If the count is correct, loosen your tension or use the hook size needed to meet gauge. Light blocking can correct a small amount of cupping, but it should not be used to force a severely undersized base flat.
Why is the base ruffling?
Confirm that you have worked only eight increases in each increase round. If the arithmetic is correct, your stitches may be too loose for the selected hook and yarn.
Why does the textured body pull inward?
Work the tr3tog clusters more loosely and avoid tightening the final loop excessively. Each cluster must still occupy one normal stitch position.
Why will the cord not pass through the eyelets?
Check that every ch-1 space remained open during Round 48. Test the yarn and completed cord through an eyelet before attaching all four leaves. Do not force a thick leaf through the opening; leaves are attached only after the cords have been threaded.
Why does the bag close unevenly?
Confirm that the first cord begins at eyelet 1 and exits at eyelet 16, while the second begins at eyelet 9 and exits at eyelet 8. Each cord must pass through every eyelet in an alternating inside-and-outside path without crossing inside the channel.
Why are my cords too short?
Chain tension varies considerably. Before adding the slip stitches, extend both foundation chains by the same number so each finished cord is at least the bag circumference plus 6 in (15 cm). Record the change to keep the cords identical.
Care Instructions
Hand wash gently in cool water with a mild detergent. Support the bag when wet, reshape the circular base and upright walls, open the eyelets, and dry flat. Do not hang the wet bag from its drawstrings. Do not apply steam directly to cotton-blend yarn containing synthetic fibers. Follow the yarn label whenever its care directions are more restrictive.
Frequently Asked Questions
Is this pattern written in US terms?
Yes. All stitch names and abbreviations use US crochet terminology.
Is the bag worked in separate panels?
No. The circular base and bucket body form one shell worked upward in joined rounds. Only the two drawstrings and four leaves are made separately.
How many pieces should I have before assembly?
You should have seven crocheted pieces: one shell, two drawstrings, and four leaves.
Does the bag need a lining?
No lining is included or required by this construction plan. Because crochet fabric can stretch, avoid carrying objects small enough to work through the stitches or loads that distort the base.
Do I need grommets or cord locks?
No. The closure uses 16 crocheted eyelets and two opposing crocheted cords. No purchased hardware is needed.
Can the drawstrings be used as shoulder straps?
No. They are designed to close the rim and are not intended as load-bearing straps.
Can I make the bag larger?
Changing the base stitch count would also require recalculating the texture repeat, the 16-eyelet spacing, yarn quantity, and cord length. Those structural changes are outside this tested arithmetic plan. The safest customization is a gauge-based cord-length adjustment rather than altering the shell counts.
Has the finished project been physically tested?
No physical testing is claimed. Make and inspect a gauge swatch, ensure the cluster fabric remains relaxed, verify that the cords pass freely through the eyelets, and test every sewn leaf join before regular use.