Crochet Snowflake Coaster Pattern
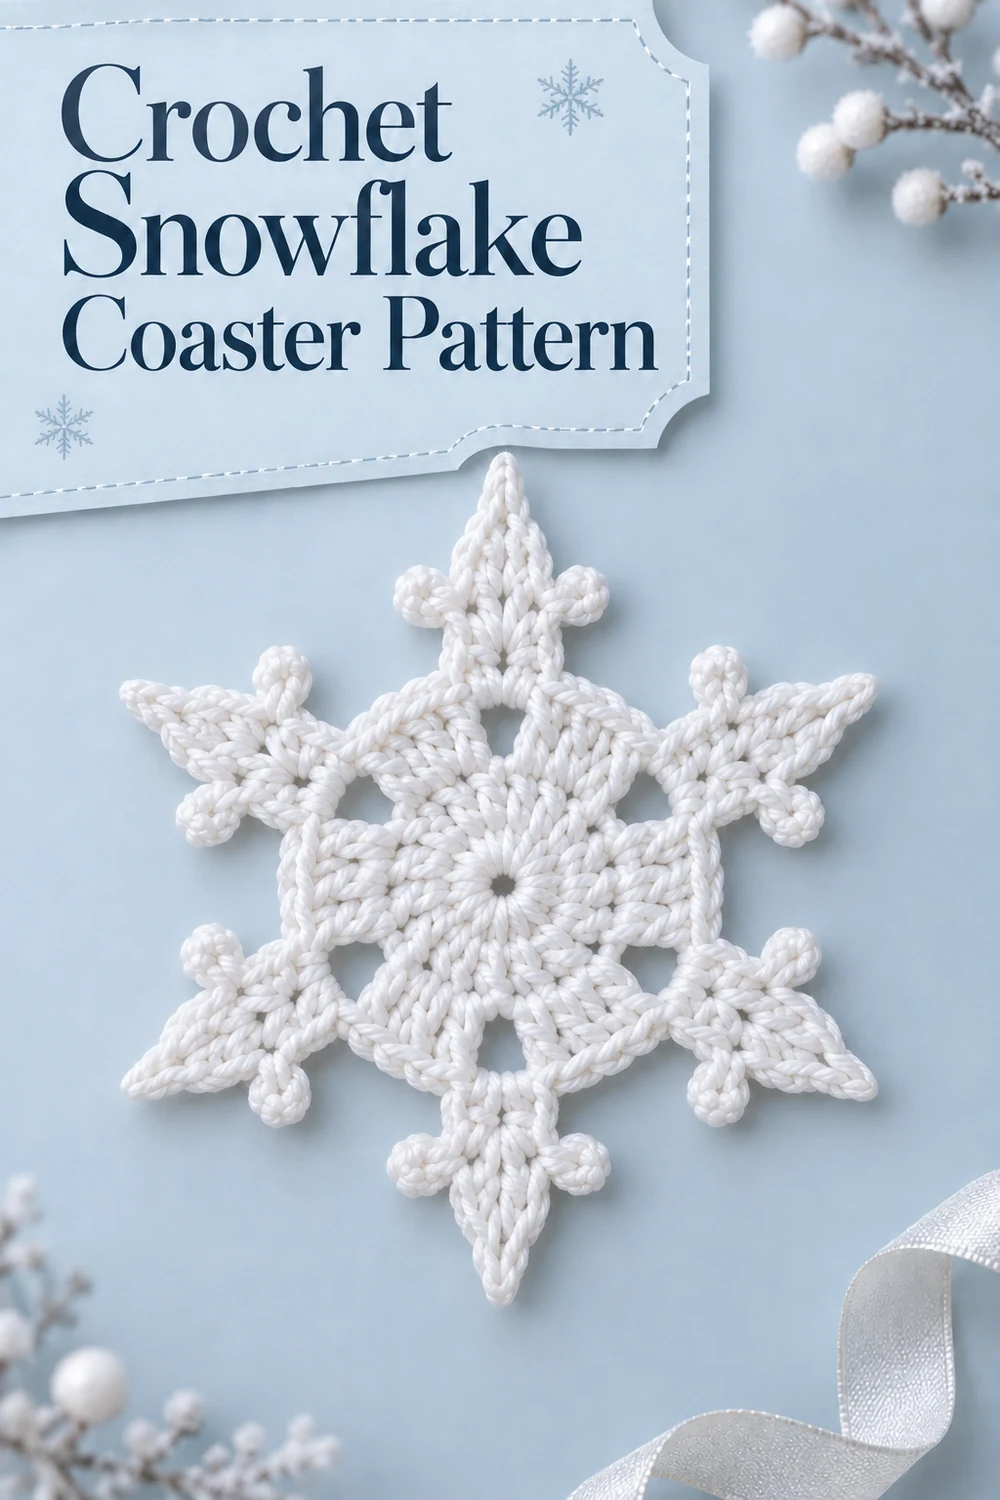
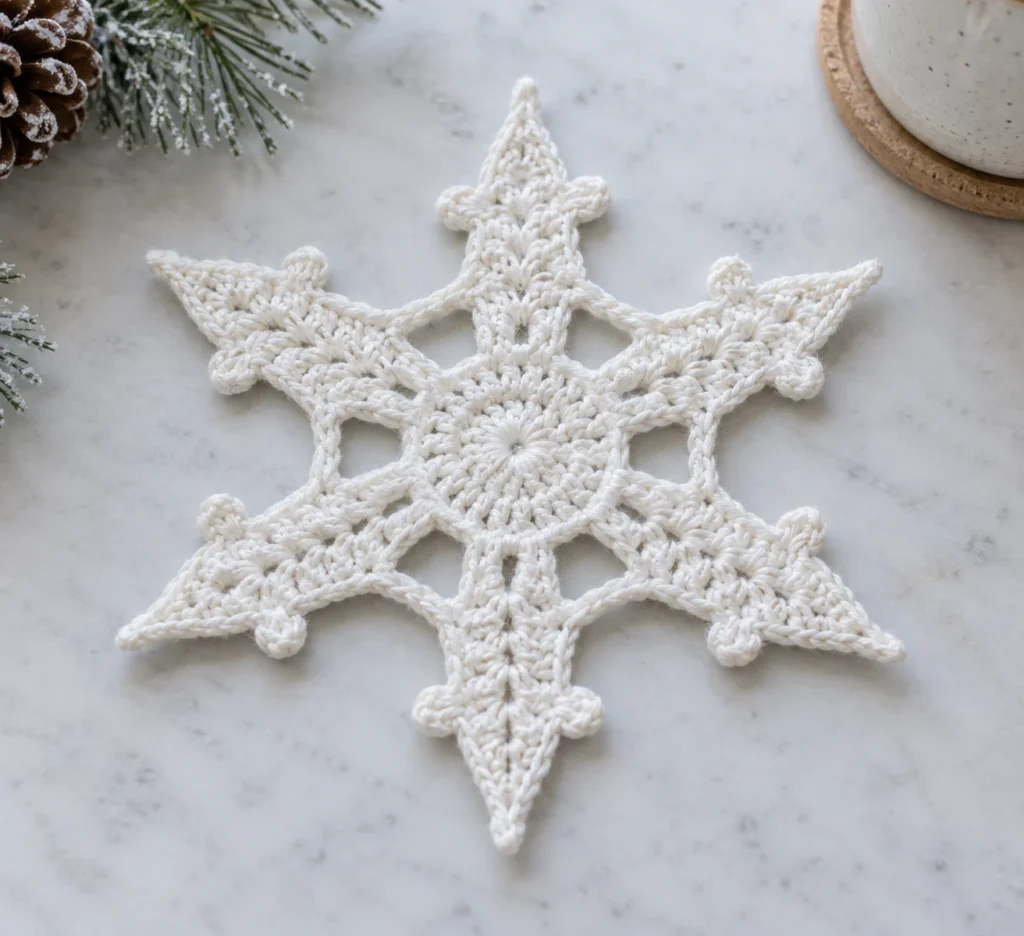
Bring a touch of winter to your table with this original crochet snowflake coaster pattern. Worked in icy-white worsted cotton, the coaster combines a solid circular center, six evenly spaced open corner spaces, six tapered points, and 12 delicate side picots in one seamless piece. The result is a practical, absorbent decoration with no sewn-on components.
Pattern at a Glance
- Skill level: Confident beginner to intermediate
- Terminology: US crochet terms
- Construction: One integrated body worked in five joined rounds
- Written component: Integrated Snowflake Coaster Body — make 1
- Visible details: One solid center, six ch-2 corner spaces, six tapered points, and 12 side picots
- Color: Icy white throughout
- Sewing: None; only the starting and finishing tails are woven in
Materials You’ll Need
- 30–35 yd (28–32 m) worsted-weight, 100% cotton yarn in icy white
- US G/6 (4 mm) crochet hook, or size needed to obtain gauge
- Removable stitch marker
- Tapestry needle
- Scissors
- Rustproof pins and blocking mat
Smooth cotton gives the coaster useful absorbency and heat resistance while helping its points retain their shape. Make one coaster as written. Multiply the yarn quantity by the number of coasters desired when making a set.
Gauge
After gentle blocking, Rounds 1–3 should measure approximately 2.5 in (6.5 cm) across. Exact gauge is less important than creating a flat, firm fabric. If the center cups, try a larger hook. If it ripples, try a smaller hook.
Finished Measurements
Approximately 5.25 in (13.5 cm) from one long point to the opposite point and 4.5 in (11.5 cm) across the narrower width after blocking. Yarn, tension, and blocking may cause minor variation.
Crochet Abbreviations
- ch = chain
- dc = double crochet
- hdc = half double crochet
- sc = single crochet
- sl st = slip stitch
- sp = space
- st(s) = stitch(es)
- tr = treble crochet
- R = round
- rep = repeat
Important Pattern Notes
- Work in joined rounds with the right side facing. Do not turn.
- The center, six points, and 12 picots are crocheted as one integrated piece.
- Unless stated otherwise, join with a sl st to the first stitch of the round.
- Beginning chains do not count as stitches except the beginning ch 3 in R3, which counts as one dc.
- A removable marker in the first stitch can make each round easier to identify.
- No stuffing, hardware, or separate attachments are used.
Special Instructions
Adjustable ring: Form a magic ring suitable for working stitches into its center.
Side picot: In the indicated stitch, work sc, ch 3, then sl st in the first chain made. The anchoring sc counts as one sc. The picot-closing sl st does not consume another stitch from the previous round.
Tapered point: Ch 7. Beginning in the second chain from the hook, work sl st in the next chain, sc in the next chain, hdc in the next chain, dc in the next chain, and tr in each of the final two chains. The point contains six worked stitches. Work back toward its base without turning.
Complete Free Crochet Pattern
Integrated Snowflake Coaster Body — Make 1
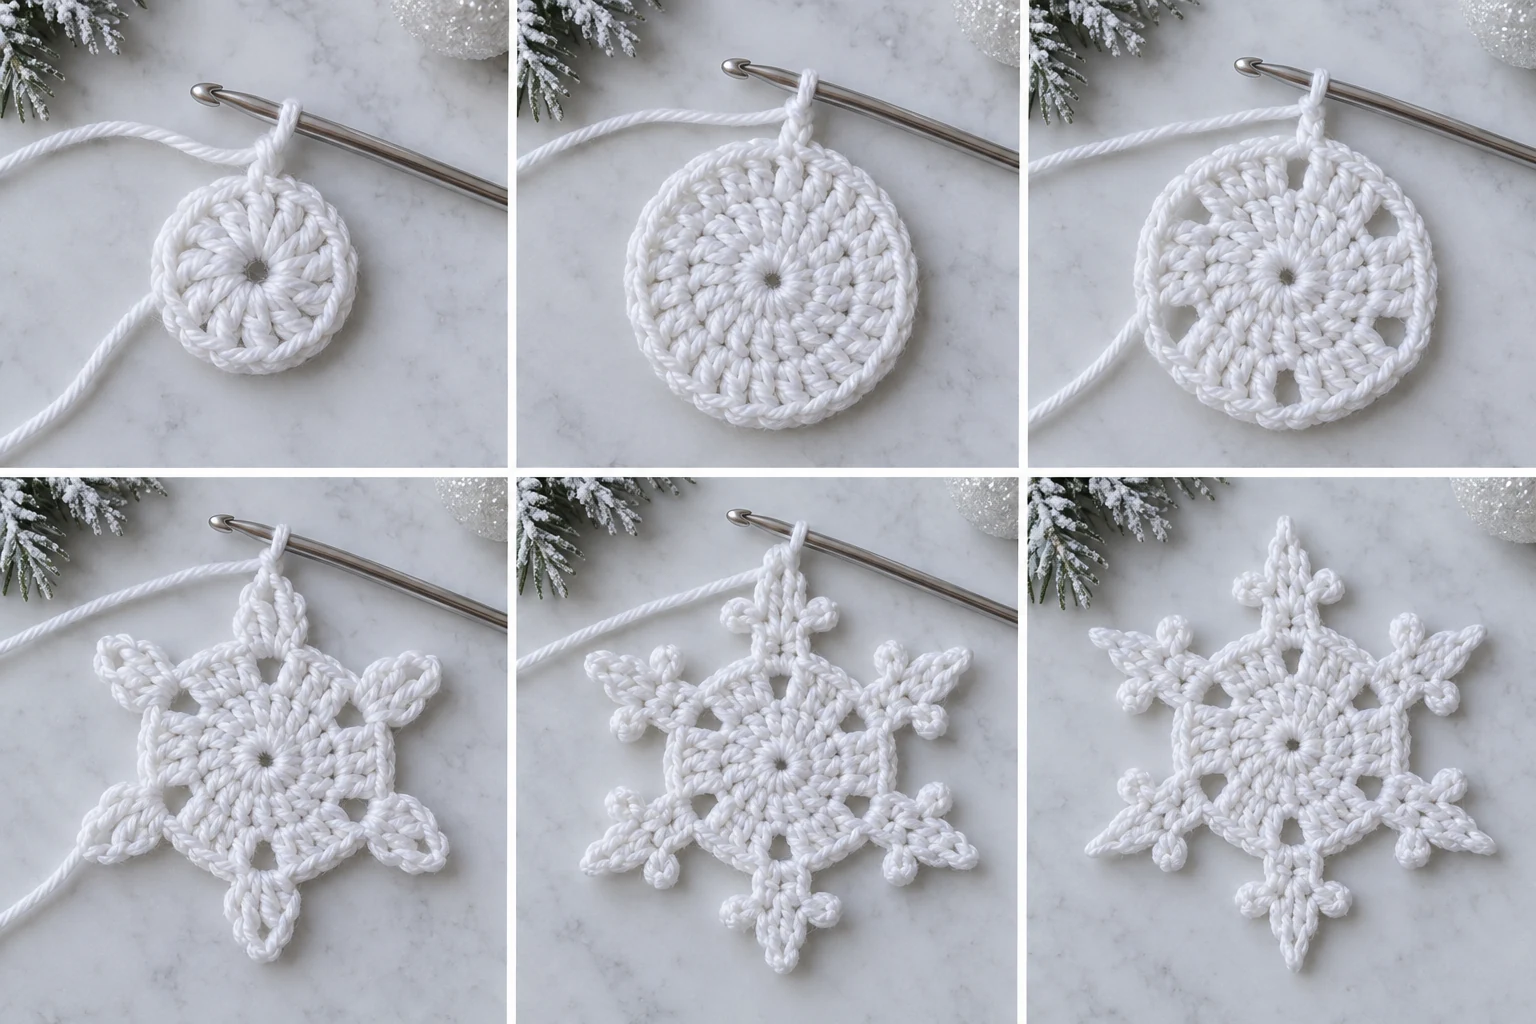
R1: Make an adjustable ring. Ch 1, work 12 sc into the ring. Pull the ring firmly closed and join to the first sc. (12 sc)
R2: Ch 1, work 2 sc in the same stitch and 2 sc in each remaining stitch around. Join to the first sc. (24 sc)
R3: Ch 3; this counts as the first dc. Work 1 dc in the same stitch, 1 dc in each of the next 3 stitches, ch 2. *Work 2 dc in the next stitch, 1 dc in each of the next 3 stitches, ch 2; rep from * 5 more times. Join to the top of the beginning ch 3. (30 dc and 6 ch-2 spaces; six 5-dc sections)
R4: Sl st in the next dc stitches as needed to reach the next ch-2 sp. Ch 1. *(Sc, ch 2, sc) in the ch-2 sp, sc in each of the next 5 dc; rep from * around. Join to the first sc. (42 sc and 6 ch-2 spaces; seven sc between adjacent ch-2 spaces)
R5: Sl st into the next ch-2 sp. *Work 1 sc in the ch-2 sp, make 1 tapered point, then work 1 sc in the same ch-2 sp. Across the next seven R4 single crochets, sl st in each of the next 2 stitches, make a side picot in the next stitch, sl st in the next stitch, make a side picot in the next stitch, and sl st in each of the next 2 stitches; rep from * around. Join to the first sc. (6 tapered points, 12 corner-anchor sc, 12 side picots, 12 picot-anchor sc, and 42 sl sts, including the picot-closing slip stitches)
Fasten off, leaving a 6 in (15 cm) tail.
Stitch-Count Check
- R1: 12 sc worked into the ring = 12 stitches.
- R2: 12 stitches × 2 sc = 24 sc.
- R3: Six sections × 5 dc = 30 dc, with six ch-2 spaces. Each section consumes four R2 stitches, so all 24 source stitches are used.
- R4: Six sections × 7 sc = 42 sc, with six ch-2 spaces.
- R5: Six points × 6 stitches = 36 point stitches. The round also contains 12 corner-anchor sc, 12 picot-anchor sc, 12 picots, and 42 sl sts when the 12 picot-closing slip stitches are included.
Assembly
No component assembly or sewing is required. The solid center is formed in R1–R2, the six structural corner spaces are established in R3–R4, and all six tapered points and 12 side picots are worked directly onto the body in R5.
Finishing
- Thread the 6 in (15 cm) finishing tail onto a tapestry needle.
- On the wrong side, weave the tail through at least 1 in (2.5 cm) of dense stitches. Change direction, weave through several more stitches, and trim.
- Check that the adjustable ring is tightly closed. Secure its starting tail in the same way.
- Wet-block or steam-block according to the yarn label. Shape the center into a flat hexagonal circle.
- Pin all six long points at equal distances, checking that opposite points align. Pin all 12 side picots open.
- Allow the coaster to dry completely before removing the pins.
Customization Ideas
Keep the construction and stitch counts unchanged while personalizing the color. Frost white, pale blue, silver gray, or a coordinated set of winter shades all suit the snowflake shape. For a crisp result, choose a smooth worsted cotton with similar yardage and behavior. A subtle metallic strand may be carried with the cotton for sparkle, but it can alter gauge and heat performance, so make a gauge sample first.
To create a matching set, repeat the complete pattern for each coaster rather than adding components to one coaster. Preserve all six points and all 12 picots so the design remains balanced.
Common Mistakes to Avoid
- Adding an extra R3 section: The opening sequence forms the first section. Repeat the starred sequence five more times for six sections total.
- Counting the wrong stitches in R4: Each ch-2 space receives two sc separated by ch 2, followed by one sc in each of the next five dc.
- Turning a tapered point: Work back along the ch-7 foundation without turning.
- Using extra base stitches for picots: Each picot is closed in its first chain, not in another R4 stitch.
- Skipping blocking: Blocking opens the picots, straightens the points, and establishes the finished dimensions.
Troubleshooting
Why is the center cupping?
Your tension may be too tight. Confirm the stitch counts, then try a larger hook if the center still cups.
Why does the center ripple?
Your tension may be too loose. Confirm that no increases were added, then try a smaller hook.
Why do I have more than six R3 sections?
The beginning ch 3 and the dc in the same stitch begin the first section. After completing that opening section, work the starred repeat only five more times.
Why are my points twisting?
Keep the ch-7 foundation relaxed, do not turn, and work each stitch into a single consecutive chain. Shape and pin every point during blocking.
Why are the picots uneven?
Make every picot with exactly ch 3 and close it in the first chain made. Keep the chain tension consistent and pin the picots open while blocking.
Care Instructions
Follow the yarn label for washing and drying. For 100% cotton, gentle hand washing in cool or lukewarm water is a dependable choice. Reshape the damp coaster, align opposite points, open the picots, and dry it flat. Avoid bleach unless the yarn manufacturer permits it. Reblock whenever laundering softens the snowflake’s shape.
Frequently Asked Questions
Is this crochet snowflake coaster worked in separate pieces?
No. It is one integrated component. The center, corner spaces, six points, and 12 picots are all formed during the five rounds.
Can a beginner make this pattern?
A confident beginner familiar with joined rounds and the listed basic stitches can make it. The tapered points and picots add a modest intermediate challenge.
Does the beginning ch 3 count as a stitch?
Only the beginning ch 3 in R3 counts as one dc. Other beginning chains do not count as stitches.
How many points and picots should the finished coaster have?
The finished coaster has exactly six tapered points and 12 side picots, with two picots between each neighboring pair of points.
Can I use acrylic yarn?
Cotton is recommended for absorbency and better heat resistance. Synthetic fibers can react differently to heat, so check the yarn manufacturer’s guidance before using them for drinkware or warm vessels.
How much yarn is needed for a set?
Allow 30–35 yd (28–32 m) per coaster. Multiply that amount by the number of coasters and add a small allowance if you want all pieces to come from the same dye lot.