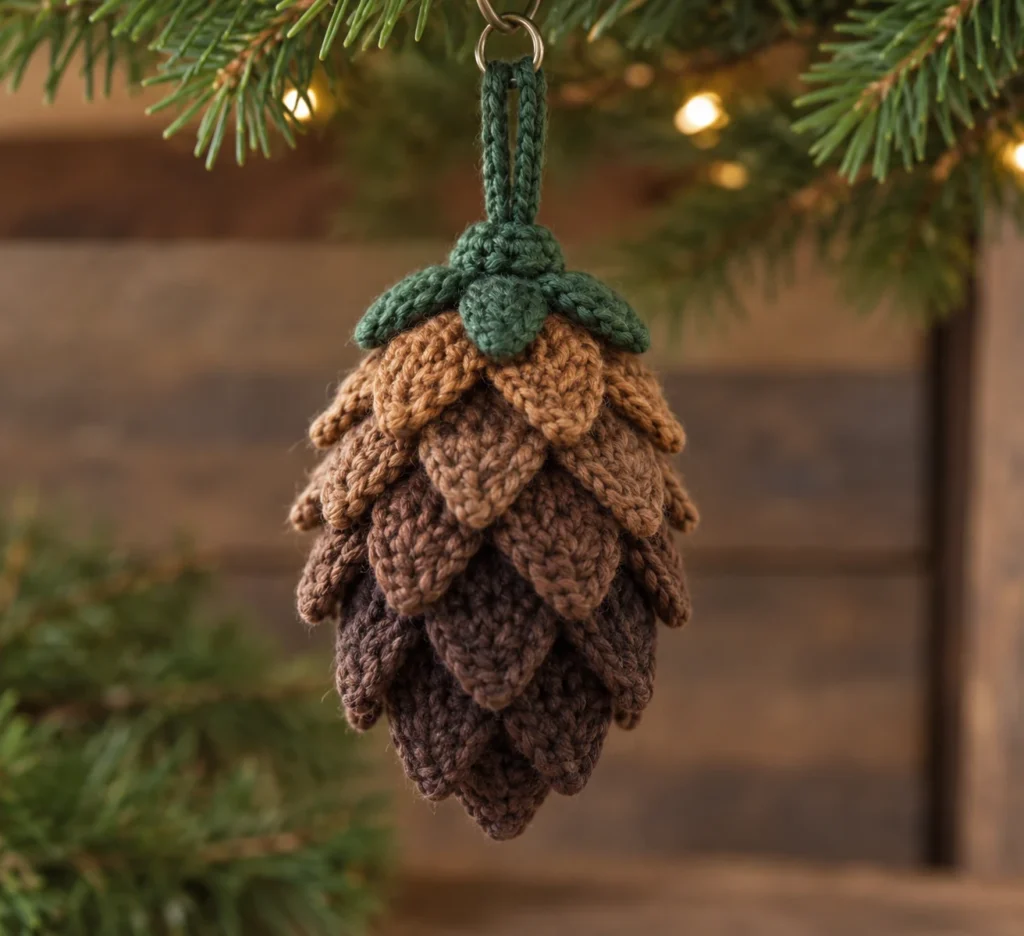
Crochet Pine Cone Ornament Pattern
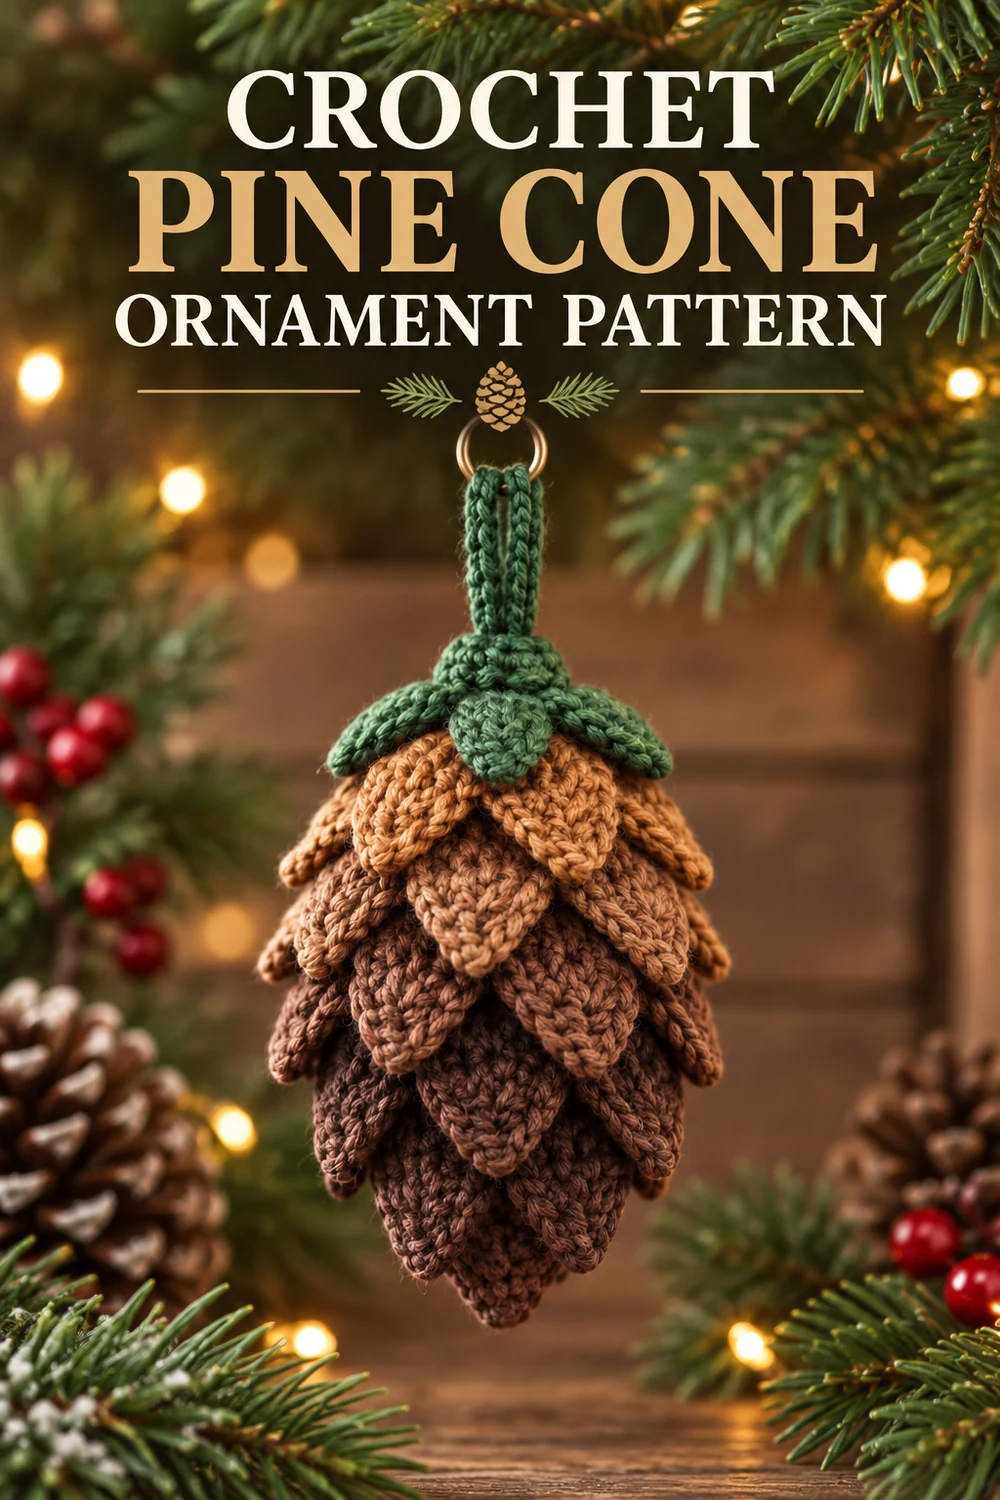
Bring a little woodland texture to your holiday décor with this original Crochet Pine Cone Ornament Pattern. A firmly stuffed dark-brown body supports three staggered tiers of pointed crochet scales, while a six-lobed green cap and reinforced hanging loop finish the ornament. The completed pine cone measures approximately 4 inches tall, excluding the loop.
This free pattern uses US crochet terminology. Make every component before assembly, then place the 18 scales carefully so the tiers overlap evenly.
Pattern at a Glance
- Skill level: Intermediate
- Terminology: US crochet terms
- Construction: The body is worked in continuous rounds; the scales are worked separately in turned rows; the cap is worked in joined rounds; all pieces are sewn together.
- Visible components: 1 stuffed dark-brown body, 6 dark-brown large scales, 6 medium-brown medium scales, 6 golden-brown small scales, 1 forest-green six-lobed stem cap, 1 forest-green hanging loop, and 1 closed metal ornament ring.
- Techniques: Magic ring, single crochet, increases, decreases, turned rows, joined rounds, slip-stitch cord, stuffing, and sewing.
Materials You’ll Need
- 25 yd (23 m) dark-brown worsted-weight category 4 yarn for the body and large scales
- 12 yd (11 m) medium-brown worsted-weight category 4 yarn for the medium scales
- 8 yd (7.5 m) golden-brown worsted-weight category 4 yarn for the small scales
- 8 yd (7.5 m) forest-green worsted-weight category 4 yarn for the cap and loop
- 3.5 mm US E/4 crochet hook
- Approximately 0.5 oz (14 g) polyester fiberfill
- One closed 20 mm metal ornament ring; do not use an open jump ring
- Removable stitch marker
- Tapestry needle
- Scissors
Choose smooth, firmly plied yarns with similar fiber content and thickness. Tight, even stitches help prevent the stuffing from showing.
Gauge
20 sc and 22 rounds = 4 in (10 cm) in continuous single crochet, measured before stuffing.
Exact gauge is not critical, but the fabric must be dense enough to contain fiberfill. Change hook size if necessary. A substantially different gauge will alter the finished dimensions and the amount of stuffing required.
Finished Measurements
- Approximately 4 in (10 cm) tall, excluding the hanging loop
- Approximately 2.75 in (7 cm) across the widest scales
- Approximately 3 in (7.5 cm) finished hanging drop
Crochet Abbreviations
- ch: chain
- dc: double crochet
- hdc: half double crochet
- inc: work 2 single crochet in the indicated stitch
- MR: magic ring
- Rnd: round
- sc: single crochet
- sc2tog: single crochet 2 stitches together
- sc3tog: single crochet 3 stitches together
- sl st: slip stitch
- st(s): stitch(es)
Important Pattern Notes
- Parentheses give the stitch count at the end of a row or round.
- The turning chain does not count as a stitch.
- Work the body in continuous rounds without joining. Move a removable marker to the first stitch of each new round.
- Work the first two cap rounds as joined rounds.
- Make all components before beginning assembly.
- Attach each scale only along its foundation edge: secure both corners and tack the center. Leave the side edges and pointed end free so the scale can lift away from the body.
- Before permanent sewing, confirm that every six-scale tier is evenly spaced and vertically staggered from the tier below it.
Complete Free Crochet Pattern
Component 1: Pine-Cone Body
Color: Dark brown. Quantity: 1.
Begin at the narrow top and work in continuous rounds.
Rnd 1: Make an MR; work 6 sc in ring. Pull ring closed. (6)
Rnd 2: Inc in each st around. (12)
Rnd 3: [Sc in next st, inc in next st] 6 times. (18)
Rnd 4: [Sc in next 2 sts, inc in next st] 6 times. (24)
Rnd 5: [Sc in next 3 sts, inc in next st] 6 times. (30)
Rnds 6–14: Sc in each st around. (30 each round)
Rnd 15: [Sc in next 3 sts, sc2tog] 6 times. (24)
Rnd 16: [Sc in next 2 sts, sc2tog] 6 times. (18)
Stuff firmly, shaping the body into a tapered oval. Add small portions of stuffing as the opening closes, keeping the final six stitches free of fiber.
Rnd 17: [Sc in next st, sc2tog] 6 times. (12)
Rnd 18: Sc2tog 6 times. (6)
Fasten off with an 8 in (20 cm) tail. Thread the tail through the front loops of the remaining six stitches and pull the opening closed. Knot securely, weave the tail through the stuffed body in several directions, and trim.
Component 2: Large Scales — Make 6
Color: Dark brown. Work in turned rows.
Row 1: Ch 6; sc in second ch from hook and in each remaining ch. (5)
Row 2: Ch 1, turn; inc in first st, sc in next 3 sts, inc in last st. (7)
Row 3: Ch 1, turn; sc in each st. (7)
Row 4: Ch 1, turn; sc2tog, sc in next 3 sts, sc2tog. (5)
Row 5: Ch 1, turn; sc2tog, sc in next st, sc2tog. (3)
Row 6: Ch 1, turn; sc3tog. (1)
Fasten off. Leave a 12 in (30 cm) sewing tail at the foundation-chain base and weave in the pointed-end tail.
Component 3: Medium Scales — Make 6
Color: Medium brown. Work in turned rows.
Row 1: Ch 5; sc in second ch from hook and in each remaining ch. (4)
Row 2: Ch 1, turn; inc in first st, sc in next 2 sts, inc in last st. (6)
Row 3: Ch 1, turn; sc in each st. (6)
Row 4: Ch 1, turn; sc2tog, sc in next 2 sts, sc2tog. (4)
Row 5: Ch 1, turn; sc2tog twice. (2)
Row 6: Ch 1, turn; sc2tog. (1)
Fasten off. Leave a 12 in (30 cm) sewing tail at the foundation-chain base and weave in the pointed-end tail.
Component 4: Small Scales — Make 6
Color: Golden brown. Work in turned rows.
Row 1: Ch 4; sc in second ch from hook and in each remaining ch. (3)
Row 2: Ch 1, turn; inc in first st, sc in next st, inc in last st. (5)
Row 3: Ch 1, turn; sc in each st. (5)
Row 4: Ch 1, turn; sc2tog, sc in next st, sc2tog. (3)
Row 5: Ch 1, turn; sc3tog. (1)
Fasten off. Leave a 10 in (25 cm) sewing tail at the foundation-chain base and weave in the pointed-end tail.
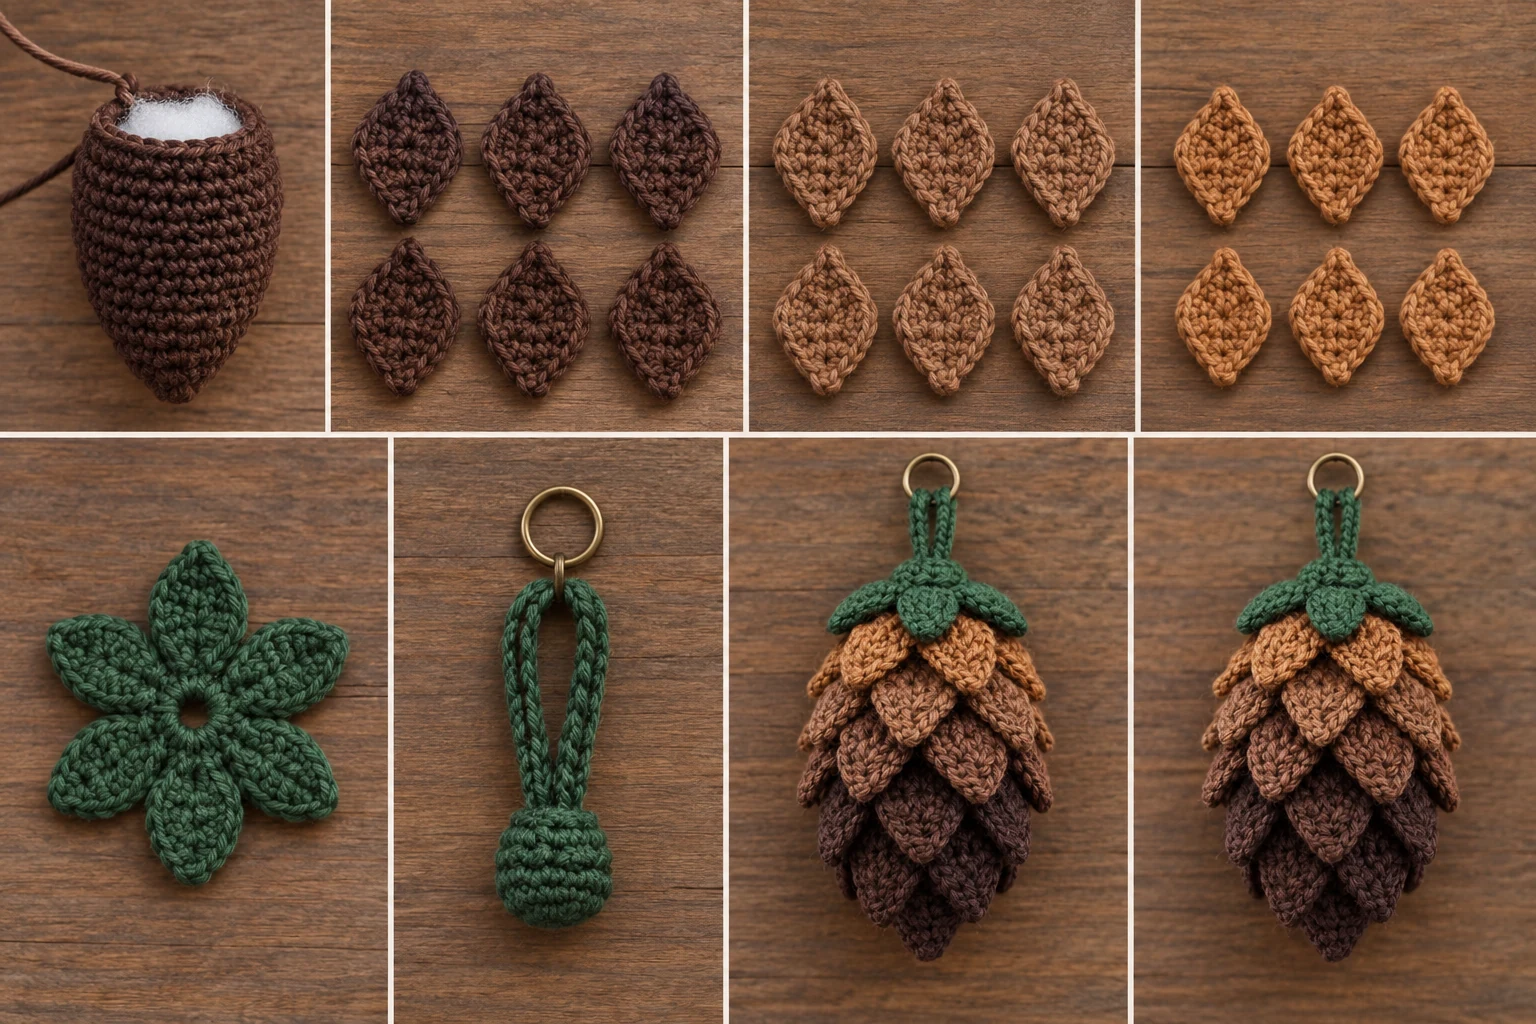
Component 5: Six-Lobed Stem Cap
Color: Forest green. Quantity: 1.
Work Rnds 1–2 in joined rounds.
Rnd 1: Make an MR; ch 1, work 6 sc in ring; join with sl st to first sc. (6)
Rnd 2: Ch 1, inc in each st; join with sl st to first sc. (12)
Lobes: Repeat the following 6 times: sl st in next st, ch 5, sl st in second ch from hook, sc in next ch, hdc in next ch, dc in final ch, sl st in next unworked st of Rnd 2. (6 lobes)
Fasten off with a 24 in (61 cm) tail for attaching both the cap and hanging loop. Weave in the starting tail and close the MR securely.
Component 6: Hanging Loop and Metal-Ring Attachment
Color: Forest green. Quantity: 1 loop and 1 closed 20 mm metal ornament ring.
Leaving a 10 in (25 cm) starting tail, ch 36. Working back along the chain, sl st in each ch. (36 sl sts)
Fasten off with a 10 in (25 cm) tail. Thread the cord through the closed metal ring. Bring the cord ends together to form an equal-sided loop, keeping both tails available for assembly.
Assembly
- Hold the body with its MR top upward and its closed decrease end downward. Identify three horizontal placement levels: the lower tier centered near Rnd 13, the middle tier near Rnd 9, and the upper tier near Rnd 5.
- Arrange the six large scales around the lower level. Keep their foundation edges horizontal and their points directed downward. The body has 30 stitches around, so center successive scale bases approximately 5 body stitches apart. With each scale’s sewing tail, secure both foundation-chain corners and tack the center of the foundation edge to the body. Do not sew the sides or points. Knot securely beneath the scale coverage and weave the tail into the body.
- Arrange the six medium scales around the middle level, approximately 5 body stitches apart. Offset this tier by about 2–3 body stitches from the large tier so each medium point falls between two large scales. Sew each foundation edge at both corners and at its center, then weave in the tails.
- Arrange the six small scales around the upper level, approximately 5 body stitches apart. Offset them by about 2–3 body stitches from the medium tier. Their points should overlap the upper portions of the medium scales without covering the stem-cap location. Sew each foundation edge at both corners and its center, then weave in the tails.
- Center the stem cap over the body’s MR top and keep all six lobes visible. With the cap’s long tail, sew around the cap’s circular center and through the upper body stitches, leaving the lobe tips free. Do not cut the remaining tail.
- Lay the two ends of the folded hanging cord together on the cap center, with the metal ring at the top of the loop. Using both cord tails, stitch down through the cap and through several body stitches at least three times per tail. Knot the two cord tails together beneath the cap and weave them deeply into different directions of the stuffed body.
- Use the remaining cap tail to make at least four additional stitches over and through both cord ends, the cap center, and the top of the body. Knot securely beneath a lobe and weave the tail deeply into the body. This provides reinforcement independent of the cord tails.
- Gently fluff the scales outward while preserving their downward-pointing, layered arrangement. Do not trim a structural tail until its knot and woven path have been checked.
Finishing and Safety Check
Shape the stuffed body by hand and arrange all three staggered tiers. Count the finished details: there must be exactly 6 large scales, 6 medium scales, 6 small scales, and 6 green cap lobes.
Hold the body and apply a firm hand pull to the metal ring. The cord, cap, and top seam should not move. Reinforce the attachment before use if any strand or seam shifts.
This ornament is decorative and is not a toy. Keep it away from children and pets because the metal ring and fiberfill can present hazards.
Customization Ideas
- Use three related natural browns for the planned woodland look, or substitute three coordinated colors while retaining the specified yarn weight and component assignments.
- Try a subtle metallic or tweed worsted yarn, provided it is smooth and firmly plied enough to maintain clear stitches and tight fabric.
- Adjust overall size by changing yarn thickness and hook size together, but keep every written stitch count, component quantity, tier position, and attachment method unchanged. Expect the finished measurements and stuffing requirement to change.
- For a more natural silhouette, gently curve the free scale points outward after assembly rather than sewing them flat.
Common Mistakes to Avoid
- Losing the start of a body round: Move the stitch marker after every round so the shaping remains aligned.
- Counting the turning chain: The ch 1 at the beginning of a scale row does not count as a stitch.
- Overstuffing the final opening: Keep fiberfill away from the last six stitches so the opening can close cleanly.
- Sewing the scales flat: Attach only the two foundation corners and center. The side edges and points must remain free.
- Stacking tiers directly above one another: Offset each tier by about 2–3 body stitches to create the intended layered appearance.
- Using an open jump ring: Use a closed 20 mm ornament ring so the yarn loop cannot slip through a gap.
- Trimming structural tails too soon: Complete the pull test and inspect every knot and woven path first.
Troubleshooting
Why is fiberfill showing through the body?
Your stitches may be too loose. Use a smaller hook and retest the gauge before continuing. Add stuffing in small portions instead of forcing a large amount against the fabric.
Why does the body look round instead of tapered?
Confirm Rnds 1–5 increase to 30 stitches and that Rnds 15–18 decrease in the written sequence. Shape the stuffed piece into a tapered oval by hand before closing it.
Why do my scales twist or lean?
Check that each foundation edge is horizontal and secured at both corners and the center. Reposition the scale before tightening the sewing stitches.
Why do the tiers look crowded?
Confirm that each tier contains exactly six scales centered about 5 body stitches apart. Keep the tiers near Rnds 13, 9, and 5, and stagger adjacent tiers by about 2–3 stitches.
Why does the hanging loop shift?
Each cord tail must pass through the cap and several body stitches at least three times. The cap tail must then make at least four additional reinforcing stitches through both cord ends, the cap, and the body. Repeat these steps if the attachment moves during the pull test.
Care Instructions
Spot-clean gently with cool water and a small amount of mild detergent. Blot with a towel, reshape the body and scales, and dry flat. Do not wring, bleach, machine-dry, or hang the ornament while wet. Before each season, inspect the yarn loop, cap seam, and metal ring and reinforce any loosened area.
Frequently Asked Questions
Is this pattern written in US or UK terminology?
It is written entirely in US crochet terminology.
Can a beginner make this ornament?
A confident beginner who can work in continuous rounds, make decreases, crochet turned rows, and sew pieces securely may succeed, but the layered placement and reinforced hanger make it best suited to an intermediate crocheter.
Must I match the gauge exactly?
No, but the fabric must be tight enough to hide and contain the fiberfill. A different gauge will alter the ornament’s size and stuffing requirement.
How many scales are required?
Make exactly 18: 6 large dark-brown scales, 6 medium medium-brown scales, and 6 small golden-brown scales.
Can I sew down the scale points?
No. For the intended layered texture, sew only the two corners and center of each foundation edge. Leave the sides and points free.
Can I omit the metal ring?
The approved construction uses one closed 20 mm metal ornament ring held by the crocheted loop. Omitting it would change the planned hanging assembly.
Is the ornament safe for children or pets?
No. It is a decorative item rather than a toy, and its metal ring and fiberfill can present hazards.