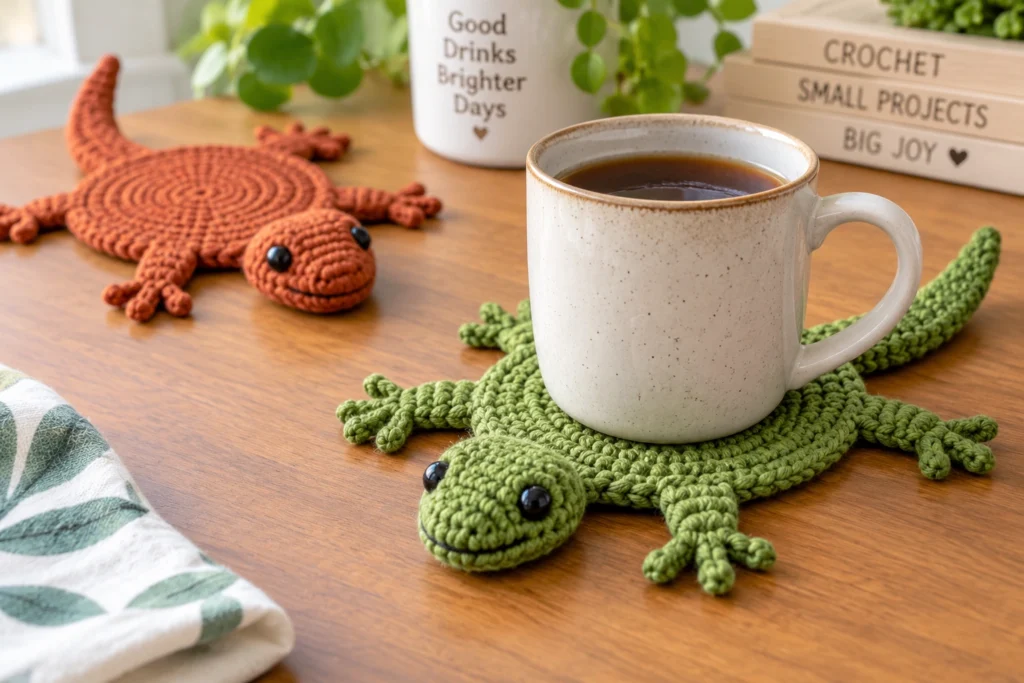
If you love crochet projects that are practical, playful, and a little unexpected, this Crochet Funny Flip-Up Lizard Coaster is such a fun idea to add to your handmade collection. At first glance, it looks like an adorable little crochet lizard resting on the table—but its clever flip-up design gives it personality and makes it much more entertaining than an ordinary coaster.
With its textured body, tiny legs, long tail, and funny lizard shape, this project is perfect for using up leftover yarn and creating something that instantly gets attention. Make one for your coffee table, crochet a colorful set for the kitchen, or turn them into quirky handmade gifts.
Why You’ll Love This Crochet Lizard Coaster
There are plenty of crochet coaster patterns out there, but this little lizard stands out because it combines function with character.
The flat body provides a useful resting place for a mug or glass, while the head, legs, and tail transform a simple coaster into a miniature crochet creature. When the coaster is uncovered, the lizard becomes part of your table décor.
This project is especially fun because you can customize almost everything about it. Try natural greens and browns for a realistic woodland look, or forget realism completely and make bright pink, turquoise, orange, purple, or rainbow lizards.
It’s also a relatively small project, so you don’t need a huge yarn stash or days of crocheting to make something satisfying.
Materials You’ll Need
For a typical Crochet Funny Flip-Up Lizard Coaster, you’ll need:
- Cotton yarn in your chosen main color
- Small amounts of contrasting yarn for details
- A crochet hook appropriate for your yarn
- Yarn needle
- Scissors
- Stitch markers
- Small safety eyes or black yarn for embroidered eyes
- Optional fiberfill if you want a slightly dimensional head
- Measuring tape
- Pins for positioning the legs before sewing
Tip: Cotton yarn is an excellent choice for coasters because it’s absorbent, durable, and generally handles the warmth from mugs better than many synthetic fibers.
Choosing the Best Yarn
Medium-weight cotton yarn works beautifully for this project because it creates a coaster with enough structure to hold its shape without becoming overly bulky.
For a rustic lizard, consider shades such as:
- Moss green
- Olive
- Sage
- Forest green
- Mustard
- Terracotta
- Beige
- Brown
For something more whimsical, experiment with lavender, coral, bright yellow, aqua, or variegated yarn.
You can even crochet each leg or the tail in a slightly different shade for a deliberately quirky look.
Understanding the Flip-Up Design
The charm of this project comes from making the lizard look animated rather than creating a perfectly flat circular coaster.
The central section of the lizard acts as the main coaster surface, while the head, four little legs, and tail extend beyond it. Depending on your preferred design, these elements can remain flexible enough to lift, curl, or flip upward.
That movement is what gives the finished lizard its funny personality.
Instead of looking like a traditional coaster with an animal motif printed or stitched onto it, the entire coaster is the animal.
How to Crochet a Funny Flip-Up Lizard Coaster
Step 1: Crochet the Main Body
Begin with the central body of your lizard.
A magic ring is a convenient starting point if you’re constructing the body in rounds. Work increases gradually to create a broad, relatively flat center.
However, don’t make it perfectly circular. A slightly elongated oval or teardrop-shaped body creates a more convincing lizard silhouette.
Keep your tension consistent throughout this section. Since the body will support a cup or mug, you want a dense fabric without large gaps between the stitches.
Single crochet is particularly suitable because it creates a firm, compact surface.
Step 2: Shape the Neck and Head
Once the body reaches the desired size, begin narrowing toward the neck.
The head can then be crocheted directly from the body or made separately and sewn into position.
A slightly rounded head gives the lizard a cute cartoon appearance. You can keep it completely flat or add a very small amount of fiberfill if you want more dimension.
Avoid making the head too heavy, though. One of the appealing features of this project is the flexible, floppy character of the finished lizard.
Step 3: Give Your Lizard a Face
Now comes one of the most enjoyable parts: adding personality.
Use tiny safety eyes or embroider the eyes with black yarn.
You can also embroider a tiny smile or nostrils if you want an especially expressive lizard.
For coasters that will be washed frequently—or if you’re making one for a household with small children or pets—embroidered features may be preferable to attached plastic pieces.
Step 4: Crochet the Front Legs
Create two small front legs extending from either side of the upper body.
Keep them narrow and flexible.
You can shape each foot with several tiny toes by working short chains from the end of the leg. These don’t have to be perfectly symmetrical. In fact, slightly irregular legs can make the lizard look even more charming.
Position the legs so they naturally spread outward when the coaster lies on a table.
Step 5: Add the Back Legs
The hind legs can be slightly longer or wider than the front legs.
Position them around the lower half of the body and angle them outward.
Before permanently attaching separately crocheted legs, pin everything into place and lay the lizard flat. This lets you check the overall silhouette.
You want someone to recognize that it’s a lizard immediately—even before seeing the face.
Step 6: Crochet the Long Tail
The tail is one of the defining features of this coaster.
Start relatively wide where the tail connects to the body and gradually decrease until you reach a narrow tip.
A gently curved tail often looks more natural than a perfectly straight one.
You can encourage the curve through stitch placement or simply shape the damp crochet during blocking.
For an extra playful effect, create a tail that naturally curls upward slightly when the coaster is uncovered.
Step 7: Create the Flip-Up Effect
Now give your lizard its signature character.
Rather than aggressively blocking every appendage perfectly flat, allow the head, legs, or tail to retain some natural movement.
The edges can curl upward slightly, and the flexible limbs can shift when the coaster is handled.
The goal isn’t an extremely stiff, perfectly symmetrical animal. The slightly floppy construction is part of what makes the design funny.
Place a mug on the central body and adjust the surrounding pieces until you like the overall appearance.
When you remove the mug, your little crochet lizard is revealed again.
Getting the Coaster to Lie Flat
One common challenge with crochet coasters is unwanted curling.
If your central body begins forming a bowl instead of lying flat, you may need additional increases. If the fabric becomes wavy or ruffled, you may have added too many increases.
Your hook size can also make a difference.
After finishing the project, lightly block the main coaster area while allowing the decorative limbs and tail to retain some flexibility.
This gives you a practical flat surface without removing the playful character.
Color Ideas
One lizard is cute. A whole family of different-colored lizards can be even better.
Try combinations such as sage green + cream, forest green + mustard, terracotta + beige, turquoise + navy, pink + coral, or purple + lavender.
Another fun approach is to crochet several lizards in different shades and use them as a coordinated coaster set.
Imagine four brightly colored crochet lizards scattered around a coffee table, each waiting for a different drink.
Add Texture to the Body
Texture can make this simple project much more interesting.
Instead of working the entire lizard in basic single crochet, experiment with subtle textured stitches across the back.
Bobble stitches can suggest little bumps, while alternating front-loop and back-loop stitches can create gentle ridges. Surface crochet can also add stripes or markings after the main body is completed.
Keep the center reasonably level, however. Large raised stitches directly underneath a mug could make it unstable.
Save the strongest textures for areas surrounding the main cup placement.
Make a Mini Lizard Family
Once you’ve made your first coaster, the pattern can easily become the foundation for an entire collection.
Create a large adult lizard and several smaller versions, or make four matching coasters in different colors.
You could even assign each lizard its own personality through different eyes, tail shapes, markings, and poses.
A set tied together with a simple ribbon would make a memorable handmade housewarming gift.
Creative Ways to Use Your Crochet Lizard
Although it’s designed primarily as a coaster, this little crochet creature can have other uses.
A larger version could become a mug rug. A tiny version could become a bag charm, appliqué, ornament, or keychain decoration. Several lizards could even be joined together to create a playful garland for a child’s room or craft space.
You could also make matching versions in different sizes and use them as quirky table decorations.
Beginner Tips
If you’re relatively new to crochet, don’t worry about making every part perfectly symmetrical.
Animal-shaped crochet projects often look better when they have a little handmade irregularity.
Focus first on creating a flat central body. Once you’ve mastered that section, the smaller head, legs, and tail are great opportunities to practice shaping, increases, decreases, chains, and joining techniques.
Use stitch markers generously, especially if you’re working continuously in the round.
Most importantly, check the shape frequently while crocheting instead of waiting until the project is completely finished.
Common Mistakes to Avoid
Making the body too small: Remember that an average mug needs enough flat space to sit securely.
Using very loose stitches: A coaster with large gaps may not protect the table effectively.
Making the head too bulky: A heavily stuffed head can overpower the lightweight body.
Over-blocking the entire project: Flatten the functional coaster area, but preserve some movement in the limbs and tail if you want that funny flip-up appearance.
Ignoring yarn choice: For something that will regularly encounter warm drinks and condensation, practical yarn matters.
Washing and Care
Because coasters inevitably encounter coffee, tea, water, and the occasional spill, washable yarn is a smart choice.
Follow the care instructions on your yarn label. Cotton crochet pieces can often be gently hand washed, reshaped, and laid flat to dry.
After washing, carefully reposition the legs and tail while the project is still damp so the lizard maintains its intended shape.
If you’ve used safety eyes or other embellishments, take extra care during washing.
Perfect for Handmade Gifts
The Crochet Funny Flip-Up Lizard Coaster makes an excellent small handmade gift because it’s unusual without requiring a huge amount of yarn.
Make one as a stocking stuffer, teacher gift, housewarming present, craft-fair item, or playful addition to a larger crochet gift basket.
For a more complete gift, crochet a set of four lizards and pair them with a favorite mug.
Final Thoughts
The Crochet Funny Flip-Up Lizard Coaster proves that practical crochet doesn’t have to be boring.
With a flat functional body, tiny expressive face, floppy legs, and wonderfully long tail, this project turns an everyday household item into something playful and full of personality. It’s small enough for leftover yarn, customizable enough to make again and again, and unusual enough to become a conversation piece whenever someone spots it on your table.
Whether you make your lizard earthy and realistic or ridiculously bright and colorful, don’t worry about making it too perfect. Give those legs a little character, let the tail curl, and embrace the funny flip-up design.
After all, the best part of lifting your coffee mug might just be discovering the little crochet lizard hiding underneath.