Crochet Fish Bag Holder Pattern
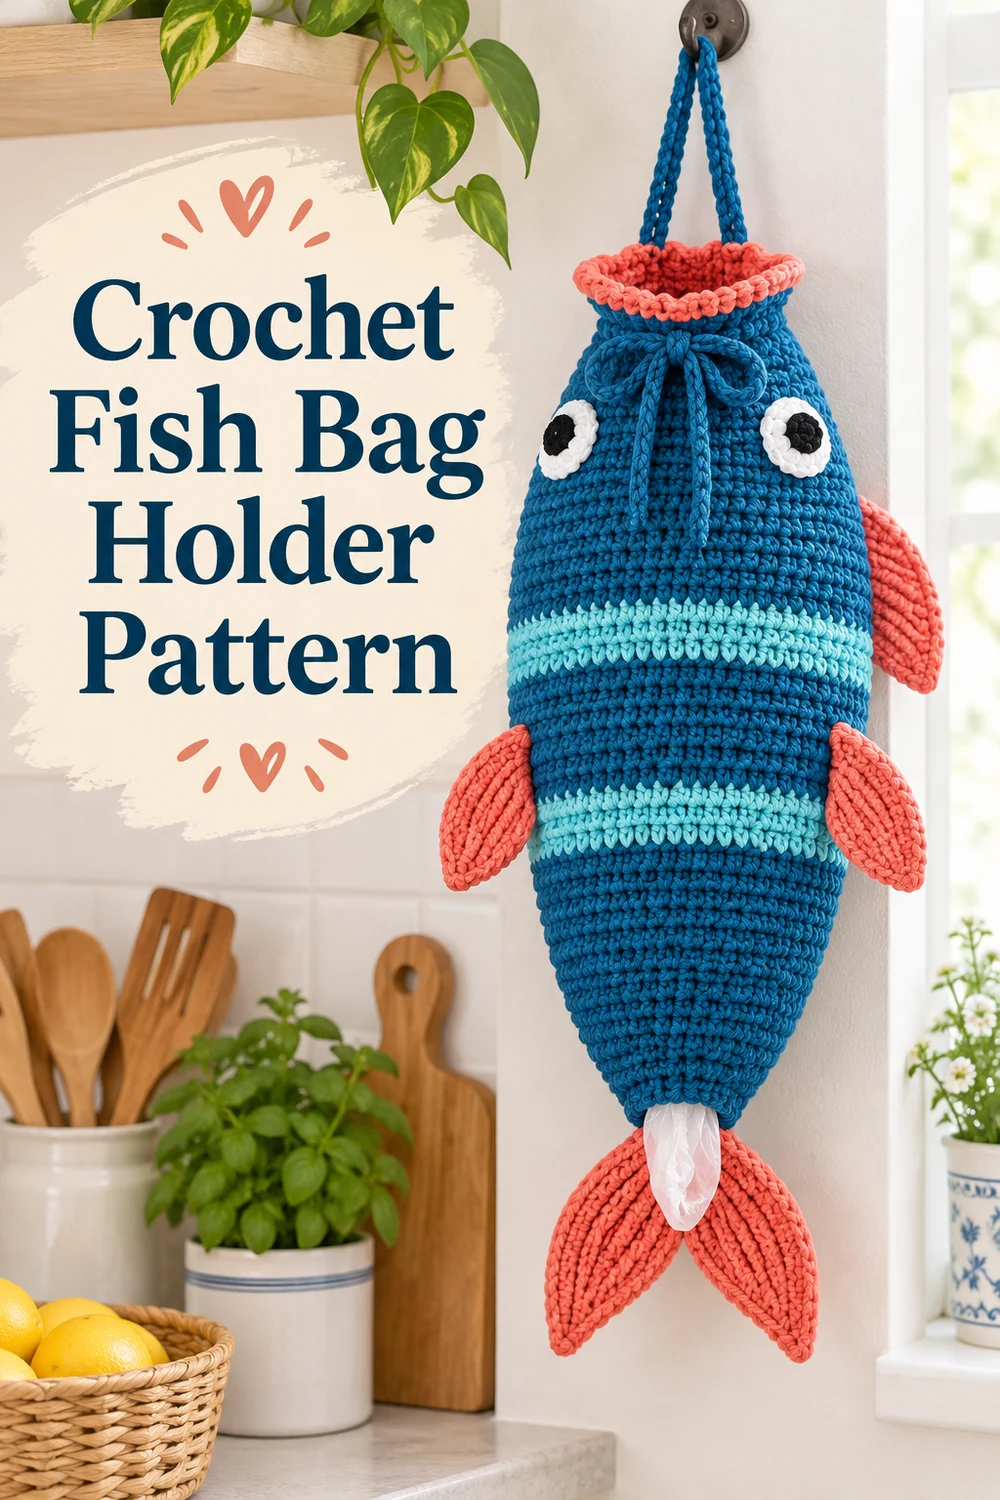
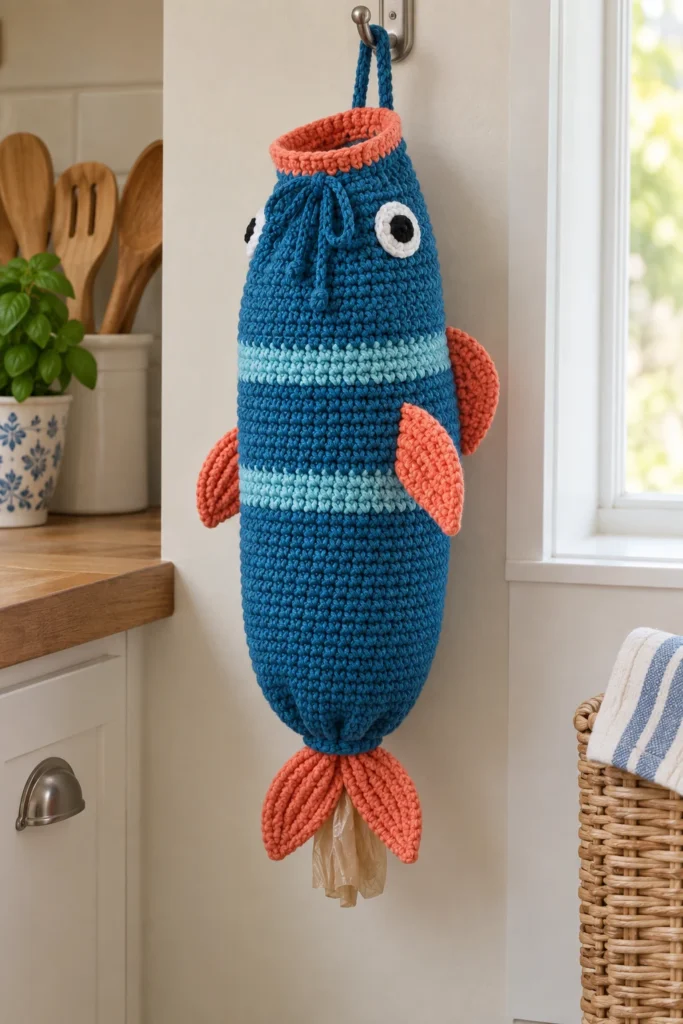
Turn practical storage into cheerful handmade décor with this original Crochet Fish Bag Holder Pattern. The fish hangs vertically, accepts clean folded bags through its drawstring mouth, and dispenses them through an elasticized opening near the tail. The holder is not stuffed; the stored bags give it shape.
This free pattern uses US crochet terminology and combines joined rounds, simple shaping, color changes, flat fins, crocheted eyes, a sturdy hanging strap, and a securely enclosed elastic loop.
Pattern at a Glance
- Skill level: Advanced beginner to intermediate
- Construction: The body is worked from the mouth downward in joined rounds. The contrasting rim is added directly to the foundation edge. Fins, eyes, drawstring, and strap are made separately and sewn in place.
- Terminology: US crochet terms
- Primary stitches: Chain, slip stitch, single crochet, double crochet, increases, and single-crochet decreases
- Finished use: Hanging storage and dispensing of clean reusable or plastic bags
- Stuffing: None
Visible Component Inventory
- Main fish body tube: 1
- Contrasting mouth and eyelet rim, worked directly onto the body: 1
- Crocheted drawstring cord: 1
- Hanging strap: 1
- Tail-fin lobes: 2
- Pectoral side fins: 2
- Dorsal fin: 1
- White eye discs: 2
- Black pupil discs: 2
- Encased lower-opening elastic: 1; visible only when the opening is stretched
Materials You’ll Need
- Worsted-weight category 4 cotton or cotton-blend yarn: approximately 180 yd/165 m total
- Color A, Sea Blue: 115 yd/105 m for the body, strap, and drawstring
- Color B, Aqua: 25 yd/23 m for the body stripes
- Color C, Coral: 30 yd/28 m for the rim and fins
- Color D, White: 7 yd/6.5 m for two eyes
- Color E, Black: 3 yd/3 m for two pupils
- US H/8 (5 mm) crochet hook, or size needed to obtain gauge
- Yarn needle
- Locking stitch marker
- Scissors
- Sewing needle and strong sewing thread
- One 7 in/18 cm length of 1/4 in/6 mm braided elastic; this length includes approximately 1 in/2.5 cm for overlap
- Safety pin or bodkin for inserting the elastic
Gauge
16 sc and 18 rnds = 4 in/10 cm in joined rounds, unblocked.
Gauge matters for the stated measurements and the fit of the elasticized opening. Make a joined-round swatch using the intended body yarn. If you have more than 16 stitches per 4 in/10 cm, use a larger hook. If you have fewer, use a smaller hook.
Finished Measurements
- Maximum body circumference: approximately 16 in/40.5 cm
- Crocheted body length before adding the rim: approximately 10 1/4 in/26 cm
- Mouth edge to relaxed tail-fin tips: approximately 13 1/2 in/34.5 cm
- Mouth circumference before drawing closed: approximately 12 in/30.5 cm
- Lower opening before elastic installation: approximately 8 in/20.5 cm
- Relaxed lower opening after overlapping the elastic by 1 in/2.5 cm: approximately 6 in/15 cm
- Strap length before its ends are attached: approximately 7 1/2 in/19 cm
Crochet Abbreviations
- beg = beginning
- ch = chain
- dc = double crochet
- dec = single-crochet decrease over the next 2 stitches
- inc = 2 single crochets in the indicated stitch
- MR = magic ring
- rep = repeat
- rnd(s) = round(s)
- RS = right side
- sc = single crochet
- sl st = slip stitch
- st(s) = stitch(es)
- yo = yarn over
Important Pattern Notes
- The beginning chain does not count as a stitch.
- Join each round with a slip stitch to its first stitch unless instructed otherwise.
- Turn only when the instructions say to turn.
- Place a marker in the first stitch and verify the stitch count before joining.
- For an invisible color change, complete the final yo of the preceding stitch with the new color.
- Carry yarn only across each four-round stripe section when the floats remain loose. Otherwise, cut the yarn and weave in the ends.
- To make a dec, insert the hook in the next stitch and pull up a loop, insert the hook in the following stitch and pull up a loop, yo, and draw through all 3 loops.
- Leave the specified yarn tails for assembly.
- Make every appliqué and separate component before assembly.
- Keep the body unstuffed. Stored bags provide its volume.
Complete Free Crochet Pattern
Main Fish Body — Make 1
Begin at the mouth with Color A. Ch 48 loosely. Without twisting the chain, sl st in the first ch to form a ring.
Rnd 1: Ch 1, sc in each ch around; join. (48 sc)
Rnd 2: Ch 1, [sc in next 5 sts, inc in next st] 8 times; join. (56 sc)
Rnd 3: Ch 1, [sc in next 6 sts, inc in next st] 8 times; join. (64 sc)
Rnds 4–12: Ch 1, sc in each st around; join. (64 sc)
Change to Color B.
Rnds 13–16: Ch 1, sc in each st around; join. (64 sc)
Change to Color A.
Rnds 17–28: Ch 1, sc in each st around; join. (64 sc)
Change to Color B.
Rnds 29–32: Ch 1, sc in each st around; join. (64 sc)
Change to Color A.
Rnds 33–39: Ch 1, sc in each st around; join. (64 sc)
Rnd 40: Ch 1, [sc in next 6 sts, dec] 8 times; join. (56 sc)
Rnd 41: Ch 1, [sc in next 5 sts, dec] 8 times; join. (48 sc)
Rnd 42: Ch 1, [sc in next 4 sts, dec] 8 times; join. (40 sc)
Rnd 43: Ch 1, [sc in next 3 sts, dec] 8 times; join. (32 sc)
Rnds 44–46: Ch 1, sc in each st around; join. (32 sc)
Fasten off, leaving a 24 in/61 cm tail for sewing the elastic casing.
Mouth/Eyelet Rim — Work Directly on the Body
With the mouth edge facing up, join Color C in the first unused loop of the foundation chain at the back-center seam.
Rim Rnd 1: Ch 1, sc once in each foundation chain around; join. (48 sc)
Rim Rnd 2: Ch 3, which counts as the first dc, ch 1, skip next st, [dc in next st, ch 1, skip next st] 23 times; join to the top of the beg ch-3. (24 dc and 24 ch-1 spaces; 48 positions)
Rim Rnd 3: Ch 1, sc in the same dc, sc in next ch-1 space, [sc in next dc, sc in next ch-1 space] 23 times; join. (48 sc)
Fasten off and weave in the tail.
Drawstring Cord — Make 1
With Color A, ch 101. Sl st in the second ch from the hook and in each remaining ch. (100 sl sts)
Fasten off, leaving 3 in/7.5 cm tails. Knot each yarn tail tightly against the end stitch, weave it back through at least 1 in/2.5 cm of cord, and trim.
Hanging Strap — Make 1
With Color A, ch 31.
Row 1: Sc in second ch from hook and in each ch across; turn. (30 sc)
Rows 2–3: Ch 1, sc in each st across; turn. (30 sc)
Fasten off, leaving a 15 in/38 cm sewing tail at each end. To obtain the second tail, leave that length before making the initial slip knot.
Tail-Fin Lobes — Make 2
Use Color C. Ch 2.
Row 1: Work 3 sc in second ch from hook; turn. (3 sc)
Row 2: Ch 1, inc in each st; turn. (6 sc)
Row 3: Ch 1, sc in each st; turn. (6 sc)
Row 4: Ch 1, [sc in next st, inc in next st] 3 times; turn. (9 sc)
Row 5: Ch 1, sc in each st; turn. (9 sc)
Row 6: Ch 1, [sc in next 2 sts, inc in next st] 3 times; turn. (12 sc)
Row 7: Ch 1, sc in each st; turn. (12 sc)
Row 8: Ch 1, [sc in next 3 sts, inc in next st] 3 times; turn. (15 sc)
Rows 9–10: Ch 1, sc in each st; turn. (15 sc)
Fasten off, leaving a 15 in/38 cm sewing tail at the narrow Row 1 end. Weave in the other tail.
Pectoral Side Fins — Make 2
Use Color C. Ch 7.
Row 1: Sc in second ch from hook and in each ch across; turn. (6 sc)
Row 2: Ch 1, inc in first st, sc in next 4 sts, inc in last st; turn. (8 sc)
Row 3: Ch 1, sc in each st; turn. (8 sc)
Row 4: Ch 1, dec, sc in next 4 sts, dec; turn. (6 sc)
Row 5: Ch 1, dec, sc in next 2 sts, dec; turn. (4 sc)
Row 6: Ch 1, dec twice. (2 sc)
Fasten off, leaving an 18 in/46 cm sewing tail at the foundation-chain edge. Weave in the Row 6 tail.
Dorsal Fin — Make 1
Use Color C. Ch 9.
Row 1: Sc in second ch from hook and in each ch across; turn. (8 sc)
Row 2: Ch 1, inc in first st, sc in next 6 sts, inc in last st; turn. (10 sc)
Row 3: Ch 1, sc in each st; turn. (10 sc)
Row 4: Ch 1, dec, sc in next 6 sts, dec; turn. (8 sc)
Row 5: Ch 1, dec, sc in next 4 sts, dec; turn. (6 sc)
Row 6: Ch 1, dec, sc in next 2 sts, dec; turn. (4 sc)
Row 7: Ch 1, dec twice. (2 sc)
Fasten off, leaving a 20 in/51 cm sewing tail at the foundation-chain edge. Weave in the Row 7 tail.
White Eye Discs — Make 2
Use Color D.
Rnd 1: Make an MR, ch 1, work 6 sc in ring; join. (6 sc)
Rnd 2: Ch 1, inc in each st around; join. (12 sc)
Close the MR firmly. Fasten off, leaving an 18 in/46 cm sewing tail.
Black Pupil Discs — Make 2
Use Color E.
Rnd 1: Make an MR, ch 1, work 6 sc in ring; join. (6 sc)
Close the MR firmly. Fasten off, leaving a 12 in/30.5 cm sewing tail.
Assembly
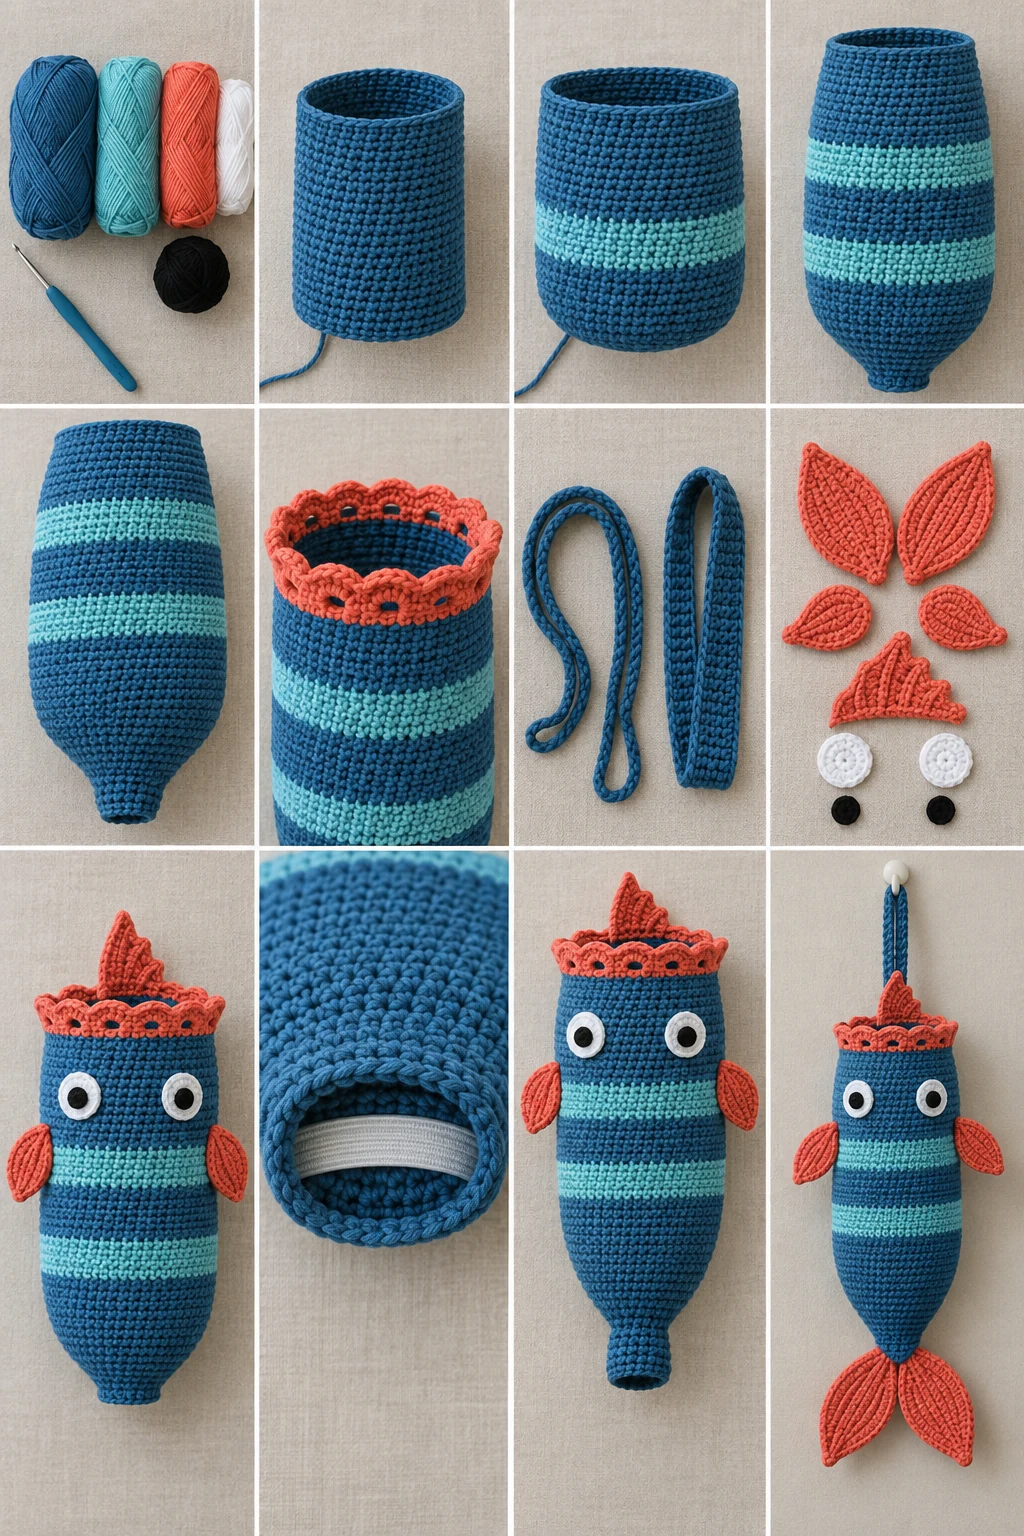
- Weave in all body color-change ends on the wrong side. Keep the body open and unstuffed.
- Temporarily flatten the body with the joining seam centered at the back. Mark the front-center stitch, back-center seam, and two side folds. Release the body after making the placement marks.
- Sew one pupil centrally to each white eye disc. Pass the needle through complete stitches rather than around the MR strands. Knot securely on the back of each eye and bury the tails within the appliqué stitches.
- Position the eyes symmetrically on the upper front over Body Rnds 5–9, with their nearest edges about 2 body stitches apart. Using the white tails, whipstitch every outer eye stitch to the body without catching the back layer. Knot on the wrong side and weave in securely.
- Position one pectoral fin at each side fold, with its straight foundation-chain edge spanning Body Rnds 18–23. Point each Row 6 tip slightly downward. Sew the entire foundation edge and the first stitch of each adjacent side edge to the body, leaving the remainder free. Knot inside and weave in.
- Position the dorsal fin on the back-center seam. Its foundation edge should run vertically from approximately Body Rnd 17 through Rnd 24, with the Row 7 tip pointing outward. Sew the complete foundation edge plus the first stitch at each end to the body. Do not sew the tapered outer edge. Knot inside and weave in.
- At the lower back, place the narrow Row 1 end of one tail lobe immediately left of the back-center seam and the other immediately right of it, both across Body Rnds 43–46. Angle their broad Row 10 edges away from each other to create a V-shaped tail. Sew each narrow end through all three Row 1 stitches, then sew approximately 1/2 in/1.25 cm up both adjacent side edges. Reinforce each attachment line with a second pass. Keep the lower opening unobstructed. Knot inside and weave in.
- Make the lower elastic casing. Turn Body Rnds 45–46 to the wrong side, creating a fold along the boundary between Rnds 44 and 45. Using the retained Color A tail, whipstitch the edge of Rnd 46 to the wrong-side backs of the Rnd 44 stitches. Catch fabric strands only; do not stitch through the visible outer layer. Leave a 1 in/2.5 cm insertion gap.
- Using a safety pin or bodkin, thread the 7 in/18 cm elastic through the casing. Keep it flat and untwisted. Overlap the ends by exactly 1 in/2.5 cm to produce an approximately 6 in/15 cm relaxed loop. With strong sewing thread, sew a boxed rectangle through both elastic layers, then sew an X across the box. Tug firmly to test the join. Pull the elastic completely into the casing and close the insertion gap with the remaining yarn tail. Knot and weave in. The elastic must move within the casing without emerging through any stitch.
- Attach the hanging strap at the back of the mouth, centering the back seam between its ends. Place each short end vertically against the wrong side of the body and rim so 1 in/2.5 cm of the strap overlaps Body Rnds 1–3. Keep the ends 6 body stitches apart. With each long tail, sew a rectangle around the overlap and an X through its center. Stitch through the body fabric without sewing across the drawstring eyelets. Knot securely, bury the tails, and pull firmly on the strap to test both attachments.
- Beginning at the front center, weave the drawstring alternately over and under the posts of Rim Rnd 2, passing through all 24 ch-1 spaces. Bring both ends out through adjacent front spaces, equalize their lengths, and tie them in a removable bow. Do not add a bead or cord lock.
Finishing
Shape the finished fish lightly by hand. Do not stuff it. Load clean folded bags through the mouth and tighten the bow just enough to retain them. Withdraw bags individually through the elasticized lower opening.
Before hanging the holder, recheck the 1 in/2.5 cm elastic overlap, boxed-and-crossed elastic seam, strap stitching, fin attachments, eye stitching, and all appliqué knots. The tail fins must remain clear of the dispensing opening.
Customization Ideas
You may personalize the color arrangement without changing the construction. Try natural fish colors, bold tropical shades, or a neutral body with contrasting stripes and fins. Keep Colors A–E assigned consistently throughout your chosen palette so the body, stripe, rim, fin, eye, and pupil placements remain clear.
For narrower or wider stripes, redistribute only the colors among the existing body rounds; do not add or remove rounds if you want to preserve the stated dimensions and assembly landmarks. Surface embroidery may be added sparingly after assembly, but avoid the eyelets, strap attachment areas, elastic casing, and dispensing opening. Do not add rigid embellishments where they could snag a bag.
Common Mistakes to Avoid
- Twisting the foundation chain: Lay all chain bumps in the same direction before joining the initial ring.
- Counting the beginning chain as a stitch: The beginning chain never counts in this pattern.
- Missing the first stitch after joining: Mark the first actual stitch of every body round.
- Changing colors too tightly: Loose floats prevent the striped sections from drawing inward.
- Attaching both body layers together: When sewing eyes and fins, work through the intended outer layer only.
- Blocking the lower opening: Keep tail-lobe stitching outside the dispensing path.
- Twisting the elastic: Check that the elastic lies flat before joining its ends.
- Weak strap attachment: Use the specified rectangle-and-X stitching and test both ends firmly.
- Skipping eyelet spaces: The drawstring must pass through all 24 ch-1 spaces.
Troubleshooting
Why is the body spiraling?
A slight diagonal shift at a joined-round seam is common, but a strong spiral may indicate misplaced first stitches or joins. Keep the marker in the first actual sc, do not count the beginning ch, and recount each round before joining.
Why did an increase or decrease round end with the wrong count?
Check that every bracketed repeat was worked exactly 8 times. In a decrease, two old stitches become one new stitch. An increase consumes one old stitch and produces two new stitches.
Why is the mouth rim puckering?
Rim Rnd 1 must contain exactly one sc in each of the 48 unused foundation-chain loops. Work those stitches evenly and avoid tightening the join.
Why will the drawstring not slide?
Confirm that it alternates over and under the dc posts and passes through all 24 ch-1 spaces. Also check that strap stitches did not cross the eyelet round.
Why is the lower opening too tight or too loose?
Verify your gauge, the 7 in/18 cm elastic length, and the exact 1 in/2.5 cm overlap. A different overlap changes the relaxed opening and may affect dispensing.
Why do the fins droop unevenly?
Check that both pectoral fins use their foundation-chain edges for attachment and that both tail lobes are joined at their narrow Row 1 ends. Match the attachment rounds and seam offsets on both sides before sewing permanently.
Care Instructions
Remove all bags before washing. Hand wash the holder in cool water with a mild detergent. Do not wring or twist the elasticized opening. Press out water gently in a towel, reshape the body, fins, rim, and strap, and dry flat. Before using it again, inspect the elastic join, casing, hanging strap, and appliqué stitching.
Frequently Asked Questions
Is this fish bag holder stuffed?
No. The holder remains hollow, and stored bags give the fish its rounded shape.
Where are bags inserted and removed?
Insert clean folded bags through the drawstring mouth. Remove them one at a time through the elasticized opening at the lower end.
Can I work the body in continuous rounds?
No. The written construction uses joined rounds, and the row and round landmarks used for assembly assume that method.
Can I omit the elastic?
No. The elastic controls the dispensing opening and is a structural part of this design.
Can I use a different yarn weight?
A different yarn weight would change the size, fabric density, opening measurements, elastic fit, and component proportions. For the stated result, use worsted-weight category 4 yarn and obtain the listed gauge.
Can I add a cord lock?
No cord lock or bead is used in this design. Tie the crocheted drawstring in a removable bow.
How should the tail fins be positioned?
Attach their narrow Row 1 ends on opposite sides of the lower back seam across Body Rnds 43–46. Angle the broad Row 10 edges outward to form a V while keeping the dispensing opening clear.
Is the holder suitable for heavy storage?
It is designed for lightweight, clean bags. Do not use it to hold heavy objects, and inspect the strap and elastic regularly.