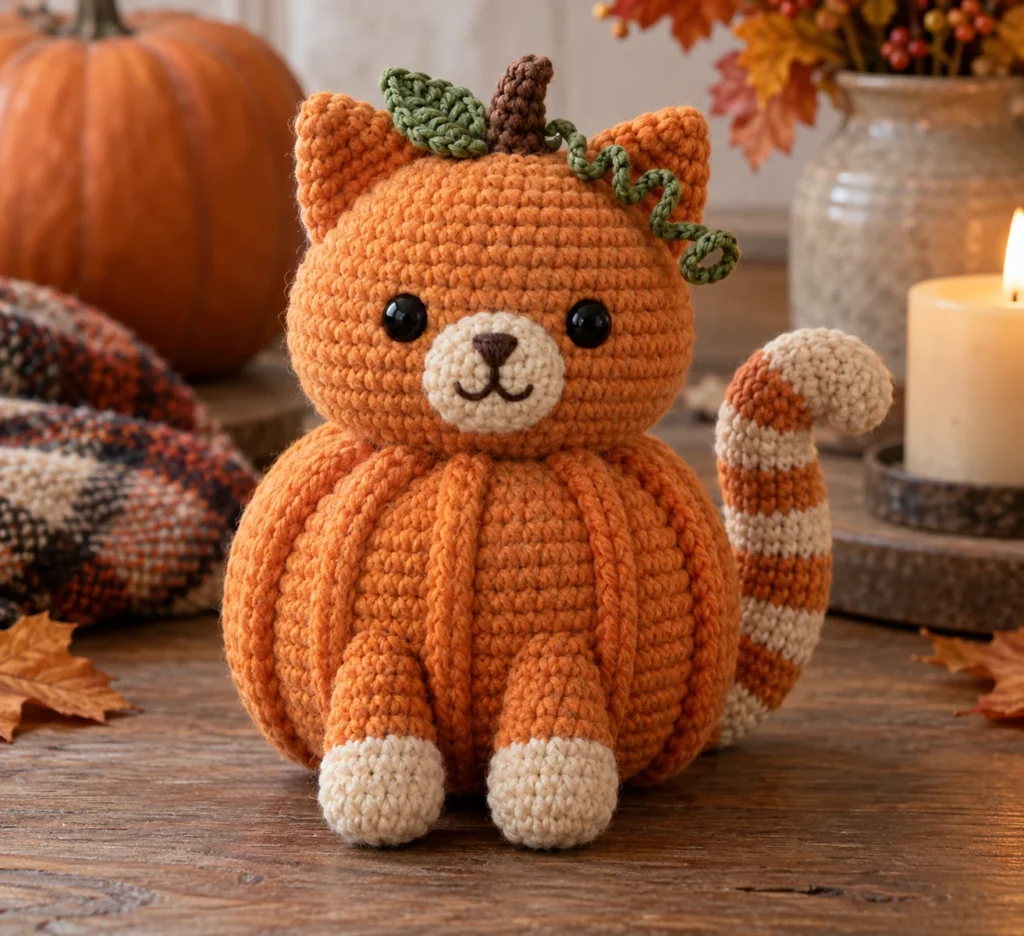
Cozy Pumpkin Cat Amigurumi: Free Crochet Pattern
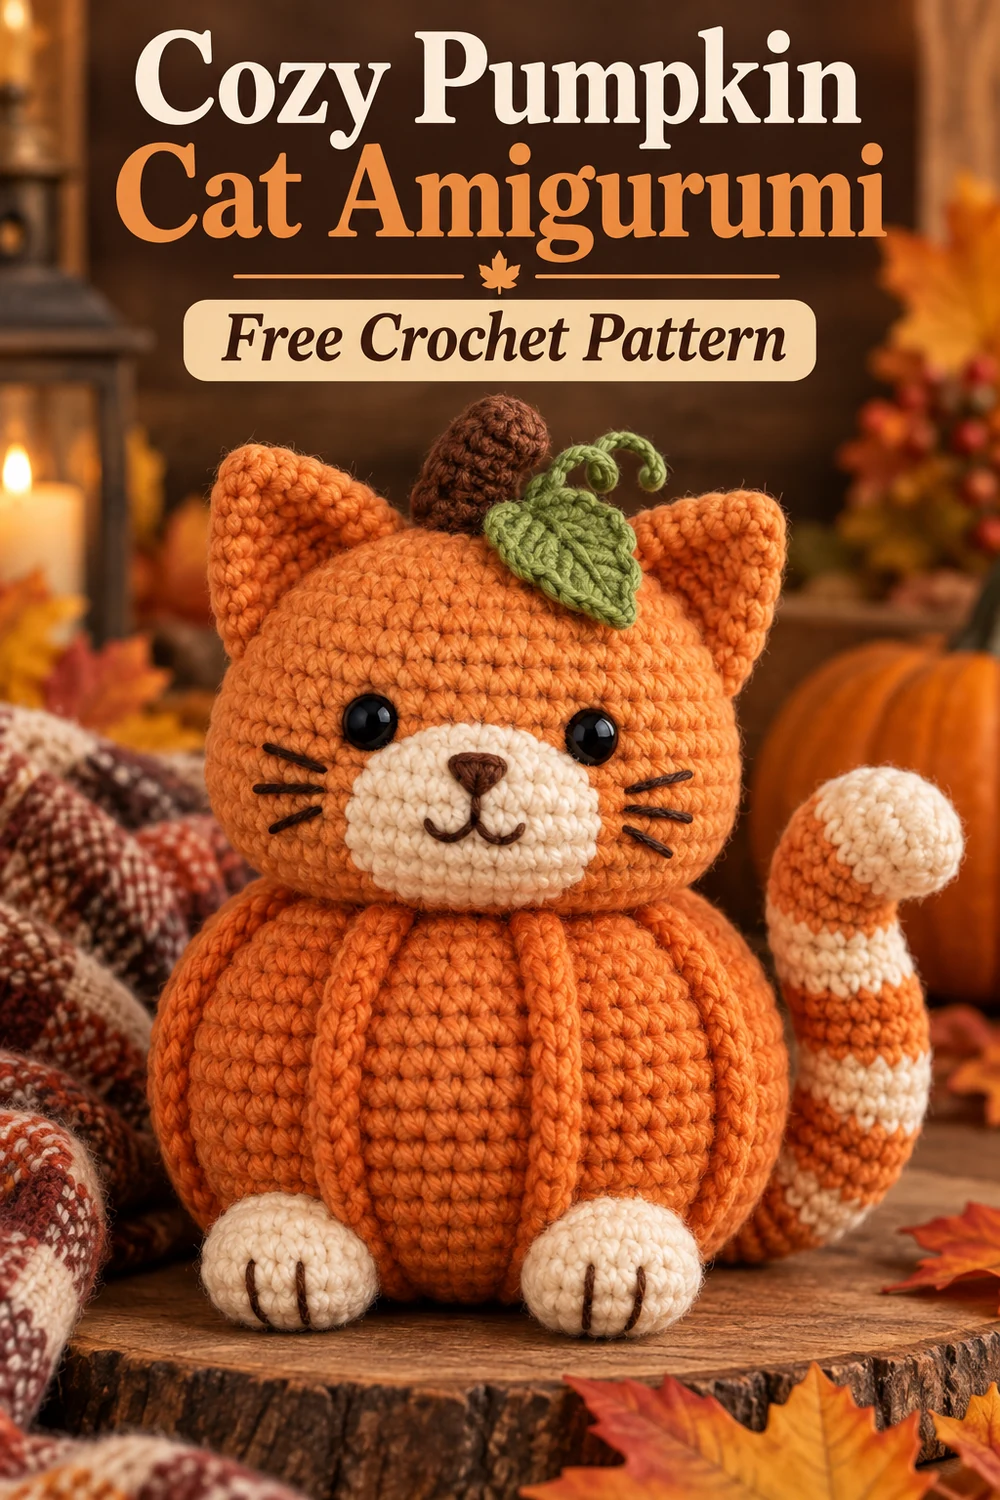
Crochet a plump pumpkin-shaped cat with a sweet embroidered face, cream paws, a curling striped tail, and leafy autumn details. This original amigurumi design is worked in US crochet terminology and measures approximately 8 in (20 cm) tall when made with worsted-weight yarn.
Pattern at a Glance
- Skill level: Advanced beginner to intermediate
- Terminology: US crochet terms
- Construction: Components are crocheted separately and sewn together
- Method: Continuous rounds unless the instructions say to join
- Finished size: Approximately 8 in (20 cm) tall and 6 in (15 cm) wide
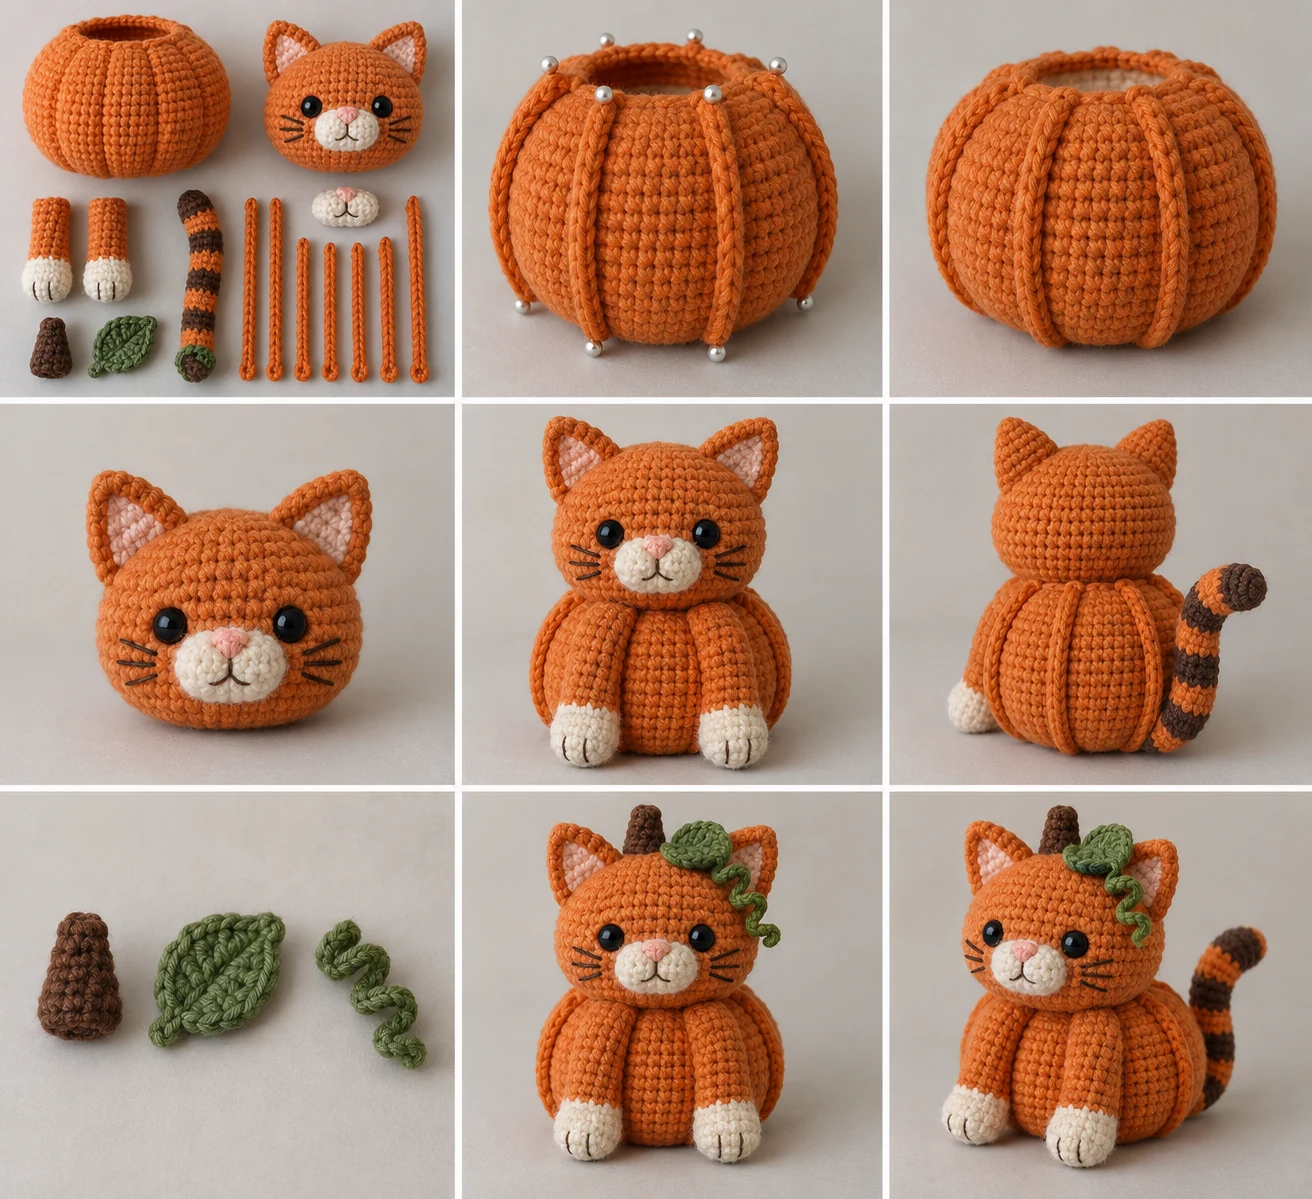
The finished project contains one pumpkin body or torso, one cat head, two ears, one muzzle patch, two forelegs with cream paws, one striped tail, six pumpkin-rib cords, one stem, one leaf, one curled vine, two safety eyes, and one embroidered nose and mouth.
Materials You’ll Need
- Worsted-weight category 4 yarn: 110 yd (101 m) pumpkin orange
- Worsted-weight category 4 yarn: 75 yd (69 m) cat orange
- Worsted-weight category 4 yarn: 15 yd (14 m) cream
- Worsted-weight category 4 yarn: 8 yd (7 m) brown
- Worsted-weight category 4 yarn: 12 yd (11 m) leaf green
- Dark brown or black embroidery yarn: 2 yd (2 m)
- 3.5 mm US E/4 crochet hook
- Two 10 mm black safety eyes with locking washers, or embroidery yarn for child-safe eyes
- Approximately 3.5 oz (100 g) polyester fiberfill
- Yarn needle, stitch marker, scissors, straight pins, and an optional stuffing tool
Yarn and Color Key
Use pumpkin orange for the torso and rib cords; cat orange for the head, ears, upper forelegs, and main tail stripes; cream for the muzzle, paws, and alternate tail stripes; brown for the stem; leaf green for the leaf and vine; and dark brown or black for facial embroidery.
Gauge
20 sc × 22 rounds = 4 in (10 cm) in firmly worked single crochet. Exact gauge is less important than creating a dense fabric through which the stuffing cannot show. Change hook size if necessary, but retain every written stitch count.
Finished Measurements
Approximately 8 in (20 cm) from the pumpkin base to the ear tips and 6 in (15 cm) across the widest part of the pumpkin. Dimensions and firmness may vary with yarn, hook, tension, and stuffing.
Crochet Abbreviations
- MR: magic ring
- ch: chain
- sl st: slip stitch
- sc: single crochet
- hdc: half double crochet
- dc: double crochet
- inc: 2 sc in the same stitch
- dec: invisible single-crochet decrease over the next 2 stitches
- BLO: back loop only
- st(s): stitch(es)
- rnd(s): round(s)
- FO: fasten off
Important Pattern Notes
- Place a removable marker in the first stitch of each continuous round and move it after every round.
- Do not join rounds unless the instructions specifically say to join.
- Stuff gradually and firmly enough to hold the shape without stretching the fabric.
- Use matching yarn and a yarn needle for assembly.
- Where a long sewing tail is requested, leave approximately 18 in (46 cm) unless another length is stated.
- Check eye placement against your fabric density before attaching the washers. Safety eyes cannot be repositioned afterward.
- Safety eyes are unsuitable for children under three or recipients who may pull or chew hardware. Embroider the eyes instead.
Complete Free Crochet Pattern
Pumpkin Body/Torso — Make 1 in Pumpkin Orange
Rnd 1: Work 6 sc in MR. (6)
Rnd 2: Inc in each st around. (12)
Rnd 3: [Sc in next st, inc in next st] 6 times. (18)
Rnd 4: [Sc in next 2 sts, inc in next st] 6 times. (24)
Rnd 5: [Sc in next 3 sts, inc in next st] 6 times. (30)
Rnd 6: [Sc in next 4 sts, inc in next st] 6 times. (36)
Rnd 7: [Sc in next 5 sts, inc in next st] 6 times. (42)
Rnds 8–15: Sc in each st around. (42 each rnd)
Rnd 16: [Sc in next 5 sts, dec] 6 times. (36)
Rnd 17: [Sc in next 4 sts, dec] 6 times. (30)
Rnd 18: [Sc in next 3 sts, dec] 6 times. (24)
Begin firm, even stuffing. Keep the base broad and the top rounded.
Rnd 19: [Sc in next 2 sts, dec] 6 times. (18)
Rnd 20: [Sc in next st, dec] 6 times. (12)
Finish stuffing firmly.
Rnd 21: Dec 6 times. (6)
FO, leaving a 12 in (30 cm) tail. Thread it through the front loops of the remaining stitches, pull closed, knot securely, and bury the tail. The closed Rnd 21 is the top and will be concealed by the head.
Cat Head — Make 1 in Cat Orange
Rnd 1: Work 6 sc in MR. (6)
Rnd 2: Inc in each st around. (12)
Rnd 3: [Sc in next st, inc in next st] 6 times. (18)
Rnd 4: [Sc in next 2 sts, inc in next st] 6 times. (24)
Rnd 5: [Sc in next 3 sts, inc in next st] 6 times. (30)
Rnd 6: [Sc in next 4 sts, inc in next st] 6 times. (36)
Rnds 7–11: Sc in each st around. (36 each rnd)
Place the safety eyes between Rnds 8 and 9, with 7 visible stitches between their insertion points. Fully engage the locking washers inside the head. For a child-safe version, omit the hardware and embroider closed eyes after assembly.
Rnd 12: [Sc in next 4 sts, dec] 6 times. (30)
Rnd 13: [Sc in next 3 sts, dec] 6 times. (24)
Rnd 14: [Sc in next 2 sts, dec] 6 times. (18)
Stuff firmly, shaping a rounded forehead and a flat lower attachment area.
Rnd 15: [Sc in next st, dec] 6 times. (12)
Finish stuffing.
Rnd 16: Dec 6 times. (6)
FO, leaving a 24 in (61 cm) sewing tail. Close the opening through the front loops and retain the tail for attaching the head.
Ears — Make 2 in Cat Orange
Rnd 1: Work 4 sc in MR. (4)
Rnd 2: Inc in each st around. (8)
Rnd 3: [Sc in next st, inc in next st] 4 times. (12)
Rnd 4: Sc in each st around. (12)
Do not stuff. Flatten the opening with 6 stitches along each side. FO, leaving a long sewing tail. The flattened opening forms the ear base.
Muzzle Patch — Make 1 in Cream
Rnd 1: Work 6 sc in MR. Join with sl st to first sc. (6)
Rnd 2: Ch 1, inc in each st around. Join with sl st to first sc. (12)
FO, leaving a long sewing tail. Do not stuff yet.
Forelegs — Make 2
Begin with cream.
Rnd 1: Work 6 sc in MR. (6)
Rnd 2: Inc in each st around. (12)
Rnds 3–4: Sc in each st around. (12 each rnd)
Change to cat orange at the end of Rnd 4. Cut the cream yarn and knot both yarn ends securely inside.
Rnds 5–10: Sc in each st around. (12 each rnd)
Stuff the paw and lower half lightly. Leave the top half unstuffed so it can lie against the body. Flatten the opening with 6 stitches along each side. Working through both layers, sc in each of the next 6 paired stitches. (6) FO, leaving a long sewing tail.
Striped Tail — Make 1
Begin with cream.
Rnd 1: Work 6 sc in MR. (6)
Rnd 2: Inc in each st around. (12)
Rnds 3–4: Sc in each st around. (12 each rnd)
Change to cat orange.
Rnds 5–7: Sc in each st around. (12 each rnd)
Change to cream.
Rnds 8–9: Sc in each st around. (12 each rnd)
Change to cat orange.
Rnds 10–12: Sc in each st around. (12 each rnd)
Change to cream.
Rnds 13–14: Sc in each st around. (12 each rnd)
Change to cat orange.
Rnds 15–18: Sc in each st around. (12 each rnd)
Cut each old color after its stripe and secure the ends inside. Stuff lightly as you work, leaving the final 1 in (2.5 cm) unstuffed. Flatten the opening with 6 stitches along each side. Working through both layers, sc in each of the next 6 paired stitches. (6) FO, leaving a 24 in (61 cm) sewing tail. The tail will be curved during attachment; do not insert wire.
Pumpkin-Rib Cords — Make 6 in Pumpkin Orange
For each cord, ch 27. Beginning in the second ch from the hook, sl st in the back bump of each ch across. (26 sl sts) FO, leaving a 12 in (30 cm) tail at both ends. Keep each cord relaxed and flexible.
Stem — Make 1 in Brown
Rnd 1: Work 6 sc in MR. (6)
Rnds 2–5: Sc in each st around. (6 each rnd)
Stuff lightly. FO, leaving a long sewing tail. Keep the open base unclosed.
Leaf — Make 1 in Leaf Green
Ch 7. Beginning in the second ch from the hook, work sl st in next ch, sc in next ch, hdc in next ch, dc in next ch, hdc in next ch, and 3 sc in the last ch. Rotate to work along the unused loops on the opposite side of the foundation chain: hdc in next loop, dc in next loop, hdc in next loop, sc in next loop, sl st in final loop. (13 sts total) FO, leaving a 12 in (30 cm) sewing tail.
Curled Vine — Make 1 in Leaf Green
Ch 21. Beginning in the second ch from the hook, work 2 sc in each ch across. (40 sc) Allow the piece to curl naturally. FO, leaving a 12 in (30 cm) sewing tail.
Face Embroidery and Hardware Placement
Center the muzzle directly below and slightly between the eyes so it spans approximately Head Rnds 9–12. Sew around its edge with small stitches. Add a tiny pinch of stuffing before closing the final 1 in (2.5 cm), then finish sewing and bury the tail.
With dark brown or black yarn, embroider a small inverted triangle nose at the center of the muzzle. Add one straight stitch downward from the nose and two short curved mouth lines. Optional whiskers may be embroidered with three straight stitches on each side. Secure embroidery tails inside or bury them deeply. If safety eyes were omitted, embroider closed eyes now.
Assembly
- Shape the pumpkin: Pin the six rib cords vertically and evenly around the stuffed body. Meet their upper ends at the closed top and their lower ends near the center of the base. Slightly tension each cord to indent the body without puckering it. Sew along both sides of every cord with pumpkin-orange yarn, anchoring every 3–4 stitches. Knot and bury all tails. Confirm the six raised ribs are evenly spaced before permanently sewing them.
- Attach the ears: Sew each flattened ear base across Head Rnds 3–6. Position the ears symmetrically with approximately 7 stitches between their nearest points. Curve each base slightly and stitch through both ear layers and the head fabric. Knot and bury the tails inside the head.
- Complete the face: Finish the muzzle, nose, mouth, and any embroidered-eye option before attaching the head.
- Attach the head: Center the head over the pumpkin’s closed top with the face pointing directly between two rib cords. Using the retained head tail, sew a secure circle through Head Rnds 14–15 and Pumpkin Rnds 19–20. Make two complete passes, knot securely, and bury the tail inside the body.
- Attach the forelegs: Pin one leg on each side of the center-front rib. Place each flattened upper edge just beneath the head and angle the cream paw toward the lower front. Sew the 6-stitch edge to the pumpkin, then tack the inner side of each paw to the body with two small stitches. Knot and bury the tails.
- Attach the tail: Position its flattened base on the cat’s back-right side across Pumpkin Rnds 10–13. Sew the 6-stitch base firmly through the tail and body fabric. Curve the tail downward around the right side and forward beside the pumpkin base. Tack it to the body at two more points, approximately at Tail Rnds 11 and 6, leaving the cream tip free. Knot and bury the tail.
- Attach the stem: Center the open stem base between the ears, slightly behind the top center of the head. Sew all six base stitches securely to Head Rnds 1–3. The stem is decorative and must never be used as a handle.
- Attach the leaf: Place its base beside the stem with its point angled toward the cat’s left ear. Sew approximately 4 stitches of the foundation-chain spine to the head, leaving the outer edge free.
- Attach the vine: Sew one end beside the stem and leaf. Add one anchoring stitch through the first curl so it cannot pull free; leave the remaining curls free.
Finishing
Inspect every seam and reinforce any loose attachment. Confirm that both safety-eye washers are fully locked and enclosed by firm stuffing; never glue safety eyes. Gently tug-test the ears, forelegs, tail, stem, leaf, and vine, adding discreet stitches wherever a component shifts.
Roll the pumpkin gently between both hands to redistribute the stuffing, restore its rounded silhouette, and emphasize the six evenly spaced ribs. Do not trim a yarn tail until it has been knotted where appropriate and buried through several inches of dense fabric.
Customization Ideas
- Change both orange shades while preserving the pattern’s stated color placement.
- Embroider sleepy eyes instead of installing safety eyes.
- Add the optional embroidered whiskers described in the face instructions.
- Vary the yarn and hook together for a different finished size, retaining every stitch count and using a hook that produces dense fabric.
Common Mistakes to Avoid
- Losing the beginning of a continuous round; move the stitch marker after every round.
- Overstuffing the foreleg tops or tail base, which makes them difficult to flatten and attach.
- Pulling the rib cords too tightly and puckering the pumpkin instead of creating gentle indentations.
- Installing eye washers before checking alignment and spacing.
- Attaching the head before finishing the ears and face details.
- Using the decorative stem as a handle.
Troubleshooting
Why does my pumpkin look tall instead of plump?
Your single-crochet rounds may be taller than the stated gauge or the stuffing may be concentrated vertically. Confirm the gauge, redistribute the stuffing toward the sides, and shape the body before attaching the rib cords.
Why are the rib cords uneven?
Pin all six cords before sewing any of them permanently. View the body from the top and base, then adjust the gaps until the cords are evenly distributed.
Why does the head wobble?
Ensure its lower area is firmly stuffed and make two complete sewing passes through Head Rnds 14–15 and Pumpkin Rnds 19–20.
Why will the tail not hold its curl?
Keep the final inch unstuffed, sew its base firmly, and add both prescribed tacking points while leaving the cream tip free.
Why can I see stuffing?
Your fabric is too loose or overfilled. Use a smaller hook while retaining all stitch counts, and reduce stuffing pressure enough to close the gaps.
Care Instructions
Surface-clean the amigurumi with a soft damp cloth and mild detergent. Avoid soaking safety-eye hardware. Reshape the pumpkin and raised ribs while damp, then allow the project to air-dry completely. Recheck all seams and attachments after cleaning.
Frequently Asked Questions
Is this pattern written in US terminology?
Yes. Every stitch and abbreviation uses US crochet terminology.
Can I make it for a child under three?
Replace the safety eyes with securely embroidered eyes. Inspect and reinforce every attachment, and supervise according to the recipient’s age and behavior.
Are the pumpkin ribs crocheted into the torso?
No. Six separate slip-stitch cords are pinned and sewn onto the completed stuffed pumpkin.
Does the tail contain wire?
No. Its shape comes from light stuffing, a curved attachment, and two additional tacking points.
Should I join every round?
No. Work in continuous rounds unless the instructions explicitly direct you to join, as they do for the muzzle patch.
Can I use a different yarn weight?
Yes, but the finished measurements and yarn requirements will change. Choose a suitable hook that makes a dense fabric and retain every written stitch count.
How much should I stuff the pieces?
Stuff the pumpkin and head firmly without stretching the fabric. Stuff only the paw and lower half of each foreleg, stuff the tail lightly while leaving its final inch empty, and stuff the stem lightly. Do not stuff the ears.