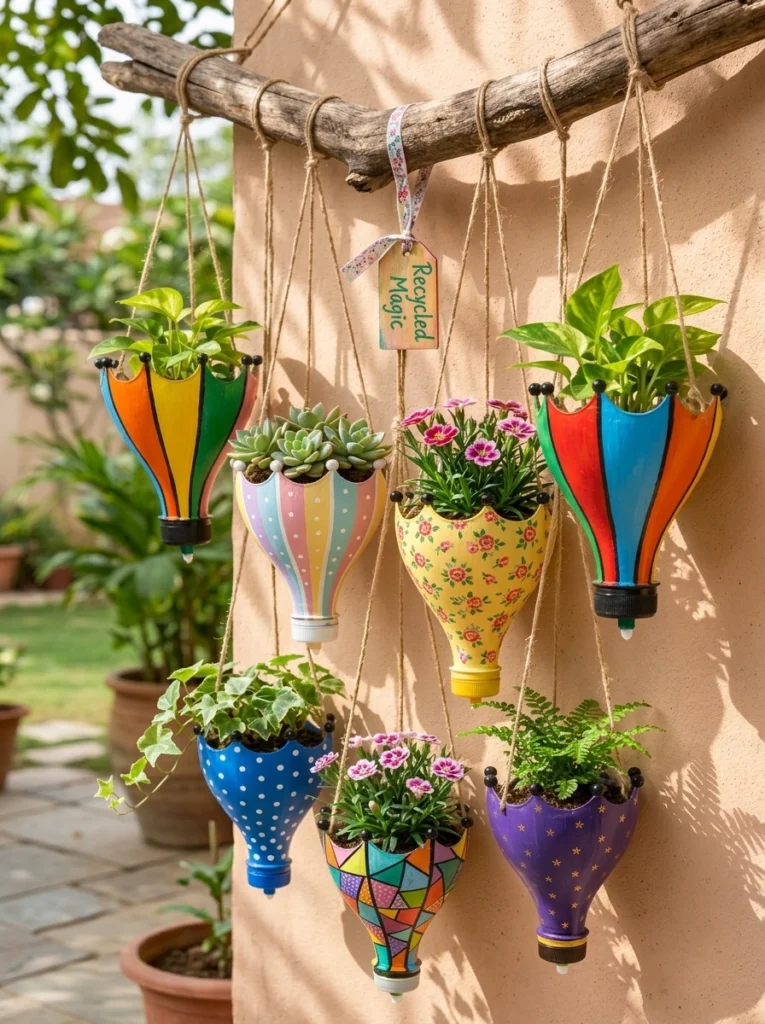
Before you toss another plastic bottle into the recycling bin, consider giving it a second life as something far more charming: a colorful, umbrella-shaped plant pot. This creative upcycling project transforms ordinary plastic bottles into cheerful little planters that add a playful, whimsical touch to any garden, patio, balcony, or windowsill. It’s a craft that’s as good for your wallet as it is for the planet, and the result is genuinely adorable.
If you’ve been looking for a sustainable DIY project that combines gardening, painting, and a bit of creative upcycling, this umbrella plant pot craft checks every box. In this guide, we’ll walk through the full supply list, detailed step-by-step instructions, styling ideas, and answers to frequently asked questions, so you can create your own colorful garden display from materials you likely already have at home.
Why Upcycled Umbrella Plant Pots Are Worth Making
Upcycling crafts have grown enormously in popularity, and it’s easy to see why. They offer a way to reduce household waste while creating something genuinely useful and beautiful. Plastic bottles, in particular, are one of the most common household recyclables, and repurposing them into planters is a wonderfully practical way to give them extended life before they’re eventually recycled.
Here’s what makes this project so appealing:
- Eco-friendly and budget-conscious: You’re using materials you’d otherwise throw away, so the only real cost is paint and a few small embellishments.
- A fun way to teach sustainability: This is a great project for kids and families, offering a hands-on lesson in recycling and creative reuse.
- Cheerful, customizable design: The umbrella shape and bright color options make this a playful addition to any outdoor or indoor plant collection.
- Perfect for small spaces: These lightweight, compact planters work beautifully on balconies, windowsills, or small patio areas where space is limited.
- A great way to display small plants and flowers: The umbrella shape naturally lends itself to holding small succulents, herbs, or flowering plants.
Whether you’re an experienced upcycler or just looking for a fun weekend project, this craft is approachable, affordable, and genuinely rewarding.
What You’ll Need: The Complete Supply List
Before diving into the steps, gather your materials so you can move through the project efficiently.
Essential Supplies
- Clean plastic bottles – Any standard plastic beverage bottle works well; larger bottles (like 1–2 liter sizes) offer more room for shaping the umbrella form, while smaller bottles work for mini versions.
- Colorful acrylic or outdoor paint – Choose vibrant, cheerful colors, and opt for outdoor-rated paint if your pots will be displayed outside long-term.
- Small plants or flowers – Succulents, herbs, or small flowering plants work beautifully in these compact planters.
- Wooden sticks or dowels – These serve as the “umbrella handle” and support structure for your finished planter.
- Strong twine or wire – Useful for securing the planter to its stick support or for creating a hanging display.
- Strong craft glue – Necessary for attaching decorative elements and reinforcing structural connections.
- Scissors or craft knife – Used to carefully cut and shape the plastic bottle into its umbrella form.
Optional Extras
- Ribbons – A fun way to add extra color and movement to your finished planters.
- Beads – Small decorative accents that can be glued along the rim or handle for extra charm.
- Decorative patterns – Stencils, patterned tape, or fine-tip paint pens can help create more intricate designs.
Having these supplies ready ahead of time will make the cutting, painting, and assembly process much smoother.
Step-by-Step Instructions: How to Make Your Umbrella Plant Pots
Follow these steps to transform a plastic bottle into a cheerful umbrella-shaped planter.
Step 1: Clean and Dry the Plastic Bottles Thoroughly
Start by removing any labels, adhesive residue, and caps from your plastic bottles. Wash them thoroughly with warm, soapy water to remove any leftover liquid or residue, then allow them to dry completely. A clean, dry surface is essential for both safe cutting and good paint adhesion later in the process.
If you’re struggling with stubborn label adhesive, a bit of rubbing alcohol or a vinegar soak can help loosen it before wiping the bottle clean.
Step 2: Carefully Cut and Shape the Bottle to Create the Umbrella-Style Planter
This is the most important structural step in the project, so take your time and work carefully. Using scissors or a craft knife, begin cutting the bottle to create the rounded, umbrella-like shape. A common approach is to:
- Cut the bottle roughly in half, keeping the rounded bottom portion as your planter’s “canopy”
- Trim the edges into a gentle scalloped or wavy pattern to mimic the ruffled edge of an umbrella
- Leave a small centered section intact or reinforced for attaching your wooden stick “handle” later
Always cut away from your body, and consider using a cutting mat or protected work surface. If the plastic is particularly thick, warming the area slightly with warm water beforehand can make it easier to cut cleanly.
Step 3: Paint Each Pot in Bright, Cheerful Colors
Once your umbrella shape is cut, it’s time for the fun part: painting. Using colorful acrylic or outdoor paint, coat the entire surface of your planter in your chosen base color. Bright reds, yellows, blues, and pinks all work beautifully for that classic, cheerful umbrella look, but feel free to experiment with any color palette that matches your garden or home decor style.
Apply paint in thin, even coats, allowing each layer to dry before adding a second coat if needed for full coverage. Outdoor-rated paint is strongly recommended if these planters will be displayed outside, as it offers better resistance to sun fading and moisture exposure.
Step 4: Add Fun Patterns, Dots, Flowers, or Stripes
Once your base coat is dry, add extra personality to your planter with fun decorative patterns. Popular options include:
- Classic polka dots in a contrasting color
- Bold stripes radiating out from the center, mimicking traditional umbrella panels
- Small hand-painted flowers or leaf motifs
- Scalloped edge detailing painted along the rim
This step is where each planter really starts to develop its own unique personality, so don’t be afraid to mix colors, patterns, and styles across your collection for a playful, eclectic garden display.
Step 5: Make Small Drainage Holes So Excess Water Can Escape
Proper drainage is essential for healthy plants, so before adding soil, use a craft knife, small drill bit, or heated needle to carefully poke a few small holes into the bottom of your planter. This allows excess water to drain freely, preventing root rot and keeping your plants healthy.
Space the holes evenly across the base, and start with just a few — you can always add more later if you find drainage isn’t sufficient for your particular plant.
Step 6: Add Your Favorite Small Plants or Flowers
Now it’s time to bring your umbrella planter to life. Add a small layer of potting soil, followed by your chosen small plant or flower. Succulents, herbs like thyme or mint, and small flowering annuals like petunias or violas all work beautifully in these compact planters.
Gently pat the soil down around the base of the plant, and water lightly to help it settle in.
Step 7: Attach the Planter Securely to a Wooden Stick or Hanging Support
To complete the umbrella effect, attach your painted planter to a wooden stick or dowel, which will serve as the umbrella’s “handle.” Depending on your design, you can:
- Glue and wire the stick directly to the underside center of the planter for a freestanding garden stake design
- Attach twine to the rim for a hanging umbrella planter display
- Combine both methods for a planter that can be displayed either way
Make sure the attachment point is secure and reinforced with strong glue, especially if the stick will be inserted into garden soil, where it will need to bear some structural weight.
Step 8: Arrange Several Colorful Pots Together for a Cute Garden Display
Once your planters are complete, the real magic happens when you arrange several together. Cluster a handful of umbrella pots at varying heights throughout a flower bed, line them along a garden path, or hang a few from a porch railing for a cheerful, coordinated display.
Creative Variations to Try
This project is highly customizable, and there are countless ways to make it your own.
Color Palette Ideas
- Bright and playful: Reds, yellows, and blues for a classic, cheerful umbrella look
- Pastel garden party: Soft pinks, lavenders, and mint greens for a delicate, whimsical display
- Monochrome with pops of color: A neutral base with brightly painted stripes or polka dots for contrast
Size Variations
Use bottles of different sizes to create a mix of larger statement planters and smaller accent pots. Grouped together, varying sizes add visual interest and depth to your garden display.
Hanging vs. Staked Designs
Try making some planters as ground-staked umbrella pots, perfect for lining garden beds, while creating others as hanging versions to display along a porch, fence, or balcony railing.
Themed Decorative Patterns
- Floral theme: Hand-painted flowers and leaf details
- Rainbow theme: Bold, colorful stripes radiating from the center
- Nature-inspired: Earthy tones with painted vines or leaf patterns
Where to Display Your Umbrella Plant Pots
This craft’s compact, colorful design makes it a versatile addition to nearly any space.
- Garden beds: Stake several planters throughout flower beds for a whimsical, coordinated look.
- Patio or balcony: A great way to add color and greenery to small outdoor spaces.
- Porch railing: Hang a row of umbrella planters for a cheerful, welcoming entrance display.
- Windowsill: Smaller versions work beautifully as an indoor accent for herbs or small succulents.
- Garden parties or outdoor events: A colorful, budget-friendly way to add decorative charm to an outdoor gathering.
Tips for Long-Lasting Umbrella Plant Pots
To help your upcycled planters stay vibrant and functional for as long as possible:
- Use outdoor-rated, weather-resistant paint for any planters that will be displayed outside year-round.
- Apply a clear sealant over your painted design to help protect it from sun fading and moisture exposure.
- Choose drought-tolerant plants like succulents for lower-maintenance care, especially in smaller planters that dry out more quickly.
- Check drainage holes periodically to ensure they haven’t become clogged with soil or roots.
- Bring smaller planters indoors during extreme weather to help extend their lifespan.
Frequently Asked Questions
What type of plastic bottle works best for this project? Standard beverage bottles made from clear or lightly tinted plastic work well, as they’re easy to cut and paint. Larger 1–2 liter bottles offer more surface area for a more dramatic umbrella shape, while smaller bottles work well for mini accent planters.
Do I need special paint for plastic bottles? Acrylic paint can work, but outdoor-rated acrylic or multi-surface paint is recommended for better durability, especially for planters displayed outside. Adding a clear sealant coat afterward can further improve longevity.
How many drainage holes should I add? This depends on the size of your planter, but generally 3–5 small holes evenly spaced across the base is sufficient for most small plants. You can always add more if drainage seems insufficient after your first watering.
What plants work best in these small planters? Succulents, small herbs, and compact flowering annuals tend to do best, as they don’t require deep root space and are generally low-maintenance.
Can I make this project with kids? Yes, this is a wonderful family-friendly craft, especially for the painting and decorating steps. Adult supervision is recommended for the bottle-cutting step, which requires sharp scissors or a craft knife.
How long will these planters last outdoors? With outdoor-rated paint and a protective sealant, these planters can last a full growing season or longer, though it’s a good idea to check them periodically for fading, cracking, or wear, especially in areas with intense sun or harsh weather.
Final Thoughts
Colorful umbrella plant pots are a perfect example of how a little creativity can turn everyday waste into something genuinely beautiful and functional. With just a few plastic bottles, some bright paint, and a handful of small plants, you can create a cheerful, sustainable garden display that’s entirely your own.
So before you toss out that next empty bottle, consider giving it a second life as a whimsical little umbrella planter. Once you’ve arranged a colorful collection throughout your garden, patio, or balcony, you’ll have transformed everyday recyclables into a charming display that’s as good for the planet as it is for your outdoor decor.