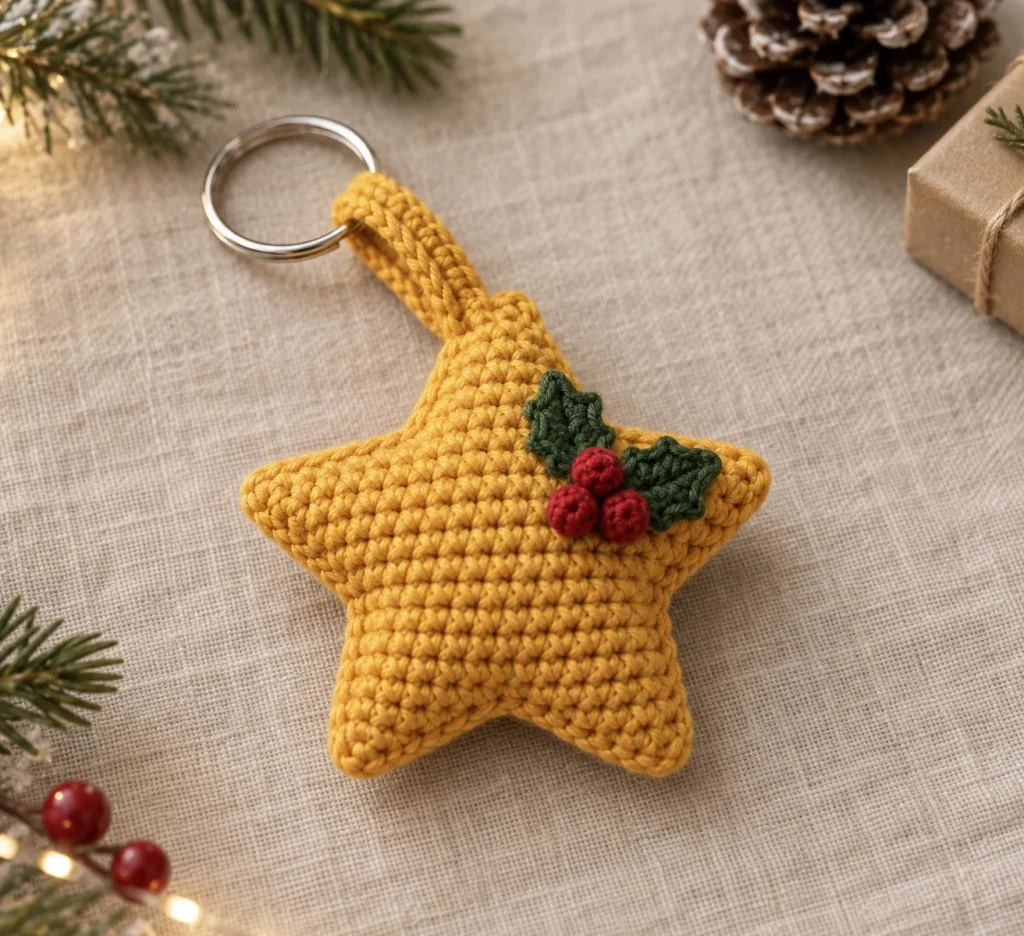
Christmas Star Keychain Delight: Free Crochet Pattern
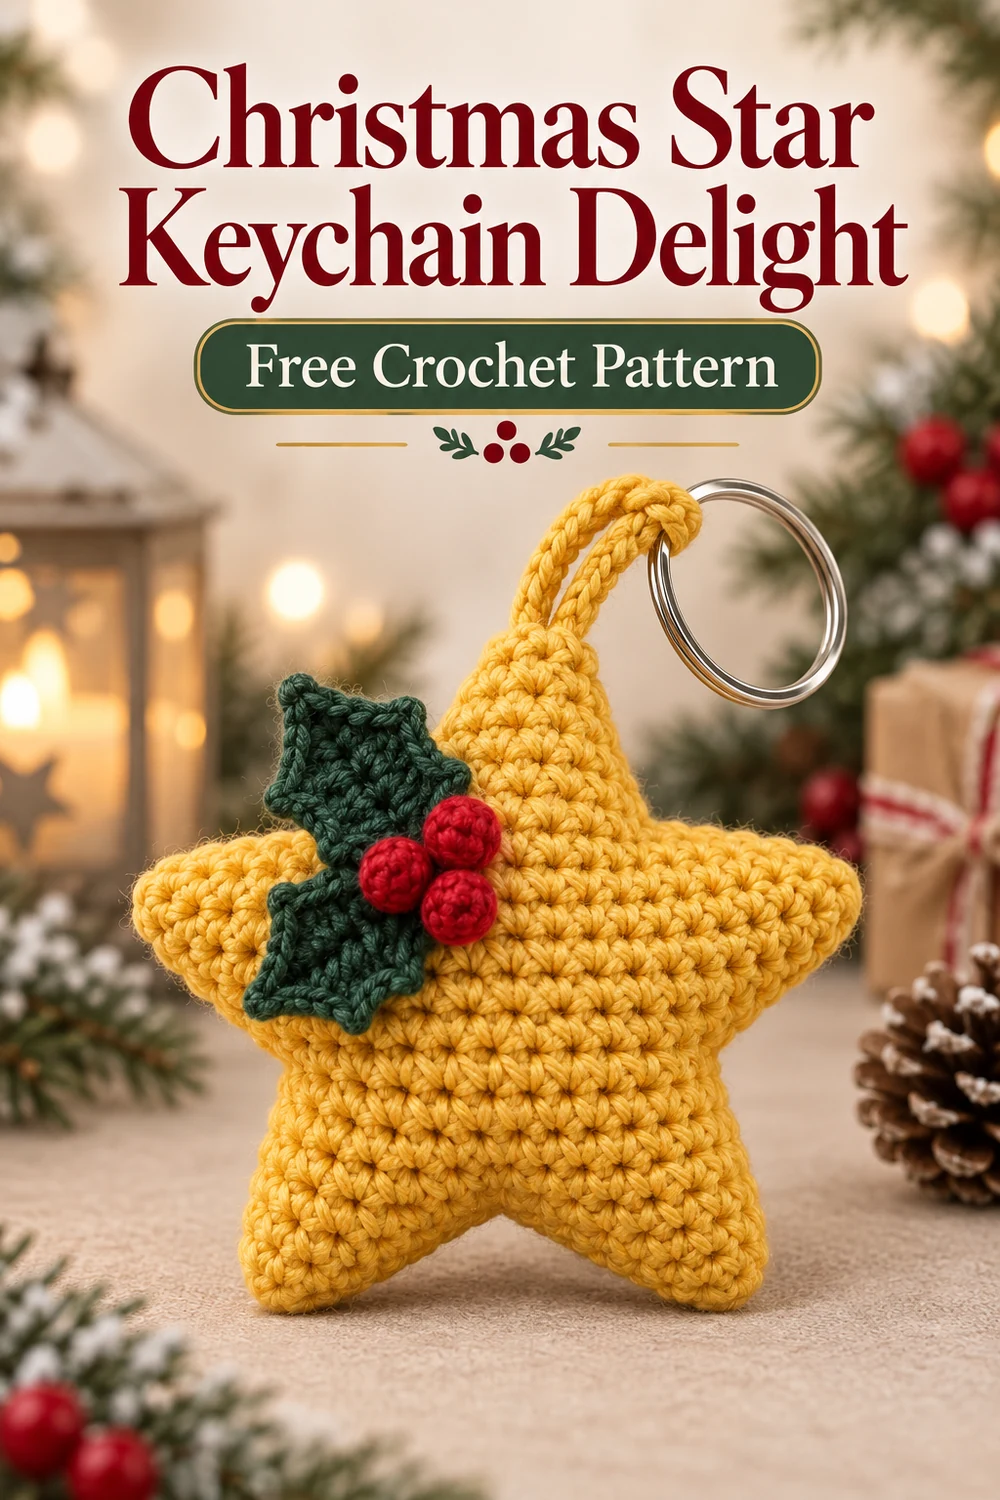
Bring a little handmade cheer everywhere you go with the Christmas Star Keychain Delight. This original US-terms crochet pattern combines two softly stuffed golden star panels, a secure crocheted key-ring strap, two evergreen holly leaves, and three tiny cranberry berries.
The project is designed for advanced beginners who are comfortable with joined rounds, short turned rows, simple decreases, small-piece assembly, and sewing. Read the entire pattern before beginning, especially the notes about assigning stitches to the five star points.
Pattern at a Glance
- Skill level: Advanced beginner
- Terminology: US crochet terms
- Construction: Two matching five-point star panels are decorated, joined, lightly stuffed, and fitted with a doubled connector strap that captures a closed split ring.
- Visible crocheted components: One golden-yellow front star panel, one golden-yellow back star panel, one golden-yellow key-ring connector strap, two evergreen holly leaves, and three cranberry-red berries.
- Techniques: Magic ring, joined rounds, turned short rows, single crochet decreases, crocheting around both sides of a foundation chain, stuffing, and sewing.
Materials You’ll Need
- DK/light worsted cotton yarn, category 3: approximately 25 yd (23 m) golden yellow, 3 yd (2.7 m) evergreen, and 3 yd (2.7 m) cranberry red
- US D/3 (3.25 mm) crochet hook, or the size needed to produce dense fabric
- Approximately 0.15 oz (4 g) polyester fiberfill
- One 1 in (25 mm) metal split key ring; do not substitute an open jump ring
- Yarn needle
- Removable stitch markers
- Scissors
- Small stuffing tool
Choose smooth, firmly spun yarn so the small stitches are easy to identify and the stuffing remains contained.
Gauge
22 sc × 24 rows = 4 in (10 cm) in firmly worked single crochet.
Exact gauge is not critical, but the fabric must be dense enough that fiberfill does not show. Change hook size if necessary.
Finished Measurements
- Star: Approximately 3 1/4 in (8.3 cm) from a point to the opposite indentation and about 3/4 in (1.9 cm) thick when lightly stuffed
- Complete keychain: Approximately 4 1/2 in (11.4 cm) from the split-ring edge to the lowest star point
- Each holly leaf: Approximately 1 1/2 in (3.8 cm) long
- Connector strap before folding: Approximately 2 1/4 in (5.7 cm) long
Measurements exclude the diameter of the metal ring where noted.
Crochet Abbreviations
- MR: magic ring
- ch: chain
- sc: single crochet
- hdc: half double crochet
- dc: double crochet
- sl st: slip stitch
- st(s): stitch(es)
- rnd: round
- RS: right side
- WS: wrong side
- inc: work 2 sc in the same stitch
- sc2tog: single crochet 2 stitches together
- FO: fasten off
Important Pattern Notes
- Chains at the beginnings of rounds and rows do not count as stitches.
- Join each round with a sl st in its first sc.
- To make an sc2tog, insert the hook in the next stitch and draw up a loop; repeat in the following stitch, yarn over, and draw through all three loops.
- Each completed Rnd 3 has 20 stitches. Divide these into five consecutive groups of four stitches, one group for each point.
- Work each point only into its assigned four core stitches. Do not crochet into the sides of neighboring points.
- The five point bases use all 20 core stitches: 5 × 4 = 20, leaving no unassigned stitches.
- Make every crocheted component before final assembly.
- Counts shown in parentheses are the stitch counts at the ends of rounds or rows.
Complete Free Crochet Pattern
Component 1 — Front Five-Point Star Panel
Quantity: 1. Color: Golden yellow.
Rnd 1 (RS): Make an MR, ch 1, work 10 sc into the ring; pull the ring firmly closed and join. (10)
Rnd 2: Ch 1, [sc in next st, inc in next st] 5 times; join. (15)
Rnd 3: Ch 1, [sc in each of next 2 sts, inc in next st] 5 times; join. (20)
Do not FO before making the first point. Mark the first stitch and divide Rnd 3 into five consecutive four-stitch groups.
Point 1
Row 1 (RS): Ch 1, sc in the same stitch and in each of the next 3 stitches; turn. (4)
Row 2: Ch 1, sc2tog twice; turn. (2)
Row 3: Ch 1, sc2tog. (1)
FO, leaving a 4 in (10 cm) tail. Weave the tail down the WS of the point and secure it in the core.
Points 2–5
With RS facing, join golden-yellow yarn in the first unworked stitch of the next four-stitch group. Repeat Point 1, Rows 1–3. Each point has row counts of 4, 2, and 1. Point 5 uses the final four unworked stitches of Rnd 3. FO each point with a 4 in (10 cm) tail and weave it securely into the WS.
After all five points are complete, FO any remaining working yarn. Do not reserve the front panel’s point tails for assembly.
Component 2 — Back Five-Point Star Panel
Quantity: 1. Color: Golden yellow.
Repeat Component 1 exactly through all five points. For Points 1–4, leave and weave in 4 in (10 cm) tails. At the end of Point 5, FO with a 36 in (91 cm) tail for joining the panels; do not weave in this long tail.
Component 3 — Crocheted Key-Ring Connector Strap
Quantity: 1. Color: Golden yellow.
Ch 13.
Row 1: Sc in second ch from hook and in each remaining ch; turn. (12)
Row 2: Ch 1, sc in each st across. (12)
FO, leaving a 20 in (51 cm) sewing tail. Weave the short starting tail into the strap.
Component 4 — Holly Leaf
Quantity: Make 2. Color: Evergreen.
For each leaf, ch 7.
Working around both sides of the foundation chain: sl st in second ch from hook, sc in next ch, hdc in next ch, dc in next ch, hdc in next ch, 3 sc in last ch. Rotate the work to continue along the unused loops on the opposite side of the foundation chain: hdc in next ch, dc in next ch, hdc in next ch, sc in next ch, sl st in final ch. (13 perimeter sts)
FO with a 10 in (25 cm) tail for sewing. Weave in the starting tail.
Component 5 — Berry
Quantity: Make 3. Color: Cranberry red.
For each berry:
Rnd 1: Make an MR, ch 1, work 6 sc into the ring; pull the ring firmly closed and join. (6)
Rnd 2: Ch 1, sc in each st around; join. (6)
Place a pea-sized pinch of fiberfill inside the berry.
Rnd 3: Ch 1, sc2tog 3 times; join. (3)
FO with a 10 in (25 cm) sewing tail. Thread the tail through the front loop of each remaining stitch, pull the opening closed, and knot securely on the underside. Retain the rest of the tail for sewing. Keep the berry small and firm; do not overstuff it.
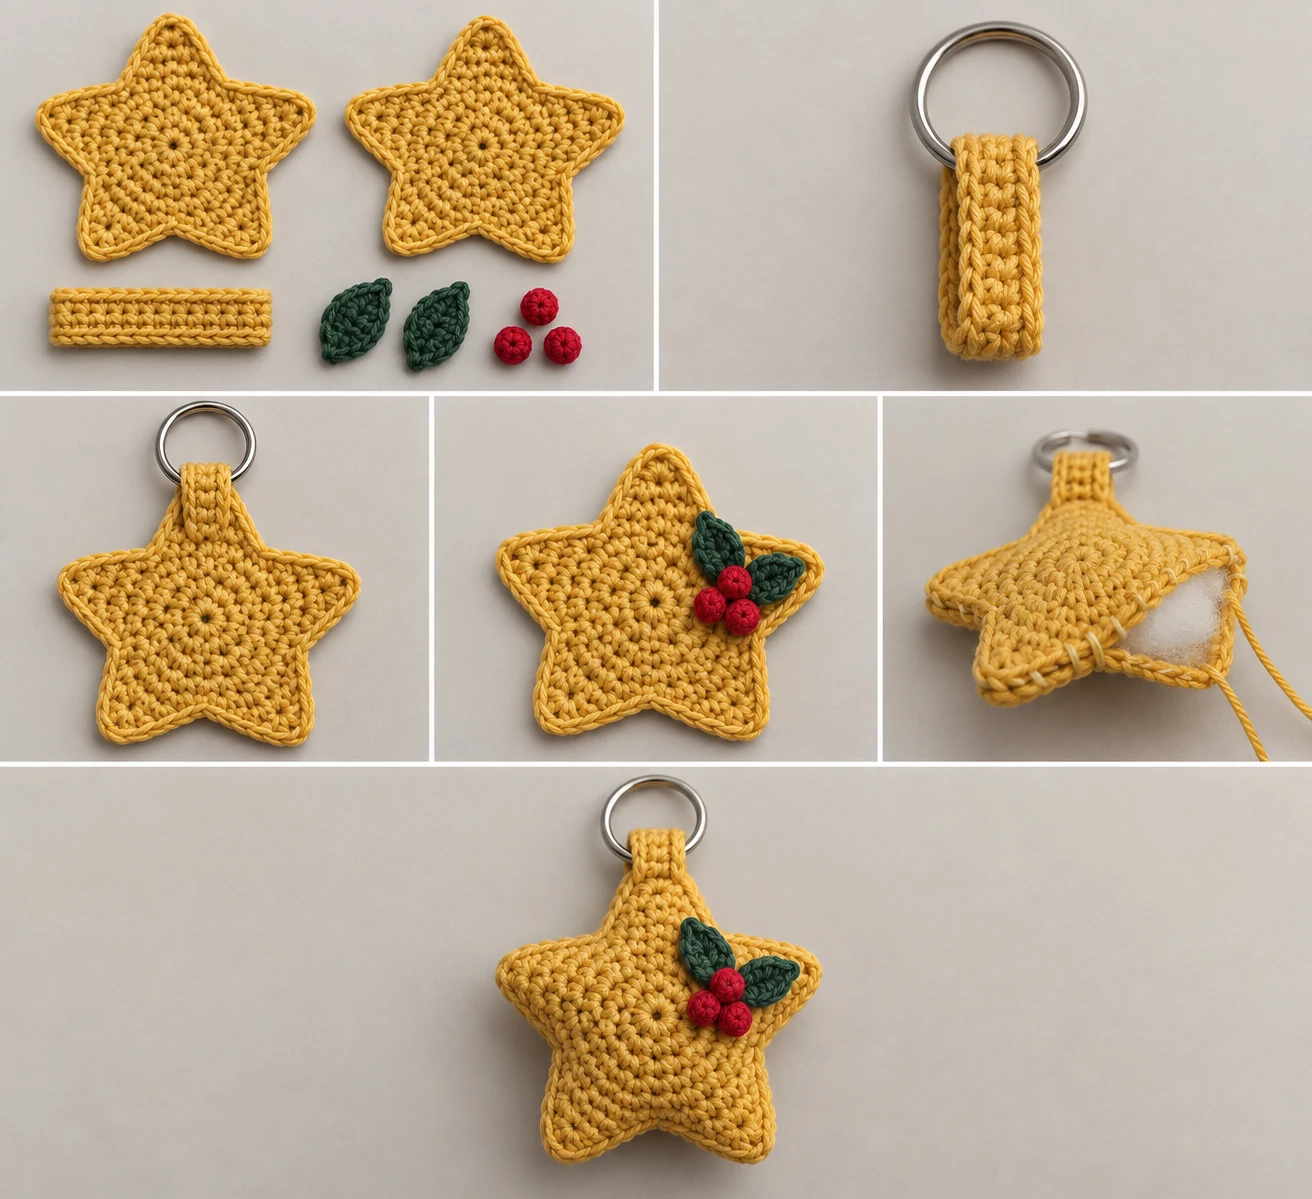
Assembly and Finishing
- Block the pieces only if needed. Lay each star panel flat with its five points evenly spaced and allow it to dry completely.
- Place the two holly leaves near the upper-right indentation on the RS of the Front Star Panel. Angle their tips apart and overlap their wider ends by approximately 1/4 in (6 mm). Keep their outer edges inside the star outline. With each evergreen tail, sew around the leaf perimeter using small stitches. Add one straight stitch along the foundation chain to prevent twisting. Knot on the WS and weave in.
- Arrange the three berries in a compact triangle over the overlapping leaf ends. With each cranberry tail, make at least four evenly spaced anchoring stitches through the berry base and Front Star Panel only. Knot on the WS and weave in. Do not pass these stitches through the future back panel.
- Thread the connector strap through the closed split ring. Bring its two short ends together, with Row 2 outward, to create a doubled tab.
- Overlap the aligned strap ends onto the WS of the Front Star Panel immediately below the indentation between the two uppermost points. Place approximately 3/8 in (1 cm) of each end inside the star outline. The ring and folded part of the strap must extend beyond the star.
- Using the strap’s golden-yellow tail, sew a rectangle through both strap ends and the Front Star Panel, then sew one diagonal across that rectangle. Keep these stitches inside the seam allowance and away from the leaves. Knot securely on the WS, but retain the remaining tail.
- Place the Back Star Panel behind the front with WS together. Match all five tips and all five indentations. The strap ends must be sandwiched between the panels.
- Thread the Back Star Panel’s 36 in (91 cm) tail onto the yarn needle. Starting beside the strap, whipstitch through both panel edges around the star. Make close, even stitches through corresponding edge loops. At the strap, stitch through the front panel, both strap layers, and back panel on at least four consecutive passes.
- Use the retained strap tail to make a second, independent line of four small stitches through both panels and both strap layers. Knot this tail inside the star and trim it.
- Stop joining when approximately one full point remains open. Add fiberfill in small pinches, pushing a light amount into every point. Softly pad the center while keeping the seam edges flat. Use no more than approximately 0.15 oz (4 g).
- Complete the whipstitch seam. Pass the joining tail through the stuffed interior and bring it out 1 in (2.5 cm) away. Pull gently, trim close, and massage the end inside.
- Inspect the split ring, doubled strap, perimeter seam, berries, and leaves. Reinforce any loose attachment, then gently shape all five points.
Customization Ideas
Keep the construction and stitch counts unchanged while making the design your own. Try ivory, metallic-look yellow, or variegated yarn for both star panels and the strap. The two leaves should use one coordinated leaf color, and all three berries should use one contrasting berry color so the component layout remains clear. A small amount of embroidery may be added to the front panel before the panels are joined, provided it does not interfere with the holly, strap, seam allowance, or stuffing.
For a larger or smaller finished piece, use a different yarn weight with a suitably sized hook, but expect the measurements, yarn requirements, stuffing quantity, and hardware proportions to change. Do not alter the stated stitch counts if you want to preserve this construction.
Common Mistakes to Avoid
- Misplacing the point bases: Mark five consecutive groups of four stitches before beginning. Every Rnd 3 stitch must belong to exactly one point.
- Counting turning chains: The initial ch 1 never counts as a stitch.
- Crocheting into point sides: Each point is worked only into four assigned core stitches.
- Twisting the holly leaves: Sew around each perimeter and add the specified straight stitch along its foundation chain.
- Attaching decorations through both panels: Sew leaves and berries to the front panel before joining the back.
- Overstuffing: Too much fiberfill distorts the points, spreads the seam, and can expose stuffing.
- Weak hardware attachment: Use a closed split ring, sandwich both strap ends between the panels, and complete both independent reinforcement lines.
Troubleshooting
Why do I have stitches left after making the fifth point?
Rnd 3 must contain 20 stitches. Each of the five points uses four consecutive stitches, so 5 × 4 consumes all 20. Recount Rnd 3 and check that no turning chain was counted as a stitch.
Why is a point leaning or shaped differently?
Confirm its rows contain 4, 2, and 1 stitch. Both sc2tog decreases in Row 2 must use all four Row 1 stitches, and Row 3 must decrease the two remaining stitches together.
Why is stuffing visible?
Your fabric may be too loose or overfilled. Use a smaller hook for denser fabric and remove excess stuffing before closing the seam.
Why does the strap twist?
Align the two short ends before sewing, keep Row 2 outward on the doubled tab, and confirm the ring is captured in the fold before attaching the strap.
Why are the berries loose?
Use at least four evenly spaced anchoring stitches through each berry base and the front panel. Reinforce them before the panels are joined if any berry rocks or lifts.
Care Instructions
Spot-clean in cool water. Avoid soaking the metal ring unnecessarily. Gently press out moisture without wringing, reshape the five points, and dry flat. Inspect the ring, strap, decorations, and seams after cleaning and reinforce any loosened stitches before using the keychain again.
Frequently Asked Questions
Is this pattern written in US terms?
Yes. Every stitch name and abbreviation uses US crochet terminology.
Can I use acrylic yarn?
Yes, if it is a smooth category 3 yarn that produces dense fabric. Cotton offers crisp definition, but a firmly spun acrylic can also work.
Can I omit the stuffing?
The construction is intended to be softly stuffed. Without fiberfill, the star will be flatter and the finished measurements and appearance will differ.
Can I use a jump ring instead of a split ring?
No. Use the specified closed split key ring. An open jump ring can pull apart under use.
Can I sew the holly on after joining the star?
It is not recommended. Attaching the leaves and berries to the front panel first keeps their sewing stitches hidden and prevents accidentally compressing or stitching through the stuffed back.
Is this suitable for children?
The metal ring and small decorative pieces can present hazards. Keep the finished keychain away from children under three years and pets. This pattern specifies the construction but makes no claim of physical testing.