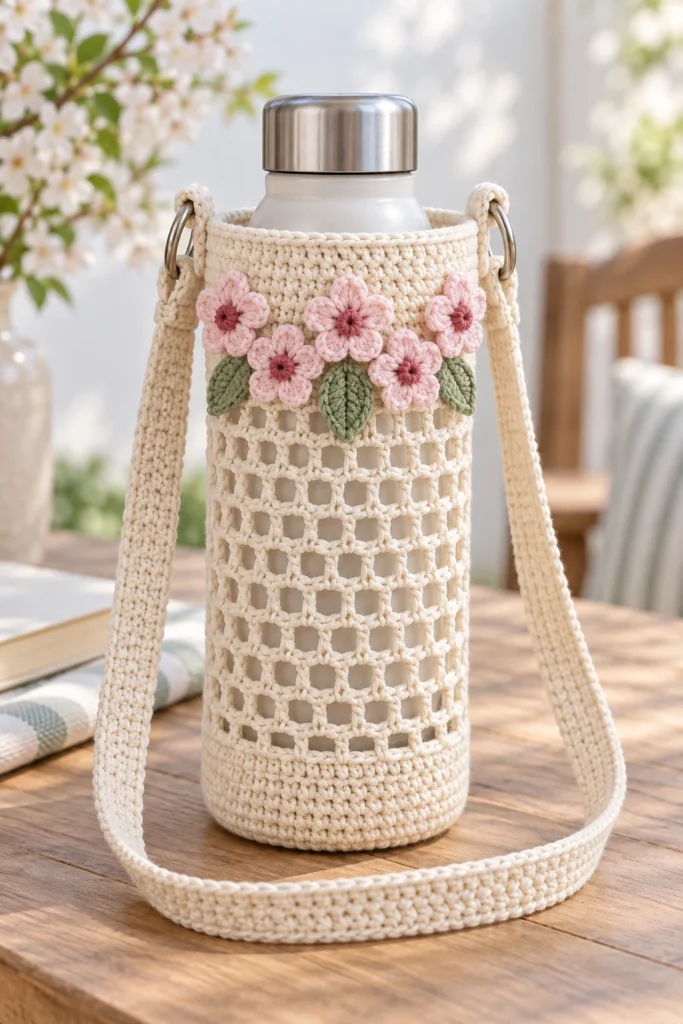
Cherry Blossom Crochet Bottle Holder DIY
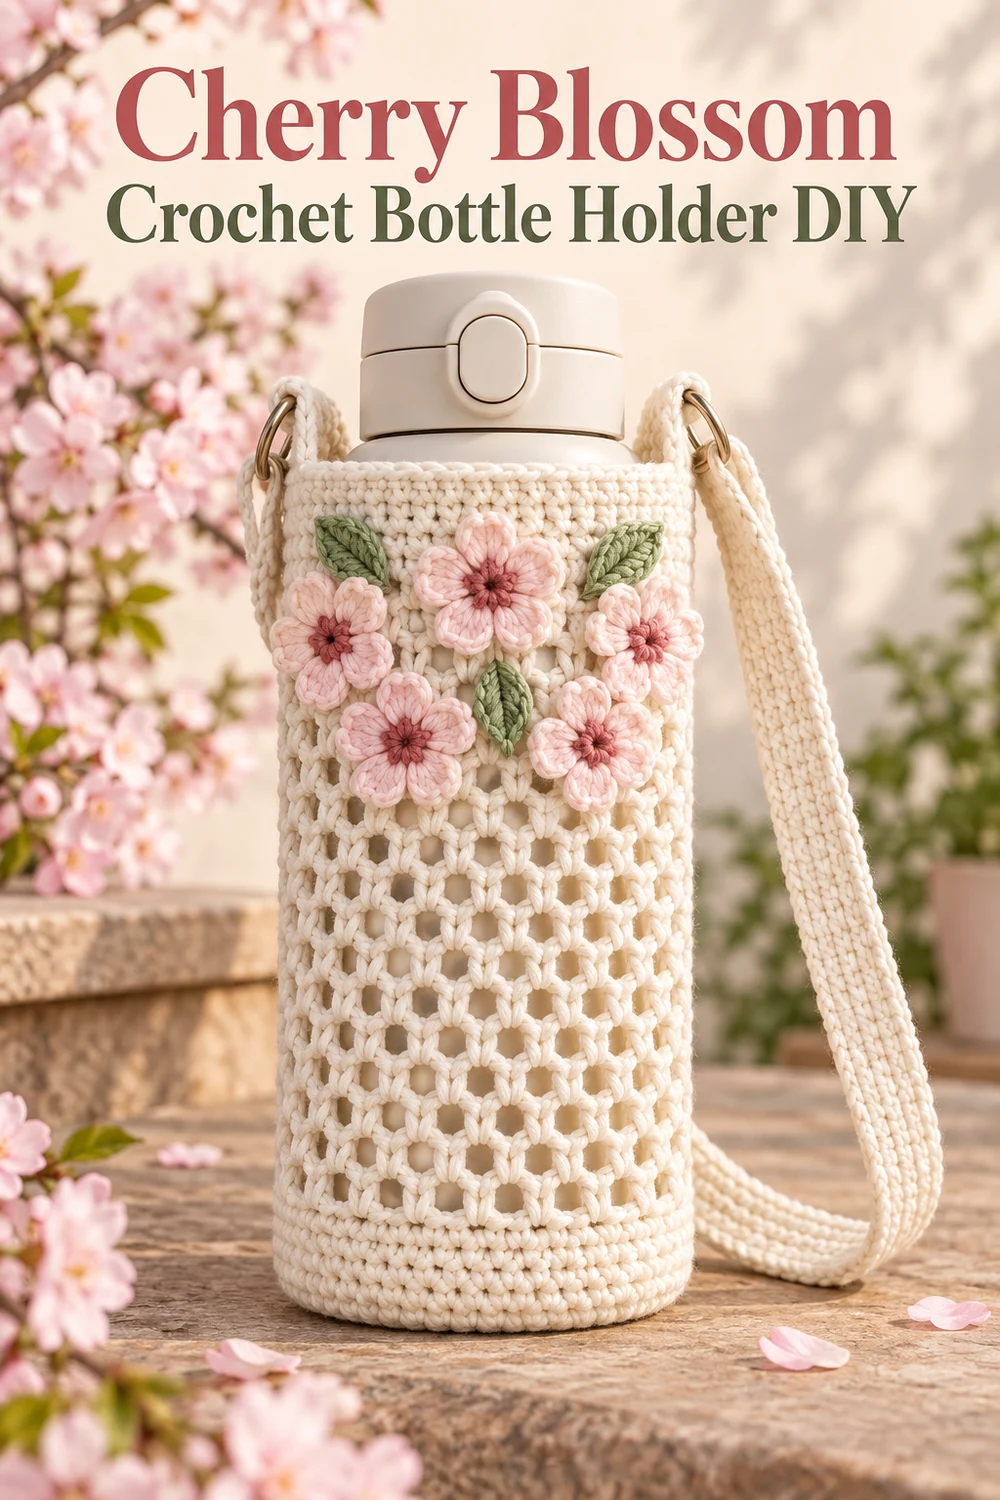
Carry your everyday water bottle in a softly structured handmade sleeve decorated with a cheerful cherry blossom spray. This original free crochet pattern combines a solid circular base, an airy mesh body, a neat eyelet rim, durable crocheted hardware tabs, and a fixed-length shoulder strap. Five pink flowers and three sage leaves add dimension without obstructing the opening or side hardware.
The pattern uses US crochet terminology and is suitable for an advanced beginner or intermediate crocheter comfortable with joined rounds, basic increases, chain-space mesh, reverse single crochet, small motifs, and simple hand sewing.
Pattern at a Glance
- Skill level: Advanced beginner/intermediate
- Construction: A bottom-up sleeve worked in joined rounds, two separate D-ring tabs, one flat fixed-length strap, five blossoms, and three leaves
- Yarn weight: Worsted weight, category 4
- Hook: US G/6 (4 mm), or size needed to obtain gauge
- Terminology: US crochet terms
- Main techniques: Magic ring, single crochet increases, chain-space mesh, reverse single crochet, double-crochet petals, and sewn assembly
Visible Component Inventory
- Main bottle sleeve with one solid circular base, open mesh body, eyelet rim, and reverse-single-crochet edging: 1
- Crocheted D-ring attachment tabs: 2
- Fixed-length crocheted shoulder strap: 1
- Five-petal cherry blossoms with contrasting centers: 5
- Crocheted leaves: 3
- Welded metal D-rings serving as visible structural connectors: 2
Materials You’ll Need
- Worsted-weight mercerized cotton in A, warm cream: approximately 85 yd/78 m
- Worsted-weight mercerized cotton in B, blossom pink: approximately 20 yd/18 m
- Worsted-weight mercerized cotton in C, deep rose: approximately 3 yd/3 m
- Worsted-weight mercerized cotton in D, sage green: approximately 8 yd/7 m
- US G/6 (4 mm) crochet hook, or size required for gauge
- Two 1 in/25 mm welded metal D-rings; do not substitute open jump rings
- Tapestry needle
- Locking stitch marker
- Scissors
- Rustproof pins
- Flexible measuring tape
- Optional fabric-safe washable glue for temporary motif placement only; all motifs must still be stitched in place
Use A for the sleeve, both attachment tabs, and the strap. Use B for the blossom petals, C for the blossom centers, and D for the leaves.
Gauge
16 sc and 17 rows = 4 in/10 cm in firmly worked single crochet after light blocking. Seven mesh rounds measure approximately 4 in/10 cm tall.
Gauge matters for bottle fit and strap length. Make and measure a single-crochet swatch before beginning. If you have too few stitches per 4 in/10 cm, use a smaller hook. If you have too many, use a larger hook. Gauge and dimensions are mathematical design specifications and are not claims of physical testing.
Finished Measurements
- Intended bottle: Straight-sided bottle approximately 3 in/7.5 cm in diameter and up to 8.5 in/21.5 cm tall
- Sleeve: Approximately 3 in/7.5 cm in diameter and 8.25 in/21 cm tall, excluding the strap
- Strap: Approximately 1.75 in/4.5 cm wide and 42.5 in/108 cm long before its ends are folded through the D-rings
- Each blossom: Approximately 2.25 in/5.5 cm across
- Each leaf: Approximately 2.5 in/6.5 cm long
Crochet Abbreviations
- A: main color
- B: blossom-petal color
- C: blossom-center color
- D: leaf color
- beg: beginning
- ch: chain
- dc: double crochet
- hdc: half double crochet
- inc: work 2 single crochet in the indicated stitch
- MR: magic ring
- rep: repeat
- rnd: round
- RS: right side
- sc: single crochet
- sk: skip
- sl st: slip stitch
- sp: space
- st(s): stitch(es)
- WS: wrong side
Important Pattern Notes
- Beginning chains do not count as stitches.
- Join completed sleeve and blossom rounds with a sl st to the first stitch unless directed otherwise.
- Mark the first stitch of every round and keep the sleeve joins at the center back.
- In the mesh rounds, 36 stitch positions consist of 12 sc plus 12 ch-2 spaces, with each ch-2 representing two stitch positions.
- Leave every specified sewing tail untrimmed until assembly is complete.
- Check the base and completed sleeve against the intended bottle before adding decorations. Bottles sold at the same capacity can have different dimensions.
- The strap is designed to measure approximately 42.5 in/108 cm before its ends are folded through the D-rings. Change its row count only after measuring the intended wearer.
- The holder uses no stuffing.
Complete Free Crochet Pattern
Component 1: Main Bottle Sleeve — Make 1
With A, make an MR.
Rnd 1: Ch 1, work 6 sc in MR; join. Pull ring firmly closed. (6 sc)
Rnd 2: Ch 1, inc in each st around; join. (12 sc)
Rnd 3: Ch 1, [sc in next st, inc in next st] 6 times; join. (18 sc)
Rnd 4: Ch 1, [sc in next 2 sts, inc in next st] 6 times; join. (24 sc)
Rnd 5: Ch 1, [sc in next 3 sts, inc in next st] 6 times; join. (30 sc)
Rnd 6: Ch 1, [sc in next 4 sts, inc in next st] 6 times; join. (36 sc)
The base should measure approximately 2.75–3 in/7–7.5 cm across. Check it against the bottle base now.
Rnd 7: Ch 1, sc in first st, ch 2, sk next 2 sts, [sc in next st, ch 2, sk next 2 sts] 11 times; join to first sc. (12 sc, 12 ch-2 spaces; 36 stitch positions)
Rnd 8: Sl st into first ch-2 sp, ch 1, sc in same sp, ch 2, [sc in next ch-2 sp, ch 2] 11 times; join. (12 sc, 12 ch-2 spaces; 36 stitch positions)
Rnds 9–20: Repeat Rnd 8. After Rnd 20, the mesh section contains 14 rounds total, Rnds 7–20. (12 sc, 12 ch-2 spaces per rnd; 36 stitch positions)
Rnd 21: Ch 1, sc in each sc and work 2 sc in each ch-2 sp around; join. (36 sc)
Rnd 22: Ch 1, [sc in next st, ch 1, sk next st] 18 times; join. (18 sc, 18 ch-1 spaces; 36 stitch positions)
Rnd 23: Ch 1, sc in each sc and each ch-1 sp around; join. (36 sc)
Rnd 24: Ch 1, working from left to right, reverse sc in each st around; join with sl st. (36 reverse sc)
Fasten off, leaving a 10 in/25 cm tail. Use the tail to reinforce the final join, then weave it through at least 2 in/5 cm of fabric in three directions.
Component 2: D-Ring Attachment Tabs — Make 2
With A, ch 9.
Row 1: Sc in second ch from hook and in each remaining ch; turn. (8 sc)
Rows 2–12: Ch 1, sc in each st across; turn. (8 sc)
Fasten off each tab, leaving a 20 in/50 cm sewing tail. Each tab should measure approximately 2 in/5 cm wide and 2.75 in/7 cm long.
Component 3: Shoulder Strap — Make 1
Before making the slip knot, leave a 24 in/60 cm beginning tail. With A, ch 8.
Row 1: Sc in second ch from hook and in each remaining ch; turn. (7 sc)
Rows 2–181: Ch 1, sc in each st across; turn. (7 sc)
Fasten off, leaving a 24 in/60 cm ending tail. The unassembled strap should measure approximately 42.5 in/108 cm long. If it differs substantially, recheck gauge instead of stretching it.
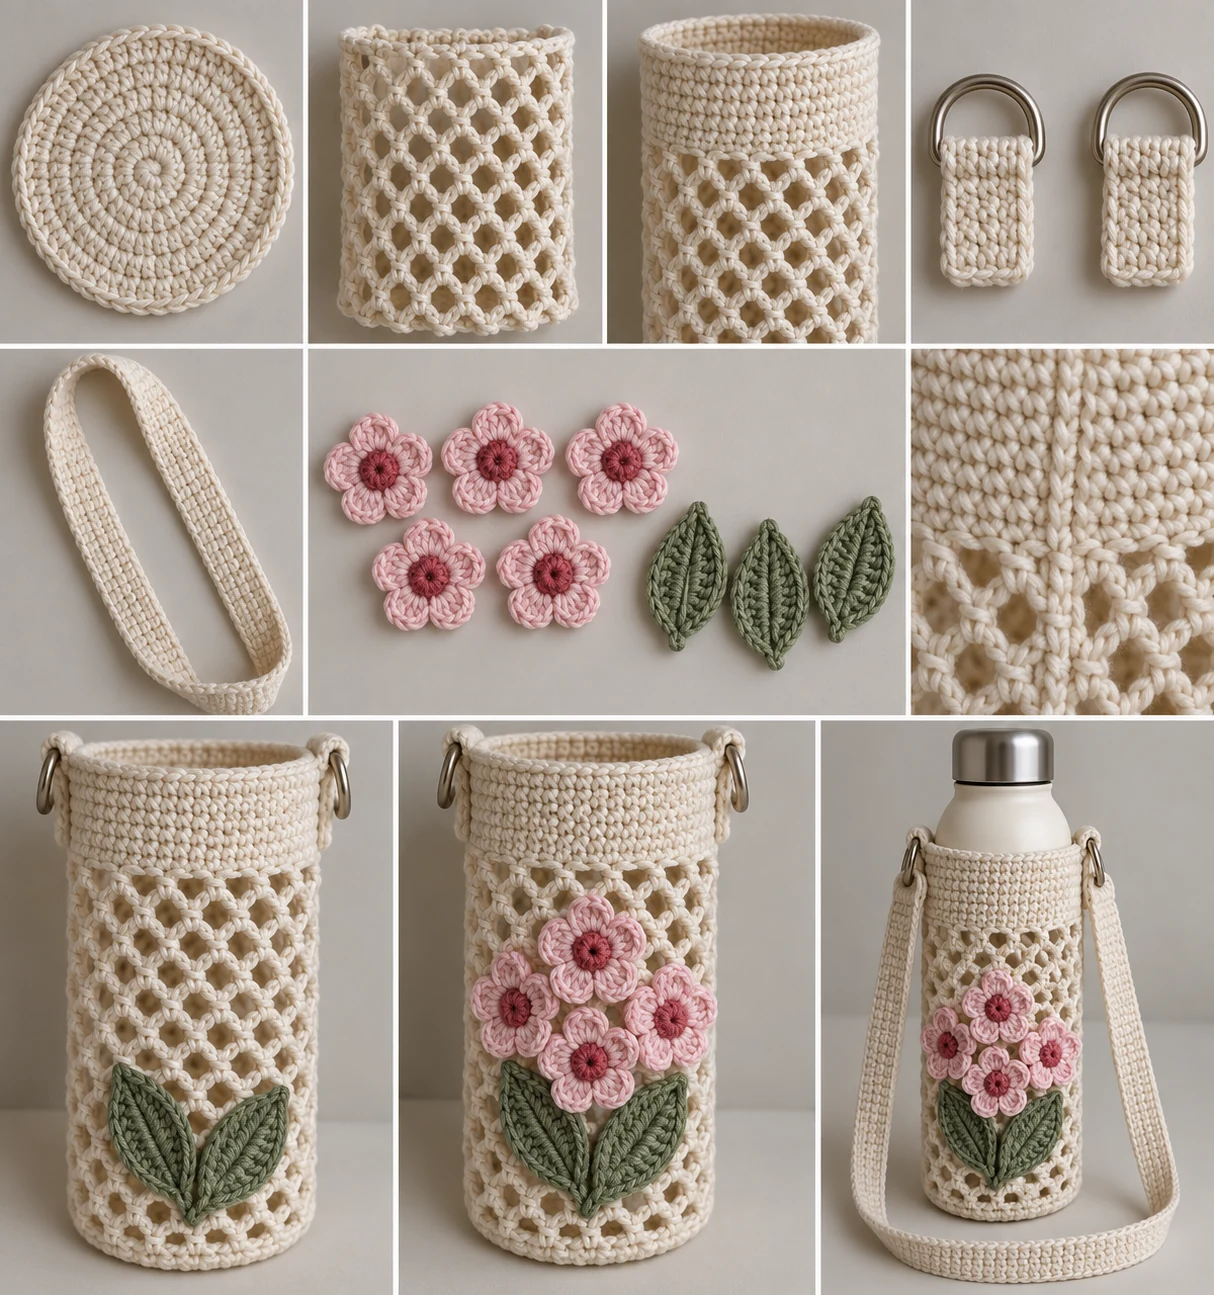
Component 4: Cherry Blossoms — Make 5
With C, make an MR.
Rnd 1: Ch 1, work 10 sc in MR; join. Pull ring firmly closed. (10 sc)
Change to B without fastening off C. Do not carry either color around the next round.
Rnd 2: For each petal, use the next 2 sts as follows: [(sl st, ch 2, 3 dc) in next st, (3 dc, ch 2, sl st) in next st]. Repeat the bracketed petal 5 times total. (5 petals; 30 dc)
Fasten off B, leaving an 18 in/45 cm sewing tail on every blossom. Cut C, leaving a 6 in/15 cm tail. Knot the two color ends together on the WS, then weave the C tail securely toward the center. Retain each B tail for assembly.
Component 5: Leaves — Make 3
With D, ch 8.
Working in the back bumps of the foundation chain, sl st in second ch from hook, sc in next ch, hdc in next ch, dc in next 2 ch, hdc in next ch, 3 sc in last ch. Rotate to work along the unused loops on the opposite side of the foundation chain: hdc in next ch, dc in next 2 ch, hdc in next ch, sc in next ch, sl st in final ch. (15 sts)
Fasten off each leaf, leaving an 18 in/45 cm sewing tail. The foundation chain forms the center vein.
Stitch-Count Check
- Sleeve Rnds 1–6 increase from 6 to 36 sc in six evenly spaced sections: 6, 12, 18, 24, 30, and 36 sts.
- Rnd 7 has twelve repeats, each occupying three positions: 1 sc plus a ch-2 space over 2 skipped sts. This equals 12 sc and 12 ch-2 spaces, or 36 positions.
- Rnds 8–20 each use all 12 spaces from the preceding round and retain 12 sc plus 12 ch-2 spaces.
- Rnd 21 has 12 sc worked into existing sc plus 24 sc worked into the twelve ch-2 spaces, totaling 36 sc.
- Rnd 22 has 18 repeats of 1 sc and one ch-1 space; Rnd 23 places one sc in every sc and every space, restoring 36 sc.
- Each tab begins with 8 usable chains and retains 8 sc in every row.
- The strap begins with 7 usable chains and retains 7 sc through Row 181.
- Each blossom center contains 10 sc. Five petals use two base stitches apiece and contain 6 dc each, for 30 dc total.
- Each leaf contains 9 stitches on its first side and 6 on its second side, totaling 15 stitches.
Assembly
- Lightly block every crocheted piece to the listed measurements. Do not stretch the mesh or strap. Identify the sleeve’s join line as center back and mark the point directly opposite it as center front.
- Install the two D-rings before attaching the strap. Insert one attachment tab through each D-ring so the ring rests at the tab’s midpoint and the short ends align. Position one folded tab vertically at each side of the sleeve, centered approximately 2 in/5 cm apart across the side point. Its lower edge should reach Rnd 19, and its upper edge should sit immediately below Rnd 24. Each tab must cover Rnds 19–23 without covering the bottle opening.
- Using each tab’s 20 in/50 cm tail, sew both tab layers to the sleeve together. Backstitch a complete rectangle through the solid sleeve stitches, sew a second inner rectangle, and add an X from corner to corner inside the inner rectangle. Pass through crocheted fabric rather than mesh holes. Knot the tail inside, weave it in three directions, and repeat for the second tab. Tug firmly on each D-ring to confirm that no stitch shifts or opens.
- Feed one strap end through one D-ring from outside to inside. Fold 2 in/5 cm of the strap back against its WS. With the retained tail, backstitch a rectangle through both strap layers, then sew an X inside the rectangle. Repeat at the other end without twisting the strap. The strap should form one continuous shoulder loop between the rings. Knot and weave each tail in three directions, then pull firmly by hand to test both seams.
- Arrange the floral spray on the upper front without covering the side hardware. Place three blossoms in a shallow diagonal from lower left to upper right across Rnds 15–21. Place the remaining two slightly above and between them. Petal edges may overlap by no more than 0.5 in/1.25 cm. Keep every flower below the reverse-sc edge so the opening remains clear.
- Place one leaf beneath the lower-left blossom, one between the center and upper-right blossoms, and one pointing outward beneath the rightmost blossom. Leaves may extend behind petals, but keep their tips visible.
- Sew the leaves first. With each D tail, stitch along both sides of the foundation-chain vein and around the lower half of the leaf, leaving the outer tip free for dimension. Knot the tail inside the sleeve and weave it securely.
- Sew the blossoms next. With each B tail, stitch around the C center and anchor the valley between each adjacent pair of petals. Add one small, inconspicuous tack near the outer curve of each petal without distorting it. Knot each tail inside and weave it securely.
Finishing
Weave in every remaining tail. Inspect the sleeve interior and remove or secure any loose loops that could catch on the bottle. Lightly steam or wet-block the floral arrangement without flattening the petals.
Insert the empty bottle. Confirm that its base sits flat, its cap remains above the sleeve rim, and neither hardware tab pulls into a mesh opening. Pull firmly on the strap and both tabs before use.
Customization
Adjusting the fit: This pattern is engineered around 36 stitch positions for a bottle approximately 3 in/7.5 cm in diameter. For the most reliable result, change hook size only after swatching rather than altering the stitch counts. Always test the circular base against the intended bottle after Rnd 6.
Adjusting the height: For a shorter straight-sided bottle, work fewer repeats of Rnd 8 before proceeding to Rnd 21, while retaining 12 sc and 12 ch-2 spaces in every mesh round. Keep enough solid upper fabric to place and securely sew the tabs.
Adjusting the strap: Measure the intended wearer and work fewer or additional 7-sc rows as needed. Each row is approximately 0.235 in/0.6 cm at pattern gauge. Remember that 2 in/5 cm at each end will be folded through the hardware. Do not stretch the strap to reach a target measurement.
Changing colors: Substitute colors freely while preserving the yarn weight and fiber behavior. Keep one consistent main yarn for the sleeve, tabs, and strap so these load-bearing crocheted parts behave alike.
Changing flower placement: The five blossoms and three leaves may be shifted slightly within Rnds 15–21, but they must remain below the rim, clear of both side tabs, and securely sewn at all specified anchor points.
Common Mistakes to Avoid
- Counting each ch-2 space as one position instead of two. Each mesh round represents 36 positions.
- Working into the sc instead of the ch-2 spaces on Rnds 8–20.
- Allowing the join to drift away from the center back.
- Stretching the mesh or strap during measurement.
- Sewing an attachment tab through open mesh instead of the solid stitches across Rnds 19–23.
- Using open jump rings in place of welded D-rings.
- Twisting the shoulder strap before securing its second end.
- Attaching blossoms before the leaves, which makes the intended layered arrangement harder to sew neatly.
- Letting the floral motifs cover the opening or hardware.
Troubleshooting
Why is the base cupping?
Your tension may be too tight or the hook may be too small. Confirm the stitch counts for Rnds 1–6, lightly block the base, and test it against the bottle before continuing.
Why is the base wavy?
Your tension may be too loose or the hook may be too large. Verify that each increase round contains exactly six increases and that Rnd 6 has 36 sc.
Why does the mesh lean?
A slight spiral is normal in joined mesh, but pronounced leaning often means a space was skipped or used twice. Each mesh round must contain exactly 12 sc and 12 ch-2 spaces.
Why does Rnd 21 have the wrong count?
Work one sc in each of the 12 existing sc and 2 sc in each of the 12 ch-2 spaces: 12 + 24 = 36 sc.
Why is the strap the wrong length?
Measure it relaxed after light blocking. If 181 rows differ substantially from 42.5 in/108 cm, correct the row gauge instead of stretching the fabric. If intentionally customizing the length, measure the wearer and account for both 2 in/5 cm end folds.
Why do the tabs pull or distort the mesh?
Check that each folded tab covers Rnds 19–23 and that its reinforced rectangles and X pass through solid crochet rather than mesh holes. Stop using the holder if stitches shift under a firm hand pull.
Care Instructions
Hand wash the holder in cool water with a mild detergent. Support its weight when wet, reshape it to the listed measurements, arrange the petals and leaves, and dry it flat. Do not hang it by the strap while wet. Check the strap seams, attachment tabs, crochet fabric, and welded D-rings before every use.
This holder is intended for ordinary personal drink bottles. It is not designed for climbing, suspension, heavy containers, or hot vessels.
Frequently Asked Questions
Can I use acrylic yarn?
You can, but mercerized cotton provides the intended stitch definition and relatively firm structure. Any substitute should match category 4 weight and gauge, and the completed seams must pass the stated hand-pull checks.
Can I use a larger water bottle?
The written counts are designed for a straight-sided bottle approximately 3 in/7.5 cm in diameter. Check Rnd 6 directly against the bottle base. A meaningfully larger diameter requires a separately recalculated pattern rather than casually adding stitches to the mesh.
Do the beginning chains count as stitches?
No. Beginning chains do not count as stitches anywhere in this pattern.
How many mesh rounds are there?
There are 14 mesh rounds total, from Rnd 7 through Rnd 20.
Can I omit the D-rings?
No. The written construction and reinforced attachment tabs are designed around two 1 in/25 mm welded D-rings. Omitting them would require a different structural assembly.
Can the strap be adjustable?
This design uses one fixed-length crocheted strap and includes no adjuster. You may change the number of strap rows before assembly, but do not add unlisted hardware without independently evaluating its compatibility and security.
Are the flowers removable?
No. Each blossom and leaf is permanently sewn at multiple points so it cannot snag or shift during normal use.
Is the holder safe for hot drinks or heavy flasks?
No. Use it only for an ordinary personal drink bottle. It is not intended for hot vessels, heavy loads, climbing, or suspension.