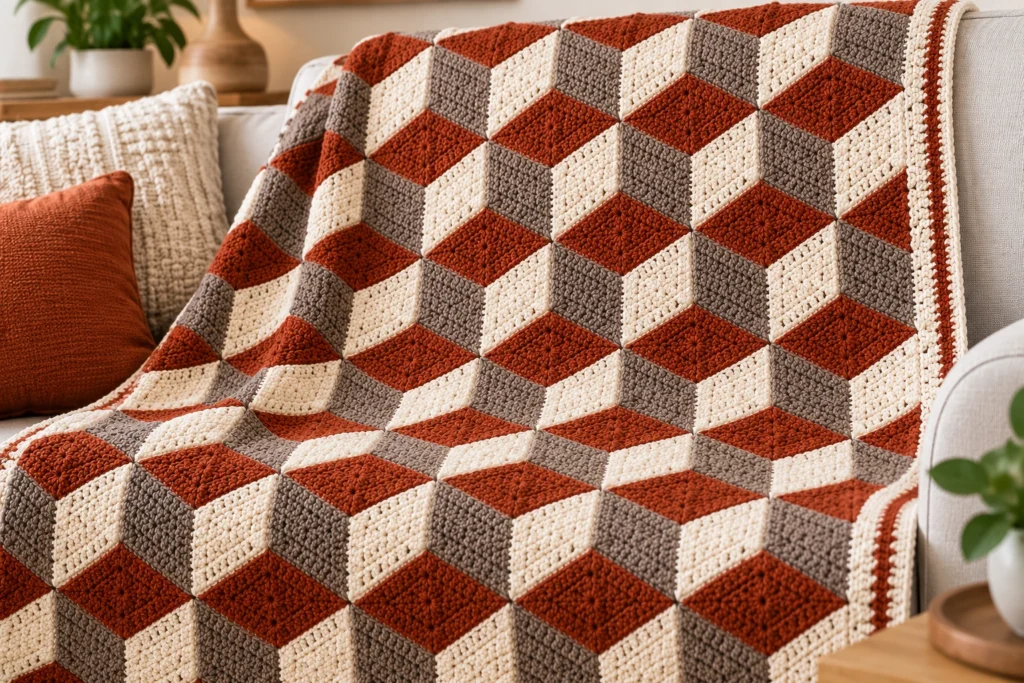
Scroll past this blanket fast enough and your brain will swear it’s looking at a pile of stacked wooden blocks. Slow down, run your hand over it, and the truth comes out: every single motif lying on top of that blanket is perfectly flat. No embossing, no stuffing, no 3D crochet trickery — just three diamonds and a color rule that fools the eye every time.
This is the tumbling block illusion blanket, and it’s one of the most satisfying “wait, WHAT?” projects a crocheter can make. If you’ve ever wanted a project that gets stopped-in-their-tracks reactions without requiring an advanced skill set, this is it.
What Is a 3D Illusion Crochet Blanket?
A 3D illusion (or “tumbling blocks”) crochet blanket is built from a single repeating diamond motif made in three different colorways. When you join enough of these diamonds together in a specific arrangement, your eye reads them as the three visible faces of a cube — a top, a left side, and a right side — even though every diamond is stitched completely flat and joined edge to edge like any other granny-square-style blanket.
The illusion isn’t a stitching trick. It’s a shading trick. Our brains are wired to interpret light and shadow as depth, so when you place a light color, a mid-tone, and a dark color in the same triangular arrangement over and over, the brain fills in the rest and “sees” a cube, even though your fingers can tell you the surface is flat.
It’s the same optical principle used in quilting’s classic “Tumbling Blocks” or “Baby Blocks” pattern, translated into crochet stitches instead of fabric pieces.
Why You’ll Love This Pattern
- It photographs like a showpiece. This is the kind of blanket that stops the scroll on social media, because most viewers assume it’s either knitted with bobbles, crocheted with 3D puff motifs, or somehow padded underneath.
- It’s beginner-friendlier than it looks. You’re really only learning one diamond motif and repeating it in three colorways. The “hard part” is just staying consistent with color placement.
- It’s endlessly customizable. Swap the three-color rust/taupe/cream palette for jewel tones, pastels, or a matching-your-decor palette, and the illusion still works as long as you keep a clear light-medium-dark contrast between the three shades.
- It’s a great stash-buster. Diamond motifs are small, so this is an excellent project for using up worsted-weight leftovers in three coordinating values.
- No embossing or bobble stitches required. Every motif is worked flat with basic stitches, so there’s no fussing with 3D crochet techniques or extra stuffing.
The Secret: Color Placement, Not Stitch Count
This is the part that trips people up, so let’s be crystal clear about it before you pick up a hook.
Each “cube” in the finished blanket is made from three diamond motifs joined together, and the illusion only works if each diamond sits in the correct position and color:
- Top of each cube: rust. This is the brightest, most saturated color of the three, positioned as a horizontal diamond forming the “top face” — the surface reading as if it’s catching the most light.
- Left face of each cube: taupe. The medium-value color, positioned as a diamond angled to lean left. This face reads as being in partial shadow.
- Right face of each cube: cream. The lightest neutral of the three, positioned as a diamond angled to lean right, rounding out the cube’s third visible face.
If you swap any two of these positions on even a handful of motifs, the illusion breaks down in that spot and the “cube” will look like a flat, slightly odd hexagon instead of a 3D block. Consistency is everything here — more than gauge, more than stitch count, more than anything else in this pattern.
Pro tip before you start: lay out your first six to nine motifs on the floor in their intended positions before joining a single stitch. Step back, squint at it (squinting blurs fine detail and makes value contrast easier to judge), and confirm the cubes read as 3D from a few feet away. It’s much easier to swap a diamond now than to rip out seamed motifs later.
Materials You’ll Need
- Worsted weight yarn (Category 4) in three colors with clear light/medium/dark contrast — the example uses rust (bright/warm), taupe (mid-tone neutral), and cream (light neutral). Roughly equal amounts of each color, since every cube uses one diamond of each.
- Crochet hook sized to your yarn label, typically a 5.0mm–5.5mm (H/8 to I/9) for worsted weight
- Yarn needle for weaving in ends and seaming motifs together
- Stitch markers to track motif orientation while you’re joining
- Scissors
- Optional: a blocking board and pins to keep diamond motifs uniform in size before assembly, which matters a lot for how crisp the illusion looks
How the Diamond Motif Works
Each diamond motif is worked in rows (not in the round like a traditional granny square), building out from a center point and increasing, then decreasing, to form the diamond shape.
Basic diamond construction:
- Foundation: Chain 4 (or the number specified by your gauge), join with a slip stitch to form a ring, or start with a magic ring.
- Row 1: Work a small number of stitches into the ring to establish the top point of the diamond.
- Increase rows: Work rows in single or half-double crochet, increasing one stitch at each end of the row, widening the diamond out toward its center point (the widest part).
- Decrease rows: Once you reach the diamond’s widest point, reverse direction — decrease one stitch at each end of every row until you taper back down to a single point at the bottom.
- Fasten off, leaving a long tail for seaming.
The exact stitch count and number of rows will depend on the finished diamond size you want (a 4–6 inch diamond is typical for a blanket), so always check your specific pattern’s row-by-row instructions and swatch first to confirm your diamond lies flat with straight edges and no ruffling or cupping — both signs your tension needs adjusting.
Joining the Motifs Into Cubes
- Lay out three diamonds in the top/left/right cube formation described above.
- Using a yarn needle and the whip stitch or slip stitch join method, seam the top diamond’s lower-right edge to the right diamond’s upper-left edge.
- Seam the top diamond’s lower-left edge to the left diamond’s upper-right edge.
- Seam the inner edges of the left and right diamonds together where they meet at the bottom center of the cube.
- Repeat to build out additional cubes, joining new diamonds to the shared edges of existing ones as you expand the blanket in rows and columns.
Because each finished “cube” shares edges with the cubes around it, you’ll quickly notice you’re not really joining in threes over and over — you’re filling in a continuous tessellating grid of diamonds, where each internal diamond you add completes one cube and starts the next.
Tips for a Flawless Illusion
- Keep tension consistent across all three colors. If your taupe motifs come out slightly larger or smaller than your rust and cream ones, the seams won’t lie flat and the illusion will look distorted.
- Block every motif before joining. Even a small variation in diamond size becomes obvious once dozens of them are seamed edge to edge.
- Work in batches by color, not by cube. Crochet all your rust diamonds first, then all your taupe, then all your cream. It’s faster than switching colors constantly, and it makes it easy to count and confirm you have the right ratio of each color before you start joining.
- Use a light source cheat sheet. Pin a printed photo of a finished illusion blanket near your work space so you can double-check color placement at a glance, especially in the first several cubes.
- Weave in ends as you go. With this many small motifs, leaving all your ends for the end of the project turns a fun blanket into a dreaded chore.
Variations to Try
- Two-color version: Some illusion crochet patterns use just two shades (light and dark) instead of three, creating a flatter, more graphic zigzag illusion rather than a full 3D cube look.
- Jewel-tone cubes: Swap rust/taupe/cream for emerald, navy, and gold for a richer, more dramatic version of the same illusion.
- Pastel nursery version: Soft pink, sage, and cream reads as a much gentler, baby-blanket-appropriate palette while keeping the same value contrast rule.
- Mixed-cube layout: Once you’re confident with the color rule, try alternating two different three-color palettes across the blanket for a patchwork-of-cubes effect.
- Pillow or coaster scale: This same technique scales down beautifully for coasters, pillow panels, or bag flaps if a full blanket feels like too big a commitment for a first try.
Serving Size, Er — Blanket Size
Since this isn’t a recipe, think in finished dimensions instead of servings:
- Lapghan/throw: roughly 6 cubes wide by 8 cubes long
- Sofa throw: roughly 8 cubes wide by 10 cubes long
- Full bed blanket: roughly 12+ cubes wide, adjusted to your mattress size
Multiply your cube count by three to get your total diamond motif count, then divide evenly across your three colors to estimate yarn needs.
Caring for Your Illusion Blanket
- Washing: Hand wash or use a gentle machine cycle in cold water with a wool-safe or gentle detergent, especially if you used wool or a wool-blend yarn.
- Drying: Lay flat to dry rather than hanging, so the seamed motifs don’t stretch out of shape under their own weight.
- Storage: Fold rather than hang for long-term storage, and store in a breathable cotton bag rather than plastic to prevent trapped moisture.
Frequently Asked Questions
Is this blanket actually 3D or textured? No. Every motif is completely flat. The 3D look comes entirely from the color placement mimicking light, mid-tone, and shadow on a cube.
What skill level does this pattern require? Advanced beginner to intermediate. The stitches themselves (increases, decreases, basic rows) are simple, but keeping consistent tension and color placement across dozens of motifs takes patience.
Can I use a different color palette? Yes, as long as you keep clear light/medium/dark contrast between your three colors, the illusion will still work.
How much yarn do I need? This depends on blanket size and diamond size, but a lapghan-sized illusion blanket typically uses somewhere between 1,200–1,800 yards total, split roughly evenly across your three colors.
Why does my blanket look flat instead of 3D? The most common cause is inconsistent color placement — double-check that every “top” diamond is your lightest/brightest color, every “left” diamond is your mid-tone, and every “right” diamond is your darkest neutral (or vice versa, as long as it’s consistent throughout).
Can this technique be done in knitting instead of crochet? Yes, illusion knitting is a whole related technique, though it typically uses a different construction method (garter stitch ridges) rather than joined motifs.
Do I need to block every single diamond? It’s strongly recommended. Blocking keeps every motif a uniform size, which is essential for the seams to lie flat and the illusion to read cleanly.
What hook size should I use? Match your hook to your yarn label as a starting point (typically 5.0–5.5mm for worsted weight), then swatch and adjust so your diamonds lie flat without curling or rippling.
Can I make this illusion pattern with just two colors instead of three? Yes, though the effect shifts from a full 3D cube illusion to a flatter zigzag illusion. Three colors with clear value contrast is what creates the classic tumbling-block look.
Is this the same as the “attic window” quilt pattern? It’s built on the same optical principle as Attic Window and Tumbling Blocks quilting patterns, just translated into crochet motifs instead of pieced fabric.
Final Thoughts
The 3D illusion crochet blanket proves that you don’t need complicated stitches to create a genuine showstopper — you need a plan, three colors with the right contrast, and the discipline to keep that color placement consistent from the first diamond to the last. Once you’ve made a handful of cubes and watched the illusion click into place in front of your eyes, it’s hard not to get hooked on making more.