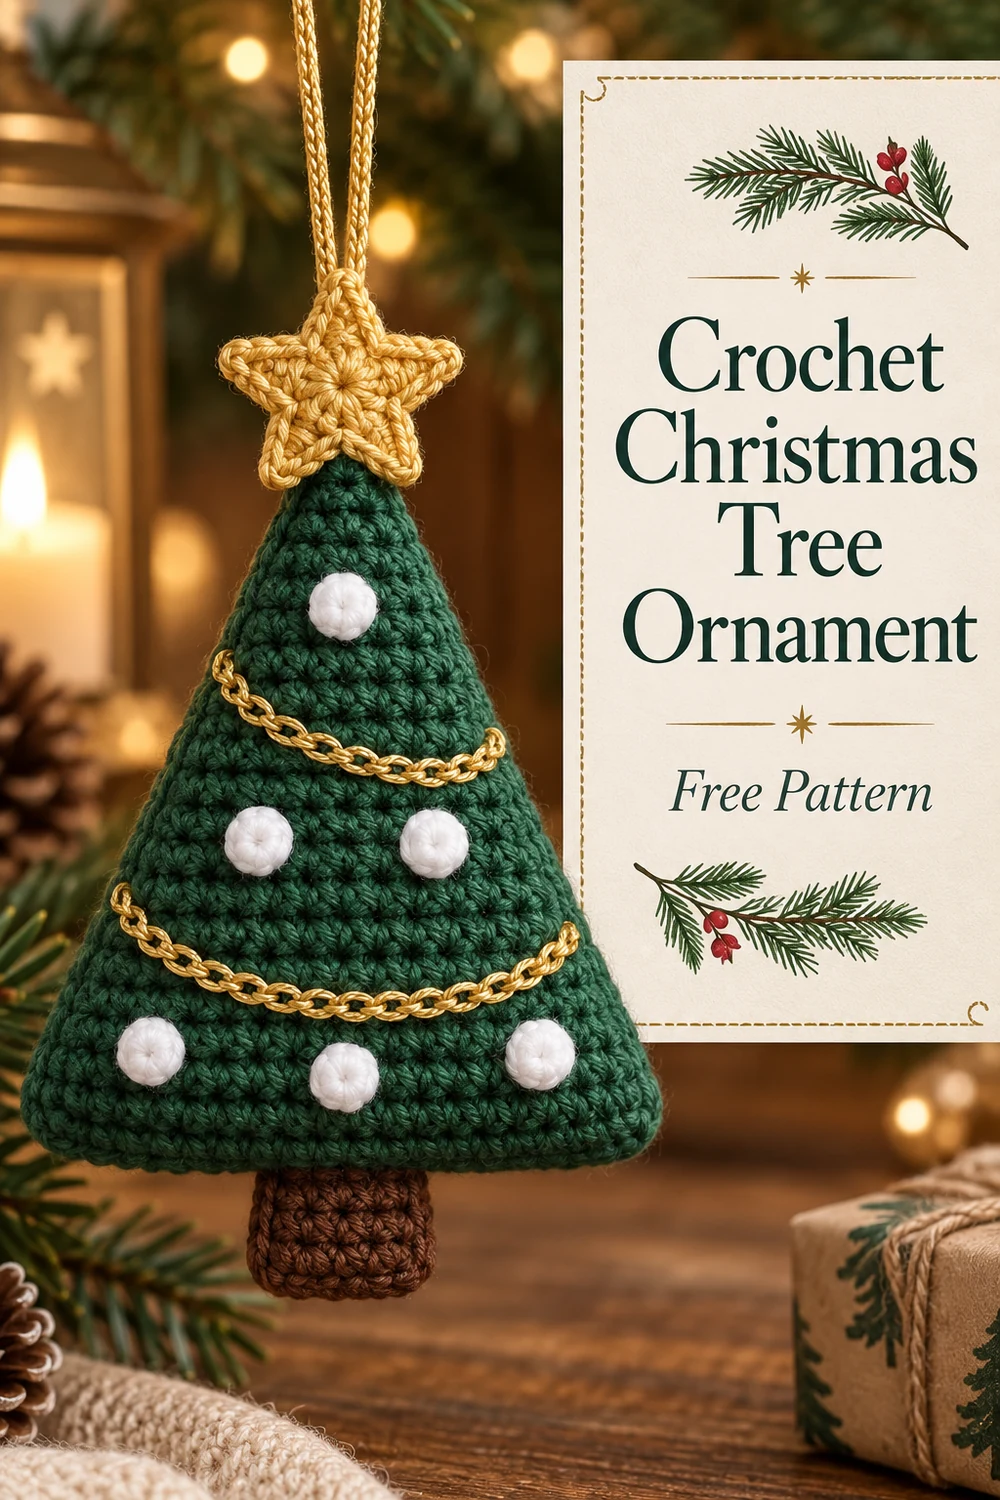
Crochet Christmas Tree Ornament
Bring a little handmade charm to your holiday decorating with this free Crochet Christmas Tree Ornament pattern. Worked in US crochet terms, this softly padded ornament features two evergreen tree panels, a flat brown trunk, gold stars and garlands, six white snow dots, and a sturdy crocheted hanging loop. The finished decoration is approximately 6 1/4 inches tall, excluding the loop.
Pattern at a Glance
- Skill level: Easy/intermediate
- Terminology: US crochet terms
- Construction: Two flat tree panels are decorated, joined, and lightly stuffed. A separately assembled trunk, two star appliqués, two chain garlands, six snow dots, and one crocheted loop complete the ornament.
- Primary stitches: Chain, slip stitch, single crochet, half double crochet, sc2tog, and sc3tog
- Estimated yarn: 60 yd (55 m) total
Visible Crocheted Components
- Tree body panels — 2, one front and one back, in evergreen
- Trunk panels — 2, one front and one back, in brown
- Five-point star appliqués — 2, one on each side, in gold
- Chain garlands — 2, attached to the front tree panel, in gold
- Snow-dot appliqués — 6, attached to the front tree panel, in white
- Crocheted hanging loop — 1, in gold
Materials You’ll Need
- Worsted-weight, category 4 acrylic or wool-blend yarn: approximately 35 yd (32 m) evergreen, 8 yd (7.5 m) brown, 12 yd (11 m) gold, and 5 yd (4.5 m) white
- US G/6 (4 mm) crochet hook, or size needed to obtain gauge
- Yarn needle
- Removable stitch markers
- Approximately 0.2 oz (6 g) polyester fiberfill
- Scissors
No separate hanging hardware is needed. The gold crocheted loop forms the hanger.
Gauge
18 sc and 20 rows = 4 in (10 cm) in rows of single crochet.
Gauge helps produce the stated measurements, but it is not critical if a slightly different finished size is acceptable. A firm fabric is recommended so the fiberfill does not show through.
Finished Measurements
Approximately 4 3/4 in (12 cm) wide and 6 1/4 in (16 cm) tall from the bottom of the trunk to the top of the star, excluding the hanging loop. The loop adds approximately 3 in (7.5 cm) when laid flat. Measurements may vary with yarn choice and tension.
Crochet Abbreviations
- beg = beginning
- ch = chain
- hdc = half double crochet
- MR = magic ring
- rep = repeat
- RS = right side
- sc = single crochet
- sc2tog = single crochet 2 stitches together
- sc3tog = single crochet 3 stitches together
- sl st = slip stitch
- st(s) = stitch(es)
- WS = wrong side
Important Pattern Notes
- Ch 1 at the beginning of a row does not count as a stitch.
- Turn after every row unless the instructions say otherwise.
- Work the tree and trunk panels firmly enough to contain the stuffing.
- Numbers in parentheses show the stitch count at the end of the row or the completed component count.
- Leave each specified sewing tail untrimmed until its assembly step is complete.
- Decorate the front tree panel before joining the two tree panels.
- The ornament should be softly padded and relatively flat, not firmly stuffed.
Complete Free Crochet Pattern
Tree Body Panels — Make 2 in Evergreen
For each panel, ch 22.
Row 1: Sc in second ch from hook and in each remaining ch across. Ch 1, turn. (21 sts)
Rows 2–3: Sc in each st across. Ch 1, turn. (21 sts)
Row 4: Sc2tog, sc in next 17 sts, sc2tog. Ch 1, turn. (19 sts)
Row 5: Sc in each st across. Ch 1, turn. (19 sts)
Row 6: Sc2tog, sc in next 15 sts, sc2tog. Ch 1, turn. (17 sts)
Row 7: Sc in each st across. Ch 1, turn. (17 sts)
Row 8: Sc2tog, sc in next 13 sts, sc2tog. Ch 1, turn. (15 sts)
Row 9: Sc in each st across. Ch 1, turn. (15 sts)
Row 10: Sc2tog, sc in next 11 sts, sc2tog. Ch 1, turn. (13 sts)
Row 11: Sc in each st across. Ch 1, turn. (13 sts)
Row 12: Sc2tog, sc in next 9 sts, sc2tog. Ch 1, turn. (11 sts)
Row 13: Sc in each st across. Ch 1, turn. (11 sts)
Row 14: Sc2tog, sc in next 7 sts, sc2tog. Ch 1, turn. (9 sts)
Row 15: Sc in each st across. Ch 1, turn. (9 sts)
Row 16: Sc2tog, sc in next 5 sts, sc2tog. Ch 1, turn. (7 sts)
Row 17: Sc in each st across. Ch 1, turn. (7 sts)
Row 18: Sc2tog, sc in next 3 sts, sc2tog. Ch 1, turn. (5 sts)
Row 19: Sc in each st across. Ch 1, turn. (5 sts)
Row 20: Sc2tog, sc in next st, sc2tog. Ch 1, turn. (3 sts)
Row 21: Sc3tog. (1 st)
Fasten off the first panel and weave in its ends. On the second panel, leave a 36 in (91 cm) tail for joining.
Trunk Panels — Make 2 in Brown
For each panel, ch 6.
Row 1: Sc in second ch from hook and in each remaining ch across. Ch 1, turn. (5 sts)
Rows 2–4: Sc in each st across. Ch 1, turn. (5 sts)
Row 5: Sc in each st across. (5 sts)
Fasten off the first trunk panel and weave in its ends. On the second panel, leave a 15 in (38 cm) sewing tail.
Five-Point Star Appliqués — Make 2 in Gold
Make an MR. Rep the following point sequence 5 times: ch 4, sl st in second ch from hook, sc in next ch, hdc in next ch, sl st into MR. Pull the ring firmly closed. (5 points)
Fasten off, leaving a 15 in (38 cm) sewing tail on each star. The chains and stitches create five narrow, tapered rays.
Chain Garlands — Make 1 Long and 1 Short in Gold
Long garland: Ch 28. Fasten off, leaving a 10 in (25 cm) tail at both ends. (28 ch)
Short garland: Ch 20. Fasten off, leaving a 10 in (25 cm) tail at both ends. (20 ch)
Snow-Dot Appliqués — Make 6 in White
For each dot, make an MR, ch 1, work 6 sc into the ring, then sl st in the first sc. Pull the ring firmly closed. (6 sc)
Fasten off, leaving a 10 in (25 cm) sewing tail. Weave the beginning tail securely through the WS of the dot, but retain the ending tail for sewing.
Crocheted Hanging Loop — Make 1 in Gold
Ch 30. Do not join the chain to itself. Fasten off, leaving a 12 in (30 cm) tail at both ends. (30 ch)
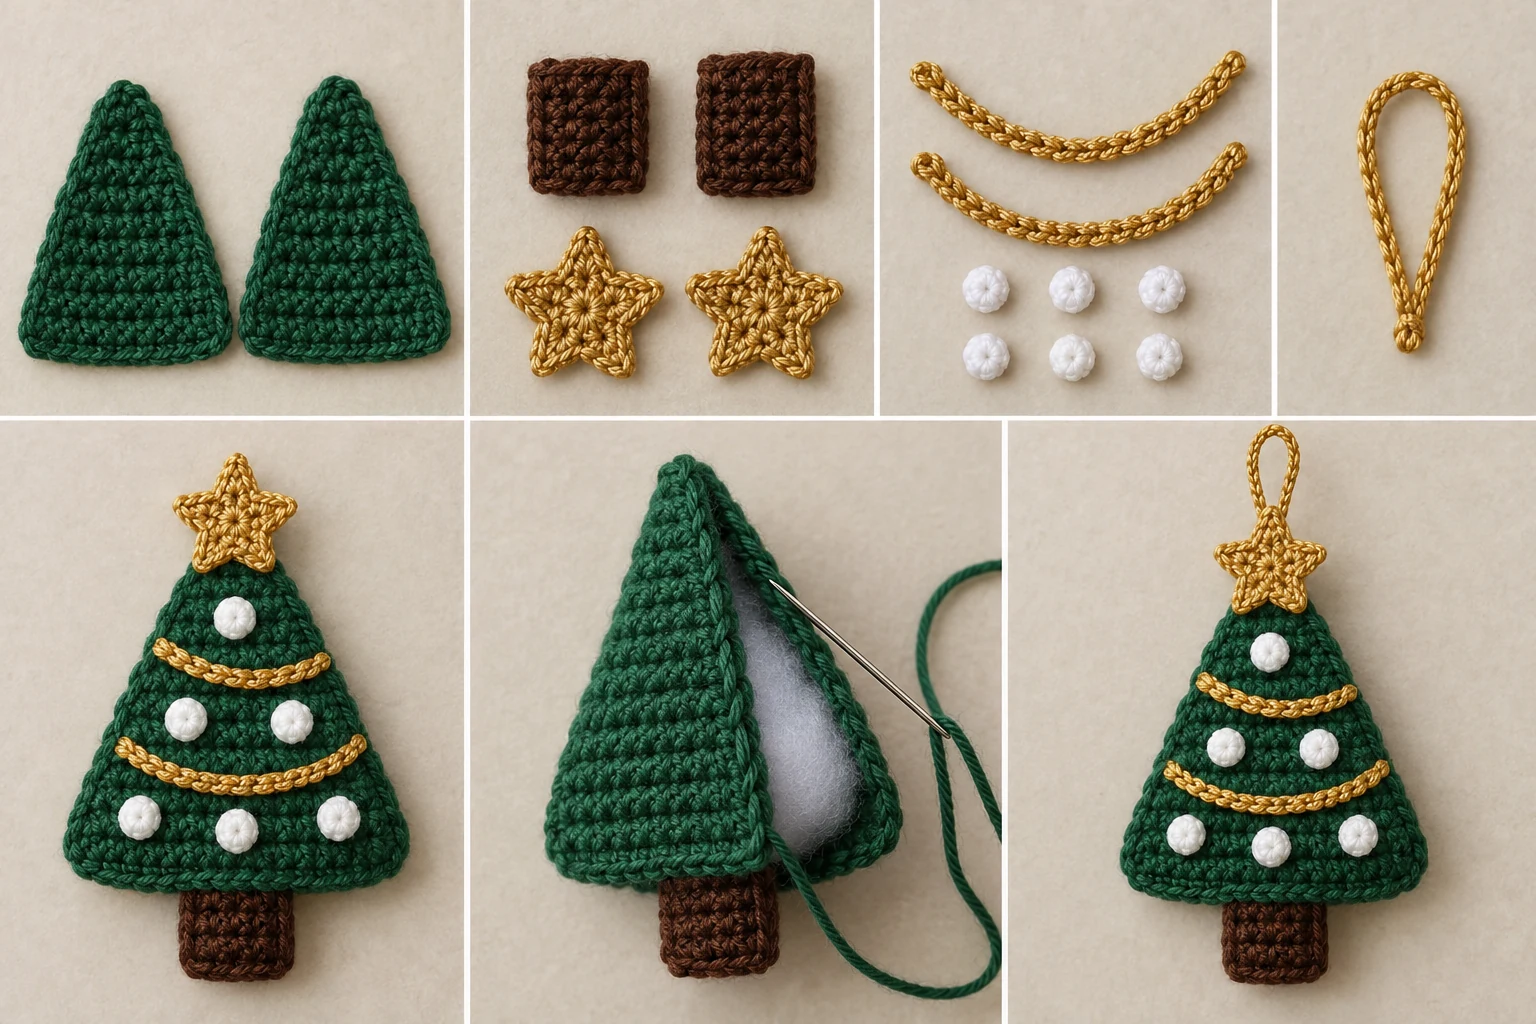
Assembly
Decorate the Front Tree Panel
- Choose one tree panel as the front and place it RS up.
- Arrange the 28-chain garland in a shallow curve across the lower third of the tree.
- Arrange the 20-chain garland in a reverse shallow curve across the upper third, creating a two-swag zigzag effect. Keep every part of both garlands at least 1/2 in (1.3 cm) from the tree edges.
- Use each garland’s two tails to secure its ends to the WS. With a separate matching length of gold yarn, tack each garland at its center and at two evenly spaced points between the center and each end. Knot securely on the WS and weave in the tacking ends.
- Arrange three snow dots between the lower garland and bottom edge, two between the garlands, and one above the upper garland. Keep all six dots clear of the joining edge.
- Using each white ending tail, sew around the outer edge of its dot. Knot on the WS and weave in securely.
Assemble the Trunk
- Place the two trunk panels together with RS facing outward and all edges aligned.
- Using the long brown tail and whipstitch, sew the two side edges and bottom edge together. Leave the top edge open.
- Insert a very small, even wisp of fiberfill. Keep the trunk flat rather than bulging.
- Knot securely and retain the remaining brown tail for attachment.
Assemble the Ornament
- Lightly block the two tree panels to matching measurements if needed. Allow them to dry completely.
- Place the back tree panel WS up. Center the open top of the assembled trunk behind its lower edge. Overlap the trunk and tree by 3/4 in (2 cm), leaving approximately 1 1/4 in (3 cm) of trunk visible below the tree.
- Using the retained brown tail, sew the trunk securely to the back panel through both trunk layers. Make two passes across the overlap, knot securely, and weave in the tail.
- Fold the 30-chain hanging loop in half and align its ends. Place both ends on the WS of the back panel at the apex, extending them 1 in (2.5 cm) down the panel.
- Using one gold tail, sew both chain ends to the panel with several small stitches. Repeat the attachment independently with the second tail. Knot the tails together on the WS and weave them into the panel. Tug the loop firmly to ensure neither end shifts.
- Place the decorated front panel over the back panel with WS together and RS facing outward. Align the edges. Keep the trunk and attached hanger ends sandwiched between the panels.
- Thread the 36 in (91 cm) evergreen tail. Starting at one lower corner, whipstitch through corresponding edge loops of both panels. Sew up the first sloping edge, around the apex without catching the free portion of the loop, and down the opposite sloping edge. Continue along the bottom until approximately 2 in (5 cm) remains open.
- Add fiberfill in small pinches. Fill the point first, then distribute the remainder evenly. Keep the ornament softly padded and flat without distorting its straight lower edge.
- Whipstitch the opening closed. Pass the needle through several interior stitches, knot securely between the layers, bury the tail inside, and trim.
Attach the Stars
- Center one star on the front apex so its lowest point overlaps the tree by approximately 1/2 in (1.3 cm). Keep the hanging loop free.
- Using the star’s gold tail, sew around the center ring and tack the base of each point to the front panel without passing through the back panel. Knot and bury the tail inside the ornament.
- Turn the ornament over and position the second star correspondingly on the back.
- Sew around its center and tack the base of each point without passing through the front star. Knot securely, bury the tail, and trim. The two stars remain separate appliqués that visually frame the apex.
Finishing
Weave in or bury every remaining tail. Shape the tree, trunk, star points, garlands, and snow dots gently with your fingers. Confirm that the trunk, both stars, all six snow dots, both garlands, and both hanger ends are secure. The crocheted loop is the sole hanging attachment; no buttons, beads, wire, or separate hardware are used.
This ornament is decorative and is not intended as a toy.
Customization Ideas
You may change the yarn colors while keeping every component, stitch count, and attachment position the same. Try a snowy white tree with blue details, a tonal green palette, or metallic-look gold yarn for the existing stars, garlands, and loop. A lightly variegated category 4 yarn can also give the tree subtle color variation. Always use compatible yarn weights so the appliqués and panels remain proportional.
Common Mistakes to Avoid
- Counting the turning chain: The ch 1 at the beginning of a row does not count as a stitch.
- Missing an edge decrease: Every tree decrease row begins and ends with a decrease. Check the stated count before continuing.
- Reversing the panel orientation: Decorate only the chosen front panel and keep all knots on its WS.
- Placing decorations too close to the edge: Leave clear space for whipstitching the panels together.
- Overstuffing: Too much fiberfill can bow the lower edge and obscure the triangular silhouette.
- Catching the hanger while seaming: Keep the free loop out of the whipstitches around the apex.
- Attaching both stars through the entire ornament: Sew each star only to its corresponding outer panel.
Troubleshooting
Why does my tree lean to one side?
Check that each decrease row has one decrease at both ends and the correct number of center stitches. Light blocking can correct minor tension differences before assembly.
Why are my two panels different sizes?
Compare row counts and stitch counts, especially on Rows 4, 6, 8, 10, 12, 14, 16, 18, and 20. Work both panels with the same hook and consistent tension.
Why does stuffing show through?
Your fabric may be too loose or the ornament may be overfilled. Use a smaller hook if necessary and add fiberfill sparingly in small pinches.
Why will the star points not lie neatly?
Shape each tapered ray before sewing. Tack the base of all five points as directed, taking care not to pull the stitches so tightly that the star puckers.
Why do the garlands sag or twist?
Confirm that both ends, the center, and two evenly spaced points on each side of the center are secured. Keep the chain facing consistently while tacking it in place.
Care Instructions
Gently spot-clean the ornament with cool water and a small amount of mild detergent. Blot with a towel, reshape, and dry flat. Do not wring or hang it while wet. Storage in a clean, dry box will help protect the star points and prevent the hanging loop from stretching. If you substitute yarn, follow that yarn manufacturer’s care guidance.
Frequently Asked Questions
Is this crochet Christmas tree ornament suitable for beginners?
An adventurous beginner who can work basic stitches, decreases, a magic ring, simple sewing, and light stuffing should be able to complete it. The star points and shaped tree make it an easy/intermediate project.
Can I make the ornament larger or smaller?
Yes. Changing the yarn weight and hook size will change the overall scale, but use the same yarn weight for every component so the proportions remain consistent. The listed finished measurements apply only when the stated yarn, gauge, and hook are used.
Do I need to join the hanging chain into a ring?
No. Leave the 30-chain length unjoined, fold it in half, and secure both ends independently to the WS of the back panel.
How much should I stuff the ornament?
Use only enough fiberfill to create gentle padding. The tree and trunk should remain relatively flat, and the straight lower edge should not bow outward.
Where are the six snow dots positioned?
Place three below the lower garland, two between the garlands, and one above the upper garland. Keep them away from the panel’s joining edge.
Are the two gold stars joined together?
No. They are separate appliqués. Attach one to the front and one to the back, sewing each only to its corresponding panel.
Can this ornament be used as a toy?
No. It is intended as a decorative ornament rather than a toy.