The allure of creating light has fascinated humanity since the dawn of time. From the controlled burn of a candle to the flip of a light switch, we are constantly seeking ways to illuminate our world. This project offers a unique and magical alternative—a self-contained glow that requires no electricity, no heat, and no open flame. Creating your own Glowing Jar is more than a simple craft; it is a hands-on journey into the fascinating world of photochemistry, resulting in a mesmerizing object that serves as a nightlight, a decorative piece, or a stunning scientific demonstration. This guide will not only walk you through the assembly process but will also delve into the profound science that makes it possible, ensuring a project that is as educational as it is beautiful.
This activity is perfectly suited for parents looking for an engaging STEM project, educators seeking a dynamic classroom demonstration, or anyone in need of a touch of whimsical, safe illumination. By understanding the principles behind the glow, you can appreciate the jar not just as an object, but as a miniature laboratory where chemistry and art collide.
The Science of the Glow: Understanding Chemiluminescence
To truly appreciate the magic happening inside your jar, it is essential to understand the scientific principle at work: chemiluminescence. Simply put, chemiluminescence is the emission of light as a result of a chemical reaction. This is distinct from incandescence (light from heat, like a light bulb) or bioluminescence (light from living organisms, like a firefly).
Inside every glow stick, the magic is contained in two separate compartments. The outer plastic tube holds one chemical solution, typically a mixture of a fluorescent dye and a phenyl oxalate compound. Suspended within this liquid is a fragile glass vial containing another chemical, most commonly hydrogen peroxide. When you bend the glow stick, you apply physical pressure that breaks the inner glass vial. This allows the hydrogen peroxide to mix with the phenyl oxalate compound. The resulting chemical reaction excites the atoms in the fluorescent dye. As these atoms return to their normal, stable state, they release their excess energy in the form of light. The color of the light is determined solely by the structure of the dye used.
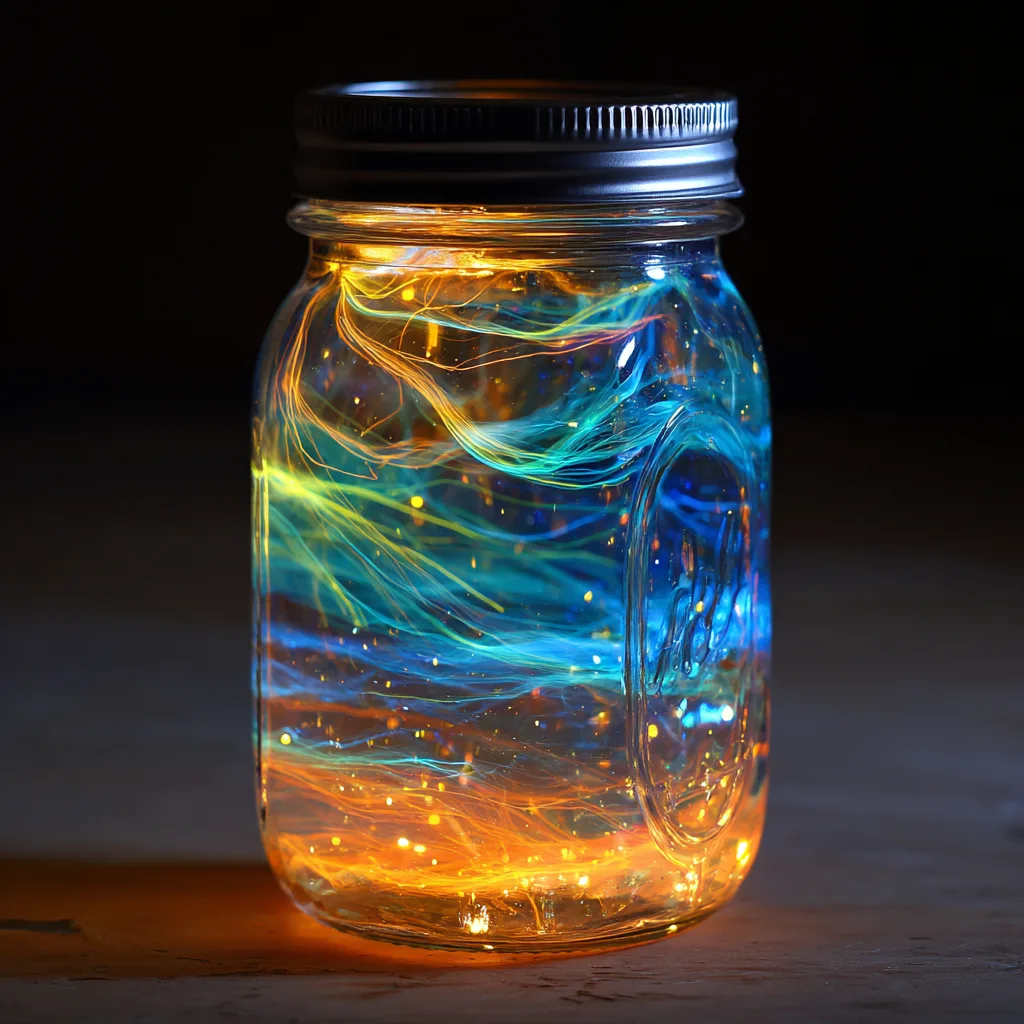
In this project, we are harnessing this potent, reactive liquid and using it as our paint, with the mason jar as our canvas. The dish soap we add acts as a thickening and texturing agent, helping the liquid coat the glass and creating the beautiful, slow-moving swirls that make the effect so dynamic.
Gathering Your Materials: A Detailed Inventory
Preparation is the key to a smooth and successful crafting experience. Here is a comprehensive breakdown of the materials you will need and the specific role each one plays.
The Foundation and Vessel
-
1 Clear Mason Jar with a Tight-Sealing Lid: The jar is the stage for our glowing performance. A standard mason jar is ideal due to its uniform clarity and reliable, threaded lid. The clarity of the glass is non-negotiable, as any tint or texture will diminish the intensity of the glow. The lid must seal perfectly to contain the liquid and prevent any spills.
The Source of Illumination
-
1–3 Glow Sticks: These are the engine of your project. For a soft glow, one stick may suffice, but for a jar that truly lights up a dark room, two or three are recommended. You can use a single bright color like electric green or cyan for a classic look, or mix colors—such as blue and yellow—to create a custom hue. It is important to note that mixing colors of light follows the additive color model, which is different from mixing paints.
The Visual Enhancers
-
A Few Drops of Clear Dish Soap: This is a critical ingredient for transforming a simple puddle of glow liquid into an artistic display. The soap reduces the surface tension of the liquid and creates an emulsion with the air introduced during shaking, resulting in the captivating, lava-lamp-like swirls that define this project.
-
Fine Glitter (Optional): For an extra layer of enchantment, a pinch of fine, iridescent glitter can be added. The glitter particles will catch and reflect the chemiluminescent light, creating sparkling points that mimic a starry night sky within the jar.
The Essential Safety and Utility Gear
-
Protective Gloves: This is a non-negotiable safety item. The chemical solutions inside glow sticks, while present in small quantities, can be irritating to the skin and eyes. Disposable latex or nitrile gloves provide an essential barrier.
-
Sturdy Scissors or Pliers: You will need a strong tool to cleanly snip the end off the plastic glow stick. Pliers can offer a more controlled and safer cutting action than scissors.
-
Newspaper or Paper Towels: Always protect your work surface. While the process is generally contained, having an absorbent layer down will make cleanup instantaneous in case of any accidental drips.
A Step-by-Step Guide to Crafting Your Glowing Jar
With your materials assembled and your workspace prepared, you are ready to begin the step-by-step process of creating your luminous masterpiece.
Step 1: Prioritize Safety and Prepare Your Workspace
The first and most important step is to ensure a safe environment. Lay down newspaper or several layers of paper towels over your table or counter. Put on your protective gloves before you handle the activated glow sticks. Having all your materials organized and within reach will make the process seamless and safe.
Step 2: Activate and Access the Glow Liquid
Take your glow sticks and bend them firmly along their entire length until you hear a distinct crack. This sound confirms that the inner glass vial has shattered. Shake the activated glow sticks vigorously to ensure the chemicals are fully mixed and the glow has reached its maximum intensity. Using your scissors or pliers, carefully snip off the sealed end of one glow stick. It is best to hold the stick vertically, with the end you are cutting positioned directly over the mouth of the open mason jar. This ensures that any liquid will drip directly into the jar.
Step 3: Combine the Ingredients in the Jar
Squeeze the contents of the first glow stick into the jar. You will see the brightly colored liquid flow out. Repeat this process with your remaining glow sticks. Next, add the dish soap. Start with three to five drops; you can always add more later if you desire thicker swirls. The soap is the key to transforming the liquid’s consistency. If you have chosen to use glitter, now is the time to add a generous pinch into the mixture.
Step 4: Seal and Agitate the Mixture
Securely screw the lid onto the jar. Double-check that it is tight to prevent any leakage. Now, for the transformative step: shake the jar. Shake it vigorously for 15 to 30 seconds. You are not just mixing; you are incorporating air into the solution, creating a foamy, heterogeneous mixture. The dish soap will trap tiny air bubbles and suspend the glow liquid around them, creating the signature swirling, cloud-like effect that makes the jar so captivating to observe.
Step 5: Witness the Magic in Darkness
The final step is the revelation. Carry your securely sealed jar into a completely dark room. A closet, a bathroom with no windows, or simply waiting for nighttime is perfect. As your eyes adjust to the darkness, you will witness the full glory of your creation. The jar will emit a soft, pulsating light, with the internal swirls slowly shifting and evolving, creating a living, breathing display of chemiluminescent art. There is no power source, no switch—just pure chemistry creating a pocket of cool, safe light.
Important Safety Protocols and Troubleshooting
A successful project is a safe one. Adhering to these guidelines is paramount.
-
Chemical Safety: While the chemicals in glow sticks are classified as non-toxic in small amounts, they are irritants. Always wear gloves and avoid any contact with your eyes or mouth. Supervise children closely during this activity. If skin contact occurs, wash the area thoroughly with soap and water. If eye contact occurs, flush with water immediately and seek medical advice.
-
Disposal and Longevity: The glow from your jar will last as long as the chemical reaction continues, typically several hours, depending on the quality and type of glow sticks used. Once the glow fades completely, the reaction is over and the chemicals are inert. You can simply unscrew the lid and wash the contents down the drain with plenty of water. The jar itself can be washed and reused for another purpose.
-
Maximizing Your Results: For a brighter jar, use more glow sticks. For more dramatic, slower-moving swirls, experiment with adding a bit more dish soap. If the mixture appears too watery, a drop or two more of soap will help thicken it. Remember, the effect is temporary, so enjoy it while it lasts and consider it a beautiful, ephemeral piece of art.
Creative Variations and Advanced Projects
Once you have mastered the basic technique, you can explore a world of creative variations.
-
Themed Jars: Create a “Galaxy in a Jar” by using deep blue and purple glow sticks and adding both fine silver glitter and larger star-shaped sequins.
-
Layered Colors: Instead of mixing all the colors together, try pouring in one color, adding a drop of soap, then gently adding another color without fully mixing them. This can create stunning layered or marbled effects.
-
Static Displays: For a less swirling, more uniform glow, you can omit the dish soap and shaking. Simply pour in the glow liquid and gently roll the jar to coat the sides. This creates a more consistent, lantern-like effect.
Conclusion: A Confluence of Science and Wonder
The DIY Glowing Jar is a quintessential example of how simple scientific principles can be harnessed to create objects of profound beauty and curiosity. It demystifies a complex chemical process and places it directly into the hands of the creator, fostering a deeper appreciation for the hidden wonders of the physical world. This project is more than a craft; it is an experience that sparks imagination, encourages scientific inquiry, and results in a temporary but unforgettable treasure. So gather your materials, prioritize safety, and embark on the rewarding journey of capturing light in a bottle. The resulting glow will illuminate not just a dark room, but also a sense of accomplishment and wonder.


