Hand-Painted Decorative Rock: Juicy Black Bear Peeking!
Sensory-Rich Introduction with Immediate Craving
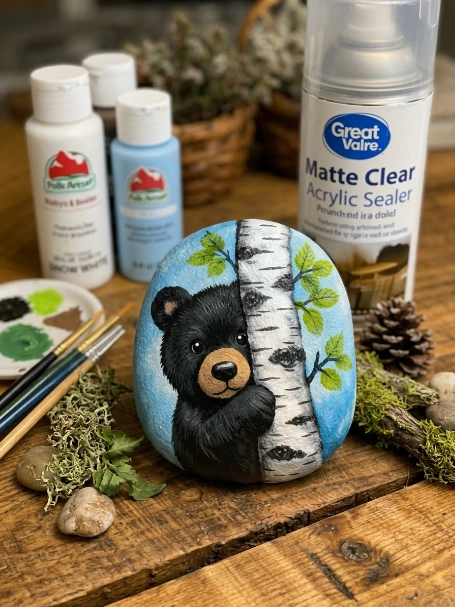
Imagine a serene garden, where the gentle rustle of leaves dances in the breeze, and a charming black bear peeks playfully from behind a white birch tree. This delightful hand-painted decorative rock captures that whimsical moment, inviting nature lovers and art enthusiasts alike to bring a piece of the wild into their homes. As you run your fingers over the smooth surface, the vibrant colors and intricate details evoke a sense of joy and connection to the great outdoors. Whether you’re looking to enhance your garden, create a thoughtful gift, or simply indulge in a relaxing art therapy project, this painted stone craft is perfect for any occasion.
Why You’ll Love This Hand-Painted Decorative Rock
- Texture Contrast: The smooth rock surface juxtaposed with the textured paint creates a visually appealing and tactile experience.
- Flavor Balance: The combination of earthy tones and vibrant colors harmonizes beautifully, making it a feast for the eyes.
- Versatility: This decorative rock can serve multiple purposes, from garden decor to unique gifts, making it a versatile addition to any space.
- Ease of Creation: With simple materials and straightforward steps, this craft is accessible for all skill levels, ensuring a fun and rewarding experience.
- Universal Appeal: The charming imagery of a bear and birch tree resonates with nature lovers, children, and adults alike, making it a beloved piece for everyone.
Essential Tools & Preparation Strategy
- Paintbrushes: Essential for applying paint smoothly and creating fine details. Use a variety of sizes for different effects.
- Pencil: Important for sketching the design before painting, allowing for adjustments without permanent marks.
- Sealer: Protects the artwork from weather and wear, ensuring longevity.
- Palette: Useful for mixing paint colors, helping you achieve the perfect shades.
- Water Container: Needed for rinsing brushes between colors, keeping your palette clean.
- Paper Towels: Handy for cleaning brushes and wiping excess paint, ensuring precision in your work.
- Smooth Flat Rock: The canvas for your artwork; choose one that is approximately 6-8 inches in size for optimal detail.
- White Paint Marker (Optional): For adding fine details and highlights, enhancing the overall design.
Ingredients & Their Roles in This Hand-Painted Decorative Rock
- Smooth Flat Rock: The base for your artwork, providing a natural canvas.
- Acrylic Paints:
- Light Blue: For the sky background.
- White: For the birch tree trunk.
- Black: For the bear’s fur and bark details.
- Brown: For the bear’s muzzle.
- Gray: For shadows on the birch tree.
- Various Shades of Green: For leaves and branches, adding life to the design.
- Thin Detail Brushes: For precision work, allowing you to create intricate details.
- Pencil: For sketching the initial design, ensuring accuracy.
- White Paint Marker (Optional): For fine detailing and highlights.
- Matte or Gloss Sealer: To finish and protect your artwork.
Step-by-Step Guide to Perfect Hand-Painted Decorative Rock
- Paint the Base: Cover the stone with light blue paint and let it dry completely (approximately 1 hour).
- Sketch the Design: Using a pencil, lightly draw the birch tree trunk, branches, and the outline of the bear.
- Paint the Birch Tree: Apply a white base for the tree, then add black irregular bark marks and thin gray shadows for depth.
- Paint the Bear: Layer dark black or navy for the bear’s fur, add a brown muzzle, and small highlights around the eyes and fur for detail.
- Add Leaves and Branches: Use small brush dabs to create leaves in different shades of green, adding dimension to the design.
- Seal the Rock: Once the paint is dry, apply a clear sealer to protect the artwork and add shine.
Chef’s Notes & Pro Tips for Flawless Results
- Make-ahead Instructions: Prepare the rock by cleaning and drying it a day in advance for optimal painting conditions.
- Storage Details: Store the painted rock in a cool, dry place to prevent damage and fading.
- Substitution Options: If you don’t have a white paint marker, use a fine brush with white paint for detailing.
- Customization Options: Feel free to change the colors or add personal touches to make the rock uniquely yours.
Avoid These Common Cooking Mistakes
- Not Sealing the Rock: Can lead to fading and damage from weather exposure. Always apply a sealer.
- Using Too Much Water with Acrylics: Can dilute colors and affect coverage. Use water sparingly.
- Skipping the Drying Time: Painting over wet layers can cause colors to blend unintentionally. Allow each layer to dry completely.
- Not Sketching the Design First: Can result in uneven proportions. Always sketch lightly before painting.
- Using Low-Quality Paints: Can lead to poor color payoff and durability. Invest in good quality acrylic paints.
- Overloading the Brush with Paint: Can create messy strokes. Use a light hand for better control.
- Ignoring the Rock’s Natural Shape: Can lead to awkward designs. Work with the rock’s contours for a more natural look.
Creative Variations & Customizations
- Seasonal Themes: Change the bear’s surroundings to reflect different seasons, like autumn leaves or winter snow.
- Different Animals: Swap the bear for other wildlife, such as deer or owls, for a unique twist.
- Color Variations: Experiment with different color palettes to match your home decor or personal style.
- Personalized Messages: Add a meaningful quote or name to make the rock a special gift.
- Larger Rocks: Use bigger stones for more elaborate designs, allowing for greater detail and creativity.
Perfect Pairings: What to Serve With Hand-Painted Decorative Rock
- Garden Decorations: Perfect for adding a whimsical touch to flower beds and outdoor spaces.
- Gifts: A thoughtful handmade present for nature lovers, friends, or family.
- Desk Decor: Brightens up a workspace with a touch of creativity and inspiration.
- Paperweights: Functional and decorative for holding down papers in a stylish way.
- Handmade Market Crafts: Ideal for selling at local craft fairs, showcasing your artistic skills.
- Art Therapy Projects: A relaxing activity for stress relief, perfect for group workshops.
- Outdoor Patio Decor: Enhances the ambiance of outdoor seating areas with a natural touch.
- Children’s Room Decor: A fun addition to a child’s room or play area, sparking imagination.
Storage & Meal Prep Instructions
- Fridge/Freezer Storage: Not applicable for this craft, but ensure the painted rock is kept in a cool, dry place to prevent damage.
- Reheating Methods: Not applicable, as this is a decorative item rather than a food item.
Nutrition Facts & Health Insights
- Serving Size: 1 decorative rock
- Calories: 0
- Sugar: 0 grams
- Sodium: 0 milligrams
- Fat: 0 grams
- Saturated Fat: 0 grams
- Unsaturated Fat: 0 grams
- Trans Fat: 0 grams
- Carbohydrates: 0 grams
- Fiber: 0 grams
- Protein: 0 grams
- Cholesterol: 0 milligrams
Frequently Asked Questions
- Can I use different types of paint? Yes, but acrylics are recommended for their durability and ease of use.
- What if I make a mistake while painting? You can paint over mistakes once the layer is dry; just be patient.
- How long will the painted rock last outdoors? With proper sealing, it can last for several years, but exposure to harsh weather may affect its longevity.
- Can I use a different type of rock? Yes, as long as it’s smooth and flat, any rock can work.
- What if I don’t have a sealer? You can skip sealing, but the rock will be more vulnerable to fading and damage.
- Is this project suitable for children? Yes, with supervision, it can be a fun and creative activity for kids.
- How do I clean my brushes? Rinse them in water immediately after use to prevent paint from drying on the bristles.
- Can I sell my painted rocks? Absolutely! Handmade crafts are popular at markets and online.
Final Inspiration & Kitchen Confidence
As you embark on this creative journey of painting your decorative rock, remember that each stroke is a celebration of your artistic expression. Embrace the process, and don’t be afraid to make it your own. Whether you’re gifting it to a loved one or keeping it as a cherished piece in your home, take pride in your creation. Now, gather your materials, unleash your creativity, and let the world see your beautiful hand-painted black bear peeking from behind a birch tree!
Print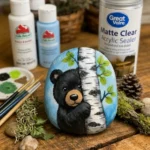
“Hand-Painted Decorative Rock: Juicy Black Bear Peeking!”
- Total Time: 1 hour
- Yield: 1 decorative rock
- Diet: n/a
Description
This hand-painted decorative rock features a charming black bear peeking from behind a birch tree, creating a delightful focal point for any garden or home. The smooth texture of the rock contrasts beautifully with the vibrant acrylic colors, while the intricate details of the bear and tree evoke a sense of whimsy and connection to nature.
Ingredients
- Smooth flat rock – 1 piece, approximately 6-8 inches in size
- Acrylic paints – light blue, white, black, brown, gray, and various shades of green
- Thin detail brushes – 2-3 sizes for precision work
- Pencil for sketching – 1 piece
- White paint marker (optional) – for fine details
- Matte or gloss sealer – 1 can for finishing
Instructions
- Paint the Base: Cover the stone with light blue paint and let dry completely (approximately 1 hour).
- Sketch the Design: Using a pencil, lightly draw the birch tree trunk, branches, and the outline of the bear.
- Paint the Birch Tree: Apply a white base for the tree, then add black irregular bark marks and thin gray shadows for depth.
- Paint the Bear: Layer dark black or navy for the bear’s fur, add a brown muzzle, and small highlights around the eyes and fur for detail.
- Add Leaves and Branches: Use small brush dabs to create leaves in different shades of green, adding dimension to the design.
- Seal the Rock: Once the paint is dry, apply a clear sealer to protect the artwork and add shine.
Notes
- Make-ahead instructions: You can prepare the rock by cleaning and drying it a day in advance.
- Storage details: Store the painted rock in a cool, dry place to prevent damage.
- Substitution options: If you don’t have a white paint marker, you can use a fine brush with white paint for detailing.
- Prep Time: 30 minutes
- Cook Time: 0 minutes
- Category: crafts
- Method: painting
- Cuisine: n/a
Nutrition
- Serving Size: 1 decorative rock
- Calories: 0
- Sugar: 0 grams
- Sodium: 0 milligrams
- Fat: 0 grams
- Saturated Fat: 0 grams
- Unsaturated Fat: 0 grams
- Trans Fat: 0 grams
- Carbohydrates: 0 grams
- Fiber: 0 grams
- Protein: 0 grams
- Cholesterol: 0 milligrams
Keywords: hand-painted decorative rock, black bear, birch tree, painted stone craft, nature art, acrylic painting, garden decoration, handmade gifts, art therapy, creative projects, DIY crafts, painted rocks


