
Faux Stained Glass Lanterns: Juicy Colors in Glass!
Sensory-Rich Introduction with Immediate Craving
Imagine a warm summer evening, the sun setting in a cascade of colors, and your garden illuminated by the soft, enchanting glow of faux stained glass lanterns. Each lantern, a unique masterpiece, radiates vibrant hues of emerald, ruby, and sapphire, casting playful shadows that dance across your patio. This DIY project not only transforms ordinary glass bottles into stunning decor but also evokes a sense of nostalgia, reminiscent of childhood days spent crafting with loved ones. Perfect for outdoor gatherings, cozy nights in, or as heartfelt gifts, these lanterns create an ambiance that invites connection and celebration.
Why You’ll Love This Faux Stained Glass Lanterns
- Textural Contrast: The smooth, glossy finish of the glass paint juxtaposed with the textured outlines creates a visually appealing contrast that captivates the eye.
- Flavor Balance: The vibrant colors harmonize beautifully, allowing you to mix and match shades to suit any occasion or mood.
- Versatility: These lanterns can be customized for any season or event, from festive holidays to serene summer nights, making them a year-round decor staple.
- Ease of Creation: With simple materials and straightforward steps, even novice crafters can achieve stunning results without the need for advanced skills.
- Universal Appeal: The enchanting glow and colorful designs make these lanterns a hit with all ages, perfect for family gatherings, parties, or as a charming addition to your home.
Essential Tools & Preparation Strategy
- Clear Glass Bottles or Jars: Essential for creating the lanterns; different shapes enhance visual interest.
- Mod Podge Gloss: Seals the paint and adds a glossy finish, ensuring a professional look.
- Gallery Glass Liquid Leading: Provides the stained-glass outline effect, crucial for achieving the authentic look.
- Small Paintbrushes: Necessary for detailed painting work, allowing for precision in filling sections.
- LED Fairy Lights or Tea Lights: Create the glowing effect inside the lanterns, essential for the final ambiance.
- Rubbing Alcohol: Ensures the glass is clean for optimal paint adhesion, preventing peeling.
- Paper Towels: Useful for cleaning up spills and drying the bottles during preparation.
- Cotton Pads: Help in cleaning the glass before painting, ensuring a smooth application.
Ingredients & Their Roles in This Faux Stained Glass Lanterns
- Clear Glass Bottles or Jars: The canvas for your artwork, providing the structure for the lanterns.
- Mod Podge Gloss: Acts as a sealant, enhancing durability and shine.
- Gallery Glass Liquid Leading: Creates the outlines that mimic traditional stained glass, adding depth.
- Glass Paint in Assorted Colors: Provides the vibrant hues that will shine through when illuminated.
- Small Paintbrushes: Allow for precision in applying paint and details.
- LED Fairy Lights or Tea Lights: The light source that brings your lanterns to life.
- Paper Towels: Essential for cleanup and drying.
- Cotton Pads + Rubbing Alcohol: Used for cleaning the glass to ensure paint adheres properly.
Step-by-Step Guide to Perfect Faux Stained Glass Lanterns
- Prep the Glass: Wash and dry all bottles thoroughly. Wipe the outside with rubbing alcohol to ensure a clean surface for paint adhesion.
- Create the “Leading”: Using the liquid leading or black dimensional paint, draw stained-glass style outlines directly onto the bottle. Let the outlines dry completely for 6–8 hours.
- Add the Color: Carefully fill each section with translucent glass paint using small brushes. Aim for even application for a smooth finish.
- Let Dry: Allow the bottles to dry upright for at least 24 hours. Avoid touching the painted areas to prevent fingerprints.
- Add the Lights: Place warm LED fairy lights or battery tea lights inside each bottle, allowing the light to shine through the colors.
- Final Touches: Ensure the lights are secure and adjust as necessary for the best visual effect.
Chef’s Notes & Pro Tips for Flawless Results
- Make-ahead: Prepare the bottles a day in advance and let them dry overnight for best results.
- Storage: Store any leftover glass paint in a cool, dry place, tightly sealed to maintain its quality.
- Substitutions: If liquid leading is unavailable, black acrylic paint can be used, though it may lack the same dimensional quality.
- Customization: Experiment with different color combinations and patterns to create unique designs tailored to your taste.
Avoid These Common Cooking Mistakes
- Not Cleaning the Glass Properly: Leads to paint peeling off. Always wipe with rubbing alcohol before painting.
- Applying Paint Too Thickly: Results in uneven drying and a cloudy finish. Use thin layers and allow each to dry before adding more.
- Touching Painted Areas While Drying: Causes fingerprints. Avoid handling until fully dry.
- Using Non-Translucent Paint: Won’t achieve the stained glass effect. Stick to glass paints specifically designed for this purpose.
- Not Allowing Enough Drying Time: Can ruin the finish. Be patient and allow at least 24 hours for drying.
- Ignoring the Shape of the Bottles: Can lead to awkward designs. Choose bottles with interesting shapes for better visual appeal.
- Forgetting to Secure the Lights: Can lead to them falling out. Ensure the lights are snugly placed inside the bottles.
Creative Variations & Customizations
- Seasonal Themes: Use autumn colors like orange and brown for fall, or pastel shades for spring.
- Holiday Designs: Create themed lanterns for Christmas with red and green, or Halloween with orange and black.
- Personalized Gifts: Customize lanterns with names or initials for a thoughtful gift.
- Different Sizes: Use a mix of small and large bottles for varied heights in your display.
- Outdoor Variations: Use weather-resistant paint for lanterns intended for outdoor use.
Perfect Pairings: What to Serve With Faux Stained Glass Lanterns
- Dinner Parties: Use as centerpieces to create a warm atmosphere that complements your meal.
- Outdoor Gatherings: Hang them in trees to add a magical touch to your garden.
- Pathway Lighting: Place them along pathways for a whimsical garden effect.
- Children’s Rooms: Use them as night lights for a soft glow that comforts little ones.
- Gift Ideas: Present them to friends as personalized home decor.
- Holiday Decor: Incorporate them into festive decorations for a cheerful look.
- Windowsill Displays: Catch sunlight during the day for a beautiful effect.
- Themed Displays: Create a cohesive look with different colors for seasonal celebrations.
Storage & Meal Prep Instructions
- Fridge/Freezer Storage: Store any leftover glass paint in a cool, dry place, tightly sealed. The lanterns themselves can be stored indoors to protect them from the elements.
- Reheating Methods: Not applicable, as these are decorative items rather than food.
Nutrition Facts & Health Insights
- Serving Size: N/A
- Calories: N/A
- Sugar: N/A
- Sodium: N/A
- Fat: N/A
- Saturated Fat: N/A
- Unsaturated Fat: N/A
- Trans Fat: N/A
- Carbohydrates: N/A
- Fiber: N/A
- Protein: N/A
- Cholesterol: N/A
Frequently Asked Questions
- Can I use regular paint instead of glass paint? No, regular paint will not achieve the translucent effect needed for faux stained glass.
- How long does the project take? Total time is approximately 24 hours and 30 minutes, including drying time.
- What if I don’t have liquid leading? Black acrylic paint can be used as a substitute, though it may not have the same dimensional quality.
- Can I use these lanterns outdoors? Yes, but ensure to use weather-resistant materials if they will be exposed to the elements.
- How do I clean the lanterns? Wipe gently with a damp cloth; avoid harsh chemicals that could damage the paint.
- What if I make a mistake while painting? You can carefully scrape off the paint with a razor blade and start over.
- Can I use battery-operated lights? Yes, battery-operated tea lights are a great option for safety and convenience.
- How do I store the lanterns? Store them in a cool, dry place, away from direct sunlight to prevent fading.
Final Inspiration & Kitchen Confidence
As you embark on this creative journey of crafting faux stained glass lanterns, remember that each piece you create is a reflection of your unique style and imagination. Celebrate your achievements, whether it’s your first lantern or a whole collection. Embrace the joy of crafting and let your creativity shine! Gather your materials, invite friends or family to join in, and transform your space into a vibrant oasis of color and light. Happy crafting!
Print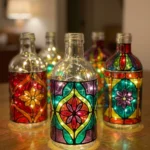
Faux Stained Glass Lanterns: Juicy Colors in Glass!
- Total Time: 24 hours 30 minutes
- Yield: 4 lanterns 1x
- Diet: N/A
Description
Transform ordinary glass bottles into stunning faux stained glass lanterns that radiate vibrant colors. The smooth, glossy finish of the glass paint combined with the warm glow of LED lights creates a mesmerizing ambiance, perfect for any occasion.
Ingredients
- 4 clear glass bottles or jars (different shapes look best)
- 1 bottle Mod Podge Gloss
- 1 bottle Gallery Glass Liquid Leading or black dimensional paint
- Glass paint in assorted colors (emerald, ruby, amber, sapphire, purple)
- Small paintbrushes
- LED fairy lights or tea lights
- Paper towels
- Cotton pads + rubbing alcohol (for cleaning glass)
Instructions
- Prep the Glass: Wash and dry all bottles thoroughly. Wipe the outside with rubbing alcohol so the paint adheres smoothly without fingerprints or residue.
- Create the “Leading”: Using the liquid leading or black dimensional paint, draw stained-glass style outlines directly onto the bottle. Ideas include floral vines, geometric shapes, mandalas, mosaic panels, or butterfly and leaf patterns. Let the black outlines dry completely for 6–8 hours before painting.
- Add the Color: Use small brushes to carefully fill each section with translucent glass paint. Color combinations that glow beautifully include emerald green + gold, ruby red + amber, and sapphire blue + violet. Apply paint evenly so it looks smooth and glossy when dry.
- Let Dry: Allow the bottles to dry upright for at least 24 hours. Do not touch the painted areas while drying to avoid fingerprints.
- Add the Lights: Place warm LED fairy lights or battery tea lights inside each bottle. The warm light will shine through the translucent colors and create a glowing faux stained-glass effect.
Notes
- Make-ahead: You can prepare the bottles a day in advance and let them dry overnight.
- Storage: Store any leftover glass paint in a cool, dry place, tightly sealed.
- Substitutions: If you don’t have liquid leading, you can use black acrylic paint for a similar effect, though it may not have the same dimensional quality.
- Prep Time: 30 minutes
- Cook Time: 0 minutes
- Category: Crafts
- Method: Painting
- Cuisine: N/A
Nutrition
- Serving Size: N/A
- Calories: N/A
- Sugar: N/A
- Sodium: N/A
- Fat: N/A
- Saturated Fat: N/A
- Unsaturated Fat: N/A
- Trans Fat: N/A
- Carbohydrates: N/A
- Fiber: N/A
- Protein: N/A
- Cholesterol: N/A
Keywords: Faux Stained Glass Lanterns, DIY Crafts, Home Decor, Glass Painting, LED Lanterns, Stained Glass Effect, Craft Projects, Colorful Lanterns, Handmade Gifts, Outdoor Decor, Party Decorations, Creative Lighting


