Open a drawer and catch a quiet drift of lavender. Walk into a closet and find it smelling faintly of eucalyptus and mint. Step into your car and breathe in something warm and citrus-bright. No synthetic sprays. No plastic diffusers. No mystery chemicals. Just a small, beautiful little stone you made yourself, doing its quiet work in the background of your day.
DIY Aroma Stones are one of those projects that surprises you — both with how simple they are to make and with how genuinely lovely the results are. They look like something from a high-end wellness boutique. They smell like whatever you love most. They cost a fraction of what you’d pay for store-bought air fresheners. And they last for weeks, releasing their scent slowly and naturally into any space where you place them.
Made from just baking soda, cornstarch, water, and a few drops of your favorite essential oil — with optional color from natural mica powder or food coloring — these little stones are as satisfying to make as they are to use. Whether you’re looking for a natural alternative to synthetic air fresheners, a thoughtful handmade gift, a calming weekend craft project, or simply something beautiful and functional to make at home, aroma stones deliver on every count.
Here’s everything you need to know to make them perfectly.
What Are DIY Aroma Stones?
Aroma stones are small, solid objects made from a dried mixture of absorbent materials — most commonly baking soda and cornstarch — that have been infused with essential oils. As the stone sits in a drawer, closet, bathroom, or car, it slowly releases the fragrance of the oils into the surrounding air, acting as a long-lasting, completely natural air freshener.
Unlike liquid diffusers or spray fresheners, aroma stones release their scent passively — no electricity, no batteries, no ongoing cost. They’re solid and mess-free, beautiful enough to display rather than hide, and completely customizable in both scent and appearance.
When shaped in silicone molds and tinted with soft mica powder, they look like artisan spa products. When pressed into simple shapes with cookie cutters, they look charming and handcrafted in the best possible way. Grouped together in a small dish or mesh sachet, they make gifts that people actually use and genuinely appreciate.
What You’ll Need
For the base:
- 1 cup baking soda — The primary absorbent material. Baking soda is excellent at holding and slowly releasing fragrance, and it also naturally neutralizes odors in the spaces where it’s placed.
- ½ cup cornstarch — Adds structure and smooth texture to the dough, preventing cracking during drying and giving the finished stones a fine, almost ceramic surface quality.
- ⅓ to ½ cup water — Added gradually to bring the dry ingredients together into a workable dough. The exact amount varies depending on humidity and the specific products you’re using.
For fragrance and color:
- 10 to 20 drops essential oil — The heart of the whole project. Lavender, lemon, eucalyptus, peppermint, orange, rose, clary sage — any essential oil or blend you love will work. The exact amount determines the intensity of the scent; more drops produce a stronger, longer-lasting fragrance.
- Natural food coloring or mica powder (optional) — For color. Mica powder, available at craft stores and online, produces the most beautiful results — soft, slightly iridescent, mineral-looking tones that give the stones a genuinely luxurious appearance. Natural food coloring works well for pastel, matte tones.
For shaping and storage:
- Silicone molds — The easiest and most reliable way to shape aroma stones. Silicone releases the dried stones cleanly without cracking. Hearts, flowers, geometric shapes, shells — any silicone mold designed for soap or chocolate making works perfectly.
- Cookie cutters — An alternative to molds. Press the dough out flat, cut shapes, and transfer them to a drying surface.
- Airtight container or mesh sachets — For storing the finished stones and preserving their scent between uses.
Step-by-Step Instructions
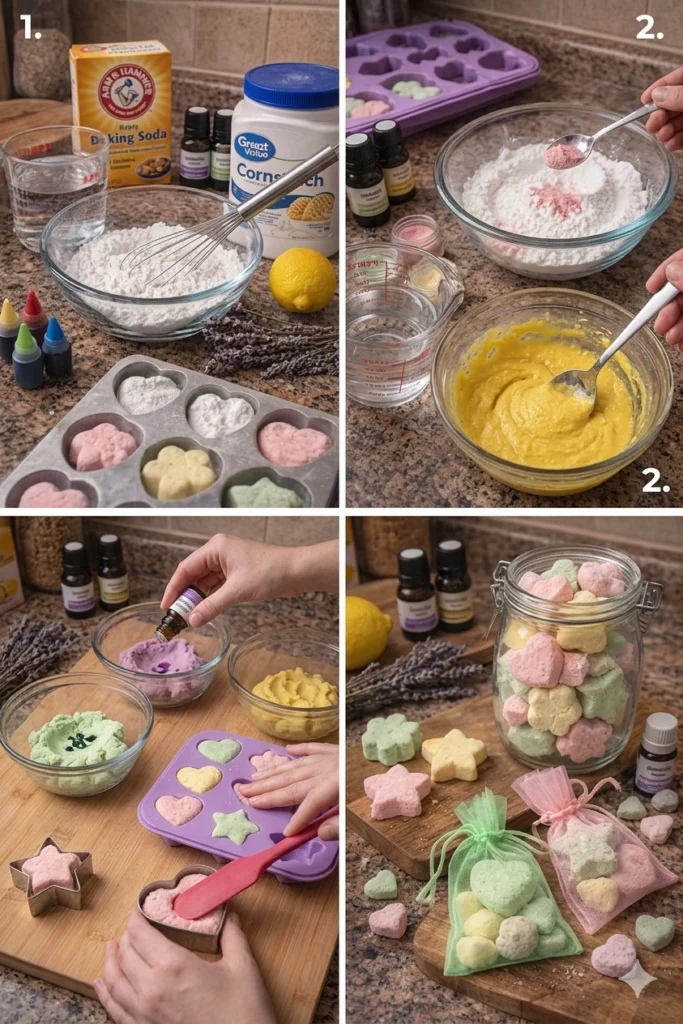
Step 1: Combine the Dry Ingredients
In a mixing bowl, whisk together the baking soda and cornstarch until they are fully combined and lump-free. Spend a little time on this step — a thoroughly mixed dry base produces a smoother, more even dough and a finer-textured finished stone.
Whisking rather than stirring is key here. The goal is to fully integrate the two powders at a fine level, which a whisk accomplishes far more effectively than a spoon.
Step 2: Add Color (Optional)
If you’re coloring your stones, add the coloring now — to the dry mixture before any water goes in. This gives the most even, consistent color distribution throughout the final dough.
For mica powder: add a small amount — a quarter to half teaspoon — and whisk thoroughly until the color is evenly distributed through the powder. Mica gives a soft, luminous, slightly pearlescent result that looks strikingly beautiful in the finished stone.
For natural food coloring: you can add it with the dry ingredients as a powder, or add it to the water before mixing. Either approach works well and produces soft, matte, organic-looking tones.
Start conservatively — you can always add more color, but you can’t remove it. For most applications, lighter, softer tones look more refined and intentional than deeply saturated colors, though there are no rules.
Step 3: Add Water Gradually
This is the most important step to do slowly and patiently. Add your water a little at a time — a tablespoon at a time is ideal — stirring thoroughly between each addition. You’re looking for the mixture to come together into a dough that is thick, firm, and pliable — similar in consistency to soft playdough or cookie dough.
The exact amount of water needed varies based on the humidity in your environment and the specific brands of baking soda and cornstarch you’re using. Start with a third of a cup, assess the texture, and add more only if needed. A dough that is too wet will crack dramatically as it dries; a dough that is too dry will crumble when shaped.
The right consistency feels smooth, holds its shape when pressed, and doesn’t stick to your hands. If you accidentally add too much water and the dough becomes sticky, adding a small additional amount of baking soda will help bring it back.
Step 4: Add Essential Oils
Add your essential oil drops directly to the dough and knead them in thoroughly. Work the dough with your hands — folding, pressing, turning — until the oil is evenly distributed throughout the entire mixture and no concentrated pockets remain.
The amount of oil you use determines the strength and longevity of the scent. Ten drops produces a subtle, gentle fragrance. Twenty drops or more produces a stronger, more persistent scent that will last longer in the finished stone. For gifting purposes, err toward the higher end — people consistently prefer a noticeably scented stone to one that is so subtle it’s barely there.
For blended scents, this is the moment to experiment. Lavender and lemon together is bright and calming. Eucalyptus and peppermint is energizing and fresh. Orange and clove is warm and grounding. Geranium and bergamot is floral and sophisticated. Trust your nose.
Step 5: Shape Your Stones
For silicone molds: press the dough firmly into each cavity, using a finger or the back of a spoon to pack it in tightly and smooth the top surface flat. Overfill slightly, then scrape the surface level with a flat edge for a clean, professional finish.
For cookie cutters: roll or press the dough out on a piece of parchment paper to an even thickness of approximately half an inch. Press cookie cutters firmly through the dough and carefully transfer each shape to a drying surface using a thin spatula.
For freeform stones: roll portions of dough between your palms into smooth balls or smooth them into organic pebble shapes for a more naturalistic look.
Take a moment with each stone to smooth any rough edges, fill any gaps, and refine the shape — a little care at this stage produces a noticeably more polished finished piece.
Step 6: Air Dry for 24 to 48 Hours
Place your filled molds or shaped stones somewhere flat and undisturbed and allow them to air dry completely at room temperature. This typically takes between 24 and 48 hours, depending on the size and thickness of the stones and the humidity of your environment.
Resist the temptation to rush this stage by putting them in the oven. While aroma stones can technically be oven-dried, high heat causes the essential oils to evaporate before the stone has fully set — dramatically reducing the scent intensity of the finished product. Room temperature drying is slower but preserves far more of the fragrance.
When fully dry, the stones will feel completely firm and solid, with no give when pressed. Their color will have lightened slightly from the wet state, and the surface will have developed a fine, smooth texture. Gently flex a silicone mold to release the stones — they should pop out cleanly.
Step 7: Store and Use
Once fully dry, store your aroma stones in an airtight container if you’re not using them immediately — this preserves their scent for when you’re ready to gift or place them.
To use, simply place them wherever you’d like a gentle, natural fragrance: in a drawer, on a closet shelf, in a car cupholder, in a bathroom, in a gym bag, beside a bed, inside a shoe — anywhere that benefits from a quiet, consistent scent presence.
When the scent begins to fade over time, refresh it by adding a few more drops of essential oil directly to the stone’s surface. The stone will absorb the oil and resume releasing fragrance — effectively resetting the scent and extending the life of the stone almost indefinitely.
The Science of How Aroma Stones Work
Understanding what’s happening inside the stone makes the results feel even more satisfying.
Why Baking Soda Is the Perfect Base
Baking soda — sodium bicarbonate — is one of the most naturally absorbent substances available in any home. Its crystalline structure contains millions of tiny pores and cavities at a microscopic level, and these spaces act as reservoirs that trap and hold essential oil molecules. As air moves across the stone’s surface, it picks up oil molecules and carries them into the surrounding space as fragrance.
Baking soda is also mildly alkaline, which means it actively neutralizes acidic odor molecules in the surrounding air — the mechanism behind its well-known use as a refrigerator deodorizer. An aroma stone doesn’t just add pleasant fragrance to a space; it simultaneously neutralizes unpleasant odors. The result is genuinely fresher air, not just masked smells.
What Cornstarch Contributes
Cornstarch serves as the structural binder in the dough. On its own, a baking soda and water mixture would crack severely as it dried, because the baking soda crystals don’t bond to each other as they dehydrate. Cornstarch molecules form long chains that act as a flexible matrix, holding the baking soda particles together and producing a dense, crack-resistant stone with a smooth, almost ceramic surface quality.
How Fragrance Is Released
Essential oils are complex mixtures of aromatic organic compounds — terpenes, alcohols, esters, and others — that evaporate at room temperature. When these compounds are trapped in the porous structure of a baking soda stone, they evaporate slowly and continuously, releasing fragrance into the air at a steady rate. The porous structure of the stone modulates this evaporation — slowing it down compared to an open dish of oil and extending the life of the fragrance significantly.
Warmer temperatures accelerate evaporation, which is why aroma stones placed in warm spaces (like cars in summer) tend to release scent more intensely and fade faster than stones in cool, stable environments.
Scent Pairing Guide: Finding Your Perfect Blend
Part of what makes aroma stones so enjoyable is the process of choosing and blending scents. Here are some tried-and-tested combinations to inspire your next batch:
For calm and relaxation: Lavender and cedarwood. Chamomile and bergamot. Sandalwood and vanilla. These warm, grounding blends are perfect for bedrooms, closets, and anywhere you want to cultivate a sense of quiet and peace.
For energy and clarity: Peppermint and eucalyptus. Lemon and rosemary. Grapefruit and spearmint. These bright, sharp combinations are ideal for home offices, gyms, and cars — spaces where you want to feel alert and focused.
For a clean, fresh home: Lemon and white tea. Eucalyptus and green tea. Orange and basil. These light, clean blends are wonderful in bathrooms, kitchens, and hallways.
For warmth and comfort: Orange and clove. Cinnamon and vanilla. Cardamom and ginger. These rich, spiced blends are perfect for autumn and winter, and they make especially beautiful seasonal gifts.
For romance and luxury: Rose and ylang-ylang. Jasmine and neroli. Patchouli and bergamot. These complex, sophisticated blends feel genuinely indulgent in a bedroom or bathroom.
Seasonal Variations to Try All Year
One of the most enjoyable things about making aroma stones at home is adapting them to the seasons. The same base recipe works year-round — only the scents and colors change.
Spring: Soft pink or lavender stones scented with rose, jasmine, and light citrus. Flower-shaped molds feel perfectly seasonal.
Summer: Bright yellow or aqua stones with lemon, orange, and fresh mint. Shell and star molds evoke the beach.
Autumn: Warm amber and rust tones using mica in bronze and copper shades. Cinnamon, orange peel, clove, and nutmeg fill a home with everything a fall day promises.
Winter: Cool white or icy blue stones with eucalyptus, peppermint, and a touch of fir or pine. Heart molds make perfect holiday gifts.
Gifting Ideas
Aroma stones make genuinely exceptional handmade gifts — personal, practical, beautiful, and clearly made with thought and care. Here are some presentation ideas that elevate them from “homemade” to “handcrafted”:
Gift jar: Arrange a selection of stones in a small glass jar tied with ribbon or twine. Include a small card listing the essential oils used.
Mesh sachet set: Place three or four stones in a drawstring mesh bag — perfect for gifting as a drawer or closet freshener.
Seasonal gift box: Fill a small kraft paper box with tissue paper and arrange a set of coordinated stones. A simple handwritten label with the scent blend adds a thoughtful, artisan touch.
Hostess gift: A small cluster of beautiful aroma stones in a ceramic dish makes a more thoughtful and memorable hostess gift than a bottle of wine — and one that will be noticed and used for weeks.
Tips for the Best Results
Knead the oil in very thoroughly. Pockets of concentrated oil in the dough will cause uneven drying and strong spots in the finished stone’s fragrance. Take the time to fully distribute the oil through thorough kneading.
Let them dry completely before storing. Sealing incompletely dried stones in an airtight container traps residual moisture and can cause mold to develop over time. When in doubt, give them another 12 hours.
Use mica powder for the most beautiful color. Natural food coloring produces soft, matte tones that are lovely in their own right, but mica powder gives the stones a subtle luminosity and mineral quality that looks genuinely premium.
Refresh with more oil as needed. The fragrance in aroma stones doesn’t last forever, but the stone itself does. A few drops of essential oil applied directly to an old stone restores it to full fragrance — making them a genuinely long-lasting investment rather than a single-use product.
Make matching sets. Stones in three or four coordinating colors with a single scent blend look beautiful together in a dish. Stones in a single color with two or three coordinating scents make a sophisticated sampler set.
Final Thoughts
There’s a particular satisfaction in making something useful and beautiful from the simplest possible ingredients. A cup of baking soda, a scoop of cornstarch, water, and a few drops of oil — and from these, something that sits on a shelf and quietly perfumes the air around it for weeks. Something people pick up, hold, smell, and ask about. Something that costs almost nothing but feels genuinely luxurious.
Aroma stones are a reminder that the best home pleasures are usually the simplest ones — made by hand, scented with intention, and placed where they’ll be encountered unexpectedly in the small moments of an ordinary day.
Make a batch for your home. Make another for someone you love. The whole process — from the first whisk of powder to the first drift of lavender from a finished stone — is exactly as lovely as it sounds.


