There’s a moment — somewhere between the first coat of paint and the instant you slip in the LED light and watch a warm golden glow spill through tiny windows — when the shoe house stops being a craft project and becomes something else entirely. Something that looks like it belongs in a fairy tale forest. Something that makes adults stop and stare just as long as the kids do.
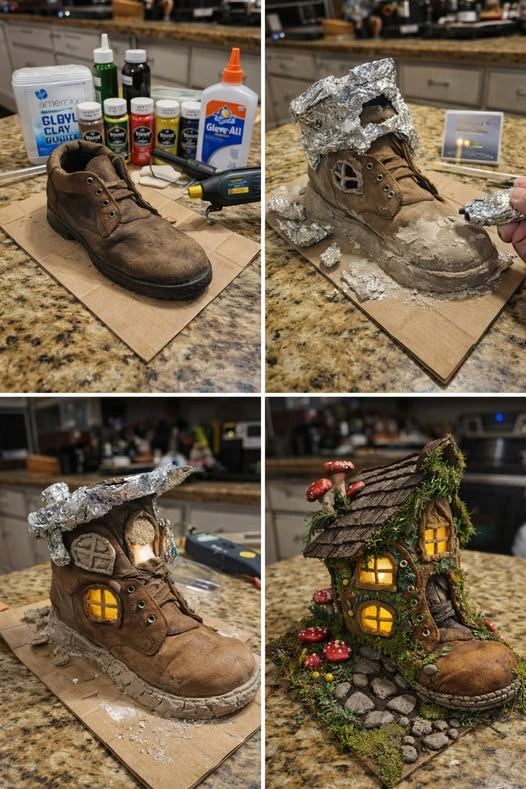
The Fairy Shoe House is one of the most rewarding and visually spectacular DIY miniature projects you can make at home. It starts with something as humble as an old shoe or a plastic bottle, and through a series of satisfying, unhurried steps — clay work, painting, texturing, dry brushing, and finally the magic of miniature lighting — it transforms into a glowing, detailed, impossibly charming little home that looks like it belongs to a woodland fairy or a storybook character.
This is not a quick craft. It asks for patience, a little artistic courage, and a willingness to work in stages. What it gives back is a finished piece that is genuinely extraordinary — the kind of thing you display on a bookshelf, photograph for hours, and never quite believe you made yourself.
Here is the complete guide, step by step, to making the most beautiful fairy shoe house you’ve ever seen.
What Is a Fairy Shoe House?
A Fairy Shoe House is a hand-crafted miniature dwelling built on the foundation of an old shoe — or a plastic bottle shaped to resemble one. Covered in air-dry clay, detailed with tiny doors, windows, mushrooms, stones, and plants, painted in rich naturalistic tones, and lit from within by a tiny LED, the finished piece looks like a magical cottage lifted straight from the pages of a children’s illustrated book.
The concept draws from the classic nursery rhyme tradition of the “old woman who lived in a shoe,” but the execution is far more sophisticated and beautiful than any nursery illustration. In the hands of a careful crafter — or a patient child guided by an enthusiastic adult — the result is a detailed, atmospheric, fully realized miniature world.
These make stunning home decor pieces, unforgettable handmade gifts, compelling photography subjects, and deeply satisfying personal projects. Once you’ve made one, the urge to make another — larger, more detailed, in a different style — is almost impossible to resist.
What You’ll Need
Structure:
- Old shoe — A worn leather or canvas shoe works best. The more textured and worn the surface, the more character the finished piece will have. Alternatively, a plastic bottle shaped into a shoe form can be used as the base.
- Cardboard — For the base platform and the roof structure. Corrugated cardboard is ideal for roofing as it can be textured to resemble wooden shingles.
- Aluminum foil — For building up additional shapes, curves, window frames, and structural details before the clay layer is applied.
- Hot glue or strong craft glue — For attaching the shoe to the base and securing all structural elements.
Sculpting:
- Air-dry clay or wall putty — The primary sculpting material that covers and transforms the shoe. Air-dry clay is preferred for fine detail work; wall putty is more economical and works well for bulk coverage.
- Toothpick or sculpting tool — For carving wood grain, stone texture, and fine surface details.
- White glue (PVA) — For sealing surfaces before painting and for adding structural rigidity to cardboard elements.
Painting:
- Acrylic paints — Brown (multiple shades), green, red, yellow, black, and white are the core palette. Having both a warm brown and a cool brown gives depth to the wood tones.
- Paint brushes — A range of sizes: a wide flat brush for base coating, medium brushes for color work, and a very fine detail brush for tiny mushroom dots and window panes.
Finishing:
- LED light or fairy lights — A small battery-operated LED tea light or a short string of micro fairy lights placed inside the shoe creates the warm interior glow that makes the finished piece truly magical.
- Artificial moss or sponge — Optional, but adds beautiful naturalistic texture to the base around the shoe. Craft foam cut and painted green can substitute for moss.
Step-by-Step Instructions
Step 1: Prepare the Base
Begin by selecting your cardboard base — a piece large enough that the shoe sits on it with room around all sides for the garden landscape you’ll build. Cut it to your desired shape (rectangular, oval, or freeform all work well) and if you have multiple layers, glue them together for added thickness and rigidity.
Apply a coat of white PVA glue to the top surface of the base and let it dry — this seals the cardboard and prevents it from absorbing moisture and warping later when paint and clay are applied.
Position the shoe on the base and glue it firmly in place using hot glue or a generous amount of strong craft glue. Press firmly and hold for a minute, then allow the glue to cure fully before proceeding. Stability at this stage prevents wobbling and cracking of the clay layer later.
Step 2: Shape the Structure
Before any clay goes on, use aluminum foil to build up any architectural details that would otherwise require thick, heavy clay. The roof base is the most important — a cardboard armature covered in aluminum foil creates the framework for the slanted roof that gives the shoe house its cottage character.
Crumple and shape aluminum foil around window frame positions, along ridge lines, and anywhere you want to add dimension and structure without the weight of thick clay. Fix everything in place with hot glue, pressing firmly to ensure nothing shifts during the clay application stage.
At this point, your shoe should be starting to look like the skeleton of a small house — rough and structural, but with the essential shapes and proportions in place.
Step 3: Apply the Clay Layer
This is the most meditative and satisfying stage of the whole project. Take your air-dry clay (or wall putty) and begin applying it in sections across the entire shoe surface. Work in patches rather than trying to cover everything at once — this gives you more control over thickness and texture.
Apply the clay in a layer roughly three to five millimeters thick. Use your fingers to smooth major areas, but resist the urge to make everything perfectly smooth. Slight irregularities, bumps, and unevenness are not flaws — they’re character. A real old stone cottage has lumpy walls and uneven surfaces. So should yours.
Press the clay firmly into the existing texture of the shoe, especially if your shoe has stitching lines, perforations, or texture patterns. These will read through the clay as architectural detail — stitching becomes stonework joints, perforations become decorative holes, worn leather becomes aged wood grain.
Cover the roof armature with clay and rough it out with horizontal lines using your fingers or a toothpick to begin suggesting the roofing material.
Step 4: Create Doors and Windows
While the clay is still workable — not yet dried — cut or mark the openings for your door and windows. For windows, press a rectangular or arched shape into the clay with a sculpting tool or toothpick, creating the illusion of depth even if the window doesn’t cut through to the interior.
For the door, shape a small rounded arch — the classic fairy-tale door shape — and either cut an actual opening (if you want light to spill through) or sculpt it as a raised relief. Add tiny planks of clay pressed flat to suggest wooden door boards. Score horizontal lines across the door surface with a toothpick to create wood grain. Add a tiny clay doorknob, a small ledge at the door step, and perhaps a miniature wreath or hanging plant.
For window frames, roll thin snakes of clay and press them around the window openings as frames. Add small horizontal bars across the window to suggest panes. Create tiny clay windowsills and press them flat below each window.
These details take time, but they are the details that make the difference between a piece that looks crafted and a piece that looks magical.
Step 5: Build the Roof
Using your pre-formed cardboard-and-foil roof armature, apply clay to the surface and immediately begin texturing. The roof is one of the most visible parts of the finished piece and deserves particular attention.
For a wooden shingle effect, use a flat tool or the side of a toothpick to press overlapping horizontal lines across the roof, working from the bottom edge upward. Each line should slightly overlap the one below — mimicking the way real shingles are laid. The result is a beautifully textured surface that looks remarkably like weathered wood in the finished painting.
For a thatched effect, press bundles of parallel lines in curving sweeps across the roof surface.
Add a clay ridge cap along the peak of the roof. Shape small clay brackets at the eaves. Consider adding a tiny clay chimney at one end for extra character.
Step 6: Add Garden Details
This is where the world around the shoe house comes to life. Using smaller portions of clay, sculpt the naturalistic elements that populate the base and the exterior of the shoe:
Mushrooms: Roll a small cylinder for the stem, flatten a disc for the cap, and press the cap onto the stem. Cluster three or five together at the base of the shoe for a fairy ring effect. They’ll be painted red with white spots — the most universally beloved fungi in all of illustration.
Stones: Press small rounded lumps of clay against the base of the shoe to suggest a stone foundation. Vary the sizes and press them unevenly — perfect uniformity looks artificial; slight irregularity looks natural.
Tiny plants and leaves: Flatten small pieces of clay into leaf shapes and press them along the base, at the corners of the building, and around the door. A simple teardrop shape pressed flat and scored with a central vein is sufficient — paint does most of the work here.
Garden path: Press clay into the base in a path shape leading from the door to the edge of the base. Press small pebble shapes into the surface.
Window boxes: Roll a small rectangular box of clay and press it below each window. Add tiny clay balls to suggest flowers in the boxes.
Step 7: Texture Work
Once all clay elements are in place, go over the entire piece with your toothpick or sculpting tool for final texture work. This stage unifies the piece and adds the fine details that read beautifully under paint.
Carve wood grain into the door with parallel, slightly irregular lines. Add stone texture to the base by pressing the tip of the toothpick into each stone shape repeatedly to suggest rough mineral surface. Press cross-hatch patterns into the path stones. Add tiny circular holes to mushroom caps where the white spots will go. Carve window pane lines. Add tiny nail heads to the door planks with the tip of a toothpick.
Every mark you make here will be amplified by the painting process, especially the dry brushing stage. The more texture you carve now, the more dimensional and lifelike the finished piece will be.
Step 8: Drying
Set the piece in a warm, dry location and allow it to dry completely. This will take at least 24 hours and potentially up to 48 hours depending on the thickness of the clay and the humidity of your environment. Do not rush this stage — applying paint to incompletely dried clay causes cracking and peeling.
Check the thickest areas — around the roof ridge and any heavily built-up sections — by pressing gently. The clay should feel completely firm, with no give at all, before you proceed.
The Painting Process: Where the Magic Happens
Painting transforms a textured clay form into something that looks truly alive. Take your time with each stage — the layered approach is what creates depth, realism, and that painterly, illustrated quality that makes these pieces so striking.
Step 9: Base Coat
Paint the entire piece — every surface, every element — with a dark base color. Black or very dark brown works best. Apply it generously and work it into every crevice, crack, and texture mark.
This base coat does something crucial: it fills all the deepest recesses with dark color, which will remain visible through all subsequent painting layers as shadows and depth. Without this dark foundation, the piece will look flat regardless of how carefully you paint the upper layers.
Let it dry completely before proceeding.
Step 10: Color Painting
Working from large areas to small, apply your main colors over the dark base. Don’t try to cover the base coat completely — especially in textured areas, letting some dark show through creates immediate depth and dimension.
The shoe body gets shades of brown — mix two or three browns to vary the tone across different sections. The door gets a darker, richer brown. The roof gets cool grey-brown tones suggesting old weathered wood. Plants get middle greens. Mushroom caps get a warm red-orange. Stones get a medium grey. Window frames get a lighter brown or cream.
Apply paint loosely and expressively rather than trying to fill perfectly within lines. The goal is atmospheric and painterly, not clean and precise.
Step 11: Dry Brushing and Highlighting
This is the technique that separates a flat-looking painted craft from something that looks genuinely three-dimensional and alive. Dry brushing involves loading a brush with paint, then wiping most of it off on a paper towel until almost no paint is left — then lightly dragging what remains across the textured surface.
The almost-dry brush deposits tiny amounts of paint on the raised surfaces only, leaving the recesses dark. The effect is immediate and dramatic: textures that looked flat suddenly appear to pop forward. Stone surfaces gain a mineral shimmer. Wood grain looks weathered and real. Mushroom caps develop a satiny depth.
Work through a progression of values — first a mid-tone dry brush, then a lighter version, and finally a very light or near-white dry brush for the highest highlights. Keep the dry brush consistent with a light source direction — typically upper-left — for a coherent sense of three-dimensionality.
Add the mushroom dots in clean white, the window pane glint in a tiny stroke of pure white, and tiny red berries in clusters using the tip of a fine brush.
Step 12: Add the Light
This is the moment everything changes. Place a small battery-operated LED tea light or a coil of micro fairy lights inside the shoe through the door opening or a gap in the base. Position it so the warm light glows through the windows and door.
Turn off the room lights.
The warm golden glow spilling through those tiny windows, pooling on the stone path, catching the tops of the mushrooms — that is the moment the shoe house becomes magic. That is the image you’ve been working toward through every careful, patient step.
Tips for the Best Results
Work in stages, let everything dry. Patience is the defining skill of this project. Rushing any stage — whether clay application, drying, or paint layers — compounds into problems that are difficult to fix.
Embrace imperfection. The houses that look most believable are the ones that look slightly irregular, slightly worn, slightly as though they’ve been standing in a forest for a hundred years. Over-smoothing and over-correcting removes exactly the character that makes these pieces beautiful.
Build your mushrooms in clusters. A single mushroom looks lonely. Three or five grouped together at slightly different heights looks like something grew there naturally.
Use at least three shades of each color. Brown is not one color. Neither is green, or grey. Mixing and layering multiple tones within each material creates the visual complexity that makes the finished piece look real rather than painted.
The dry brush is everything. If there is one technique that makes the most visible difference to the finished piece, it is confident, thorough dry brushing. Don’t be shy with it.
A warm LED makes a cold LED look sad. Warm white LED lights (labeled “warm white” or with a color temperature around 2700K) produce the golden, candlelit interior glow that looks magical. Cool white LEDs produce a clinical, fluorescent-feeling light that works against the fairy-tale atmosphere entirely.
Display and Photography Ideas
A finished Fairy Shoe House deserves a worthy setting. Consider placing it on a wooden slice, a moss-covered tray, or a small piece of bark for a naturalistic base. Surrounding it with additional artificial moss, miniature ferns, and small stones from the garden extends the world outward and creates a more complete scene.
For photography, shoot in a dimly lit room with the LED engaged. A camera placed at eye level with the shoe creates the illusion of inhabiting the scene at fairy scale. Soft natural light from one side plus the warm interior LED glow creates beautiful, atmospheric images.
Final Thoughts
The Fairy Shoe House asks more of you than most crafts. It asks for time, for patience, for the willingness to build something in stages and trust that each layer is working toward something greater than the sum of its parts.
What it gives back is extraordinary. A glowing, detailed, fully realized miniature world that catches light, tells a story, and stops everyone who sees it in their tracks.
Make it slowly. Make it carefully. And when you slip that LED inside and see the light pour through those tiny windows for the first time — you’ll know exactly why it was worth every single hour.


