If you’re looking for a kids’ activity that feels like absolute magic, this is it. Squishy sensory balloons — filled with a homemade cornstarch and baking soda mixture — are one of those rare DIY projects that land at the perfect intersection of easy to make, impossible to put down, and secretly educational. Parents are raving about them. Kids are obsessed. And once you make a batch, you’ll understand exactly why.
These soft, squishable, stress-ball-style balloons take about ten minutes to put together and deliver hours of tactile entertainment. They’re perfect for sensory play, calming anxious kids, keeping little hands busy, and sneaking in a little kitchen science along the way.
Here’s everything you need to know — including the step-by-step instructions, the science behind the satisfying squish, tips for making them even better, and ideas for getting the most out of this simple, brilliant activity.
What Are Squishy Sensory Balloons?
Squishy sensory balloons are DIY stress-ball-style toys made by filling regular balloons with a smooth, doughy mixture of cornstarch, baking soda, and water — tinted with food coloring for an extra pop of fun. The result is a soft, pliable, endlessly satisfying balloon that kids (and honestly, adults too) can squeeze, stretch, and squish to their heart’s content.
They feel almost alive in your hands. Press them and they slowly push back. Squeeze them and the shape morphs in the most satisfying way. Draw little faces on them and suddenly they’re characters with expressions that change depending on how hard you squeeze.
Sound like magic? It basically is.
What You’ll Need
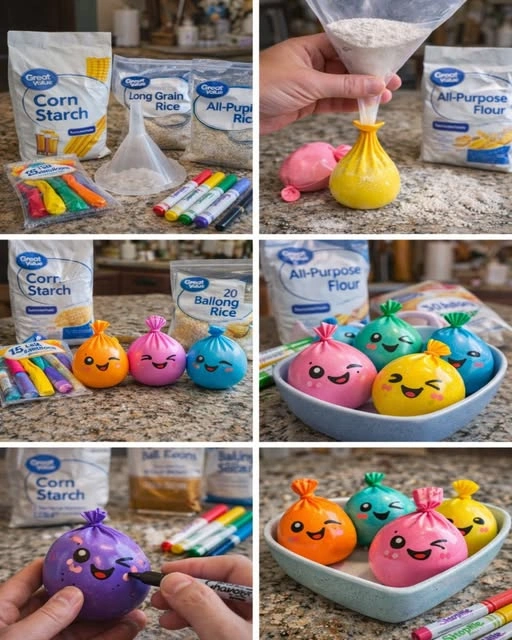
The supply list couldn’t be simpler. You probably have most of these at home already.
- Cornstarch — The main ingredient that gives the filling its uniquely satisfying, smooth texture.
- Baking soda — Adds a slightly firmer body to the mixture and makes the texture extra smooth.
- Water — Just enough to bring the mixture together into a thick, pourable consistency.
- Food coloring — Any colors you like! The more vibrant, the better.
- Balloons — Standard latex balloons work perfectly. Thicker balloons are more durable, but any size works.
- A funnel — Essential for getting the mixture into the balloon without a mess.
Optional but highly recommended: a permanent marker for drawing faces, googly eyes to glue on, or glitter to add to the mixture for extra sparkle.
Step-by-Step Instructions
Step 1: Make the Mixture
In a bowl, combine cornstarch, baking soda, and a small amount of water. You’re aiming for a thick, smooth consistency — similar to a very stiff pancake batter or soft playdough. Start with roughly equal parts cornstarch and baking soda, then add water slowly, a little at a time, stirring as you go.
The goal is a mixture that’s thick enough to hold its shape but still pourable through a funnel. If it’s too thick, add a tiny splash more water. If it’s too runny, add a little more cornstarch.
Step 2: Add Food Coloring
Once your mixture reaches the right consistency, add several drops of food coloring and stir until the color is fully and evenly incorporated. This is a great moment to let kids choose their own colors — you can make multiple bowls for a rainbow of balloon options.
Stir until the color is smooth and consistent with no streaks. The more vibrant the color, the more visible it’ll be through the balloon.
Step 3: Fill the Balloons
Stretch the opening of a balloon over the narrow end of your funnel. Hold it firmly in place — this part can get a little messy, so it’s worth taking your time.
Carefully spoon or pour the mixture into the funnel, using a finger or a pencil to push it down through the neck if needed. Fill each balloon until it’s roughly the size of a tennis ball or a bit larger. You don’t want to overfill — leave enough room at the top so you can tie it off without the mixture squishing out.
Step 4: Tie the Balloons
Remove the balloon from the funnel carefully and tie it off in a tight knot. Give it a gentle squeeze to make sure nothing is leaking and the tie is secure.
Set the finished balloon on a flat surface and repeat with as many colors as you’d like.
Step 5: Add Faces and Details
This is where the real fun begins. Use a permanent marker to draw faces on your balloons — wide eyes, big smiles, little noses, funny expressions. When kids squeeze the balloons, the faces distort and stretch in hilariously satisfying ways.
You can also add googly eyes with a small dot of craft glue, use stickers for decoration, or draw patterns and designs. Each balloon becomes its own little character.
Watch the Magic Happen
Once the balloons are made, hand them to a kid and watch their face light up. The first squeeze always produces the same reaction: eyes wide, a huge grin, and an immediate “again.” There’s something about the texture — smooth, soft, yielding, and strangely alive-feeling — that is just irresistible.
Kids squeeze them, pass them back and forth, hold them up to the light to see the color, and stack them on top of each other. They give them names. They argue over which color is the best. They want to make more.
And speaking of colors — which one do you think kids reach for first? In our experience, red and bright blue are perennial favorites, but every kid is different. Make a full rainbow set and let them decide.
The Science Behind the Squish
This activity isn’t just play — there’s real, fascinating science happening inside every balloon. Here’s what’s going on.
Cornstarch and Non-Newtonian Fluids
The secret star of this recipe is cornstarch. When cornstarch is mixed with water in the right ratio, it creates a substance called a non-Newtonian fluid — a liquid that doesn’t behave like a normal liquid.
Normal fluids (like water or juice) have a consistent viscosity — they flow the same way regardless of how much force you apply. Non-Newtonian fluids change their behavior depending on force. Cornstarch mixed with water becomes thicker and more solid-like when pressure is applied, and thinner and more liquid-like when the pressure is released.
This is exactly why squeezing the balloon feels so unusual and satisfying. When you press firmly, the mixture resists. When you relax your grip, it flows and shifts. The texture is unlike anything else, and that’s precisely what makes it so captivating to touch and hold.
What Baking Soda Does
Baking soda adds a fine, powdery smoothness to the mixture that enhances the texture. It also reacts very mildly with any moisture in the environment, which gives the filling a subtle body and helps prevent it from separating over time. The result is a filling that stays smooth and consistent even after lots of squeezing.
Why the Colors Look So Vivid
Food coloring disperses evenly through the water in the mixture, tinting the entire filling a bright, saturated hue. When that colored mixture is sealed inside a semi-translucent balloon, the color is visible through the latex, giving each balloon a jewel-like quality. Holding one up to a light source makes the color glow beautifully.
Why This Activity Is Perfect for Kids
Sensory Benefits
Squishy sensory balloons are a fantastic sensory play tool. The tactile experience of squeezing, stretching, and manipulating the balloon engages the nervous system in a calming and organizing way. For children who are sensory-seeking — those who love to touch and squeeze and feel different textures — these balloons are endlessly satisfying.
Many parents and teachers also find that sensory tools like these help kids self-regulate during moments of frustration or anxiety. Squeezing something soft and responsive is a well-known calming strategy, and having a personalized, homemade version makes it even more effective.
Fine Motor Development
Squeezing, gripping, and manipulating these balloons builds hand strength and fine motor skills — the same muscles kids use for writing, drawing, cutting, and other precise tasks. It’s exercise disguised as play, and children are none the wiser.
Creative Expression
Decorating the balloons with faces and characters invites creativity. Kids can design whole families or casts of characters. They can use different expressions to explore and talk about emotions — “this one looks surprised, this one looks happy, this one looks grumpy.” It’s a natural, low-pressure way to build emotional vocabulary and empathy.
A Gateway to Science Conversation
Once kids are holding and playing with the balloons, questions naturally arise. Why does it feel weird when I squeeze it? Why does it go back to its shape? What’s inside? These are perfect openings for talking about non-Newtonian fluids, states of matter, and the properties of different materials — all in simple, age-appropriate language.
You don’t need a science lesson plan. Just follow their curiosity.
Tips for the Best Results
Get the consistency right. This is the most important step. Too runny and the mixture will leak; too thick and you won’t be able to fill the balloons. Aim for a texture similar to thick yogurt or soft playdough.
Use a helper for the filling step. One person holds the balloon over the funnel while the other spoons in the mixture. This makes the process much cleaner and easier.
Don’t overfill. A balloon filled about halfway is more durable and more satisfying to squeeze than one stuffed to the max.
Double-balloon for durability. For extra longevity — especially for younger kids who play hard — slip a second balloon over the first before tying. This significantly reduces the chance of a burst.
Store them in a cool, dry place. Sensory balloons last longer when kept away from heat and direct sunlight. A basket or bin at room temperature is ideal.
Make a big batch. Once you’ve made two or three, you’ll want a whole rainbow. It’s worth mixing up multiple colors at once and assembling a set.
Variations to Try
Glitter Balloons: Add a pinch of fine glitter to the mixture before filling for a sparkly surprise when you hold the balloon up to light.
Glow-in-the-Dark: Add a small amount of glow-in-the-dark paint to the mixture for balloons that have a spooky, magical glow when the lights go out.
Scented Balloons: Add a drop of vanilla extract or a small amount of a kid-safe essential oil to give each balloon a subtle scent.
Seasonal Themes: Match your colors to holidays or seasons — orange and black for Halloween, red and green for Christmas, pastels for spring.
Emotion Faces: Draw a specific emotion on each balloon (happy, sad, surprised, silly, sleepy) and use them as conversation starters about feelings.
Safety Notes
These balloons are intended as supervised play items, not unsupervised toys for very young children. While the ingredients are non-toxic, a popped balloon presents a small choking hazard from the latex pieces, and the filling can be messy.
Play with these on a hard floor or over a tray in case of a burst. And if a balloon does pop, clean it up promptly — the cornstarch mixture can be slippery.
Always supervise children under three during sensory play activities.
Final Thoughts
Squishy sensory balloons are one of those rare DIY activities that deliver an outsized return on a tiny investment of time and effort. Ten minutes of prep. A handful of pantry ingredients. And the result? A toy that kids return to again and again, squeezing and giggling and playing long after the novelty of most activities has worn off.
Make them in every color. Draw the silliest faces you can. Hand them to your kids and watch what happens.
Magic — that’s what happens.


