There’s something quietly magical about a pressed flower. A bloom picked at the height of its beauty, preserved flat between the pages of a book, kept long after the garden has moved on to other seasons. It’s a small act of preservation — a way of saying: this moment was beautiful, and I wanted to hold onto it.
Clear Cornstarch Flower Heart Charms take that impulse one step further. Instead of pressing a flower between pages and tucking it away, you suspend it — visible from every angle, centered in a smooth, translucent heart-shaped charm that you made yourself from nothing more than cornstarch and cold water. The flower becomes a window. The charm becomes a jewel. And a rainy afternoon becomes the afternoon you made something genuinely lovely.
These little charms are simpler to make than they look and more beautiful than they sound. No baking. No special equipment. No craft store supplies beyond a silicone heart mold and a handful of flowers from the garden. Just a smooth, pourable mixture, a careful placement, and 24 to 48 hours of patient waiting — followed by the quiet satisfaction of popping a perfect, translucent heart from its mold and holding it up to the light.
Here is everything you need to make them beautifully.
What Are Clear Cornstarch Flower Heart Charms?
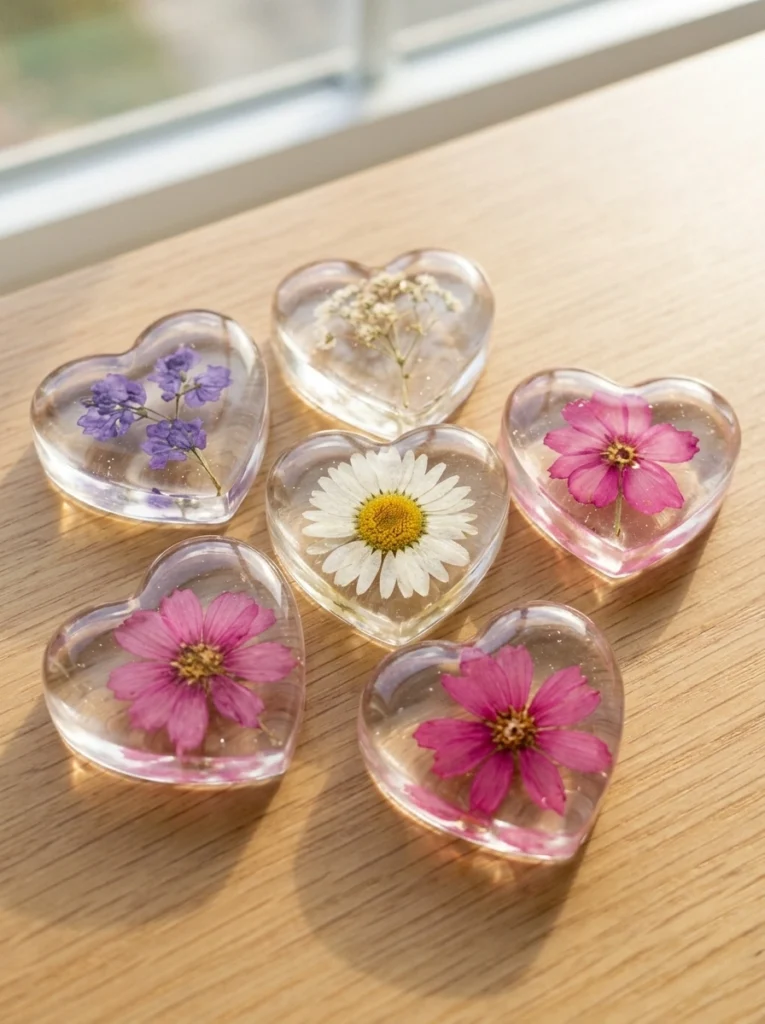
Clear Cornstarch Flower Heart Charms are small, translucent heart-shaped objects made from a simple mixture of cornstarch and cold water — a naturally transparent base that dries to a smooth, glass-like finish — with pressed flowers suspended inside. When fully dried and held up to the light, the flower is visible through the translucent cornstarch, giving each charm the appearance of a botanical specimen preserved in glass or resin.
They are simultaneously a science activity, a nature craft, an art project, and a keepsake-making exercise. They make beautiful gifts, delicate ornaments, window decorations, and personal mementos. A charm made from a flower picked in a grandmother’s garden, a bloom saved from a wedding bouquet, or a wildflower gathered on a walk with a child — these are objects that carry meaning far beyond their materials.
And unlike resin casting, which requires specialty materials, careful measuring, safety precautions, and long cure times, cornstarch charms are accessible to anyone. Children can make them with minimal supervision. The materials cost almost nothing. The results are genuinely beautiful.
What You’ll Need
For the charms:
- Cornstarch — The primary ingredient. When mixed with cold water in the right ratio, cornstarch creates a smooth, pourable suspension that dries to a surprisingly clear, slightly translucent finish. The natural clarity of dried cornstarch is what allows the flower to be seen through the surface of the finished charm.
- Cold water — Cold water is specified for a reason: it prevents the cornstarch from clumping or beginning to gelatinize before the mixture is poured. Room temperature water works; warm water does not.
- Food coloring (optional) — A few drops of any color tints the charm while preserving its translucency. Soft pinks and yellows complement floral subjects beautifully. A very pale tint — barely a hint of color — gives the charm a delicate, watercolor quality.
- Silicone heart molds — The flexible silicone allows the dried charms to be released cleanly without cracking or breaking. Heart-shaped molds are the classic choice, but any silicone mold works: flowers, circles, stars, teardrops. Standard soap-making or chocolate molds are ideal.
- Pressed flowers — The heart of the whole project. Small, flat flowers work best: pansies, violas, forget-me-nots, small daisies, individual rose petals, Queen Anne’s lace, lavender sprigs. The flatter the pressed flower, the more cleanly it embeds in the charm.
Optional additions:
- Fine glitter for a soft sparkle effect throughout the charm
- A toothpick or skewer for positioning the flower in the wet mixture
- Ribbon, twine, or a jewelry finding if you want to hang the finished charm
- A straw or skewer for pressing a hole into the wet mixture before drying — for hanging purposes
How to Press Flowers for This Project
If you don’t already have pressed flowers on hand, pressing them is simple — it just requires a little advance planning, as most flowers need one to two weeks to press fully flat.
Place fresh flowers between two sheets of absorbent paper (parchment, coffee filters, or plain paper towels all work) and place them inside a heavy book. Stack additional books on top for extra weight. Leave undisturbed for one to two weeks, checking after the first week to see if the flowers need the paper changed (wet paper slows drying and can cause mold).
Fully pressed flowers will be flat, papery, and completely dry to the touch. They’ll hold their color surprisingly well — though some flowers fade more than others. Pansies and violas press beautifully and hold vibrant color. Roses and daisies press well with slightly more fading. Delicate flowers like forget-me-nots and Queen Anne’s lace become particularly ethereal when pressed, their fine structure preserved in extraordinary detail.
For faster pressing, flowers can be placed between paper and microwaved in short intervals (10–15 seconds at a time) until flat and dry — this takes minutes rather than weeks but requires more care to avoid burning.
Step-by-Step Instructions
Step 1: Mix the Cornstarch Base
In a clean bowl, measure out your cornstarch and cold water in a ratio of 2 parts cornstarch to 1 part cold water. For a standard silicone mold with six to eight heart cavities, two tablespoons of cornstarch and one tablespoon of cold water is a good starting amount — scale up proportionally if you’re filling more molds.
Add the cold water to the cornstarch gradually, stirring continuously as you pour. The mixture will seem resistant at first — cornstarch and water at this ratio behave as a non-Newtonian fluid, resisting sudden force while yielding to gentle, slow movement. Stir slowly and steadily and the mixture will come together into a smooth, thick, pourable consistency.
You’re looking for a texture similar to heavy cream or thick paint — pourable but with noticeable body, not watery. If the mixture seems too thick to pour smoothly, add water a few drops at a time. If it seems too thin and watery, add a small additional amount of cornstarch.
Stir until completely smooth with no visible lumps. A smooth base produces a clear, even-surfaced finished charm; a lumpy base produces an uneven, cloudy surface.
Step 2: Add Color (Optional)
If you’re adding food coloring, do it now — before pouring. Add just two or three drops to the mixture and stir gently until the color is evenly distributed.
The key with color is restraint. The beauty of these charms is their translucency — the way light passes through them and illuminates the flower inside. Heavy color blocks this light transmission and turns the charm opaque rather than glowing. A very light tint — just enough to give the mixture a whisper of color — is almost always more beautiful than a deeply saturated one.
Pale pink with pink flowers. Soft yellow with yellow or white flowers. Pale lavender with purple or pink flowers. Barely-there blue with white daisies. These light, harmonious color pairings produce finished charms that look refined and intentional.
If you’re adding glitter, add it now as well — a small pinch stirred gently through the mixture. Fine glitter distributes evenly and catches light beautifully in the finished charm without obscuring the flower.
Step 3: Pour and Place the Flowers
Pour the cornstarch mixture carefully into each heart mold cavity. Fill each cavity about three-quarters of the way full — not completely to the brim, as you’ll be pressing a flower in and don’t want the mixture to overflow.
Pour slowly and steadily, keeping the bowl close to the mold to minimize splashing. If any bubbles form on the surface, tap the mold gently on the table a few times — this brings bubbles to the surface and helps them pop, giving a smoother finished surface on the charm.
Now comes the most careful and most lovely part: placing the flowers. Take your pressed flowers — handling them gently, as dried pressed flowers are fragile — and lay one in each filled cavity. Position it thoughtfully: centered, right-way up, arranged as you want it to appear in the finished charm.
Gently press each flower down into the mixture with a fingertip or the blunt end of a toothpick. The goal is to submerge it slightly below the surface of the mixture so that the cornstarch closes over it as it dries, embedding the flower fully inside the charm rather than leaving it sitting on top. A thin layer of cornstarch mixture over the flower is ideal.
If the flower is slightly too large for the cavity, trim it carefully with small scissors before placing. If it keeps floating up rather than staying submerged, hold it down gently for thirty seconds until the mixture begins to set slightly around it.
Step 4: Dry for 24 to 48 Hours
Set the filled molds on a flat, level surface somewhere they won’t be disturbed and allow them to dry completely at room temperature. This typically takes between 24 and 48 hours, depending on the thickness of the charms and the humidity of your environment.
As they dry, the mixture transitions from white and opaque to increasingly clear and translucent — a transformation that happens gradually and is beautiful to check in on. At the 12-hour mark, the surface will have firmed and the color (if you added any) will have deepened slightly. At 24 hours, most charms will be firm to the touch. At 48 hours, they should be fully hard throughout.
Resist the urge to hurry this process by placing the molds in the oven or near a heat source. Rapid heating causes the cornstarch mixture to crack as it dries. Slow room-temperature drying produces a much more even, crack-free surface.
The charms are ready when they feel completely hard and solid throughout — no soft or yielding spots when pressed. The underside (which was the top surface while drying) should feel smooth and firm.
Step 5: Release and Marvel
Gently flex the silicone mold to release each charm — the flexible mold will peel away from the dried cornstarch without sticking. Pop each charm out carefully and set it on a clean surface.
Now hold one up to the light.
The translucent cornstarch glows softly with transmitted light. The flower inside is visible — suspended, preserved, displayed — its petals and veins and fine details visible through the clear surface. If you added a tint, the charm glows with a soft wash of color that makes the flower appear to float in a colored mist. If you added glitter, tiny sparks of light move through the charm as you turn it.
It looks, unmistakably, like something precious. Like a botanical specimen sealed in glass. Like a small, perfect jewel made from a flower and a quiet afternoon.
The Science Inside the Charm
The beautiful clarity of these charms is not an accident — it’s the direct result of what happens to cornstarch at a molecular level as it dries.
Why Cornstarch Becomes Translucent When Dried
Raw cornstarch is opaque white because its tightly packed starch granules scatter light in all directions — the same reason that flour, sugar, and salt all appear white despite being made of transparent crystals. Light enters but cannot pass through in a directed way; it bounces randomly among the granules and returns to your eye as white.
When cornstarch is mixed with water, the water molecules penetrate and surround the starch granules, partially separating them and creating a more uniform medium. As this mixture dries slowly, the water evaporates gradually and the starch molecules rearrange into a denser, more ordered matrix. In this matrix, the gaps between particles are much smaller and more uniform — small enough that light can pass through with less scattering. The result is translucency: not perfect transparency, but a soft clarity that allows light to pass through and the embedded flower to be seen.
The Non-Newtonian Behavior of the Wet Mixture
When you first mix the cornstarch and water, you’ll notice the mixture behaves unusually — it resists being stirred quickly but yields to slow, gentle movement. This is the same non-Newtonian behavior described in other cornstarch activities: the mixture thickens under rapid pressure and flows freely under slow, gentle force. Stirring slowly and steadily is the key to a smooth, lump-free mixture — trying to stir quickly just makes the mixture lock up.
Once poured into molds and allowed to settle, the mixture relaxes into a fluid state that conforms perfectly to the shape of the mold cavity — producing a charm with crisp, defined edges that match every detail of the mold surface.
Why These Charms Are Worth Making
They Connect Children to the Natural World
This project begins outdoors — or at least in a garden or park — finding and pressing flowers. That gathering stage, which might feel like a preliminary step, is actually one of the most valuable parts of the whole activity. Children who look carefully for interesting flowers to press develop observational skills, botanical awareness, and a kind of attentive relationship with the natural world that has its own quiet value.
They Teach Patience as a Creative Skill
The 24 to 48-hour drying period is not a limitation — it’s part of the lesson. Waiting for the charms to dry, checking on them, watching the transformation happen gradually — this builds the understanding that beautiful things take time. That patience is a creative tool, not just a virtue.
They Produce Genuine Keepsakes
A charm made from a flower that matters — from a specific garden, a specific occasion, a specific moment — is an object with real emotional weight. Unlike most craft projects, which are fun to make but not particularly meaningful to keep, a cornstarch flower charm can be genuinely precious. Children who make them with flowers from a grandmother’s garden, or from a birthday bouquet, or from a place they love, tend to keep them for years.
They’re an Introduction to Botanical Preservation
Cornstarch charms are an accessible gateway into the wider world of botanical art and preservation — an ancient tradition that includes herbarium specimens, pressed flower art, resin casting, and wax preservation. Children who make these may go on to press and frame flowers, create botanical journals, or explore resin art. The cornstarch charm is a beginning.
Tips for the Most Beautiful Results
Press your flowers very flat before using. A flower that is even slightly three-dimensional will create a bump in the surface of the charm rather than lying flush. The flatter the flower, the more cleanly it embeds and the more clearly it’s visible in the finished piece.
Choose flowers with strong color. Some flowers fade significantly during pressing. Pansies, violas, and many wildflowers hold their color beautifully. Very pale flowers can become nearly invisible in the finished charm — unless that ghostly, barely-there quality is what you’re going for, which can be its own kind of beautiful.
Use the lightest possible tint. The single most common mistake is adding too much food coloring. Add one or two drops, stir, and assess before adding more. The color will deepen as it dries, so what looks pale in the wet mixture will be noticeably stronger in the finished charm.
Let the mixture settle before placing flowers. After pouring, wait thirty seconds for any surface bubbles to settle before placing your flower. A bubble under the flower creates an uneven surface.
Make a hole for hanging while still wet. If you want to hang the finished charm — as a window ornament, on a necklace, tied to a gift — press a toothpick or straw through the mixture near the top of the heart before drying. Remove it after an hour and the hole will remain as the mixture dries.
Seal with clear nail polish after drying. A thin coat of clear nail polish or craft varnish applied to the surface of the fully dried charm increases its durability, adds a slight gloss, and significantly enhances the translucent quality of the finished piece.
Creative Variations to Try
Layered color charms: Pour a thin layer of one color, let it set for an hour until slightly firmed, then pour a second thin layer of a contrasting color on top. The two layers remain distinct in the finished charm, creating a color-gradient effect.
Herb and botanicals: Instead of flowers, embed small sprigs of rosemary, thyme, lavender, or fern fronds. The fine, detailed structure of herb leaves is particularly beautiful when preserved in translucent cornstarch.
Confetti effect: Scatter several tiny individual flower petals throughout the mixture rather than using a single centered flower — the result is a charm scattered with color, like a snow globe frozen mid-swirl.
Initial charms: Use letter-shaped silicone molds with flowers positioned to complement the initial. A name initial charm with a pressed flower makes a particularly personal gift.
Seasonal sets: Make spring charms with cherry blossoms and violets in pale pink. Summer charms with daisies and cornflowers in yellow and blue. Autumn charms with pressed maple leaves in amber. Winter charms with holly in pale green with a tiny red berry.
Gift tags: Make rectangular or tag-shaped charms, punch a hole at the top while wet, and use them as botanical gift tags tied to wrapped presents with ribbon. They become a gift within a gift — a keepsake the recipient will want to keep long after the present is opened.
Displaying and Preserving Your Charms
Finished cornstarch charms are beautiful but somewhat fragile — they can crack if dropped or bent, and they are sensitive to prolonged moisture exposure. Display them in dry environments: on a windowsill in indirect light, in a glass display case, on a jewelry stand, or strung on ribbon in a window.
Direct sunlight over extended periods may cause the food coloring to fade slightly — indirect light is better for long-term display. A light coat of clear sealant significantly extends their life and protects against surface moisture.
Store unused charms in an airtight container in a cool, dry place. They will keep indefinitely in dry conditions.
Final Thoughts
Clear Cornstarch Flower Heart Charms are a reminder that the most beautiful things are often the simplest ones — and that the materials for making something genuinely lovely are usually already at hand. Cornstarch from the kitchen cupboard. Flowers from the garden or a walk. A silicone mold, a bowl, a quiet afternoon.
And then: 48 hours of patient waiting, and the morning when you pop a small translucent heart from its mold, hold it up to the light, and find a flower inside — suspended, glowing, perfect.
Make a memory today. Not just a mess.
The charms will still be there long after the afternoon is over, carrying the flower with them — a small, luminous proof that something beautiful happened here.


