It starts with a spoonful of sugar and ends with something that looks like liquid stained glass. Rainbow Sugar Crystal Jars are one of those homemade activities that stops kids mid-sentence the moment they see it — colors layered and swirled inside a little glass jar, catching the light like something you’d find in an enchanted apothecary shop.
Parents who’ve tried this keep reporting the same thing: kids who won’t sit still for five minutes will stand at the table, spoon in hand, completely transfixed. The colors. The swirling. The way the mixture slowly thickens and settles into something that looks almost crystalline. It’s genuinely hard to walk away from.
And the best part? The ingredient list is basically your kitchen pantry. Sugar. Water. Food coloring. A jar. That’s it.
Here’s everything you need to know — the full step-by-step, the science behind the stunning effect, tips for the most beautiful results, and the answer to the question everyone ends up asking: which color combination actually looks the coolest?
What Are Rainbow Sugar Crystal Jars?
Rainbow Sugar Crystal Jars are a simple, beautiful sensory and science activity where colored, sugar-thickened water is layered and swirled inside a small glass jar to create a vivid, rainbow-like effect. As the mixture sits, the high sugar content creates a dense, syrupy liquid that catches and refracts light in a way that looks almost crystalline — like liquid gemstones suspended in a jar.
They’re part science experiment, part art project, part decor piece. Kids love making them. They look stunning on a windowsill. And they open up a surprisingly rich conversation about density, light, and color along the way.
No special equipment. No craft store run. No complex technique. Just sugar, water, color, and a little bit of patience — rewarded by something that genuinely looks like magic.
What You’ll Need
Everything on this list is either already in your kitchen or available at any grocery store:
- Sugar — Regular white granulated sugar works perfectly. The more you add, the denser and more syrupy the mixture becomes.
- Water — Room temperature or slightly warm water dissolves the sugar most easily.
- Food coloring — Liquid food coloring in as many colors as you like. Gel food coloring produces even more vivid, saturated results if you have it on hand.
- A small glass jar — A mason jar, a clean jam jar, or any clear glass container. The transparency is essential — you want to see every layer and swirl from the outside.
- A spoon — For stirring and for the gentle swirling step.
- Glitter (optional) — Fine glitter added to individual color portions makes the finished jar look absolutely spectacular, especially near a window or lamp.
Optional extras that elevate the finished product: a dropper or pipette for more controlled color placement, multiple small bowls for mixing individual colors, and a lid for the jar if you want to keep your creation long-term.
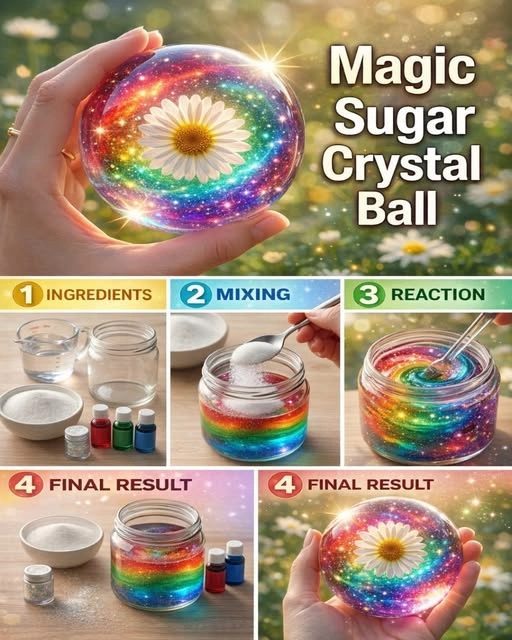
Step-by-Step Instructions
Step 1: Mix Water With Food Coloring
Start by dividing your water into several small bowls or cups — one for each color you plan to use. Add a few drops of food coloring to each and stir until the color is fully dissolved and vivid. Don’t be shy with the coloring; pale, watery colors lose their impact once the sugar goes in. You want deep, saturated hues.
If you’re adding glitter, stir a small pinch into each colored water portion now, before the sugar goes in. This distributes the glitter evenly through the mixture rather than leaving it floating on top.
Step 2: Add Sugar Slowly and Stir Until Thick
This is the most important step, and it’s worth taking your time. Add sugar to each bowl of colored water gradually — a spoonful at a time — stirring after each addition until it fully dissolves before adding more.
Keep adding sugar until the mixture becomes noticeably thick and syrupy. It should coat the back of your spoon and move slowly when you tilt the bowl. The exact amount of sugar will depend on how much water you’re using, but plan on using significantly more than you think — sugar water becomes surprisingly dense before it reaches saturation.
The thicker the mixture, the more beautifully it will layer and the more pronounced the crystalline effect will be as it sits.
Step 3: Swirl Colors Gently for a Rainbow Effect
Now comes the creative, meditative heart of this activity. Carefully pour or spoon your different colored sugar mixtures into the jar one at a time. Pour slowly down the side of the jar rather than straight down the middle — this helps preserve distinct layers and colors.
Once you have all your colors in, use a spoon or skewer to swirl them very gently. A single slow drag through the mixture is often enough to create gorgeous marble and swirl effects without blending everything into one muddy color. The goal is to move the colors around each other, not into each other.
This is the step kids love most. Let them take the spoon and make their own swirling decisions — the results are always beautifully unpredictable.
Step 4: Let It Sit and Watch the Crystal Look Form
Set the jar somewhere it won’t be disturbed — ideally on a windowsill where light can pass through it — and let it rest. Over the next several hours, something lovely happens. The dense sugar mixture begins to settle and clarify slightly, and the surface develops a texture that genuinely resembles crystal or glass.
The colors remain vivid and distinct, the swirl patterns freeze in place as the mixture thickens further, and the whole jar takes on an almost jewel-like quality. Kids who check on it throughout the day get to watch the transformation in real time.
Place it near a light source and the effect is even more dramatic — the colors glow and the glitter (if you added it) sends tiny sparks of light across the surrounding surface.
The Science Behind the Stunning Effect
This activity looks like pure art, but there’s genuine and teachable science working underneath the surface.
Why Sugar Makes the Mixture Thick
When you dissolve sugar in water, you’re creating what chemists call a sugar solution. The more sugar you add, the more viscous — thick and syrupy — the solution becomes. This happens because sugar molecules dissolve into the spaces between water molecules, increasing the overall density and resistance to flow of the liquid.
At very high concentrations, the solution moves like syrup because the sugar molecules are packed so densely that movement is significantly slowed. This is the same principle behind honey, maple syrup, and caramel — all of which are essentially very concentrated sugar solutions.
Why It Looks Crystalline
As a highly concentrated sugar solution sits undisturbed, the liquid slowly begins to organize at a molecular level. Water molecules begin to evaporate gradually from the surface, which increases the concentration of sugar even further. Under the right conditions, sugar molecules will begin to align into the early stages of crystal formation — which is exactly how rock candy is made.
Even before full crystallization occurs, the dense sugar solution refracts light differently than plain water would, giving the mixture a depth and luminosity that plain colored water simply doesn’t have. That’s the crystalline look you see forming as the jar sits.
Density and Layering
If you pour your colors carefully and at different sugar concentrations, you can create distinct layers that don’t mix — because denser liquids sink beneath less dense ones. This is the same principle behind a density tower, and it’s a beautiful, visual way to introduce kids to the concept of density without a single equation in sight.
How Light Creates the Rainbow Effect
Food coloring absorbs some wavelengths of light and reflects others — that’s what gives each color its hue. When multiple colors are layered in a glass jar and placed near a light source, the light passes through each colored layer, bends slightly (a process called refraction), and emerges transformed. The result is a complex, glowing interplay of color that genuinely looks like a rainbow suspended in glass.
Why Kids Are So Obsessed With This Activity
It Moves Slowly Enough to Watch
In a world of fast-paced screens and instant gratification, there’s something surprisingly captivating about an activity that unfolds slowly. The swirling of colors, the gradual thickening, the way the jar transforms over hours — it rewards patience and encourages the kind of slow, observational attention that’s increasingly rare and genuinely valuable.
It’s Different Every Single Time
No two Rainbow Sugar Crystal Jars ever look exactly the same. The swirl patterns, the way colors blend at the edges, the settling of glitter — all of it is slightly random and entirely unrepeatable. Kids quickly realize that their jar is truly one of a kind, which makes it feel special in a way that store-bought things rarely do.
It Produces a Beautiful Keepsake
Unlike many activities that leave nothing behind, a finished Rainbow Sugar Crystal Jar is genuinely beautiful — pretty enough to display on a shelf, a desk, or a windowsill. Kids take enormous pride in something they made themselves that actually looks good. That pride is powerful.
It Teaches Color Theory Naturally
Watching what happens when two colors swirl together — how blue and yellow make green at the edges, how red and blue create purple where they meet — is an intuitive, hands-on introduction to color mixing. No lesson required. The jar teaches it on its own.
It’s Calming and Meditative
The slow stirring, the deliberate pouring, the gentle swirling — the process itself is a calm, focused, almost meditative experience. For kids who are overstimulated or need to decompress, this kind of quiet, hands-on activity can be genuinely regulating and restorative.
Tips for the Most Beautiful Results
Use gel food coloring if you can. Liquid food coloring works well, but gel coloring produces dramatically deeper, more jewel-toned colors that stay vivid even in a very thick sugar solution.
Don’t rush the sugar. Adding too much sugar at once can cause clumping. Add it gradually, one spoonful at a time, and stir patiently between additions.
Pour down the side of the jar. Tilting the jar slightly and pouring each color slowly down the inner glass wall creates the cleanliest layers and most defined color separation.
Less swirling is more. The biggest mistake beginners make is over-swirling. One or two slow, deliberate movements of the spoon creates far more beautiful results than enthusiastic stirring, which just blends everything into one color.
Put it on a windowsill. Natural light transforms this activity from pretty to extraordinary. The backlight makes the colors glow and the glitter sparkle in a way that artificial light just can’t match.
Make multiples in different sizes. A cluster of three or four jars in different sizes, each with a different color palette, looks absolutely stunning grouped together on a shelf.
Creative Variations to Try
Sunset Jar: Use red, orange, yellow, and a touch of pink for a gradient that looks like a warm summer sunset captured in glass.
Ocean Jar: Layer deep navy, turquoise, seafoam green, and white with silver glitter for a jar that looks like layered ocean water.
Galaxy Jar: Swirl together deep purple, midnight blue, and black with holographic glitter for a cosmos-in-a-jar effect that glows beautifully near a lamp.
Seasonal Palettes: Try orange and brown for autumn, red and green for Christmas, pastels for spring, or icy blues and whites for winter.
Glitter Gradient: Use the same color in progressively lighter shades from bottom to top, with the glitter concentration increasing toward the top for a gradient that shimmers.
Rainbow Layers: Use all seven rainbow colors — red, orange, yellow, green, blue, indigo, violet — each at a slightly different sugar concentration so they stay in distinct layers rather than mixing.
How to Display and Preserve Your Jar
Once your Rainbow Sugar Crystal Jar is finished and has had time to settle, seal it with a lid to prevent further evaporation and keep dust out. A sealed jar will maintain its beauty for weeks.
Display it where light can work its magic — a sunny windowsill is ideal, but even a lamp placed nearby creates a lovely glow effect. Group multiple jars together for maximum visual impact.
Over time, if the jar is left open or stored in a very dry environment, the sugar may begin to crystallize further along the edges and surface — which is actually even more beautiful, and a natural extension of the science at work.
The Big Color Question
Every time someone makes one of these jars, the same debate breaks out: which color combination actually looks the coolest?
Deep purple swirled with gold is consistently one of the most striking combinations — it looks like something out of a fairy tale. Teal and coral together create a color contrast so vivid it almost vibrates. The classic rainbow gradient, when done carefully, is breathtaking near a window. And there’s something about deep red swirled with midnight blue and silver glitter that looks genuinely like a galaxy.
But here’s the real answer: the coolest color combination is the one your kid chooses on their own. Put the food coloring in front of them, step back, and let them decide. The combinations kids come up with — sometimes surprising, sometimes unconventional, always their own — are almost always the most interesting ones.
Final Thoughts
Rainbow Sugar Crystal Jars are proof that the most magical things in life are often the simplest. A jar, some sugar, a little color, and a moment of slow and patient attention — and suddenly you have something genuinely beautiful sitting on your windowsill, glowing in the afternoon light.
Kids who make these don’t forget them. They check on them throughout the day. They show them to every person who comes through the door. They ask to make another one in different colors.
And honestly? That reaction — that pure, uncomplicated delight — is the whole point.
Set out the jars, choose your colors, and get ready to be amazed. The magic is already in your pantry.


