It sits on the windowsill, exactly where a real cactus would sit — green, textured, a little spiky-looking, arranged in a small terracotta pot with sand packed carefully around the base. Visitors walk past it, glance at it, and move on. Then they stop. Look again. Reach out and pick up one of the rocks.
“Wait — is this painted?”
The painted rock cactus is one of those crafts that crosses the line from “cute activity” into something that genuinely fools people. Smooth oval stones painted in layered greens with white dot patterns along their ridges, grouped together in a pot, look startlingly like real cactus pads. They have weight. They have dimension. They have the quiet, architectural confidence of a real succulent arrangement.
And unlike actual cacti — which need just the right amount of light, the right soil mix, and the right watering schedule to survive — painted rock cacti require absolutely nothing after they’re made. No water. No sunlight. No soil. No care whatsoever. They sit exactly where you put them and look beautiful forever.
This is a project that works beautifully as an afternoon craft with children, a meditative solo project for adults, a handmade gift idea, a home decor piece, and an introduction to painting technique. Here is the complete guide to making the most realistic, most beautiful painted rock cacti you’ve ever seen.
What Are Painted Rock Cacti?
Painted rock cacti are smooth stones or pebbles, selected for their natural shapes and sizes, painted to resemble cactus pads, and then arranged in small pots filled with sand or gravel to create the illusion of a living succulent arrangement.
The best painted rock cacti don’t try to look cartoonish or craft-store-cute. They aim for something more interesting — a genuine visual mimicry of the real thing, achieved through careful color layering, realistic detail work, and thoughtful arrangement. A well-made painted rock cactus, placed in a terracotta pot with coarse sand, can be genuinely mistaken for the real thing from across a room.
They’ve become beloved in the crafting community for several reasons. They’re forgiving — stone is a patient, stable surface that accepts paint beautifully and allows for corrections. They’re accessible — the materials are inexpensive and widely available. And they produce something that genuinely looks good in any home, not just in the context of “things my kid made.”
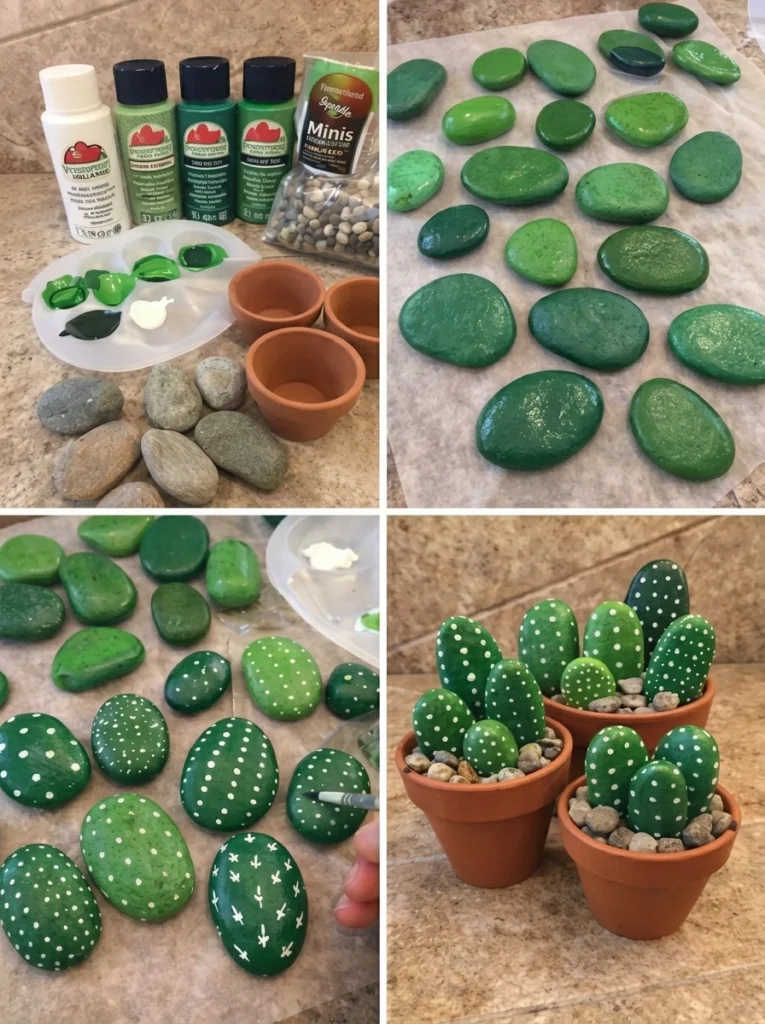
What You’ll Need
For the rocks:
- Smooth stones or pebbles in various sizes — Look for oval or round shapes with relatively flat sides. River stones and beach pebbles are ideal; craft stores also carry bags of smooth stones in various sizes. The natural variation in shape is part of what makes a grouped arrangement look realistic — use small, medium, and larger stones together.
For painting:
- Acrylic paint in shades of green — Multiple greens are key. At minimum, a medium green, a darker forest green, and a lighter yellow-green or lime green. Acrylic paint adheres beautifully to stone and dries quickly.
- White paint — For the spines, dots, and surface detail that transform a green-painted rock into something that reads unmistakably as cactus.
- Small paintbrushes — A medium flat brush for base coats, a small round brush for shading and blending, and a very fine detail brush or liner brush for the white spine details.
For the pot:
- Small flower pots — Terracotta pots are the most realistic and the most beautiful. A 3 to 4 inch pot works well for a small grouping of three to five rocks. Larger arrangements can go in 6 inch pots or wider, shallower succulent dishes.
- Sand, soil, or small pebbles — For filling the pot and holding the rocks upright. Coarse sand looks most realistic. Fine gravel or aquarium stone works beautifully as a top dressing. Soil works but looks less finished than sand or gravel.
Step-by-Step Instructions
Step 1: Choose the Right Rocks
This step matters more than most people realize. The shapes you select will determine how convincingly the finished pieces read as cactus — and not all smooth stones are created equal.
Look for stones that are oval, teardrop-shaped, or slightly flattened — shapes that naturally suggest the pad-like segments of an Opuntia (prickly pear) cactus, or the rounded barrel of a barrel cactus. Collect a range of sizes: some about the size of a large egg, some smaller like a golf ball, some tiny enough to tuck in at the base as young offshoots. This size variation is what makes the finished arrangement look organic and natural rather than uniform and artificial.
Avoid stones that are too perfectly round — they read as pebbles, not cacti. Avoid stones that are too flat — they’ll tip over and won’t hold their position in the pot. The sweet spot is an oval stone with enough depth to stand upright when pressed into sand or gravel.
Step 2: Clean the Rocks Thoroughly
Wash each stone under running water and scrub with a brush or rough cloth to remove all dust, soil, and surface oils. Any contaminant between the stone and the paint will cause adhesion problems — paint that peels, bubbles, or refuses to stick evenly.
Dry the stones completely — either air dry for an hour or pat dry and leave them for thirty minutes. The stone surface must be entirely moisture-free before any paint is applied.
For extra adhesion — especially on very smooth stones — lightly sand each surface with fine sandpaper (220 grit) before washing. This creates tiny scratches in the surface that give the paint more to grip. If you skip this step on very polished stones, the finished paint may chip more easily with handling.
Step 3: Apply the Base Color
Paint each stone in a solid base coat of medium green. Use a flat brush and apply the paint in even strokes, covering the entire surface of the stone. On the first coat, don’t worry too much about perfect coverage — stone is porous and textured, and the first coat will look patchy. That’s expected.
Allow the first coat to dry completely — acrylic paint on stone typically dries in fifteen to twenty minutes. Then apply a second coat in the same direction. By the end of the second coat, you should have solid, even, opaque coverage across the whole stone.
Different stones in the arrangement should receive slightly different base greens — this color variation is one of the most important realism touches in the finished piece. Use a slightly more yellow-green on one stone. A slightly more blue-green on another. A deeper, darker olive green on a third. Real cacti in a garden vary in color considerably, and your rocks should too.
Step 4: Build Depth with Shading
This is the step that separates a flat-looking painted rock from something with genuine three-dimensional presence — and it’s worth taking time on.
While the base coat is still faintly tacky or immediately after it dries, load a brush with a darker green (mixed by adding a small amount of black or dark brown to your base green) and apply it to the edges and bottom of each stone. This shadow color should be concentrated at the perimeter and fade toward the center — suggesting that the center of the cactus pad catches the most light while the edges fall into shadow.
Blend while wet by brushing across the color boundary with a dry or barely-damp brush. You’re not trying to create a hard line between shadow and light — you want a gradual transition that reads as form and roundness.
Then take a lighter green — your base mixed with a small amount of white or yellow — and apply it to the highest, most central point of each stone. This highlight suggests the topmost surface catching direct light. Again, blend outward gently.
After this stage, each stone should look noticeably rounder and more three-dimensional than it did with just the flat base coat. The light source should feel consistent across all stones — light from above, shadows below and at the edges — to make the grouped arrangement read as a coherent scene.
Step 5: Add the Cactus Details
This is the most defining stage — the moment each painted stone stops being “a green rock” and becomes unmistakably a cactus. The detail work is done in white, applied with the finest brush you have.
Real cacti have areoles — the small, specialized structures from which spines, flowers, and new pads grow. These appear as small bumps or circles arranged in regular rows across the surface of the cactus pad. This is what you’re recreating with white paint.
For an Opuntia-style cactus pad: paint rows of small white dots across the surface, following the natural oval contour of the stone. The dots should be evenly spaced in a grid or diamond pattern, each one the same size, becoming slightly smaller toward the edges. From each dot, optionally extend one or two tiny hair-thin white lines outward to suggest individual spines.
For a barrel cactus style: paint thin vertical lines from top to bottom following the curve of the stone, with small clusters of dots at regular intervals along each line.
For a column cactus style: paint slightly curved vertical ridges along the length of the stone with dots positioned along each ridge line.
Don’t be rigid about this — real cacti aren’t perfectly regular either. Allow slight variation in dot size and spacing. That slight imperfection is part of what makes the detail work look organic and real rather than mechanical.
Allow the detail work to dry completely before handling.
Step 6: Prepare the Pot
Before arranging the rocks, prepare your pot. Pour a layer of coarse sand, fine gravel, or soil into the pot until it’s approximately three quarters full. Pack it down slightly — you want it stable enough to hold the rocks upright without shifting.
The filling material you choose affects the look of the finished piece significantly. Coarse sand — especially tan or pale desert sand — looks the most realistic and creates the most convincing cactus-in-its-natural-habitat appearance. Fine gravel gives a more sculptural, architectural feel. Soil is familiar but can look too dark and garden-like alongside the carefully painted rocks.
For a top dressing layer — applied after the rocks are positioned — consider fine white quartz gravel, crushed oyster shell, or pale decorative sand. This finishing layer covers the packing material and gives the base of the arrangement a polished, complete look.
Step 7: Arrange the Cactus
Begin placing your rocks into the pot, pressing each one into the sand firmly enough that it stands upright without tipping. This is the arrangement stage — and like all arrangement work, it rewards patience and a willingness to try different configurations before committing.
Start with your largest stone — the main “body” of the cactus. Place it slightly off-center for a more natural, asymmetric feel. Then add medium-sized stones around and beside it, grouping them as a cactus would naturally cluster and branch. Finally, tuck the smallest stones in at the base as young pads or offshoots.
Step back regularly and assess the arrangement from multiple angles. A grouping that looks good from the front might have an awkward gap at the side. Rotate, reposition, add or remove rocks until the arrangement looks balanced, natural, and coherent from all angles.
Press the top dressing material around the base of the rocks once you’re happy with the arrangement — this anchors everything visually and completes the illusion of a cactus growing from desert ground.
Step 8: Display and Enjoy
Place your finished painted rock cactus somewhere it will be seen and appreciated. A sunny windowsill is the natural choice — it places the piece where a real cactus would live and allows light to move across the painted surfaces and reveal the depth and detail of the painting.
Grouped with other small pots — each a different cactus style or color palette — a collection of painted rock cacti creates a miniature desert garden that looks genuinely curated and beautiful.
Why This Craft Is Worth Making
It Produces Something Genuinely Decorative
Painted rock cacti are not “cute kid crafts” that get displayed briefly and then stored. Done with care and attention to the techniques above, they are genuine home decor objects — the kind of thing visitors notice, compliment, and ask about. They look intentional and thoughtful on a shelf or windowsill in a way that most crafts don’t.
It’s a Perfect Introduction to Painting Technique
The rock cactus project introduces three fundamental painting skills — base coating, shading and highlighting for form, and fine detail work — in a context that is forgiving, accessible, and produces immediate visible results. Children who do this project learn, without being explicitly taught, how painters create the illusion of three-dimensional form on a flat surface.
It’s Genuinely Relaxing
The repetitive nature of painting dots in organized rows is deeply meditative. The focus required for fine detail work is the same kind of absorption that mindfulness practices describe — full attention on a small, immediate task, with no room for anxious thought. Painting rock cacti is, without exaggeration, one of the most calming creative activities you can do with a brush.
It Works for Every Skill Level
A beginner can paint a rock solid green, add some white dots, put it in a pot with sand, and produce something that looks charming and intentional. An experienced painter can spend an hour on a single rock — building up layers, blending transitions, varying the direction and pressure of individual brushstrokes — and produce something that looks museum-worthy. The same project accommodates every level of skill and ambition.
It’s Zero Maintenance Forever
Real cacti, for all their reputation for toughness, do actually need things. Light. Occasional water. Proper drainage. The right temperature. Painted rock cacti need nothing. They can sit in a dark corner, survive years of neglect, travel across the country in a box, and emerge looking exactly as they did the day they were made. For people who love plants but struggle to keep them alive — and there are many of us — this is a genuinely liberating feature.
Tips for the Most Realistic Results
Use at least three shades of green. A single flat green reads as painted. Multiple greens layered and blended read as real. Mix your own variations from a base green by adding black, white, yellow, or blue in small amounts.
Keep a consistent light source. Decide which direction light is coming from — typically from above — and apply all highlights and shadows accordingly across every stone in the arrangement. Consistent lighting makes the grouping read as a coherent, unified scene.
The dots are the thing. Spend real time on the white dot work. Evenly spaced, consistently sized dots with fine spine lines extending from them make the difference between a green painted rock and something that immediately reads as cactus to anyone who sees it.
Seal after painting. A coat of clear acrylic sealer or Mod Podge applied over the finished, dry paint protects the surface from chipping and gives the stones either a matte or gloss finish depending on the product you choose. Matte is more realistic for cacti; gloss adds a vibrant, jewel-like quality.
Group odd numbers. One stone, three stones, five stones — odd-numbered groupings look more natural and organic than even numbers. Three stones of different sizes in a small pot is often the most elegant configuration.
Creative Variations
Flowering Cactus: Once the rocks are dry and sealed, glue small silk or paper flowers to the top of one or two stones — cacti flower in spectacular fashion, and a cluster of bright blooms on your painted rocks looks wonderful and adds an unexpected pop of color.
Painted Succulent Garden: Use the same techniques with different stone shapes to create a whole variety of succulents — echeveria rosettes painted on flat circular stones, aloe spikes on elongated pebbles, haworthia stripes on small oval stones — and arrange them all together in a wide succulent dish.
Seasonal Cactus: Add tiny painted ornaments or stars to the tops of the cactus stones for a Christmas cactus arrangement. Paint tiny orange-red blooms for an autumn display.
Miniature Desert Scene: Arrange the cactus grouping in a tray or shallow bowl with a full desert landscape — sand, small rocks, a tiny painted lizard or roadrunner stone, perhaps a small driftwood piece suggesting a sun-bleached branch.
Gift Set: Make three small individual pots — each with one or two painted cactus stones — and group them together as a set. Tied with twine and labeled with a handwritten tag, they make a distinctive, thoughtful, completely original gift.
Final Thoughts
The painted rock cactus is a craft that rewards the attention you give it. A stone painted hastily in flat green is still a pleasant little object. A stone painted with care — layered colors, blended shadows, patient dot work, consistent light — is something that makes people stop and look twice, reach out and pick it up, hold it up to the window, and ask: “Did you make this?”
Yes. You did. From a smooth stone, some green paint, and a fine brush.
Place it on a windowsill. Let the light hit it. Watch it look, for all the world, like something alive.


