Introduction to Shake Up a Rainbow Storm
Welcome to a world bursting with color and creativity! Today, we’re going to Shake Up a Rainbow Storm in a jar, and I promise it’s going to be a blast! This fun DIY craft is perfect for kids and adults alike, making it a fantastic way to spend quality time together. With just a few simple materials, you can create a mesmerizing display that brings joy and wonder to any day. Plus, it’s an easy project that sparks imagination and curiosity, making it a rewarding experience for everyone involved!
Why You’ll Love This Shake Up a Rainbow Storm
This Shake Up a Rainbow Storm project is not just a craft; it’s a delightful experience that brings families together. It’s easy on the wallet and requires minimal materials, making it perfect for busy moms and teachers. Plus, the joy of watching colors swirl and mix is incredibly relaxing! You’ll create lasting memories with your kids while igniting their creativity. What’s not to love about that?
Materials and Tools Needed for Shake Up a Rainbow Storm
To create your vibrant Shake Up a Rainbow Storm, you’ll need a few simple materials that are easy to find. Here’s what you’ll need:
- Clear glass jar with a lid: This is essential for showcasing your colorful creation. A mason jar works perfectly, but any clear container will do!
- Water: The base of your rainbow storm, water allows the colors to mix and swirl beautifully.
- Food coloring: Choose a variety of colors like red, orange, yellow, green, blue, and purple to create a stunning rainbow effect. You can even use natural food dyes for an eco-friendly option!
- Vegetable oil: This is crucial for creating the separation between the water and colors. It’s affordable and easy to find in any grocery store.
- Glitter (optional): For that extra sparkle! You can use any type of glitter you have on hand, or even biodegradable glitter for a more eco-conscious choice.
- Small funnel: This handy tool makes pouring the oil into the jar mess-free, especially for little hands.
- Spoon: You’ll need this for mixing the colors and creating those beautiful layers.
Gathering these materials is part of the fun! Plus, it’s a great way to teach kids about the importance of recycling and using what you have at home. Let’s get crafting!
How to Make Shake Up a Rainbow Storm
Now that we have our materials ready, it’s time to dive into the fun part—creating our very own Shake Up a Rainbow Storm! This step-by-step guide will walk you through the process, ensuring you and your little ones have a blast while crafting. Let’s get started!
Step 1: Prepare Your Jar
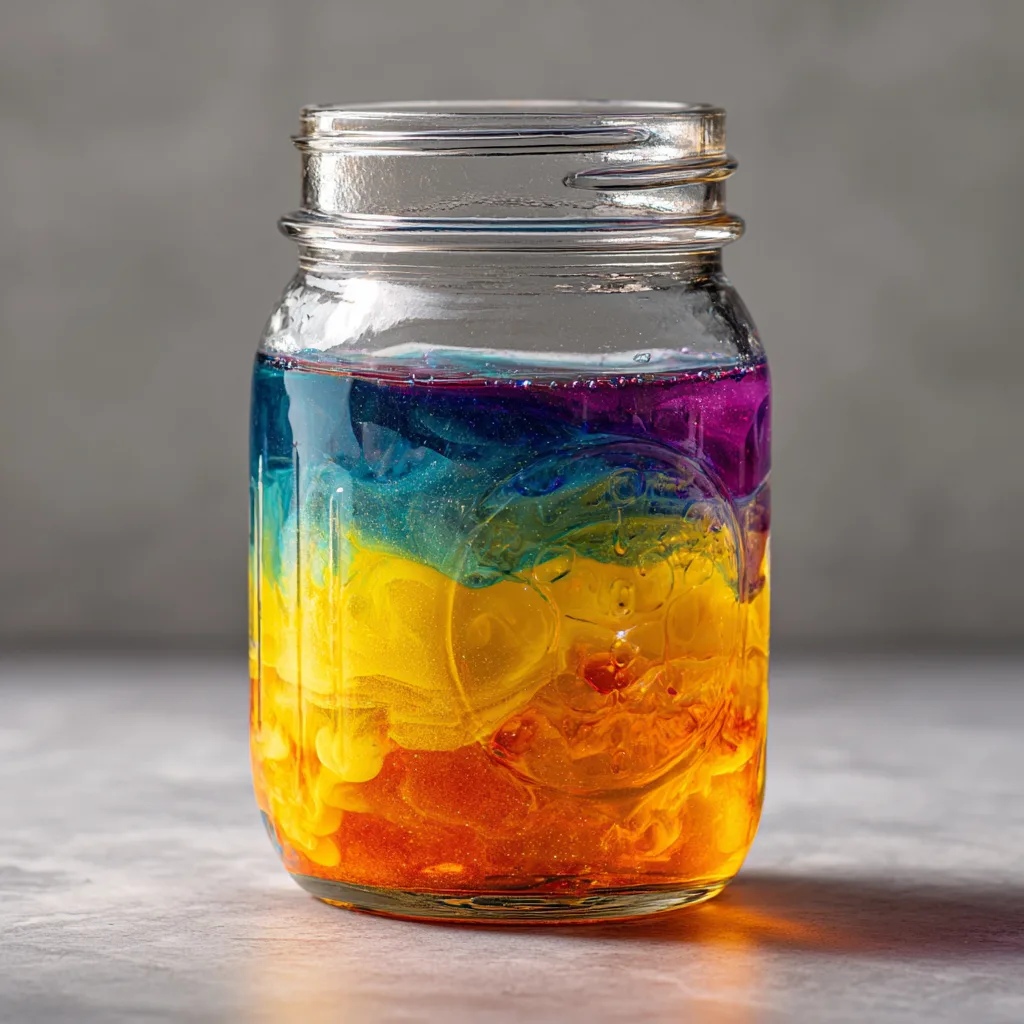
First things first, grab your clear glass jar. I love using a jar that’s big enough to see all the magic happening inside. Fill it about 1/4 full with water. This is where the fun begins! The clear jar allows you to appreciate the vibrant layers we’re about to create. Trust me, the anticipation of seeing those colors swirl together is half the fun!
Step 2: Add the Colors
Now, let’s bring in the colors! Start with your first food coloring. Just a few drops will do. I like to use red, orange, yellow, green, blue, and purple for a classic rainbow effect. After adding each color, gently mix it with a spoon. This is where the magic happens! Watching the colors blend and dance in the water is like a mini science experiment right in your kitchen. Remember, take your time and enjoy the process!
As you add each color, encourage your kids to observe how the colors interact. It’s a fantastic way to spark conversations about art, science, and creativity. Plus, it’s a wonderful bonding experience that you’ll cherish together!
Step 3: Fill with Oil
Once you’ve added all your colors, it’s time to fill the rest of the jar with vegetable oil. Pour it in slowly, leaving a little space at the top. This is where the science comes into play! Oil and water don’t mix, so you’ll see the oil float on top, creating a beautiful separation. It’s fascinating to watch, and it’s a great opportunity to talk to the kids about density and why this happens!
As you pour, remind everyone to be patient. The slower you pour, the more distinct the layers will be. It’s like creating a beautiful sunset in a jar!
Step 4: Add Sparkle
Who doesn’t love a little sparkle? If you want to take your rainbow storm to the next level, sprinkle some glitter on top of the oil. It adds a magical touch that makes the whole jar shimmer and shine. Just imagine how beautiful it will look when the light hits it! Plus, it’s a fun way to get the kids involved—let them choose their favorite glitter colors!
Feel free to experiment with different types of glitter. You can use chunky glitter for a bold effect or fine glitter for a more subtle shimmer. The choice is yours!
Step 5: Seal and Shake
Now that your jar is filled with color and sparkle, it’s time to seal it up! Tightly screw on the lid, and get ready for the grand finale. Give your jar a gentle shake and watch as your rainbow storm comes to life! The colors will swirl and mix, creating a mesmerizing display. It’s like having a piece of the rainbow right in your hands!
As you shake, encourage the kids to observe how the colors interact. It’s a fantastic way to spark conversations about art, science, and creativity. Plus, it’s a wonderful bonding experience that you’ll cherish together!
And there you have it! Your very own Shake Up a Rainbow Storm is complete. Enjoy the vibrant colors and the joy of creating something beautiful together!
Tips for Best Results
- For vibrant colors, use gel food coloring instead of liquid; it creates more intense hues.
- If the colors mix too much, try shaking gently instead of vigorously to maintain distinct layers.
- Supervise young children when using food coloring to avoid stains on clothes and surfaces.
- Experiment with different oils, like coconut or olive oil, for unique effects.
- Seal the lid with hot glue for a more permanent display.
Theme and Design Variations
- Seasonal Themes: Create a fall-inspired jar with warm colors like red, orange, and yellow, or a winter wonderland with icy blues and whites.
- Holiday Colors: For Halloween, use orange, black, and purple; for Christmas, try red, green, and gold!
- Kid-Friendly Versions: Let kids choose their favorite colors or create a jar based on their favorite cartoon characters.
- Glow-in-the-Dark: Add glow-in-the-dark paint to the water for a magical nighttime effect!
- Nature-Inspired: Use colors that reflect a sunset or a rainbow after the rain for a beautiful natural theme.
Display and Use Ideas
Your completed Shake Up a Rainbow Storm is not just a craft; it’s a vibrant piece of art that can brighten up any space! Here are some fun ways to use and display your colorful creation:
- Home Decor: Place it on a windowsill or coffee table to add a splash of color to your home.
- School Crafts: Use it as a fun science project to teach kids about density and color mixing.
- Gift Idea: Wrap it up as a unique gift for friends or family, perfect for any occasion!
- Holiday Displays: Incorporate it into your seasonal decor for a festive touch.
FAQs about Shake Up a Rainbow Storm
1. Can I use other types of jars for this project?
Absolutely! While a clear glass jar is ideal for visibility, you can use any clear container you have at home. Just make sure it has a lid to keep the rainbow storm contained!
2. What if my colors mix too much when I shake the jar?
If the colors blend too much, try shaking the jar gently instead of vigorously. This will help maintain the distinct layers and keep your rainbow storm looking vibrant!
3. Is this project safe for young children?
Yes, it’s generally safe, but be sure to supervise young kids when using food coloring to avoid any stains. You can also use natural food dyes for a safer option!
4. How long will my rainbow storm last?
Your Shake Up a Rainbow Storm can last for a long time if sealed properly. If you want a more permanent display, consider using a hot glue gun to seal the lid.
5. Can I add other materials to my rainbow storm?
Definitely! You can experiment with different types of glitter, small beads, or even tiny figurines to personalize your rainbow storm. Just make sure they’re small enough to fit through the jar opening!
Final Thoughts
Creating your very own Shake Up a Rainbow Storm is not just a craft; it’s a joyful experience that brings color and creativity into your home. The satisfaction of watching those vibrant colors swirl together is truly magical! I encourage you to gather your materials, invite your kids to join in, and let your imaginations run wild. Don’t forget to share your colorful creations with friends and family! I can’t wait to see how your rainbow storms turn out—let’s spread the joy of crafting together!
Print
Shake Up a Rainbow Storm: Fun DIY Crafts for Colorful Days!
Description
Create a vibrant and colorful rainbow storm in a jar using simple materials. This fun DIY project is perfect for kids and adults alike, bringing a splash of color to any day!
Instructions
- Start by filling the jar about 1/4 full with water.
- Add a few drops of food coloring to the water, one color at a time, creating layers. Use a spoon to gently mix each color before adding the next.
- Once you have added all the colors, fill the rest of the jar with vegetable oil, leaving some space at the top.
- If desired, sprinkle some glitter on top for extra sparkle.
- Seal the jar tightly with the lid.
- Shake the jar gently to see your rainbow storm come to life!
- Category: Kids Craft
Keywords: Rainbow, DIY, Crafts, Kids, Colorful, Fun