Crafting Your Own Rainbow Pool Noodle Garden Flowers
As the golden rays of the sun dance through a vibrant garden, your outdoor space takes on a magical aura when adorned with colorful blooms. Imagine a lazy Saturday afternoon, where the air is filled with laughter, warm breezes, and the earthy scent of spring. Around you, your children gather, their little hands eager to create, to bring a splash of color that will brighten any landscape. This is where the idea of Rainbow Pool Noodle Garden Flowers blooms—an imaginative craft that blends creativity and whimsy, perfect for any garden lover.
Picture this: it’s the beginning of spring, and your yard is finally shedding its winter coat. You’ve decided to host a garden party to celebrate the season’s arrival. But your garden is missing something, a touch of personality, something playful. This is where pool noodles—yes, those buoyant tubes of summer fun—come into play, transforming into cheerful blossoms that make not just for delightful decor but also serve as a splendid crafting activity for the whole family.
Why Rainbow Pool Noodle Flowers?
Garden enhancements often focus on natural blooms, but bringing a playful, homemade twist can be incredibly fulfilling. Rainbow pool noodle flowers are not only visually captivating but incredibly simple to make. They embody joy, creativity, and whimsy, making them ideal for kids’ parties, summer gatherings, or just to add a splash of color to your outdoor space. As you piece together these flowers, you will also be weaving memories with your loved ones—each petal snipped reflects laughter, creativity sprouting amid conversations and shared smiles.
Plus, they offer a host of benefits:
- Durable and Weather Resistant: Unlike real flowers, these vibrant blooms are designed to withstand the elements, shining brightly even during rain or shine.
- Versatile Decor: Use them in your garden, on your patio, or even to adorn indoor spaces for a burst of cheer.
- Cost-Effective: There’s simply no breaking the bank on these delightful crafts; pool noodles and paint are inexpensive yet provide endless crafting potential.
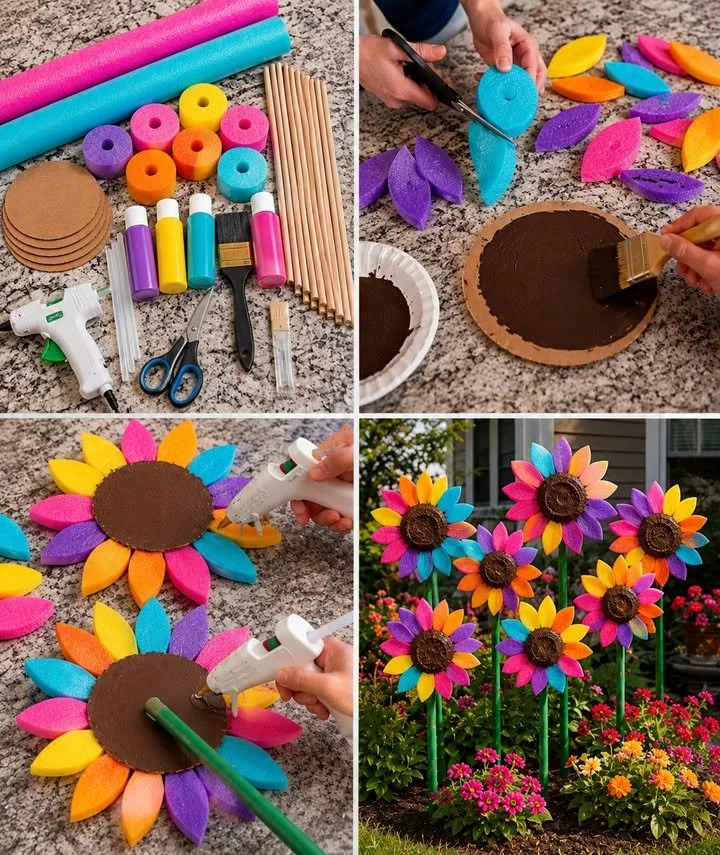
Gather Your Materials
Let’s dive into the artistic process! Here’s what you’ll need to bring this project to life:
- Pool Noodles in assorted bright colors: Think oranges, pinks, yellows, greens, and blues—these will form the petals of your flowers.
- Cardboard Circles: You can craft these from any old cardboard you have lying around (perhaps from a pizza box?).
- Brown Acrylic Paint: This will be used to create the flower centers.
- Green Wooden Dowels or Garden Stakes: These will act as the sturdy stems of your vibrant blooms.
- Hot Glue Gun and Glue Sticks: Essential for holding your petals and flowers securely.
- Scissors: To shape your pool noodles into petals.
- Paintbrush: For painting, of course!
- Green Craft Paint: For painting the dowels to match the flowers.
Step-by-Step Guide
As you prepare to create your rainbow garden, remember: this process is as much about the journey as it is the final piece. Invite your little ones to join in—it’s an experience filled with laughter, fun, and the vibrant hue of creativity. Here’s how to do it:
Step 1: Shaping the Petals
Start by grabbing those pool noodles. Using your scissors, cut them into lovely petal shapes. Go for ovals that create a soft, flowing appearance. As you cut through the foam, notice the cheerful brightness each noodle radiates. Lay those petals aside, imagining how they will dance in the garden breeze.
Step 2: The Flower Centers
While your petals are waiting, take those cardboard circles and paint them brown—this is where the flower centers will bloom. Let those dry under the warm sun or a gentle breeze, envisioning how they will bring your flowers to life.
Step 3: Arranging Petals
Once everything is dry, it’s time to assemble your flowers. Arrange the colorful petals around the dried cardboard circle, alternating the vibrant hues for a delightful rainbow effect. It’s like a painting coming to life right before your eyes.
Step 4: Securing the Petals
Using your trusty hot glue gun, secure each petal to the cardboard circle. Press firmly and hold in place for a moment, breathing in the satisfaction of creating something beautiful.
Step 5: Painting the Stems
Next, grab those green dowels. Get your green craft paint and apply a smooth, even coat. Watch as each dowel transforms into a fresh, flourishing stem, ready to hold your vibrant blooms high toward the sky.
Step 6: Assembling the Flowers
Once the stems are dry, it’s time to attach them to your flowers. Flip your flower over and use the hot glue gun to affix a dowel firmly to the back of each flower. Don’t shy away from using a bit of extra glue for reinforcement—this will ensure your vibrant flowers withstand the test of time.
Step 7: Displaying Your Creation
Now comes the moment of joy! Place your finished flowers in garden beds, vibrant flower pots, or along walkways, bringing a cheerful atmosphere that invites smiles from family, friends, and passersby.
Tips to Enhance Your Crafting Experience
- Double-Up on Petals: For a fuller flower, consider using two layers of petals to create an even more vibrant outdoor display.
- Seal for Durability: If you plan to place your flowers outside, consider using an outdoor spray sealer. This simple step will protect your creations against the elements, ensuring your blooms stay bright and beautiful.
- Explore Color Combinations: Don’t hesitate to experiment with different color patterns—blues with greens, or a fiery blend of reds and oranges. The garden is your canvas!
Creative Variations
As you grow more comfortable with the craft, why not experiment with different themes? Consider:
- Holiday-Themed Flowers: Use colors associated with different holidays—red and green for Christmas, pastels for Easter, or even black and orange for Halloween.
- Themed Colors: Create a whole garden dedicated to a specific color palette or pattern. From monochrome to a vibrant mix of hues, the possibilities are endless.
Long-Term Care
To keep your pool noodle flowers looking fresh and fun, consider bringing them indoors during extreme weather conditions. If they collect dust or dirt, a simple rinse with water can revive their colorful appearance. Stacked storage prevents them from being squished and keeps their lovely shapes intact.
Frequently Asked Questions
Can this craft be made with kids?
Absolutely! This is a wonderful family project, fostering creativity and teamwork. Just be sure to supervise the use of scissors and the hot glue gun.
How durable are the finished flowers?
These flowers are surprisingly durable! While they can withstand light weather, heavy storms or high winds may require you to bring them inside.
Can I paint the noodles instead of using different colors?
Yes! You can paint pool noodles if you’re striving for a specific theme, just ensure the paint is flexible enough not to crack when the noodle moves.
Conclusion
Crafting rainbow pool noodle garden flowers is more than just a fun afternoon activity; it’s a chance to engage with loved ones, express creativity, and add a personal touch to your outdoor spaces. As friends and family come together amidst laughter and colorful petals, you’ll be crafting more than just flowers—you’ll be cultivating memories, joy, and a spirit of togetherness.
This crafting project allows your garden to bloom year-round, uplifting your spirits every time you step outside. So gather your materials and let your imagination soar; vibrant blooms await your creative touch. After all, life is a garden, and it’s time to lace it with color and joy—one delightful flower at a time!
Meta Description: Discover the joy of crafting Rainbow Pool Noodle Garden Flowers, a delightful DIY project that combines creativity with vibrant outdoor decor. Step-by-step instructions to brighten your garden await!
SEO Tags: pool noodle crafts, garden decoration, creative DIY, family activities, colorful flowers, summer garden ideas, kids crafts


