Introduction to Pressed Flower Contact Paper Suncatchers
Welcome to the enchanting world of pressed flower contact paper suncatchers! This delightful DIY project is not only a fantastic way to bring a splash of color into your home, but it also allows you to connect with nature and unleash your creativity. I find that crafting these suncatchers is a joyful experience, especially when I involve my kids. It’s simple, fun, and incredibly rewarding to see the beauty of pressed flowers transformed into stunning art pieces that brighten up any window. Let’s dive into this colorful adventure together!
Why You’ll Love This Pressed Flower Contact Paper Suncatchers
Creating pressed flower contact paper suncatchers is a delightful blend of creativity and relaxation. This project is not only easy on the wallet, but it also offers a wonderful opportunity to bond with your kids. As we craft together, I cherish the laughter and stories shared. Plus, the satisfaction of seeing our colorful creations dance in the sunlight is simply magical. It’s a perfect way to bring nature’s beauty indoors!
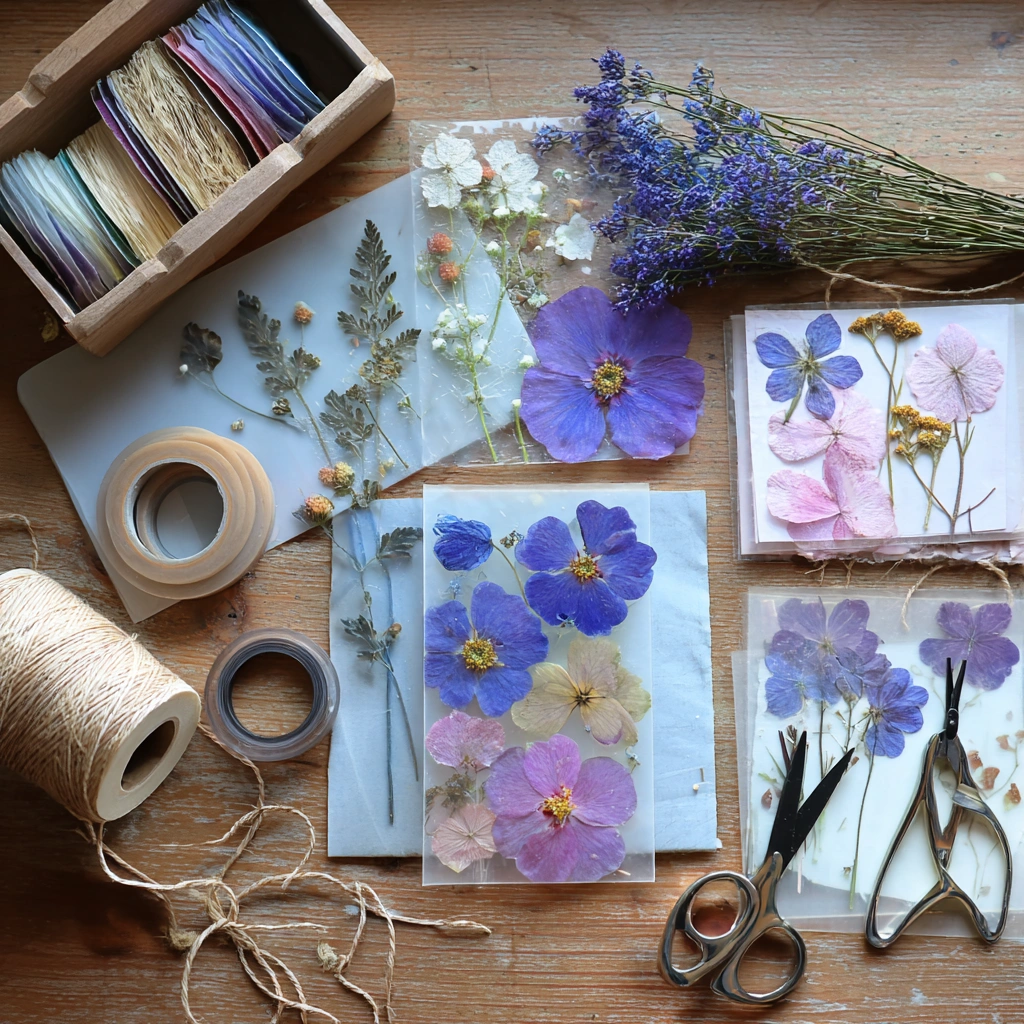
Materials and Tools Needed for Pressed Flower Contact Paper Suncatchers
To create your stunning pressed flower contact paper suncatchers, you’ll need a few essential materials. First, grab some contact paper, which acts as the magical adhesive that holds everything together. Next, gather your pressed flowers—these can be dried flowers or leaves that retain their color beautifully. Scissors are a must for cutting the contact paper, while clear tape can be handy for extra security if needed. You’ll also want some paper or cardstock for backing, and don’t forget string or ribbon for hanging! If you’re looking for eco-friendly options, consider using recycled paper or natural twine. Each item plays a vital role in bringing your suncatcher to life, so choose materials that inspire you!
How to Make Pressed Flower Contact Paper Suncatchers
Creating your own pressed flower contact paper suncatchers is a delightful way to bring a touch of nature indoors. I love how this project allows for creativity while being simple enough for kids to join in. So, let’s dive into the steps that will transform your pressed flowers into stunning art pieces!
Step 1: Gather Your Materials
Before we get our hands sticky, let’s gather everything we need! Having all your materials ready makes the crafting process smoother and more enjoyable. You’ll need contact paper, pressed flowers, scissors, and optional items like clear tape and string for hanging. Trust me, when the kids are excited, the last thing you want is to be searching for supplies!
Step 2: Arrange Your Pressed Flowers
Now comes the fun part! Take your pressed flowers and start arranging them on a piece of contact paper. I like to lay them out in a way that feels balanced and colorful. You can mix different shapes and sizes for a unique look. Remember, there’s no right or wrong here—let your creativity flow! The soft shimmer of the contact paper adds a magical touch to your arrangement.
Step 3: Cut the Contact Paper
Once you’re happy with your flower arrangement, it’s time to cut the contact paper. Use scissors to cut a piece that’s slightly larger than your flower design. This extra space will help seal everything in nicely. Plus, it gives you a neat edge to work with later. I always find that a little extra preparation goes a long way!
Step 4: Peel and Place
Carefully peel off the backing of the contact paper, revealing the sticky side. Place it sticky side up on your workspace. This is where the magic happens! Gently place your arranged flowers onto the sticky surface. Take your time—this is your chance to create something beautiful. I often find myself getting lost in the colors and textures of the flowers!
Step 5: Seal the Flowers
Once you’re satisfied with your flower placement, it’s time to seal them in. Cut another piece of contact paper and place it over the flowers, sticky side down. Press down gently to ensure there are no air bubbles. This step is crucial for keeping your flowers safe and secure. It’s like wrapping a present, but instead, you’re preserving nature’s beauty!
Step 6: Trim and Finish
Now, let’s tidy things up! Trim the edges of the contact paper to remove any excess. This will give your suncatcher a polished look. I love how satisfying it is to see everything come together neatly. Plus, it makes hanging them much easier!
Step 7: Add Hanging Options
If you want to hang your suncatcher, now’s the time to attach a piece of string or ribbon to the top. You can use clear tape to secure it, or simply punch a small hole and thread the string through. This little detail makes it easy to display your creation in a sunny window, where it can catch the light beautifully.
Step 8: Display Your Creation
Finally, find the perfect sunny spot to display your suncatcher! I love placing mine in the kitchen window, where the sunlight dances through the flowers, creating a warm, inviting glow. It’s a wonderful way to brighten up your home and enjoy the beauty of nature indoors. Plus, it’s a great conversation starter when friends come over!
Tips for Best Results
- Choose flowers that hold their color well, like pansies or violets, for vibrant suncatchers.
- If you accidentally get air bubbles, gently lift the contact paper and smooth it out again.
- For a fun twist, try layering different colors of contact paper for a unique effect.
- Always supervise younger children with scissors to ensure safety during crafting.
- Experiment with different shapes and sizes of flowers to create a one-of-a-kind masterpiece!
Theme and Design Variations
- Seasonal Themes: Create autumn-inspired suncatchers using vibrant orange and yellow leaves, or spring designs with pastel flowers like daisies and tulips.
- Color Schemes: Choose a monochromatic palette for a chic look, or mix complementary colors for a bold statement.
- Kid-Friendly Versions: Let kids use stickers or drawings alongside pressed flowers for a playful touch.
- Holiday Decor: Incorporate holiday-themed elements, like red and green for Christmas or spooky silhouettes for Halloween!
Display and Use Ideas
- Home Decor: Hang your suncatchers in windows to create a colorful display that brightens any room.
- School Crafts: Use them as a fun classroom project to teach kids about nature and creativity.
- Gift Ideas: Package your suncatchers as thoughtful gifts for friends or family, adding a personal touch to any occasion.
- Holiday Displays: Incorporate seasonal themes to celebrate holidays, making your home festive and inviting!
FAQs about Pressed Flower Contact Paper Suncatchers
1. Can I use fresh flowers instead of pressed ones?
While fresh flowers are beautiful, they won’t work as well for suncatchers since they can wilt and lose their color. I recommend using pressed flowers for a long-lasting and vibrant display!
2. How do I press flowers for this project?
To press flowers, simply place them between the pages of a heavy book or use a flower press. Leave them for a week or two until they’re completely dry. This method preserves their color and shape beautifully!
3. What if my suncatcher gets dirty?
If your suncatcher collects dust, gently wipe it with a soft, damp cloth. Avoid using harsh chemicals, as they can damage the contact paper and flowers.
4. Can I make this project with younger children?
Absolutely! Just be sure to supervise them closely, especially when using scissors. This project is a great way to teach kids about nature while having fun!
5. How long will my suncatcher last?
With proper care, your pressed flower contact paper suncatcher can last for several months. However, keep it out of direct sunlight for long periods to prevent fading. Enjoy the beauty of nature indoors!
Final Thoughts
Creating pressed flower contact paper suncatchers is not just a craft; it’s a joyful experience that brings nature’s beauty into your home. I hope you feel inspired to gather your materials and dive into this colorful project with your family. The satisfaction of seeing your creations catch the sunlight and brighten your space is truly magical. So, grab those pressed flowers and let your creativity shine! I can’t wait to hear about your suncatcher adventures—don’t forget to share your results and inspire others to join in the fun!
Print
Pressed Flower Contact Paper Suncatchers: Craft Stunning Art Today!
Description
Create beautiful pressed flower suncatchers using contact paper to brighten up your windows with natural art.
Instructions
- Gather your pressed flowers and arrange them on a piece of contact paper.
- Cut a piece of contact paper to your desired size, leaving extra around the edges.
- Carefully peel off the backing of the contact paper and place it sticky side up.
- Arrange the pressed flowers on the sticky side of the contact paper.
- Once satisfied with the arrangement, cut another piece of contact paper and place it over the flowers, sealing them in.
- Trim the edges of the contact paper to remove excess and create a neat finish.
- If desired, attach a piece of string or ribbon to the top for hanging.
- Display your suncatcher in a sunny window and enjoy the beauty of nature indoors!
- Category: Crafts
Keywords: pressed flowers, suncatchers, contact paper, DIY crafts, home decor