Dance of the Wind: Crafting Plastic Cup Jellyfish Wind Chimes
There’s something magical about a gentle breeze that makes the world around us feel alive. It whispers secrets through the trees, it invites laughter from children playing outside, and it brings forth the songs of birds, each note more gleeful than the last. Now, picture this—the sun is shining, the kids are playing, and off in the distance, you hear the tinkling harmony of wind chimes swaying with the rhythm of the air. But these are no ordinary wind chimes; these chimes are whimsical and colorful, crafted from something as mundane as plastic cups. You might find yourself captivated by their movement, enchantingly reminiscent of jellyfish drifting gracefully through the ocean depths.
Creating your own plastic cup jellyfish wind chimes can be a delightful home project that transforms your outdoor space. Not only do they add a splash of color and character, but they also invite a sense of playfulness that resonates with both children and adults alike. So, grab your crafting tools, channel your inner artist, and let’s bring a touch of oceanic charm to your backyard!
Why Plastic Cup Jellyfish Wind Chimes?
You may wonder why this quirky idea has captured so many hearts. Perhaps it’s the nostalgia of carefree childhood days spent splashing in puddles and chasing after butterflies. Or maybe it’s because, in a world increasingly suffocated by disposable plastic, upcycling becomes not just a necessity but also an opportunity for creativity. These wind chimes are an invitation to craft something beautiful while teaching children about artistic expression and resourcefulness.
Moreover, they are an engaging project that can be enjoyed on a sunny afternoon or included as part of outdoor celebrations, making them a perfect activity for birthday parties or family gatherings. The laughter of friends and loved ones as they gather around to help cut, glue, and decorate provides a heartwarming atmosphere—one that can be cherished long after the craft is completed.
The Joys of Crafting
But beyond enjoyment, crafting has numerous benefits. Engaging your hands encourages mindfulness, sparking a flow of creativity that alleviates stress and anxiety. Each snip of the scissors, squeeze of the glue, and tie of the ribbon connects us to our inner child, reminding us that simplicity often holds the deepest pleasure. It’s a reminder to pause and take joy in the little things—even when they come in the form of colorful plastic jellyfish that sway in the breeze.
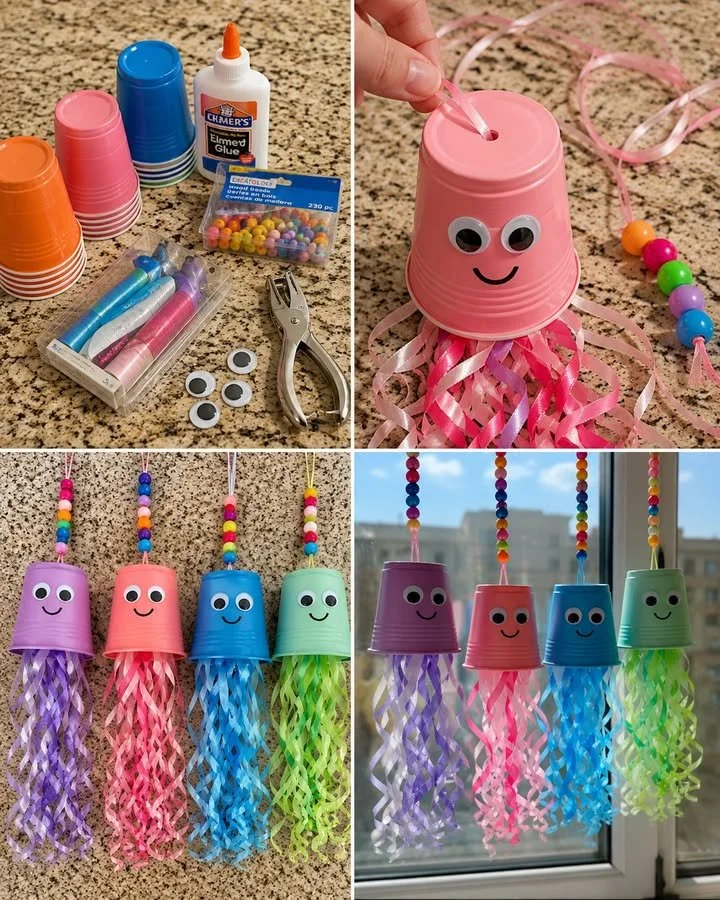
Materials to Gather
Before we embark on this vibrant journey, let’s gather our supplies. Just a handful of everyday items will bring our jellyfish to life:
- Plastic Cups: Four in total; choose bright colors for a cheerful effect.
- Googly Eyes: Because jellyfish wouldn’t be jellyfish without their dreamy stare!
- Ribbon in Assorted Colors: This is your chance to play with combinations—let your imagination run wild!
- Large Pony Beads: To add a touch of sparkle and whimsy.
- Craft Glue or Hot Glue: For ensuring everything sticks perfectly.
- Hole Punch: To create the perfect hanging point.
- Scissors: For those snippy tentacle ribbons.
- String or Ribbon for Hanging: To connect your creation to the outside world.
Crafting Your Jellyfish Wind Chimes
Ready to dive in? Let’s turn those ordinary plastic cups into delightful jellyfish that sway in the wind!
Step 1: Prepare Your Cups
Take one plastic cup and turn it upside down. Now, grab your hole punch and carefully punch a hole in the center of the bottom.
Step 2: Create a Hanger
Cut a length of ribbon (around 12 inches should do) and thread it through the hole. To make it colorful, add some pony beads, tying a knot at the top to secure everything in place. This will serve as your jellyfish’s floating appendage.
Step 3: Tentacle Time!
Next, cut several pieces of ribbon to create the tentacles, varying their lengths for added texture and movement. The shining rainbow beneath the gleaming sun will evoke mesmerizing waves, so dream up a design that excites you.
Step 4: Affix the Tentacles
Taking your ribbons, glue them inside the rim of the cup, ensuring they hang down evenly. This is where your jellyfish will come to life, so make it beautiful!
Step 5: Bring on the Personality
Now comes the fun part. Use your craft glue to attach two googly eyes on the front of the cup. Go ahead and get imaginative—draw or paint a big, happy smiley face to reflect the joy of your creation.
Step 6: Let it Dry
Patience is a virtue! Allow all the glue to dry completely. This step is vital to ensure your jellyfish stays intact.
Step 7: Hang and Enjoy
With your jellyfish ready, the moment of truth arrives—find the perfect spot to hang your creation! Whether it’s near a window where the sunlight can filter through, on your porch to serenade guests, or in a play area to spark imagination, these wind chimes will captivate both young and old alike.
Tips and Tricks
- For more bouncy, playful tentacles, consider using curling ribbon. When the wind hits, they sway and twirl like the gentle flow of an aquatic dance.
- Mix up the ribbon colors for a vibrant rainbow effect that looks even better against the blue sky.
- Feeling experimental? Add more beads for extra sparkle and weight, creating an enchanting ambiance.
Common Mistakes to Avoid
While crafting is all about exploration, it’s wise to steer clear of putting too much glue or overstuffing your cup with ribbons—this can hinder the joyful swaying motion of your wind chime.
Creative Variations
Feel free to switch things up with different materials—use fabric scraps for the tentacles or metallic ribbons for an elegant touch. You could even paint the cups with patterns or marine-themed designs, transforming each jellyfish into a uniquely stunning piece of art.
When it comes to decorating for outdoor gatherings, why not create a whole school of jellyfish? Imagine vibrant hues of jellyfish floating together, effortlessly animated by any breeze, turning your garden into an enchanting underwater realm.
Maintenance Tips
These little beauties are surprisingly resilient, but always check the connections and tentacles periodically, particularly after strong winds or storms. A quick re-glue or re-tie will ensure they remain a cheerful presence by your side for many seasons to come.
Frequently Asked Questions
Q: Can children help with this project?
Absolutely! Crafting is an excellent way to foster creativity and teamwork, making it a perfect family activity.
Q: Can I use other materials instead of plastic cups?
Of course! While plastic cups are budget-friendly and easy to decorate, feel free to experiment with paper cups or even lightweight plastic containers.
Q: How do I store them during winter?
During the colder months, hang them in a safe place indoors, or simply take them apart for easy storage until spring arrives.
Final Thoughts
Crafting a set of plastic cup jellyfish wind chimes is more than just a delightful afternoon project; it’s an opportunity to create lasting memories with family and friends, to revel in artistic expression, and to bring warmth and joy to your outdoor space. Each time the wind catches your whimsical jellyfish, may it remind you of laughter, love, and the beauty of creativity—the very essence of life itself. So gather your materials, unleash your imagination, and let the crafting begin!
Meta Description
Transform your outdoor space with colorful and whimsical plastic cup jellyfish wind chimes. Follow this engaging guide for a fun crafting project that invites playfulness and creativity into your home!
SEO Tags
- Jellyfish wind chimes
- DIY craft projects
- Upcycled crafts
- Outdoor decoration
- Family craft ideas
- Summer crafts for kids
- Whimsical home decor


