Unleashing Creativity: Ocean Puffy Paint Sidewalk Art
Ah, summer afternoons—there’s just something magical about them. The gentle warmth of the sun, children’s joyous laughter echoing in the background, and the sweet scent of garden blooms wafting through the air. As the days stretch longer and temperatures rise, it’s the perfect time to explore creativity right in your front yard. Picture this: a carefree day spent outside, transforming your ordinary sidewalk into a vibrant undersea world pop with colors and textures. This isn’t just any arts and crafts project—this is Ocean Puffy Paint Sidewalk Art.
Imagine gathering your children, friends, or even embarking on this colorful adventure solo. The excitement builds as you mix paints that will soon emerge as playful turtles, whimsical fish, and curious octopuses. There’s something so soothing and exhilarating about this activity, making it a wonderful experience for kids and adults alike. Are you ready to dive in?
Why Ocean Puffy Paint Sidewalk Art is a Hit
The beauty of this project lies in its ability to captivate both the young and the young-at-heart. It’s more than just an art activity; it’s an experience that engages children’s senses and sparks their imagination. The colorful puffy paint adds a tactile quality, transforming seemingly simple illustrations into 3D masterpieces they can not only see but feel.
Moreover, this activity encourages teamwork, creativity, and fine motor skills. There’s something deeply satisfying about squeezing paint from a bottle, outlining sea creatures, and filling them with playful colors. Plus, it offers a perfect excuse to enjoy nature, connect with loved ones, and explore the depths of your imagination—all while getting a little messy in the best possible way.
Materials You’ll Need
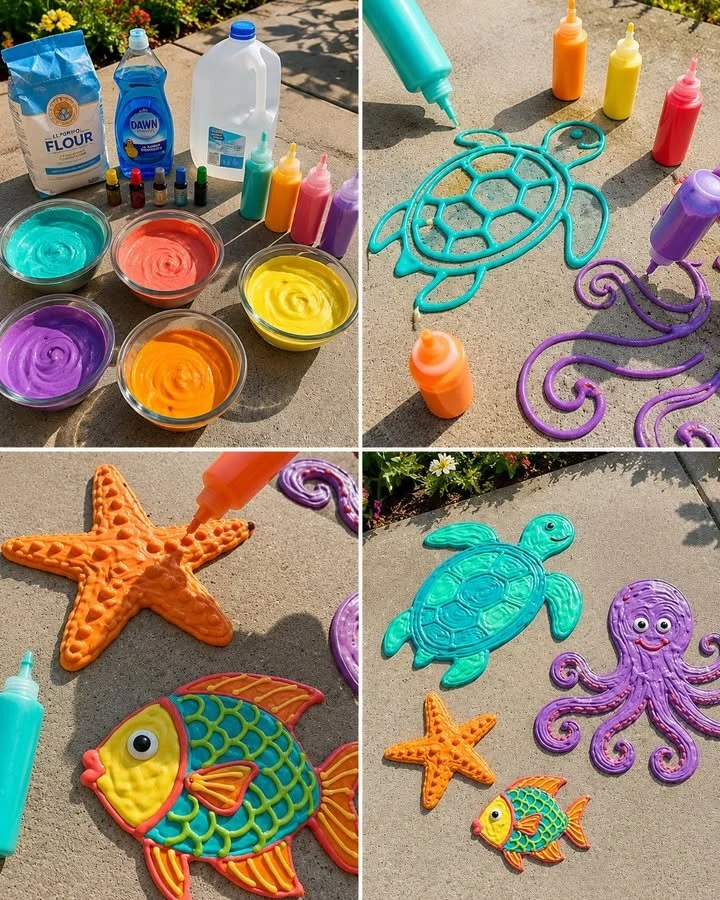
Before you leap into the world of oceanic creativity, let’s gather our materials! Here’s what you’ll need:
- 1 cup flour: This will serve as the base for our paint, giving it the perfect texture.
- 1 cup shaving cream: The key ingredient that provides the puffy effect, adding a delightful fluff.
- A few tablespoons dish soap: Just a little is needed to help with mixing and ensure the colors pop.
- Food coloring or washable paint: Choose a bright, assorted palette to bring life to your ocean theme.
- Mixing bowls: For blending your ingredients and colors.
- Squeeze bottles: These are essential for easy application of the paint onto your sidewalk.
- Spoon for mixing: A trusty spoon for stirring and combining your materials.
- Outdoor sidewalk or driveway surface: Wherever you choose to create; it should be a canvas for your imagination!
Step-by-Step Guide to Creating Your Ocean Art
Let’s immerse ourselves in the creative process! Follow these steps to bring your ocean dreams to life:
-
Mix the Base: In a mixing bowl, combine equal parts flour and shaving cream. Stir with your spoon until you achieve a smooth and fluffy texture. Feel free to inhale deeply—the airy scent of the shaving cream is reminiscent of whipped cream!
-
Color it Up: Divide your fluffy mixture into separate bowls. Now is the time to add your chosen colors—this is where it gets exciting! A few drops of food coloring or washable paint in each bowl will create your ocean-themed hues. Don’t be shy; vibrant blues, sunny yellows, and bright pinks will make your artwork pop!
-
Bottling the Fun: Once your paints are colorful and delightful, transfer each mixture into squeeze bottles. This will make it easier for you to draw and express your creativity without fussing over paintbrushes.
-
Create Your Ocean Scene: Start creating outlines of sea creatures with the squeeze bottles. Imagine tracing the sleek fin of a fish or the graceful swirl of an octopus tentacle. Whatever inspires you!
-
Fill It In: Once you’re satisfied with your outlines, it’s time to fill them in! Grab your chosen colors and show your creativity, adding charming details like scales and happy faces. Let your imagination run wild; maybe your turtle wears sunglasses or your fish can sparkle!
-
Let It Dry: After you’ve painted your underwater world, leave it in the sunlight to dry. You’ll notice it puffing slightly as it sets—almost like a baking miracle right on your sidewalk!
-
Enjoy and Clean Up: Step back and marvel at your masterpieces! The best part is that once you’re done enjoying the vibrant display, you can simply rinse it away with water for a clean slate, ready for your next artistic endeavor.
Helpful Tips to Enhance Your Creative Process
- Bright Color Palette: Opt for bright colors to emulate underwater life—think rich blues, greens, and warm coral tones to create a vibrant atmosphere.
- Shake It Up: Occasionally shake the squeeze bottles to ensure the paint stays smooth and ready for action.
- Larger Designs: For younger children, initiate larger designs to make it easier for them to decorate without feeling overwhelmed.
Common Mistakes to Avoid
As exciting as this project is, there are a few pitfalls to avoid. First, ensure you mix the flour and shaving cream thoroughly; any lumps can create texture issues in your artwork. Also, be mindful of how much dish soap you add—a little goes a long way! Too much soap can inhibit the fluffy effect we’re striving for. And, of course, always supervise younger children during this activity—they may get inspired to create… and create… and create!
Creative Variations to Explore
Feeling adventurous? Why not add some unique twists to your puffy paint creations? Here are a few ideas to spark your imagination:
- Themed Mosaics: Instead of just sea creatures, why not create a mosaic of an entire underwater scene? Include coral reefs, treasure chests, or even a whimsical mermaid!
- Interactive Features: Incorporate natural elements like leaves or paper cutouts into your artwork, creating added textures to explore with tiny fingers.
- Glow-in-the-Dark Fun: Try incorporating glow-in-the-dark paints for nighttime fun! Your ocean can transform into a magical underwater world once the sun sets.
Frequently Asked Questions
- How long will the artwork last? The puffy paint typically lasts until a good rain or hose rinse comes along, making it a perfect temporary outdoor activity.
- Is it safe for children? Yes! All the materials used are non-toxic and washable, ensuring a safe creative environment for kids.
- What if it rains? If it rains before the artwork has set, don’t worry! You can simply start again on another day—this activity encourages repetition and experimentation!
The Finishing Touch
As the day wanes and the sun casts a golden glow on your newly adorned sidewalk, take a moment to savor your creations. This isn’t just a craft project; it’s an avenue of expression, connection, and joy. The laughter, the colors, and the memories made will linger long after the puffy paints are washed away.
So gather your supplies, let your creativity run wild, and dive into the thrilling world of Ocean Puffy Paint Sidewalk Art. As you squeeze each vibrant color onto your canvas, remember: the ocean is vast, and so is your imagination.
Happy crafting!
SEO Meta Description: Dive into the fun of Ocean Puffy Paint Sidewalk Art! This engaging DIY project is perfect for summer days, transforming sidewalks into vibrant sea scenes with easy-to-follow steps and tips.
SEO Tags: Ocean Art, Puffy Paint, DIY Crafts, Outdoor Activities, Kids Crafts, Summer Fun, Creative Play


