Ocean Glitter Sensory Jar: A DIY Escape into Underwater Magic
Imagine a quiet, sunny afternoon, where laughter and joy fill the cozy room as you gather with your children to embark on a delightful crafting adventure. A gentle breeze drifts in through the window, carrying with it the salty scent of the sea. As you sit around the kitchen table, materials scattered before you, the excited chatter and giggles morph into a serene focus on creativity. This is where you dive into a world of imagination with an enchanting Ocean Glitter Sensory Jar.
These sensory jars are not just a creative project; they’re a peek into a whimsical underwater realm that can calm, delight, and educate. By crafting these gorgeous little creations together, you’re not only stimulating your children’s senses but also creating lasting memories packed with love and laughter.
Why People Love This Idea
The allure of making an Ocean Glitter Sensory Jar lies in its simplicity and profound impact. Children are naturally drawn to the captivating colors and movements of water, glitter, and decorations. Watching the glitter swirl and the colors blend can be mesmerizing, providing hours of visual stimulation. But beyond aesthetics, these jars serve as tools for mindfulness and relaxation, helping both children and adults manage anxiety and stress through the act of observing.
Moreover, they encourage creativity and fine motor skills. Assembling colorful elements, deciding where to place the tiny ocean animals, and crafting a personal underwater scene engages young minds deeply, developing their artistic senses and sense of agency. The moment they shake the jar and watch their work come to life is a shared celebration of imaginative expression.
The Benefits and Best Occasions to Use It
An Ocean Glitter Sensory Jar can be a wonderful addition to various occasions. From rainy afternoons spent at home to festive crafting gatherings or summer-themed birthday parties, these jars provide versatile fun. They can also serve soothing purposes during transitions, like starting a new school year, bedtime routines, or moments when life feels overwhelming.
On top of that, they make lovely handmade gifts. Imagine gifting a beautifully crafted jar filled with oceanic magic! Friends and family will cherish it and appreciate the thoughtfulness behind such a personal creation.
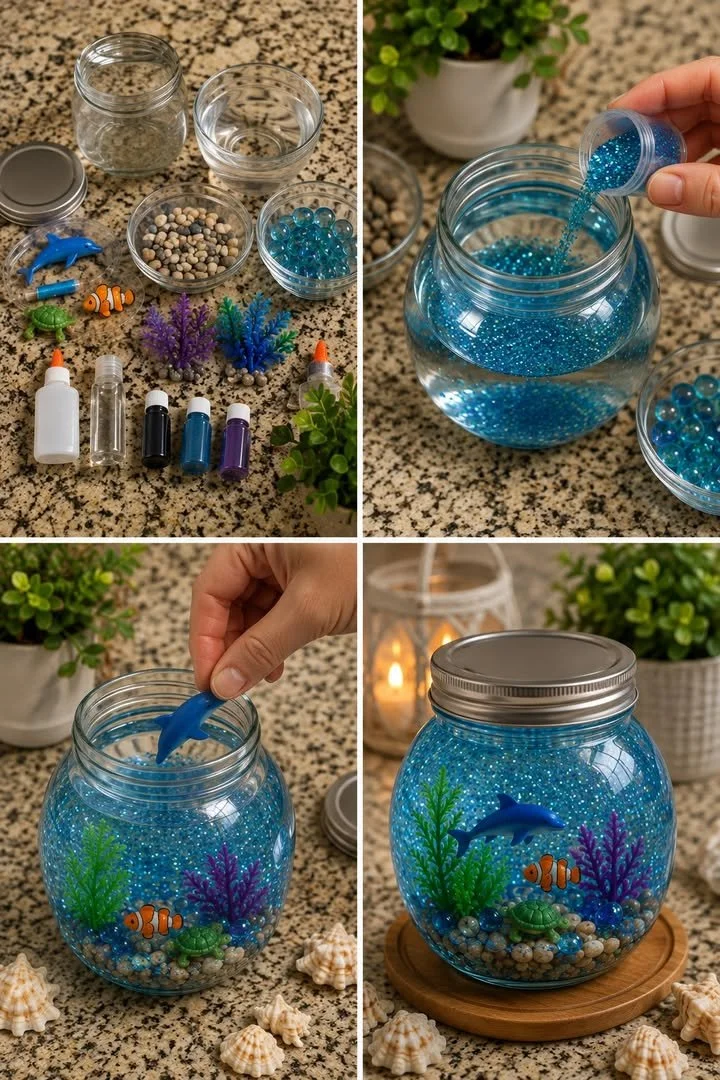
The Materials You’ll Need
Before we dive into crafting, let’s gather our tools and ingredients. You’ll need:
- Clear jar with lid: This is the canvas for your underwater world. Choose a size that allows for creativity without overwhelming little hands.
- Water: The essence of your ocean scene—make sure it’s clean and clear!
- Blue glitter: For that sparkling, magical touch reminiscent of sun-dappled water.
- Blue water beads or clear gems: These will add dimension and texture, simulating bubbles beneath the waves.
- Small pebbles: These represent the ocean floor, grounding your whimsical creations.
- Mini ocean animal figures: Choose some of your children’s favorite sea creatures to bring your scene to life.
- Artificial coral or aquarium plants: These will provide vibrant color and visual interest to your jar.
- Blue and purple food coloring: A few drops will transform the water into a beautiful ocean hue.
- Craft glue: If you want to ensure the lid remains tightly sealed for child-safe play.
Step-by-Step Instructions
Crafting your Ocean Glitter Sensory Jar is not just about assembling materials—it’s a journey into creativity, much like a treasure hunt, where excitement builds with each step.
-
Create the Ocean Floor: Start by placing a layer of small pebbles at the bottom of your jar. Feel free to let your children pick the pebbles—they might enjoy choosing rocks that resonate with their favorite colors or patterns. This will act as your ocean floor, adding a natural and earthy touch.
-
Add Some Coral: Next, sprinkle in the artificial coral and aquarium plants, arranging them to create an inviting underwater scene. Ask your little ones to imagine what their underwater world would look like, and encourage them to design it in a way that makes sense to them.
-
Place the Ocean Animals: Integrate the mini ocean animal figures, placing them playfully among the coral and plants. Watch as your children create little stories about their sea creatures, perhaps placing a seahorse near a shell or a starfish on a rock.
-
Fill with Water: Slowly fill the jar with water, leaving just a little space at the top. This is a great opportunity for kids to carefully pour and witness the easy transition of water flowing into the jar—like a gentle tide washing ashore.
-
Color the Ocean: Add a few drops of blue and purple food coloring, and marvel as they swirl through the water, creating a captivating underwater ambiance. This step turns the jar into a vivid ocean-scape, and you can let children experiment with colors, discussing what happens when they mix shades together—how fun is that?
-
Add Glitter and Gems: Stir in the blue glitter, creating a shimmering effect that mimics sunlight dancing on water. Next, toss in the blue water beads or clear gems, giving the illusion of bubbles drifting up through the water.
-
Seal Your Masterpiece: Secure the lid tightly on the jar. If you’d like, use craft glue around the seam to ensure it stays closed. This step is vital if you’re creating jars for younger children, making sure the ocean magic stays contained—just like a real adventure!
-
Shake and Observe: Appreciate the beauty of the moment. Encourage your children to shake the jar gently and watch the glitter swirl through the underwater scene. It’s magic in a bottle; moments like these build connections and spark joy.
Helpful Tips Throughout the Process
For a slower floating effect of the glitter, consider using fine glitter instead of chunky versions. This will allow children to enjoy the breathtaking sight of glitter gliding and twirling, echoing the calming flow of an actual ocean wave.
If you want to seal your lid securely for child-safe play, glue is your best friend. You won’t have to worry about an accidental spill during playtime.
Consider adding extra ocean animals to create a larger underwater habitat, inviting your children to explore the balance of nature and the interdependence of marine life.
Common Beginner Mistakes to Avoid
One common mistake is overcrowding the jar with too many decorations or figures. Keep in mind that less is often more. Allow for some space so the glitter can move freely and the figures can be seen clearly.
Another common misstep is using too much food coloring, resulting in a murky, unappealing mix. Encourage measured drops; it’s all about creating a balance of colors that mimic nature!
Creative Variations to Explore
Once you’ve mastered the basic jar, give yourself the creative freedom to explore variations! How about creating a themed jar? Consider designing a “tropical reef” with vibrant greens alongside neon glitters or a “deep-sea” version laden with darker hues and glow-in-the-dark elements. You could even celebrate each season with unique themes—think winter with silver decor and white glitter or Halloween with spooky figures.
Presentation and Decoration Ideas
These jars can be wonderful decorative pieces, serving as conversation starters on your mantle or as soothing nightstand companions for bedtime rituals. Consider placing them in a sunny spot where the light can catch the glitter just right, creating a magical visual experience.
Storage and Maintenance Tips
Once crafted, placing your jar in a high, secure spot ensures it remains a cherished spectacle rather than a target for curious little hands. If you choose not to glue the lid securely, educate children on how to handle it with care.
Frequently Asked Questions
Can I reuse the materials?
While it’s best to avoid mixing ingredients after they’ve been sealed, creating anew is always an option! You can recycle some elements like the jar and animal figures for future projects.
Are there age restrictions for this project?
While younger kids can safely participate, adult supervision is recommended, especially when handling food coloring and glitter.
A Journey to Remember
As you and your children immerse yourselves in creating these Ocean Glitter Sensory Jars, you engage in an exploration of creativity, tranquility, and storytelling. Each jar becomes a unique representation of teamwork and enrichment that extends beyond just a creative endeavor.
The real magic lies in the shared experience, the laughter, and the calm that this craft brings into your lives. Every time you look at these jars, you’ll be reminded of that sunny afternoon, the warm connection, the swirling colors, and the ocean depths waiting to be explored—all cradled within a little jar. So grab your materials, and let the adventure begin!
SEO Meta Description
Dive into a serene crafting experience with our Ocean Glitter Sensory Jar! This guide will lead you through a fun project that brings the calming beauty of the ocean right into your home.
Suggested SEO Tags
- Ocean Glitter Sensory Jar
- DIY Sensory Crafts
- Kids Craft Projects
- Relaxation Techniques for Kids
- Underwater Sensory Jar
- Creative Family Activities
- Mindfulness Crafts for Children