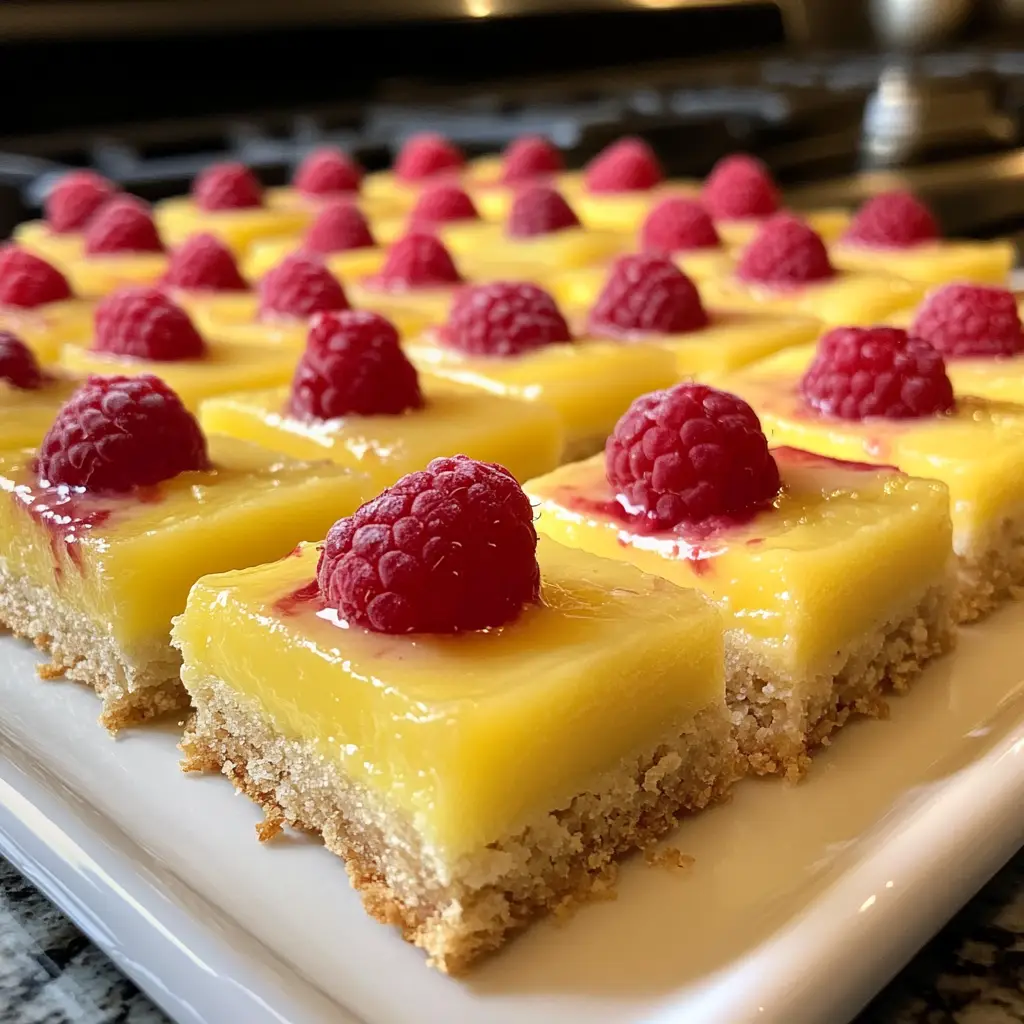
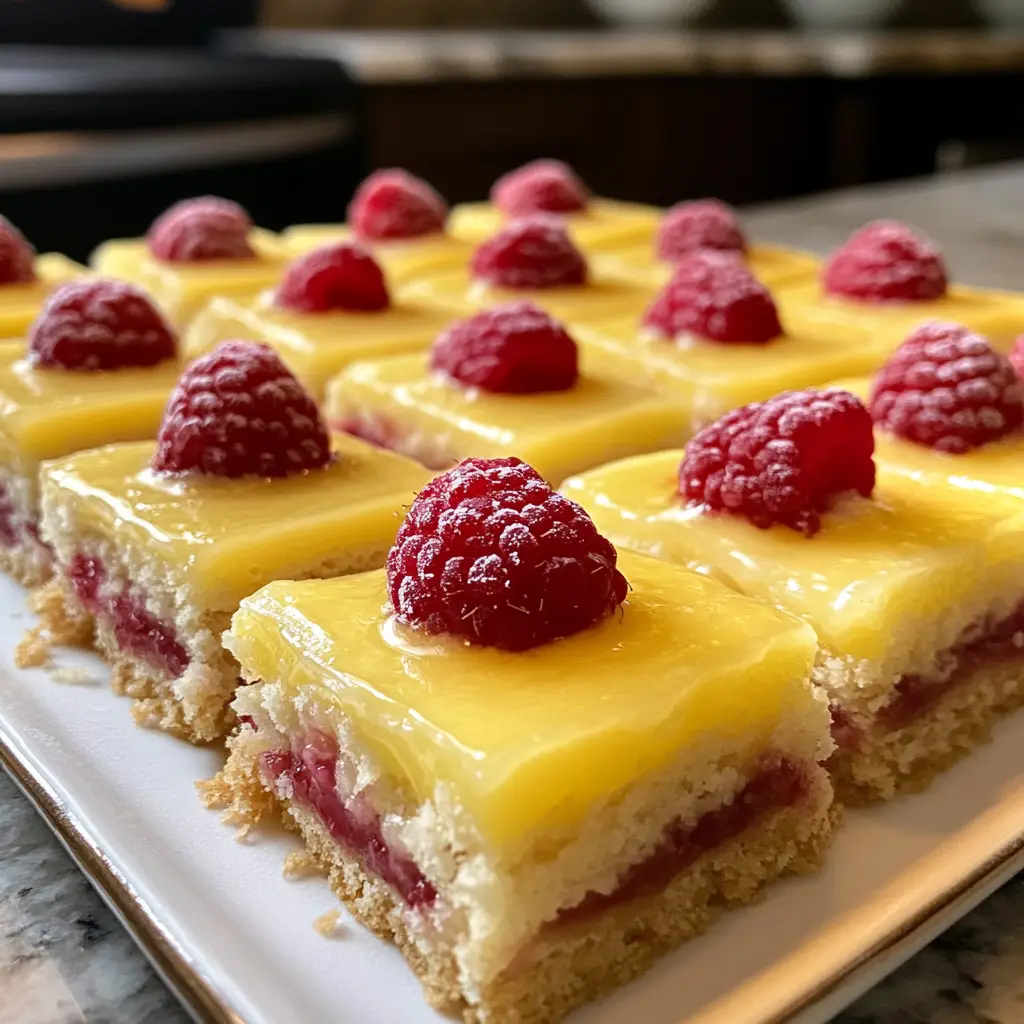
Introduction to Lemon Raspberry Bars Recipe
Ah, Lemon Raspberry Bars! Just the name makes my taste buds tingle with excitement. I remember the first time I tasted these delightful treats at a summer picnic. The sun was shining, laughter filled the air, and there they were—golden bars with a vibrant raspberry swirl peeking through a luscious lemon topping. It was love at first bite! The sweet-tart flavor danced on my tongue, and I knew I had to recreate that magic in my own kitchen.
As a passionate home cook, I find joy in sharing recipes that bring people together. Lemon Raspberry Bars are not just a dessert; they are a celebration of summer, a burst of sunshine on a plate. The combination of zesty lemon and juicy raspberries creates a symphony of flavors that is simply irresistible. Plus, they are surprisingly easy to make, which is a win-win in my book!
In this recipe, I’ll guide you through each step, sharing tips and tricks that I’ve learned along the way. Whether you’re a seasoned baker or a novice in the kitchen, I promise you’ll find joy in making these bars. So, roll up your sleeves, and let’s embark on this delicious adventure together. Trust me, your friends and family will be begging for seconds!
Ingredients for Lemon Raspberry Bars Recipe
Before we dive into the delightful world of baking, let’s gather our ingredients. Having everything ready makes the process smoother and more enjoyable. I always find that when I have my ingredients prepped, it feels like I’m setting the stage for a beautiful performance in the kitchen. Here’s what you’ll need to create these scrumptious Lemon Raspberry Bars!
Main Ingredients
- 1 cup all-purpose flour
- 1/2 cup unsalted butter, softened
- 1/4 cup granulated sugar
- 1/4 teaspoon salt
- 1 cup fresh raspberries (or frozen, if fresh aren’t available)
- 1 cup granulated sugar (for the filling)
- 2 large eggs
- 1/4 cup fresh lemon juice (about 2 lemons)
- 1 tablespoon lemon zest (from the same lemons)
- 1/4 teaspoon baking powder
When selecting your ingredients, I always recommend using fresh, high-quality items. Fresh lemons will give you the best flavor, and ripe raspberries will add that juicy burst that makes these bars so special. If you can, visit a local farmer’s market for the freshest produce!
Optional Add-ons
- Powdered sugar for dusting
- Whipped cream or vanilla ice cream for serving
- Chopped mint leaves for garnish
These optional add-ons can elevate your Lemon Raspberry Bars to a whole new level. A sprinkle of powdered sugar adds a touch of elegance, while a scoop of vanilla ice cream brings a creamy contrast to the tartness of the bars. And don’t forget the mint! It’s like a little green hug for your dessert.
Now that we have our ingredients ready, let’s move on to the fun part—preparing these delicious Lemon Raspberry Bars!
How to Prepare Lemon Raspberry Bars Recipe
Now that we have our ingredients all lined up like eager little soldiers, it’s time to dive into the preparation! Making Lemon Raspberry Bars is like painting a beautiful canvas; each step adds a splash of color and flavor. Let’s get started!
Step 1: Prepare the Crust
First things first, we need to create a buttery, crumbly crust that will serve as the foundation for our bars. In a mixing bowl, combine the softened butter, granulated sugar, flour, and salt. Use a fork or your fingers to mix until the mixture resembles coarse crumbs. Then, press this mixture firmly into the bottom of a greased 8×8-inch baking dish.
Tips for Achieving the Perfect Crust
- Make sure your butter is softened but not melted. This helps create that perfect crumbly texture.
- Press the crust down firmly to avoid it crumbling apart after baking. Think of it as giving your crust a warm hug!
- For an extra touch, you can add a pinch of vanilla extract to the crust mixture for added flavor.
Step 2: Make the Raspberry Filling
Next up is the raspberry filling! In a separate bowl, gently mash the fresh raspberries with a fork. You want to break them down a bit, but not completely puree them. Then, mix in the sugar, eggs, lemon juice, and baking powder until everything is well combined. This filling is where the magic happens!
Tips for Selecting Fresh Raspberries
- Look for plump, vibrant raspberries with no signs of mold. They should smell sweet and fruity!
- If using frozen raspberries, make sure to thaw and drain them before adding to the mixture to avoid excess moisture.
- Don’t be afraid to taste a raspberry or two! They should be sweet-tart and bursting with flavor.
Step 3: Prepare the Lemon Curd Topping
Now, let’s whip up that luscious lemon curd topping! In a clean bowl, whisk together the eggs, sugar, lemon juice, lemon zest, and a pinch of salt. This mixture will create a bright, zesty layer that perfectly complements the raspberry filling. Pour this over the raspberry layer in the baking dish.
Tips for Smooth Lemon Curd
- Make sure to whisk the mixture thoroughly to avoid any lumps. A smooth lemon curd is key to a beautiful presentation!
- Use fresh lemon juice for the best flavor. Bottled juice just doesn’t compare!
- Don’t skip the zest! It adds a wonderful aroma and enhances the lemony goodness.
Step 4: Assemble and Bake
It’s time to bring everything together! After pouring the lemon curd over the raspberry filling, gently swirl it with a knife to create a marbled effect. Pop the baking dish into a preheated oven at 350°F (175°C) and bake for about 25-30 minutes, or until the edges are set and the center has a slight jiggle.
Tips for Even Baking
- Rotate the baking dish halfway through baking to ensure even cooking. Ovens can be tricky, and this little trick helps!
- Keep an eye on the bars as they bake. You want them to be set but not overcooked. A little jiggle in the center is perfect!
- Let the bars cool completely in the pan before cutting. This helps them hold their shape and makes for cleaner slices.
And there you have it! With these steps, you’re well on your way to creating the most delightful Lemon Raspberry Bars. I can already imagine the sweet-tart aroma wafting through your kitchen. Let’s move on to the next exciting part—gathering the equipment we’ll need!

Equipment Needed for Lemon Raspberry Bars Recipe
Before we dive into the baking process, let’s make sure we have all the right tools at our fingertips. Having the right equipment can make a world of difference in your cooking experience. Here’s a quick list of what you’ll need to whip up these delightful Lemon Raspberry Bars!
- Mixing Bowls: A couple of medium-sized mixing bowls will help you combine your ingredients without any fuss.
- Measuring Cups and Spoons: Accurate measurements are key to baking success, so don’t skimp on these!
- Whisk: A whisk is perfect for blending the lemon curd and ensuring a smooth texture.
- Fork or Pastry Cutter: Use this to mix the crust ingredients until crumbly. A fork works just as well if you don’t have a pastry cutter!
- 8×8-inch Baking Dish: This is the ideal size for our bars. If you don’t have one, a similar-sized dish will do, but keep an eye on the baking time.
- Spatula: A spatula is handy for spreading the crust and filling evenly in the baking dish.
- Knife or Pizza Cutter: Once your bars are baked and cooled, a sharp knife or pizza cutter will help you slice them into perfect squares.
And there you have it! With these tools in hand, you’re all set to create your Lemon Raspberry Bars. Remember, cooking is all about improvisation, so feel free to use what you have. Let’s keep the momentum going and move on to the next delicious section!
Variations of Lemon Raspberry Bars Recipe
While I absolutely adore the classic Lemon Raspberry Bars, there’s something thrilling about experimenting with flavors. Just like a painter adds different hues to their canvas, you can add your own twist to this recipe! Here are a few variations that I’ve tried and loved:
- Blueberry Lemon Bars: Swap out the raspberries for fresh blueberries. The sweet, juicy blueberries pair beautifully with the zesty lemon, creating a delightful new flavor.
- Strawberry Lemon Bars: Use fresh strawberries instead of raspberries for a sweeter, more summery vibe. You can even blend the strawberries into a puree for a smooth filling!
- Coconut Lemon Bars: Add shredded coconut to the crust for a tropical twist. The coconut adds a lovely texture and flavor that complements the lemon perfectly.
- Chocolate Lemon Bars: For the chocolate lovers, try drizzling melted dark chocolate over the cooled bars. The rich chocolate adds a decadent touch to the bright lemon and raspberry flavors.
These variations are just the tip of the iceberg! Feel free to get creative and mix in your favorite fruits or flavors. After all, cooking is all about having fun and making it your own. I can’t wait to hear what delicious combinations you come up with!
Cooking Notes for Lemon Raspberry Bars Recipe
As I’ve journeyed through the world of baking, I’ve learned a few essential cooking notes that can make all the difference when preparing Lemon Raspberry Bars. These little nuggets of wisdom are like secret ingredients that elevate your baking game. Here are some tips to keep in mind:
- Room Temperature Ingredients: For the best results, make sure your eggs and butter are at room temperature. This helps them blend more easily, creating a smoother batter.
- Chill the Bars: After baking, let your Lemon Raspberry Bars cool completely in the pan. For an even firmer texture, pop them in the fridge for a couple of hours before slicing. Trust me, the wait is worth it!
- Storage Tips: Store any leftovers in an airtight container in the fridge. They’ll stay fresh for up to a week, but I doubt they’ll last that long!
- Serving Temperature: These bars are delightful served chilled or at room temperature. A little dusting of powdered sugar right before serving adds a lovely touch!
With these cooking notes in your back pocket, you’re well-equipped to create the most scrumptious Lemon Raspberry Bars. Remember, every baking adventure is a chance to learn and grow, so don’t hesitate to experiment and make this recipe your own!
Serving Suggestions for Lemon Raspberry Bars Recipe
Now that your Lemon Raspberry Bars are baked to perfection, it’s time to think about how to serve them! Presentation can elevate your dessert from delightful to dazzling. Here are some of my favorite serving suggestions that will make your bars shine:
- Dust with Powdered Sugar: A light sprinkle of powdered sugar on top adds a touch of elegance. It’s like a little snow blanket that makes everything look more inviting!
- Pair with Whipped Cream: A dollop of freshly whipped cream on the side creates a creamy contrast to the tartness of the bars. It’s a match made in dessert heaven!
- Serve with Ice Cream: For a truly indulgent treat, serve your bars with a scoop of vanilla or lemon ice cream. The cold creaminess complements the warm flavors beautifully.
- Add Fresh Berries: Garnish your plate with a handful of fresh raspberries or other berries. Not only does it look stunning, but it also enhances the fruity flavor of the bars.
- Mint Garnish: A sprig of fresh mint adds a pop of color and a refreshing aroma. It’s like a little green hug for your dessert!
These serving suggestions are sure to impress your family and friends. Whether it’s a summer gathering or a cozy family dinner, your Lemon Raspberry Bars will be the star of the show. Enjoy every bite, and don’t forget to share the love!
Tips for Perfecting Lemon Raspberry Bars Recipe
As I’ve baked Lemon Raspberry Bars time and time again, I’ve gathered a treasure trove of tips that can help you achieve perfection. Think of these as little gems of wisdom that will elevate your baking game. Here are my top tips for perfecting your Lemon Raspberry Bars:
- Use Fresh Ingredients: Fresh lemons and ripe raspberries make all the difference. Their vibrant flavors will shine through in your bars, creating that delightful sweet-tart balance.
- Don’t Overmix: When combining your filling ingredients, mix just until combined. Overmixing can lead to a denser texture, and we want our bars to be light and airy!
- Check for Doneness: Every oven is different, so keep an eye on your bars as they bake. They should be set around the edges but still have a slight jiggle in the center. This ensures a creamy filling!
- Let Them Cool: Patience is key! Allow your bars to cool completely in the pan before slicing. This helps them hold their shape and makes for cleaner cuts.
- Experiment with Flavors: Don’t hesitate to add your own twist! A hint of vanilla or a splash of almond extract can add a delightful depth to the flavor.
With these tips in your back pocket, you’re well on your way to creating Lemon Raspberry Bars that will impress everyone. Remember, baking is as much about the journey as it is about the destination. Enjoy the process, and happy baking!
Breakdown of Time for Lemon Raspberry Bars Recipe
As a passionate home cook, I know that timing is everything in the kitchen. It’s like a dance, where each step needs to be perfectly timed to create a beautiful performance. Here’s a quick breakdown of the time you’ll need to whip up these delightful Lemon Raspberry Bars:
- Prep Time: 15 minutes
- Cooking Time: 25-30 minutes
- Total Time: 40-45 minutes (plus cooling time)
Keep in mind that while the baking time is relatively short, allowing your bars to cool completely is essential for achieving that perfect texture. I often find that the hardest part is waiting! But trust me, the wait is worth it when you finally slice into those golden bars, revealing the vibrant raspberry and lemon layers. So, grab your timer and let’s get baking!
Nutritional Information for Lemon Raspberry Bars Recipe
As I whip up my Lemon Raspberry Bars, I often think about how to balance indulgence with nutrition. While these bars are a delightful treat, it’s nice to know what we’re enjoying. Here’s a quick look at the nutritional information for one serving of Lemon Raspberry Bars, assuming you cut the batch into 16 squares:
- Calories: Approximately 150
- Protein: 2g
- Carbohydrates: 22g
- Fat: 6g
- Saturated Fat: 4g
- Cholesterol: 30mg
- Sodium: 50mg
- Fiber: 1g
- Sugar: 10g
These bars are a delightful balance of sweetness and tartness, making them a perfect dessert for any occasion. While they do contain sugar and fat, the fresh raspberries and lemons provide a burst of vitamins and antioxidants. So, enjoy these bars in moderation, and don’t forget to savor every bite! After all, life is all about balance, and a little treat now and then is what makes cooking so much fun.
Frequently Asked Questions about Lemon Raspberry Bars Recipe
As I’ve shared my love for Lemon Raspberry Bars, I’ve noticed that many home cooks have similar questions. It’s always great to connect with fellow bakers and share insights! Here are some of the most frequently asked questions I’ve encountered, along with my answers to help you on your baking journey.
Can I use frozen raspberries instead of fresh?
Absolutely! Frozen raspberries work just fine in this recipe. Just make sure to thaw and drain them before adding to the filling. This helps prevent excess moisture, ensuring your bars maintain that perfect texture.
How do I store leftover Lemon Raspberry Bars?
To keep your bars fresh, store them in an airtight container in the refrigerator. They’ll stay delicious for up to a week. Just remember to let them cool completely before storing to avoid sogginess!
Can I make these bars ahead of time?
Yes, you can! Lemon Raspberry Bars are perfect for making ahead of time. Just bake them, let them cool, and store them in the fridge. They actually taste even better after a day or two as the flavors meld together!
What can I substitute for eggs in this recipe?
If you’re looking for an egg substitute, you can use flaxseed meal or chia seeds. Mix 1 tablespoon of either with 2.5 tablespoons of water and let it sit for a few minutes until it thickens. This works well to bind the ingredients together!
Can I use a different type of fruit?
Definitely! While I love the combination of lemon and raspberry, you can experiment with other fruits like blueberries, strawberries, or even peaches. Just keep in mind that the sweetness and tartness may vary, so adjust the sugar accordingly.
How do I know when the bars are done baking?
The best way to check for doneness is to look for set edges and a slightly jiggly center. The bars will continue to firm up as they cool. If the edges are golden brown and the center has a slight jiggle, you’re good to go!
These questions are just a glimpse into the wonderful world of baking Lemon Raspberry Bars. If you have any more queries or tips to share, I’d love to hear them! Remember, every baking adventure is a chance to learn and grow, so don’t hesitate to reach out. Happy baking!
Conclusion on Lemon Raspberry Bars Recipe
As I reflect on my journey of creating Lemon Raspberry Bars, I can’t help but smile at the joy they bring. These bars are more than just a dessert; they are a celebration of flavors, a sweet reminder of sunny days, and a delightful treat that can brighten any occasion. The zesty lemon pairs beautifully with the tart raspberries, creating a harmonious balance that dances on your palate.
What I love most about this recipe is its simplicity. With just a handful of ingredients and straightforward steps, anyone can whip up these delicious bars. Whether you’re baking for a family gathering, a picnic, or simply to indulge yourself, Lemon Raspberry Bars are sure to impress. Plus, they’re versatile enough to allow for creative variations, making them a canvas for your culinary imagination.
So, gather your ingredients, roll up your sleeves, and dive into this delightful baking adventure. I promise you’ll find joy in every step, and the smiles on your loved ones’ faces when they take that first bite will be the sweetest reward of all. Happy baking!