Introduction to Jelly Crystals
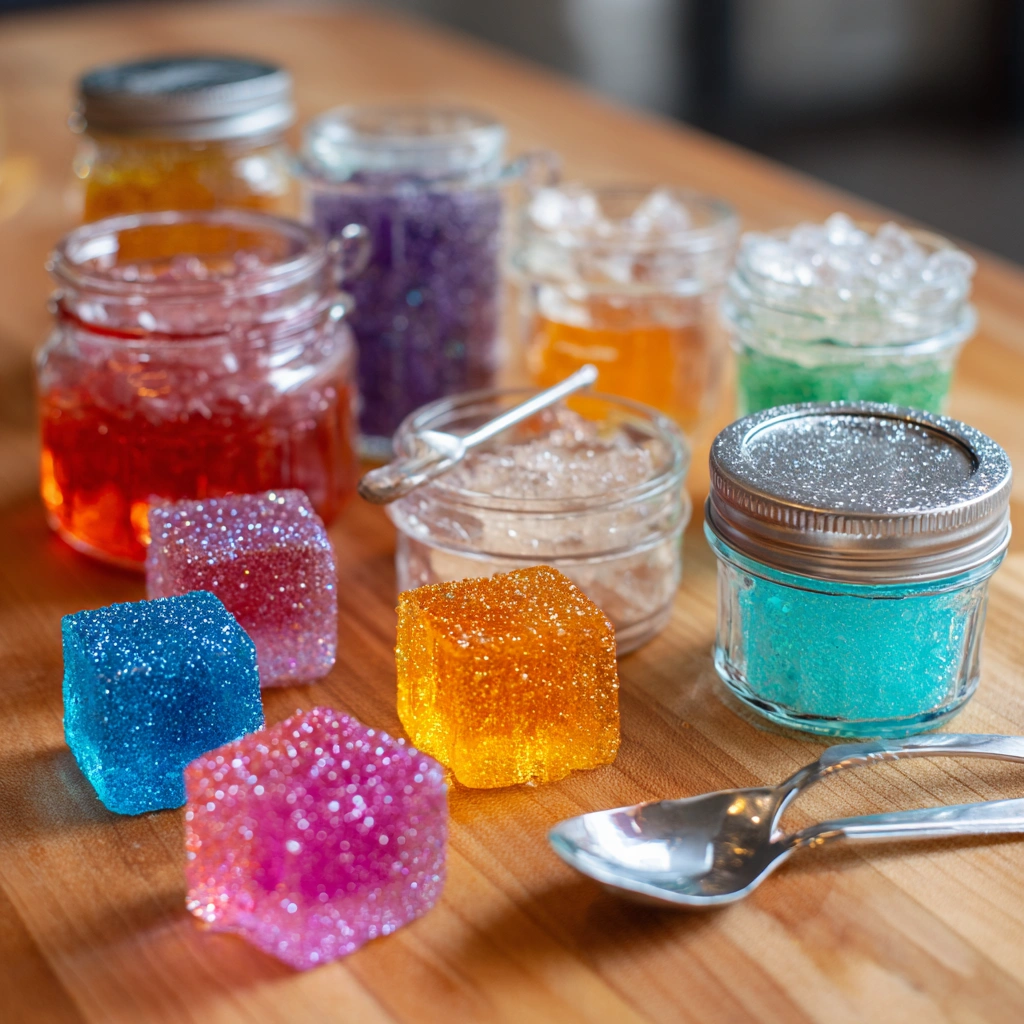
Welcome to the colorful world of Jelly Crystals! If you’re looking for a fun and simple craft project that brings joy to both kids and adults, you’ve come to the right place. These vibrant decorations are not only easy to make but also a fantastic way to unleash your creativity. Imagine the delight of watching your jelly creations shimmer and shine, adding a splash of color to your home. Whether you’re a busy mom, a crafty teacher, or just someone who loves to create, this DIY project is sure to bring smiles and satisfaction to your day!
Why You’ll Love This Jelly Crystals
There’s something truly magical about creating with Jelly Crystals. This craft is not only easy on the wallet but also a wonderful way to bond with your kids. Imagine the laughter and creativity flowing as you mix colors together! Plus, it’s a relaxing activity that allows you to unwind while making something beautiful. The joy of seeing your vibrant decorations come to life is simply priceless!
Materials and Tools Needed for Jelly Crystals
To embark on your Jelly Crystals adventure, you’ll need a few essential materials that are easy to find and budget-friendly. First up, grab some jelly crystals in various colors—these are the stars of the show! Next, you’ll need water, which acts as the base for your colorful concoction. Clear containers or molds are crucial for shaping your jelly; think of them as your canvas. A mixing spoon and measuring cup will help you get everything just right. If you want to add a little pizzazz, consider using glitter or small decorations. For an eco-friendly twist, look for biodegradable glitter or reusable silicone molds. Each item plays a vital role in creating your vibrant decorations, making this project both fun and accessible!
How to Make Jelly Crystals
Creating vibrant decorations with jelly crystals is not only a fun project but also a fantastic way to bond with your kids or unleash your inner artist. Let’s dive into the steps to make these colorful creations that will brighten up any space!
Step 1: Measure the Water
First things first, grab your measuring cup! You’ll want to measure the appropriate amount of water according to the instructions on the jelly crystal package. This is where the magic begins! The water acts as the canvas for your jelly crystals, so make sure to get it just right. If you’re crafting with little ones, this is a great opportunity to teach them about measuring and pouring. Plus, it’s a fun way to practice those math skills!
Step 2: Mix the Jelly Crystals
Now, it’s time to pour the jelly crystals into the water. As you sprinkle them in, watch how they dance and swirl! Grab your mixing spoon and stir well until everything is fully dissolved. The soft shimmer of the mixture is simply mesmerizing. If you notice any lumps, don’t worry—just keep stirring until it’s smooth. This step is all about patience and excitement as you see the colors come to life!
Step 3: Add Extra Flair
If you want to take your jelly creations to the next level, this is the moment to add some extra flair! Consider tossing in a sprinkle of glitter or small decorations like tiny plastic spiders or leaves. Imagine the delight on your kids’ faces as they see the sparkles twinkling in the mixture! Just remember, a little goes a long way, so don’t overdo it. This is your chance to get creative and make each batch unique!
Step 4: Pour into Containers
Next, it’s time to pour your colorful mixture into clear containers or molds. This is where your jelly crystals will take shape! Use a funnel if you have one to avoid spills—trust me, sticky messes can be a real party pooper. If you’re using molds, silicone ones work wonders for easy removal later. As you pour, take a moment to appreciate the vibrant colors swirling together. It’s like a mini art project in every cup!
Step 5: Let it Set
Now comes the hardest part—waiting! Allow the jelly to set according to the package instructions, usually a few hours in the refrigerator. This is a great time to clean up your crafting area and maybe even enjoy a snack. The anticipation builds as you imagine how beautiful your jelly creations will look once they’re ready. You can even sneak a peek every now and then to see how they’re coming along!
Step 6: Display Your Creations
Once your jelly has set and transformed into those vibrant decorations, it’s time for the grand reveal! Carefully remove the jelly from the containers. If you used silicone molds, they should pop right out. Now, find the perfect spot to display your creations! Whether it’s on a windowsill, as a centerpiece for a party, or even as a gift, these jelly crystals are sure to impress. The way they catch the light is simply magical, and you’ll feel a sense of pride knowing you made them yourself!
Tips for Best Results
- For a layered effect, pour different colors of jelly one at a time, allowing each layer to set slightly before adding the next.
- If your jelly doesn’t set properly, try adding a bit more jelly crystals to the mixture and stir well.
- Always supervise younger children during the crafting process to ensure safety.
- Experiment with different container shapes for unique displays!
Theme and Design Variations
- For a spooky Halloween vibe, use orange and black jelly crystals, and add plastic spiders or bats for extra fun!
- Celebrate spring with pastel colors like pink, yellow, and lavender, perfect for Easter decorations.
- Try a beach theme with blue and green jelly crystals, adding tiny seashells or starfish for a coastal touch.
- For a festive holiday look, mix red and green jelly crystals and incorporate small ornaments or candy canes.
- Let kids choose their favorite colors for a personalized touch, making each creation uniquely theirs!
Display and Use Ideas
- Place your vibrant jelly crystals on a sunny windowsill to catch the light and create a beautiful glow.
- Use them as centerpieces for parties or family gatherings, adding a splash of color to your table.
- Gift them in decorative jars to friends or teachers as a thoughtful, handmade present.
- Incorporate them into holiday displays, like Halloween or Christmas, for a festive touch.
- Let kids use them in school projects or as fun decorations for their rooms!
FAQs about Jelly Crystals
Can I eat the jelly crystals once they are set?
While jelly crystals are typically food-safe, it’s best to check the packaging for any specific warnings. If you’re using them for crafts, I recommend keeping them as decorations only!
How long do the jelly crystals last once made?
Your vibrant decorations can last for several days to a week, depending on the environment. To keep them looking fresh, store them in a cool place away from direct sunlight.
Can I use any type of container for the jelly crystals?
Absolutely! Just make sure the containers are clear so you can admire the beautiful colors. Silicone molds are great for easy removal, but any clear container will work just fine!
Are jelly crystals safe for kids to handle?
Yes, as long as you choose non-toxic jelly crystals and supervise younger children during the crafting process. It’s a fun way to engage them in creative activities!
What if my jelly crystals don’t set properly?
If your jelly doesn’t set, don’t fret! You can try adding a bit more jelly crystals to the mixture and stirring well. Sometimes, a little extra magic is all you need!
Final Thoughts
Creating with Jelly Crystals is not just a craft; it’s an experience filled with laughter, creativity, and a splash of color! The joy of watching your vibrant decorations come to life is truly rewarding. I encourage you to gather your family or friends, dive into this fun project, and let your imaginations run wild. Don’t forget to share your beautiful creations with us! Whether it’s a unique color combination or a clever display idea, I can’t wait to see how you bring your jelly crystals to life!
Print
Jelly Crystals: Discover Fun Craft Ideas for Vibrant Decorations!
Description
Create colorful and vibrant decorations using jelly crystals! This fun craft project is perfect for adding a splash of color to any space.
Instructions
- Measure the appropriate amount of water according to the instructions on the jelly crystal package.
- Pour the jelly crystals into the water and stir well until fully dissolved.
- If desired, add glitter or small decorations to the mixture for extra flair.
- Pour the mixture into clear containers or molds.
- Allow the jelly to set according to the package instructions, usually a few hours in the refrigerator.
- Once set, remove the jelly from the containers and display them as vibrant decorations!
- Category: Crafts
Keywords: Jelly Crystals, Craft Ideas, Vibrant Decorations, DIY Crafts


