A bloom frozen in time tells a story longer than words ever could.
Flowers don’t last forever — but with a little oil and a small glass bottle, they can come breathtakingly close. Preserving flowers in oil is one of the most beautiful, simple, and satisfying crafts you can do at home. The result is a tiny, luminous world suspended in glass: petals soft with color, stems delicate and still, floating in clear oil like something caught between a garden and a dream.
Whether you want to preserve a rose from a wedding bouquet, a wildflower picked on a hiking trail, or simply create something beautiful for your windowsill, this guide will walk you through everything you need to know — supplies, step-by-step instructions, tips for stunning results, and ideas for what to do with your finished bottles.
What Is Flower Oil Preservation?
Flower preservation in oil is exactly what it sounds like: dried flowers placed inside small glass bottles and sealed with clear oil — typically baby oil or a plant-based mineral oil. The oil acts as a protective medium, surrounding the petals and preventing further degradation while giving the flowers a luminous, almost magical quality when light passes through.
Unlike pressing (which flattens flowers between book pages) or silica gel drying (which removes moisture for display), oil preservation creates a three-dimensional, living-looking display. The flowers appear almost fresh inside their little glass world — frozen in a moment, preserved indefinitely.
It’s a craft that sits at the intersection of science, art, and sentiment. And it’s remarkably accessible — you don’t need special equipment, artistic training, or hours of free time. Anyone can do it. Anyone can make something stunning.
Why Preserve Flowers in Oil?
Before we get into the how, let’s talk about the why — because there are many beautiful reasons to try this craft.
To preserve a memory. A flower from a wedding, a funeral, a first date, a garden that no longer exists — flowers carry memory in their petals. Sealing them in oil keeps that memory vivid, tangible, and present.
To create a unique home décor piece. A row of small glass bottles, each containing a different flower in clear oil, makes a stunning shelf or windowsill display. The light plays through the glass and oil in constantly shifting ways depending on the time of day.
To give a deeply personal gift. A bottle of preserved flowers from someone’s garden, or from a meaningful occasion, is a gift that costs very little money but carries enormous emotional weight. It’s thoughtful, handmade, and genuinely one of a kind.
Because it’s meditative and joyful. Arranging tiny flowers inside a bottle with a skewer, watching the oil slowly fill the space around them — it’s a quiet, focused, satisfying process that slows the mind and rewards patience.
Because it lasts. Unlike a fresh bouquet that wilts in a week, a properly sealed flower oil bottle can last for years, even decades. Some say indefinitely, if kept out of direct sunlight.
Supplies You’ll Need
One of the best things about this craft is how simple the supply list is. You likely already have some of these items at home, and the rest are easy and inexpensive to find.
Dried Flowers
The flowers must be fully dried before going into the oil. Fresh flowers contain moisture, and moisture in oil creates cloudiness, mold, and rapid decay. You want crisp, dry, fully preserved blooms.
Good choices for flower oil bottles include:
- Rose petals or small rosebuds
- Lavender sprigs
- Baby’s breath
- Statice (the papery purple and white flowers often found in dried arrangements)
- Chamomile
- Strawflowers
- Small daisies
- Eucalyptus leaves
- Pressed fern fronds
- Dried wildflowers of any kind
You can dry your own flowers at home using several methods — hanging them upside down in a dry, dark space for 2–3 weeks is the simplest — or purchase pre-dried flowers from craft stores, florists, or online.
Tip: Choose flowers with vibrant, saturated colors, as some fading will occur over time. Deep reds, purples, and oranges tend to hold their color particularly well in oil.
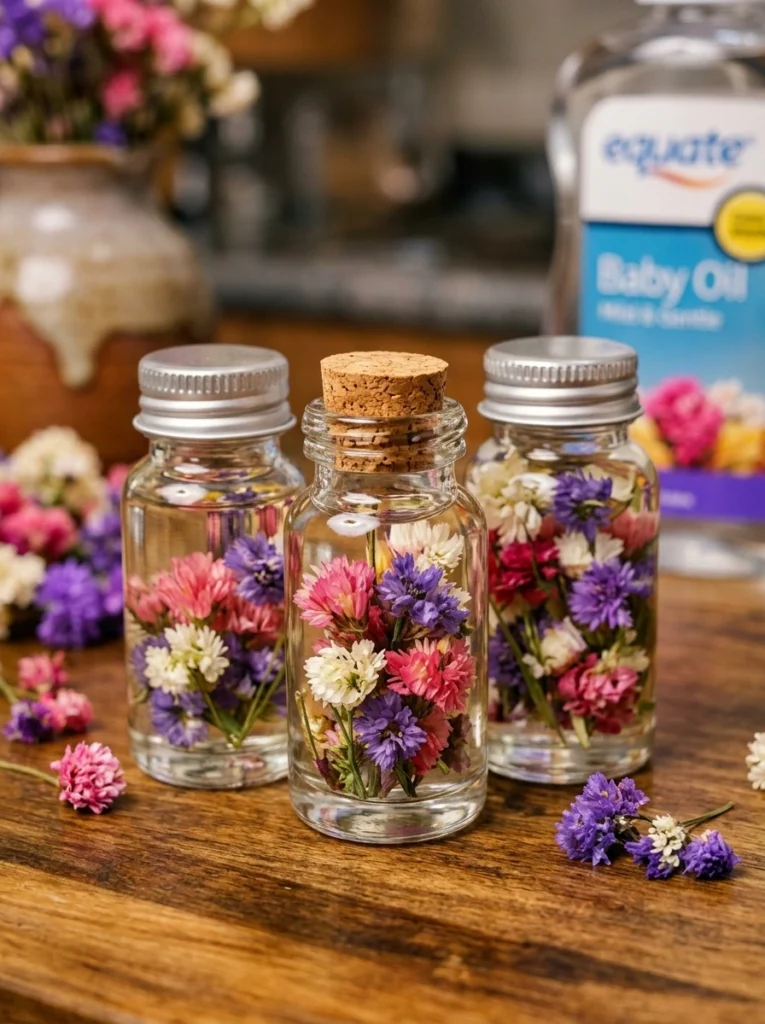
Small Glass Bottles
The vessel matters. Look for small glass bottles with tight-fitting corks or screw-on caps. Clear glass lets the light in and shows off the flowers; amber or colored glass creates a different, moodier aesthetic.
Great options include:
- Cork-top potion bottles (widely available in craft stores)
- Small apothecary bottles
- Mini bud vases with tight lids
- Laboratory-style glass vials
- Vintage perfume bottles
Size is up to you. Smaller bottles (3–5 cm tall) make delicate, jewel-like pieces. Larger bottles (10–15 cm) allow for more elaborate floral arrangements and are more dramatic on display.
Baby Oil or Plant-Based Mineral Oil
The oil is what makes this work. You need a clear, odorless, slow-to-cloud oil that won’t react with the plant material over time.
Baby oil (which is typically mineral oil with a light fragrance) is the most commonly used option — it’s inexpensive, widely available, very clear, and has a lovely viscosity that makes the flowers appear to float gracefully.
Plant-based mineral oil (also called food-grade mineral oil or fractionated coconut oil) is an excellent alternative, especially if you prefer a fragrance-free, natural option. Fractionated coconut oil is particularly popular because it stays liquid at room temperature, is completely clear, and is derived from a natural source.
Avoid: Olive oil, vegetable oil, sunflower oil, or any other cooking oil. These will turn rancid over time, cloud up, and ultimately ruin your flowers.
Plastic Pipettes or a Syringe
These are essential for controlling the flow of oil into the bottle. Pouring directly from the bottle creates bubbles, spills, and disturbs the carefully arranged flowers. A pipette or syringe lets you add oil slowly and precisely, drop by drop if needed.
Plastic transfer pipettes are inexpensive and available in packs of 50 or 100 online. A small craft or cooking syringe works equally well.
A Skewer or Toothpick
You’ll use this to adjust the position of flowers inside the bottle — nudging a petal, turning a stem, or creating space for the oil to flow through. A bamboo skewer works well for larger bottles; a toothpick is perfect for small vials.
Step-by-Step Instructions: How to Preserve Flowers in Oil
Now for the heart of it. Follow these steps and you’ll end up with something genuinely beautiful.
Step 1: Prepare the Flowers
Begin by selecting your dried blooms. Think about color, shape, and scale in relation to your bottle. A single perfect rosebud might be enough for a small vial. A larger bottle might call for a layered arrangement of lavender, statice, and baby’s breath.
Once you’ve chosen your flowers, snip the stems so they fit inside your bottle with a little room to spare. You don’t want the stems pressing against the glass at an awkward angle — they should sit naturally, as if they were simply placed there by a gentle hand.
Remove any leaves or petals that look damaged, discolored, or fragile. Everything inside the bottle will be on permanent display, so take a moment to choose only what’s beautiful.
Step 2: Arrange the Flowers Inside the Bottle
This is the most creative — and most satisfying — step.
Start by placing a few flowers at the very bottom of the bottle to create a foundation. Then layer additional flowers on top, using your skewer or toothpick to adjust their position as you go. Think about what will be visible from the front of the bottle and arrange accordingly.
Consider creating depth by layering different textures: a sprig of eucalyptus at the back, a rosebud in the middle, a few sprigs of baby’s breath framing the front. Mix colors intentionally — complementary colors (purple and yellow, pink and green) create beautiful contrast.
Don’t be afraid to experiment. You can always remove flowers and start again before the oil goes in. Take your time. This is the part that makes the piece uniquely yours.
Tip: If you’re having trouble getting flowers to stay in position, add a tiny amount of oil first — just enough to create a little resistance — then continue arranging.
Step 3: Add the Oil
Now comes the magic.
Fill your pipette or syringe with oil and begin adding it to the bottle, slowly and steadily. Add it along the inside edge of the bottle rather than directly onto the flowers, which can disturb your arrangement. Watch the oil rise gradually around the blooms, encasing them, filling every tiny space between the petals.
Go slowly. Patience here makes the difference between a cloudy, bubble-filled result and a clear, luminous one. If bubbles form, set the bottle aside and let them rise to the surface before continuing.
Fill the bottle almost to the top — but stop just before the rim if you’re sealing with a cork, to allow a little room for expansion and to avoid overflow when you push the cork in.
Step 4: Seal the Bottle
Once the oil reaches the right level, it’s time to seal. If you’re using a cork, press it in firmly and evenly. If you’re using a screw-on cap, close it tightly.
For extra security — especially if the bottle will be given as a gift, or if you want a truly permanent seal — consider sealing the cork with wax. Simply dip the corked top into melted candle wax or craft sealing wax. It creates a beautiful, old-world look and ensures nothing leaks.
Check for any oil around the rim and wipe clean before the wax sets.
Your flower oil bottle is complete.
Display Ideas and Creative Uses
The finished bottles are versatile and endlessly displayable. Here are some of the most beautiful ways to use them:
- Windowsill row — Line up several small bottles on a sunny windowsill. The light passing through the oil and flowers creates a stunning, ever-changing display throughout the day.
- Shelf vignette — Group bottles of different heights and flower types together on a bookshelf alongside candles, books, and other natural objects.
- Gift sets — Fill three small bottles with flowers in the recipient’s favorite colors, tie them together with twine, and attach a handwritten note. It’s a beautiful, affordable, and deeply personal gift.
- Wedding favor — A small bottle of preserved flowers from the wedding bouquet, given to each guest as a favor, is a keepsake they’ll treasure far longer than a piece of wedding cake.
- Memorial piece — Preserve flowers from a funeral or memorial service. It’s a gentle, healing way to hold on to something beautiful from a difficult time.
Tips for the Best Results
Use fully dry flowers. Any residual moisture will cloud the oil. When in doubt, leave your flowers to dry for an extra week.
Work in good lighting. You need to see exactly what’s happening inside the bottle as you arrange and fill.
Keep out of direct sunlight during storage. While sunlight through a bottle is beautiful for display, prolonged direct sunlight will fade the flowers more quickly. A spot with bright indirect light is ideal.
Choose oil carefully. Clear, refined mineral oil or fractionated coconut oil will stay clearest the longest. Avoid anything that’s slightly yellow or has an unrefined quality — it will only cloud more over time.
Label your bottles. If you’re preserving flowers from a meaningful occasion, add a small tag or label noting the flower type and the date or event. Future you — and future generations — will be glad you did.
Frequently Asked Questions
How long will preserved flowers in oil last? When made with fully dried flowers and quality clear oil, sealed tightly and kept out of direct sunlight, flower oil bottles can last for many years — potentially decades. They won’t last forever, but they’ll outlast any fresh bouquet by an extraordinary margin.
Can I use fresh flowers? Fresh flowers must be fully dried before use. Using undried flowers will introduce moisture into the oil, causing cloudiness and eventually mold. Dry your flowers completely first.
My oil looks cloudy. What went wrong? Cloudiness usually means moisture got into the oil — either from the flowers not being fully dried, or from humidity during the process. Unfortunately, this is difficult to reverse once it happens. Prevention is key: always use fully dried flowers and work in a dry environment.
Can I add fragrance or color to the oil? Yes! A drop of essential oil can add a subtle scent. For color, some crafters add a tiny amount of mica powder or a drop of oil-based dye. Just make sure any additions are oil-soluble.
A Final Thought
There’s something quietly profound about preserving a flower. Flowers are supposed to be temporary — their beauty tied to their brevity. But sometimes a bloom carries something more: a memory, a feeling, a person, a place. And it seems worth keeping.
A glass bottle. A little clear oil. A dried petal or two.
It doesn’t take much to hold something precious a little longer.


