Somewhere in a drawer, a box, or a dusty shelf, there’s a stack of old CDs or DVDs that haven’t been touched in years. Burned mix CDs from a decade ago. Software discs for programs that no longer exist. Movies you’ve long since replaced with streaming. They’re too nostalgic to throw away but too obsolete to use — the definition of clutter.
Here’s what you do with them.
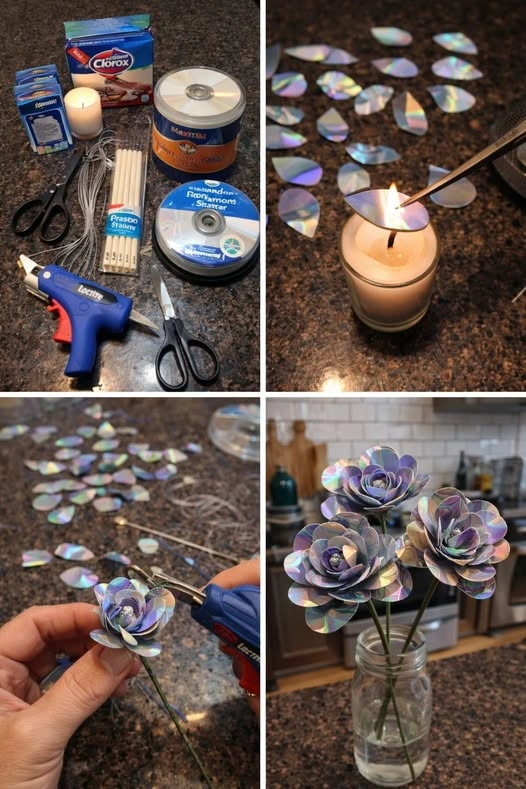
With a candle, a pair of scissors, and a hot glue gun, those forgotten discs transform into something that stops people mid-sentence when they see it: shimmering, iridescent decorative flowers that catch and scatter light in every color of the rainbow simultaneously. Each petal is a curved piece of CD — still bearing that signature rainbow-oil-slick surface — shaped by heat into a natural, rounded form and layered around a central bud to create a flower that looks, at first glance, like something from another world.
They’re sculptural. They’re luminous. They’re completely free to make if you have old discs on hand. And they are one of the most visually striking upcycling projects you can do at home.
Here’s the complete guide — step by step, tip by tip — to making the most beautiful CD flowers you’ve ever seen.
What Are CD Decorative Flowers?
CD decorative flowers are handcrafted sculptural flowers made entirely from recycled compact discs or DVDs, shaped using heat and assembled with hot glue into rose-like or peony-like forms. The finished flowers can be displayed on stems as a bouquet, mounted on walls as art pieces, arranged in vases, used as table centerpieces, or incorporated into wreaths and other decorative arrangements.
What makes them extraordinary is the material itself. The surface of a CD is coated with a thin metallic layer — typically aluminum — covered by a transparent lacquer. This layered structure creates structural color: the surface reflects different wavelengths of light at different angles, producing the familiar rainbow iridescence that shifts and changes as you move. Cut into petals and curved into shape, each piece becomes a tiny prism — a petal that glows with a different color depending on where you stand, what angle you look from, and what light falls on it.
The result is a flower that looks like it was made of mother-of-pearl, or abalone shell, or some precious material that doesn’t quite exist in nature. It’s uniquely beautiful and genuinely unlike anything else you can make or buy.
What You’ll Need
For the flowers:
- Old CDs or DVDs — Any discs work: music CDs, software discs, burned blanks, DVDs. The data layer doesn’t affect the decorative surface. Each flower requires approximately two to three discs depending on the size you’re making.
- Strong scissors — CD plastic is thin but rigid. Sharp, heavy-duty scissors — kitchen shears or craft scissors with strong blades — cut through it cleanly. Standard paper scissors will struggle and may crack the disc unpredictably.
- A candle or heat source — A standard taper or pillar candle provides enough concentrated heat to soften the CD plastic for shaping. A heat gun works even better for controlled, even heating. Never use a microwave — CDs should never be microwaved.
- Pliers or tweezers — For handling heated pieces without burning your fingers. Needle-nose pliers are ideal for gripping and curving small pieces.
- A hot glue gun — For assembling the petals into a flower. Hot glue sets quickly, which makes the assembly process fast.
- Wire or a stick for the stem — Florist’s wire, a wooden dowel, a twig, or a bamboo skewer all work well. Florist’s wire wrapped in floral tape gives the most professional, realistic result.
Optional but useful:
- Work gloves for handling heated pieces
- A heat-resistant mat or ceramic tile as a work surface
- Acrylic paint or nail polish to add color accents to specific petals
Step-by-Step Instructions
Step 1: Cut the Petals
Begin by breaking each CD into manageable pieces. Hold the CD firmly over a hard surface and make a controlled cut from the outer edge toward the center hole. Once you have an opening, cut around the disc to create rough segments, then refine each segment into the petal shape you want.
Petal shape options:
- Oval petals — Symmetrical, rounded shapes that resemble the petals of a peony or magnolia. These are the most forgiving to cut and produce the most natural-looking flower.
- Teardrop petals — Wider at the base and narrowing to a rounded point. These layer beautifully and create a more rose-like, layered appearance.
- Elongated petals — Longer, more pointed shapes that suggest dahlia or chrysanthemum petals. These require more precision but create a more dramatic, spiky flower.
For a single flower, cut approximately fifteen to twenty petals in a range of sizes — smaller petals for the inner layers, progressively larger petals for the outer layers. Vary the sizes deliberately: having three or four distinct size categories (small, medium, large, and extra-large) allows you to build a flower with the authentic, layered depth of a real bloom.
Cut carefully and steadily. CD plastic cuts cleanly with sharp scissors and doesn’t require significant force — let the blade do the work. Avoid cutting toward your body, and be aware that small fragments can occasionally flick off during cutting.
Step 2: Heat the Pieces
This is the step that transforms flat petal-shaped pieces of plastic into something that looks genuinely organic and three-dimensional — and it requires care and attention.
Light your candle and allow it to establish a steady flame. Hold a petal piece with pliers or tweezers and pass it slowly through the heat zone above the flame — not into the flame itself, but through the warm air several centimeters above it. Move the piece slowly and steadily, keeping it in constant motion to avoid concentrating heat in one spot.
The CD plastic will begin to soften within a few seconds. You’ll see it become slightly more pliable — it will start to droop and bend under its own weight when held at an angle, rather than holding rigidly flat.
Critical safety points:
- Never hold the piece still directly in or above the flame. Keep it moving.
- CD plastic heats quickly and retains heat — handle heated pieces only with pliers or tweezers, never bare fingers.
- Work in a ventilated area. Burning or overheating plastic produces unpleasant and potentially harmful fumes. The goal is softening, not melting or burning.
- If you see smoke, the piece is too hot. Set it down on a heat-resistant surface and allow it to cool before trying again.
- Have a ceramic tile or heat-resistant mat nearby as a rest surface for hot pieces.
The iridescent surface of the CD is heat-sensitive — overheating can cause the colors to dull or the metallic layer to separate. Brief, controlled heating preserves the rainbow surface beautifully; excessive heat damages it.
Step 3: Shape the Petals
Immediately after heating — while the plastic is still warm and pliable — use your pliers or protected fingers to curve each petal into its natural form. Work quickly but gently, as the plastic cools and re-hardens within fifteen to thirty seconds.
For a natural petal curve, hold the petal piece between thumb and forefinger and apply gentle pressure to curve it lengthwise — creating a slight cupped or concave shape like a real petal. This cupping is what makes the assembled flower look dimensional and alive rather than flat.
For the outer petals, curve them more gently — a soft, open curve. For the inner petals, curve them more tightly — a more pronounced cup that suggests petals still partially closed near the flower’s center.
You can also create a slight curve across the width of the petal — bending it so the petal’s sides curl slightly inward or outward. This cross-curve adds additional realism and makes each petal look distinctly different from its neighbors, just as real petals vary in their exact curvature.
If a petal cools and hardens before you’ve achieved the shape you want, simply reheat it and try again. The CD plastic can be reheated and reshaped multiple times without significant degradation.
Step 4: Make the Center
The center of the flower — the inner bud — anchors the whole composition and determines the character of the finished bloom. Making it well is important.
Take one of your smallest cut pieces and, while heating it gently, roll or fold it into a tight cone or tube shape to represent the innermost, still-closed petals of the rose or peony bud. Hold the rolled shape with pliers while it cools and hardens in position — this takes only a few seconds. Apply a small spot of hot glue to hold the rolled form permanently.
For a more complex center, make two or three of these small rolled pieces and glue them together in a tight cluster — some slightly more open than others, suggesting petals at different stages of unfurling. This layered center creates the most realistic, most beautiful core for the finished flower.
The center is what you’ll be working around as you glue petals outward, so it needs to be solid and stable. Let the glue set fully before proceeding.
Step 5: Build the Flower Layer by Layer
This is the most meditative and rewarding stage of the whole project — the point where individual petals become a flower.
Begin with your smallest shaped petals. Apply a small dot of hot glue to the base of each petal and press it against the central bud, holding for a few seconds until the glue sets. Position the first three or four small petals tightly around the center, angling them slightly inward to suggest the innermost ring of petals still partially closed.
For the next ring, use slightly larger petals and position them between the gaps of the previous ring — staggered, not directly aligned. This offset positioning is how real flowers work: each ring of petals fills the gaps left by the previous ring, creating the characteristic overlapping pattern of a rose or peony.
Continue outward, using progressively larger petals with each ring, angling each ring slightly more open — more horizontal, more spread — than the one inside it. The innermost petals lean inward and upward. The outermost petals spread nearly horizontally or even curl slightly downward, as the outermost petals of a fully open flower do.
Apply each petal with a quick touch of hot glue at the base only — not along the full length of the petal. Gluing only at the base allows the rest of the petal to remain free and natural-looking, rather than stiffly adhered flat against the flower.
Take your time with this stage and step back regularly to assess the developing flower from multiple angles. Rotate it. Hold it up to the light. Check whether it looks balanced. Move a petal if something feels off — hot glue sets quickly but can usually be gently peeled away and repositioned while still warm.
A finished flower typically has five to seven rings of petals — from the tight inner bud out to the broad outer petals — and uses fifteen to twenty-five individual petal pieces depending on the final size.
Step 6: Attach the Stem
Once the flower head is complete and all glue has fully set, it’s time to add the stem.
If using florist’s wire: bend the top of the wire into a small loop or hook and embed this into the base of the flower with a generous application of hot glue. Hold firmly while the glue sets. Wrap the wire in green florist’s tape for a finished, professional look that also strengthens the connection between wire and flower.
If using a wooden dowel or stick: apply a generous amount of hot glue to the top of the dowel and press it firmly against the base of the flower, holding for thirty to forty-five seconds to ensure a strong bond. For extra security, apply additional glue around the joint once the initial application has set.
If you want to make a full arrangement, vary the stem lengths across multiple flowers so the finished bouquet has natural-looking variation in height — taller statement flowers at the back, shorter filler flowers at the front.
The Science of Why CDs Are So Beautiful
Understanding what makes CDs so visually extraordinary enriches the whole project.
Structural Color and Thin-Film Interference
The rainbow iridescence of a CD surface is not created by pigment or dye — it’s created by physics. The surface of a CD consists of a microscopic spiral track pressed into a layer of clear polycarbonate plastic, coated with a thin layer of reflective aluminum, covered by a protective lacquer. The spiral track has a spacing of approximately 1.6 micrometers — incredibly fine, comparable to the wavelength of visible light.
When light hits this surface, it is reflected from multiple layers simultaneously — from the lacquer surface and from the aluminum beneath it. These reflected light waves interfere with each other, a phenomenon called thin-film interference. Depending on the viewing angle, certain wavelengths of light are amplified by constructive interference (and appear as colors) while others are cancelled by destructive interference (and disappear). As the viewing angle changes, which wavelengths are amplified and cancelled changes — and the perceived color shifts dramatically.
This is the same physical phenomenon that creates the colors of soap bubbles, oil slicks on wet pavement, butterfly wings, and abalone shell. It is structural color — color created not by pigment but by the geometry of the surface and the wave nature of light.
When you cut a CD into petal shapes and curve each piece, you create a surface that reflects different colors from different points — and as light moves across the flower or as you move around it, the entire flower seems to shift through the visible spectrum. Purple becomes green becomes gold becomes pink, all in the same moment from different angles.
Why This Project Is Worth Making
It’s True Upcycling
Many “upcycling” projects are more craft than genuine waste reduction. This one is genuine: old CDs and DVDs have essentially no recycling stream available for most people — they end up in landfill. Transforming them into lasting decorative objects is a meaningful alternative to disposal, and the finished pieces are beautiful enough to actually use and keep for years.
The Results Are Genuinely Gallery-Worthy
CD flowers, well-made, are not obviously “homemade” in the self-deprecating sense. They are unusual, sophisticated, and beautiful in a way that stands on its own merits. Arranged in a vase on a shelf or mounted as a wall installation, a collection of CD flowers is legitimately striking art.
It Teaches Hands-On Material Knowledge
Working with heat and plastic teaches an intuitive understanding of material properties — how plastic responds to heat, how quickly it cools, how the surface changes under different conditions. This is practical, embodied knowledge that children who do this project carry with them.
Every Flower Is Completely Unique
Because each CD has a slightly different track pattern, and because the heating and shaping process introduces natural variation in each petal, no two CD flowers are ever identical. The way the colors shift across the surface varies from petal to petal, disc to disc, and angle to angle — making each finished flower genuinely one of a kind.
Tips for the Most Beautiful Results
Work with pliers throughout the heating stage. The urge to use fingers to shape a petal is understandable — it gives more control — but CD plastic retains heat longer than it appears to, and burns from heated plastic are surprisingly painful. Always use pliers or tweezers for any piece that has been near a heat source.
Heat in short passes, not prolonged exposure. Multiple quick passes through the heat zone give you more control than one long exposure. You can always apply more heat; you can’t undo overheating.
Vary the curvature of each petal deliberately. A flower where every petal curves in exactly the same way looks mechanical and artificial. Varying the curve — some petals more open, some more cupped, some curling slightly at the tip — makes the assembled flower look organic and alive.
Use three distinct petal sizes at minimum. Small for the inner two rings, medium for the middle rings, large for the outer rings. This graduation of size is what makes the assembled flower read as a real bloom rather than a collection of cut plastic pieces.
Glue at the base only. Resist the urge to glue along the full back of each petal. Base-only gluing keeps the petals free and natural-looking and allows them to catch light from more angles simultaneously.
Work near a strong light source. The iridescent surface of each petal changes dramatically under different lighting conditions. Working near a window or lamp lets you see the full color potential of each piece as you position and glue it.
Creative Variations and Display Ideas
Wall-mounted flower installation: Mount five to seven flowers of varying sizes on a piece of painted canvas or a wooden board for a dramatic wall art piece. Cluster them asymmetrically for the most sophisticated look.
Iridescent wreath: Arrange CD flowers on a grapevine or foam wreath base, filling the spaces with smaller petal pieces used as foliage. The result is a wreath unlike anything available in stores — entirely iridescent, shifting color with every change of light.
Table centerpiece: Fill a glass vase or bowl with CD flower stems at varying heights. Add a few real or artificial leaves for contrast. The iridescent flowers against green foliage in a glass vase looks genuinely extraordinary in candlelight.
Garden art: If the stems are embedded in a weighted base (a pebble-filled pot, for example), CD flowers can be displayed outdoors where wind movement creates constant shifting color play across each petal surface.
Mixed media: Combine CD flowers with elements made from other recycled materials — wine cork centers, bottle cap accents, fabric leaves made from old clothing — for a richer, more textured assemblage.
Painted accents: Before assembly, paint selective areas of individual petals with translucent nail polish or alcohol ink to add additional color — deep purples, golds, or rose tones that complement the natural iridescence of the disc surface.
Safety Summary
This project involves heat and sharp edges and is most appropriate for older children (10 and above) and adults. Key safety reminders: always use pliers or tweezers when handling heated pieces, work in a ventilated space, keep the heat source on a stable surface away from flammable materials, supervise children closely throughout the heating stages, and have a heat-resistant mat or ceramic tile available as a resting surface for hot pieces.
The finished flowers are safe to handle and display with no ongoing safety concerns.
Final Thoughts
Old CDs were once the most modern object in a room. They held music, films, games, software — the contents of a digital life compressed onto a disc the size of a hand. Now they sit in drawers and boxes, obsolete but somehow too personal to discard.
Turning them into flowers feels right. It honors the object — the beauty of that iridescent surface, the precision of those microscopic tracks — by giving it a new purpose that has nothing to do with data and everything to do with light.
Each petal carries a rainbow. Each flower is a prism. Each arrangement is a small reminder that the most beautiful things are sometimes hidden inside the most ordinary ones, waiting for a candle, a pair of scissors, and someone willing to find out what’s inside.


