Imagine watching bubbles float through a dark room, each one glowing a vivid, otherworldly green — soft orbs of light drifting and spinning before they pop in a silent burst of color. It sounds like something out of a science fiction movie. It’s actually something you can make in your kitchen in about fifteen minutes.
Glow-in-the-Dark Bubble Solution is the kind of activity that earns a permanent spot in family memory. Parents who’ve tried it describe the same moment: the lights go off, the first bubble floats up, and the room goes completely silent — followed immediately by the loudest gasps and squeals of the evening. Kids who thought they’d seen everything stop and stare. And then they want to do it again. And again.
The recipe is simple, the ingredients are easy to find, and the results are genuinely spectacular. Here’s everything you need to know — the full step-by-step, the science that makes it work, tips for the most dramatic glow effect, and creative ways to take this activity even further.
What Is Glow-in-the-Dark Bubble Solution?
Glow-in-the-Dark Bubble Solution is a homemade bubble mixture infused with non-toxic, craft-grade glow pigment powder. The result is a solution that produces real, blowable bubbles — just like regular bubble solution — except that each bubble glows with an eerie, beautiful light in a dark or dimly lit room.
The effect is unlike anything kids experience with standard glow-in-the-dark toys or stickers. Bubbles are moving, floating, three-dimensional objects, and watching them glow as they drift through the air creates a sense of wonder that static objects simply can’t match.
This is an outdoor evening activity, a sleepover centerpiece, a birthday party showstopper, and a quiet bedtime wind-down — depending on how you use it. It works for toddlers watching from a parent’s arms and for teenagers who’ve decided they’re too old to be impressed by anything (they are always impressed).
What You’ll Need
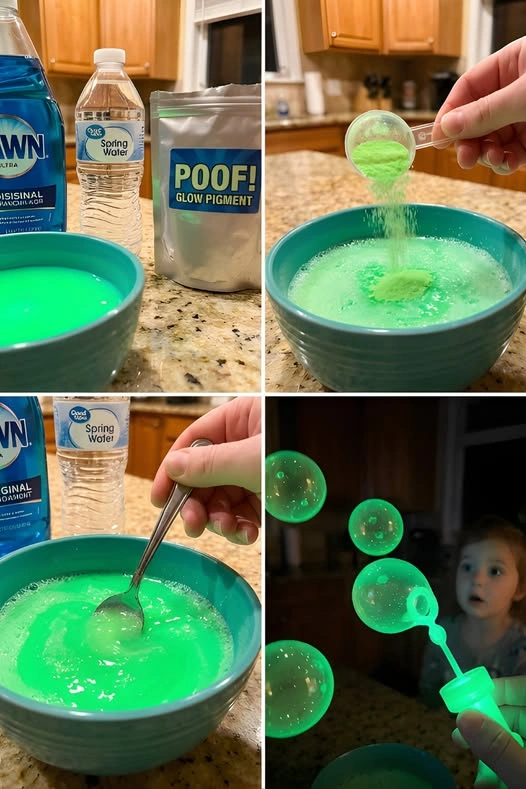
The ingredients list is short and everything is either already in your home or available at any craft store:
- 1 cup water — Plain tap water works perfectly. Some bubble enthusiasts swear by distilled water for better bubbles, but it isn’t necessary.
- 2–3 tablespoons dish soap — Dawn is the gold standard for homemade bubble solutions because of its particular soap composition, but any standard dish soap will work.
- 1–2 teaspoons sugar (optional) — Sugar strengthens bubble walls and helps them last longer before popping. Highly recommended if you want maximum float time.
- 1–2 teaspoons glow pigment powder — This is the star of the show. Look for non-toxic, craft-grade phosphorescent pigment powder, available at most craft stores and online. Bright green is the classic choice and produces the most dramatic effect, but other colors are available.
Optional additions that enhance the experience: a UV blacklight flashlight (dramatically intensifies the glow), multiple colors of glow powder for color variety, and glycerin (a substitute for sugar that works even better for bubble longevity).
Step-by-Step Instructions
Step 1: Mix the Base
Pour one cup of water into a clean bowl. Add your dish soap slowly and carefully — the key word here is slowly. Pouring too fast or stirring too aggressively at this stage will create a bowl full of foam rather than a smooth solution, which makes it much harder to work with.
Stir gently in a slow circular motion until the soap is fully incorporated but the surface is relatively calm. You want the soap evenly distributed through the water, not whipped into a froth.
Step 2: Add Strength (Optional but Recommended)
If you’re using sugar, add it now — one to two teaspoons stirred gently into the soap-water mixture. Sugar works by increasing the viscosity of the solution slightly, which gives the bubble walls more structure and elasticity. The result is bubbles that float longer, resist popping, and hold their spherical shape more consistently.
Stir until the sugar is fully dissolved. You shouldn’t be able to see or feel any granules when you rub a little between your fingers.
Step 3: Add the Glow Effect
This is the moment everything gets exciting. Sprinkle your glow pigment powder into the solution — start with one teaspoon and add more depending on how intense you want the glow to be.
Stir thoroughly and patiently. Glow pigment powder is very fine, but it takes a little time to fully distribute through the liquid. Keep stirring until the solution turns a consistent, even color — bright luminous green is the classic result, and even in normal light it looks striking and unusual. There should be no visible clumps of powder floating on the surface.
Step 4: Let It Rest
Set the bowl aside and let the mixture sit undisturbed for 10 to 15 minutes. This resting period allows everything to fully combine and settle at a molecular level. The soap molecules need time to stabilize in the solution, and any remaining powder particles will fully incorporate during this window.
This is a great moment to get the space ready — dim the lights, set up a blacklight if you have one, and build a little anticipation for what’s coming.
Step 5: Blow Bubbles in the Dark
Dip your bubble wand into the solution, give it a moment to coat fully, and blow slowly and steadily. For the most dramatic effect, do this in a dark or dimly lit room.
Watch what happens.
Each bubble that floats free from the wand carries the glow pigment with it, producing a softly glowing orb that drifts through the dark air like something from another world. Clusters of bubbles create a constellation effect. Large, slowly rising bubbles look like tiny moons. And when they pop — a silent flash of luminous mist that vanishes in an instant — kids instinctively reach out to catch the next one.
The Science Behind the Glow
The magic of these bubbles is rooted in real, fascinating physics and chemistry. Here’s what’s actually happening.
How Phosphorescent Pigments Work
Glow-in-the-dark pigment powder is made from phosphorescent materials — most commonly strontium aluminate, which is non-toxic and the same compound used in professional glow-in-the-dark products worldwide.
Phosphorescent materials work through a process called photoluminescence. When the pigment is exposed to light — sunlight, a lamp, or especially a UV blacklight — it absorbs photons of light energy. These photons excite electrons within the pigment’s molecules, bumping them up to a higher energy state. When the light source is removed, those excited electrons gradually fall back down to their normal energy level, releasing the stored energy as visible light in the process. That slow release is the glow you see in the dark.
The reason the glow is green in most standard phosphorescent pigments is that green wavelengths sit in the middle of the visible light spectrum, where the human eye is most sensitive. The glow appears brighter because our eyes detect it more readily than blue or red wavelengths at the same intensity.
Why Bubbles Work as a Vessel
A soap bubble is an incredibly thin film of soapy water — sometimes only a few hundred nanometers thick — stretched over a sphere of air. That film is strong enough to hold liquid (including the glow pigment particles suspended in the solution) but thin enough to be partially translucent.
When glow pigment is suspended in the bubble solution and a bubble forms, the film carries those pigment particles with it. The bubble essentially becomes a glowing, three-dimensional shell — a sphere of soft light hovering in the air.
The thinness of the bubble wall is what gives each bubble its iridescent shimmer even in regular light, and what makes the glow effect so visually striking in the dark.
What Sugar (or Glycerin) Does
The walls of a soap bubble are constantly losing water to evaporation, which makes them progressively thinner and more fragile until they burst. Sugar and glycerin both slow this evaporation process by increasing the solution’s viscosity and helping the water molecules stay bonded together longer. The result is a bubble wall that stays stable longer — giving you more float time and better visibility of the glow before each bubble pops.
Why This Activity Is So Special
It Works on Every Age
Toddlers are mesmerized by the floating glowing spheres. Elementary kids want to know exactly why it glows and how to make more. Tweens and teenagers — who will insist they’re not excited — inevitably end up elbowing each other for a turn with the wand. This is genuinely one of those rare activities with no age ceiling.
It Transforms the Ordinary Into the Extraordinary
Bubbles are one of the most familiar childhood experiences in the world. Almost every child has blown bubbles dozens of times. Glow-in-the-Dark Bubble Solution takes that deeply familiar thing and makes it completely new — which creates a particular kind of delight that’s different from experiencing something entirely new. It’s the magic of the unexpected.
It Creates a Shared Moment
Turning the lights off and blowing glowing bubbles together is an inherently communal experience. Everyone in the room is looking at the same thing, reacting at the same moment, sharing the same wonder. Those shared moments — simple, unplanned, and vivid — are exactly the kind of thing kids remember years later.
It’s a Natural Science Conversation Starter
Once the wonder settles and the questions start — “why does it glow?”, “why does it stop glowing?”, “what’s the powder made of?”, “why are bubbles always round?” — you have the foundation for a rich, natural science conversation that covers physics, chemistry, and optics without anyone opening a textbook.
It Builds Patience and Fine Motor Control
Blowing bubbles successfully requires breath control, patience, and a gentle, steady technique. Kids who struggle with this at first develop it quickly through repetition — motivated entirely by wanting another glowing bubble to float through the dark.
Tips for the Most Dramatic Glow Effect
Charge the solution before you start. Hold the bowl of solution under a bright lamp or take it outside in sunlight for a few minutes before heading into the dark. The more light the pigment absorbs, the brighter and longer-lasting the initial glow will be.
Use a UV blacklight. A UV (ultraviolet) blacklight dramatically intensifies the glow of phosphorescent pigments. Shining a small UV flashlight at your bubbles as they float takes the visual effect from impressive to absolutely stunning. UV blacklight flashlights are inexpensive and widely available.
Go as dark as possible. The effect works in any dim room, but the darker the space, the more vivid the glow appears. A room with blackout curtains at night, or a bathroom with the light off, produces the most dramatic results.
Blow slowly. Large, slow-moving bubbles show the glow effect far better than small fast ones. Practice a slow, steady breath rather than a quick puff.
Use a wide wand. Wider bubble wands produce larger bubbles that float more slowly and display the glow more visibly. Some kids find that blowing through a loop made from pipe cleaners produces especially large bubbles.
Recharge as you go. If the glow starts to fade during a session, briefly expose the solution and any wet wands to a bright light source for a minute — the pigment will recharge and the glow will return to full intensity.
Creative Variations and Ideas
Blacklight Bubble Party: Set up a UV blacklight in a dark room and blow bubbles continuously. The combination of UV light and phosphorescent bubbles creates an atmosphere that looks like something from a professional light show.
Multiple Glow Colors: Use separate bowls of solution tinted with different colors of glow pigment — green, blue, pink, orange — and blow them together into the same dark space for a multicolor bubble display.
Outdoor Evening Sessions: On a warm evening, take the solution outside after dark. Bubbles floating through outdoor darkness, caught in the ambient light, look ethereal and beautiful — and the larger outdoor space lets them drift farther before popping.
Bubble Catch: Challenge kids to catch a bubble on the wand without popping it, then blow it back into the air. The glow makes tracking and catching far more exciting in the dark.
Sleepover Centerpiece: Set up a glow bubble station as an activity at a kids’ sleepover. Dim the lights, play some ambient music, and let kids take turns at the bowl. It’s calming, visually stunning, and completely unforgettable.
Photography Experiment: Set a phone camera to a slow shutter speed or night mode and photograph the bubbles as they float. The resulting images — glowing orbs against dark backgrounds — look like professional long-exposure photography.
Safety Notes
The glow pigment powder used in this recipe should always be non-toxic and craft-grade. Read the label carefully before purchasing and look for products explicitly labeled as non-toxic and skin-safe. Avoid industrial or fluorescent pigments, which may contain chemicals unsuitable for children.
As with all bubble activities, avoid getting solution in eyes, and supervise young children to prevent them from drinking the mixture. If the solution contacts eyes, rinse thoroughly with water.
The glow effect is completely safe — phosphorescence is a purely physical process that produces no heat and involves no radiation.
Final Thoughts
Glow-in-the-Dark Bubble Solution is the kind of activity that sounds impressive on paper and then somehow exceeds every expectation in real life. The moment the lights go off and the first glowing bubble rises from the wand, something shifts in the room. Kids go quiet. Eyes go wide. And for a few minutes, everyone — regardless of age — is completely, helplessly amazed.
It’s just water, soap, sugar, and a little powder. But in a dark room, with a child’s breath behind it, it becomes something that looks and feels genuinely magical.
Make the solution. Turn off the lights. Blow the first bubble.
And watch the room light up.


