A Whimsical Afternoon Craft: Creating Your Very Own Glitter Bee Solar Light
Picture this: it’s a sunny afternoon, and you’re surrounded by friends and family. Laughter fills the air as kiddos scamper about, while the scent of freshly bloomed flowers dances on a gentle breeze. You want to craft something special, something that radiates joy both day and night. Enter the Glitter Bee Solar Light Craft! This darling DIY project transforms an ordinary solar light into an enchanting bee that sparkles and shines—bringing a touch of whimsy to your garden or patio after sundown.
Let’s dive into this colorful adventure of creativity and fun!
Why People Love This Craft
Crafting is more than just putting things together; it’s about creating memories, igniting creativity, and expressing yourself. The Glitter Bee Solar Light Craft embodies all of this and more. The combination of vibrant colors, playful shapes, and the soft glow of a solar light makes it not only aesthetically pleasing but also deeply satisfying. Your heart swells with joy every time you catch a glimpse of your new little friend lighting up the night sky.
Not to mention, the charm of handmade decorations adds a unique flair to any gathering. They become conversation starters, sparking anecdotes and personal stories among guests. Plus, when you engage children in this craft, you’re fostering their creativity and fine motor skills—a win-win for everyone involved!
Benefits and Occasions to Shine
This delightful project is perfect for a variety of occasions. Picture a garden party, a birthday bash, or even a cozy evening dinner with friends illuminated by these cheerful lights. They also make fantastic gifts, especially during bright summer months. Best of all, once you’ve created your glittering bee, it brings eco-friendly charm to your outdoor space, illuminating pathways, and adding a welcoming ambiance.
Additionally, working with family or friends on this project fosters collaboration and connection. It’s a wonderful way to bond over shared laughter and the occasional artistic blunder—like a stray glitter explosion or a perfectly crooked smile made from pipe cleaner!
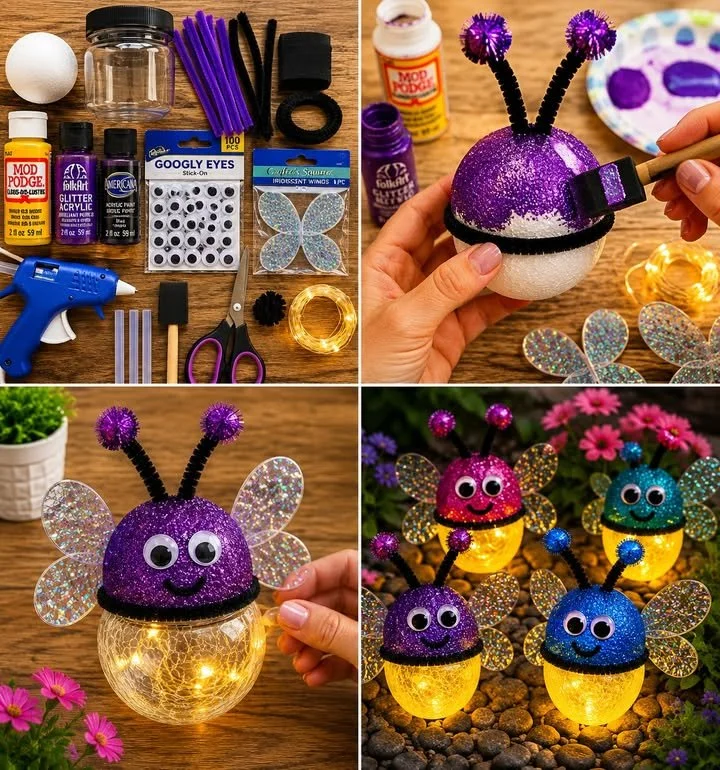
The Materials You’ll Need
Gather these essentials before you get started on your whimsical beetle creation. Each item holds a part in crafting your magical masterpiece:
- Small solar globe light: This will be the body of your bee.
- Foam ball cut in half: Use this as the bee’s head—it’s soft and cute!
- Purple glitter acrylic paint: Because every bee deserves a splash of sparkle.
- Mod Podge: This reliable adhesive will help bring it all together.
- Black pipe cleaners: For those delightful, whimsical antennae.
- Small pom-poms: Imagine their vibrant colors peeking out from the ends of the antennae!
- Googly eyes: They’ll give your bee character and whimsy.
- Iridescent craft wings: Look for wings that shimmer like sunlight on water.
- Hot glue gun and glue sticks: The trusty sidekick to keep everything secure.
- Foam brush: Perfect for applying your glitter paint smoothly.
- Scissors: For our pipe cleaner magic!
Let’s Create the Buzz: Step-by-Step Instructions
Now that you’re all set with materials, let’s jump into crafting!
-
Paint the foam: Use the foam brush to apply a generous coat of purple glitter acrylic paint to one half of the foam ball. The sparkle will be enchanting! Allow it to dry completely—patience is key here as you look forward to the shimmering results.
-
Seal with Mod Podge: Once dry, brush a thin layer of Mod Podge over the top of the glittered foam. This step not only adds a protective layer but also gives a beautiful finish. Set it aside to dry, anticipating the sheer joy in creating something magical.
-
Bee body assembly: Grab the solar globe light, and using your hot glue gun, attach the foam half you just painted on top. Press down gently but firmly to ensure there’s a solid bond—watch as the head of your bee comes to life!
-
Craft the antennae: Take two pieces of black pipe cleaner, bend them into whimsical shapes, and glue small pom-poms on the ends. Giving your bee personality starts here, so let your imagination flow!
-
Fasten the antennae: Securely attach the antennae to the top of the foam half, gluing them in place. For a fabulous final touch, wrap a piece of pipe cleaner around the seam between the globe light and the foam head.
-
Add some character: Time for the eyes! Attach the googly eyes, standing watch on either side of your bee’s face. A small piece of pipe cleaner makes an adorable smile—your bee is officially ready to greet the world!
-
Wings of wonder: Finally, glue those glorious iridescent wings on either side of your bee. As the sunlight catches these wings, it will cast a rainbow of colors—truly a sight to behold.
-
Charging time: Place the light in direct sunlight to allow it to absorb natural energy, so it can later twinkle in the dark!
Golden Tips for Crafting Success
As you embark on your crafting journey, here are a few gems of wisdom to ensure everything goes smoothly:
- Layer patience: Allow each layer of paint or glue to dry completely before moving to the next step. This avoids smudging and ensures a clean finish.
- Glittery magic: Don’t shy away from an extra layer of glitter paint; it can significantly enhance the sparkle of your final product!
- Waterproof choices: If you plan to display your masterpiece outdoors, opt for waterproof glue for your assembly. After all, we want our bees to dance through rain showers without losing their charm.
Beginner Mistakes to Avoid
While crafting is meant to be fun and free-flowing, here are a few common pitfalls to watch for:
- Inconsistency in colors: Make sure your paint is evenly applied to avoid patchy glitter spots.
- Not drying enough: Avoid rushing to assemble your bee—this will save you from potential disasters.
- Forget to recharge: Failing to place your solar light in enough sunlight will leave your bee twinkle-less at night!
Creative Variations
Once you’ve nailed this delightful craft, let your creativity soar! Consider using different colors for the paint, experimenting with creature-inspired themes—like ladybugs or butterflies. You could even make a whole garden of critters to light up your backyard!
Maintenance and Display
Your Glitter Bee Solar Light is low-maintenance and will delight you for seasons to come. Occasionally check for dust or accumulated debris on the solar panel and clean it gently. This ensures the light can charge efficiently, keeping your bee functional and fabulous!
Frequently Asked Questions
-
Can I use different colors for the bee?
Absolutely! Feel free to explore shades that match your garden theme or personal style. -
How long does the solar light stay on?
The duration depends on sunlight exposure; generally, it should last around 6-8 hours after a full charge. -
Can children participate in this craft?
Yes, with adult supervision, kids can enjoy painting, gluing, and creating their very own bees!
A Lasting Glow of Creativity
The Glitter Bee Solar Light Craft is not just a DIY project; it is an experience. One that brings friends and family together, igniting inspiration and laughter. As dusk falls and the world quiets, catch a glimpse of your handcrafted bee humming with light. It’s the little moments—those made with love and creativity—that leave the brightest impressions. Happy crafting, and may your gardens glow with the magic of your enchanting creations!
SEO Meta Description
Dive into a whimsical crafting adventure! Create your own Glitter Bee Solar Light, a delightful way to illuminate your garden with charm and creativity. Perfect for gatherings, gifts, or simply adding joy to your outdoor space.
Suggested SEO Tags
- DIY crafts
- Garden decoration
- Solar lights
- Creative activities for kids
- Eco-friendly crafts
- Home decor ideas
- Fun family projects


